How to Sharpen Images in Photoshop: A Comprehensive Guide for Stunning Visuals

In the vast and intricate world of digital photography and visual design, the pursuit of perfection often leads us to refine the most subtle aspects of an image. Among these, sharpness stands as a cornerstone, transforming an ordinary photograph into a captivating visual experience. Whether you’re a seasoned professional meticulously crafting high-resolution stock photos or an enthusiast looking to elevate your nature photography for a beautiful wallpaper, understanding how to sharpen an image in Photoshop is an invaluable skill. At Tophinhanhdep.com, where we celebrate everything from aesthetic backgrounds to digital art, we recognize that a crisp, clear image is paramount. Sometimes, despite our best efforts, a photo can come out looking a bit soft, blurry, or simply lacking the punch we envisioned. This comprehensive guide will delve deep into the art and science of image sharpening within Photoshop, equipping you with the knowledge and techniques to bring unparalleled clarity and definition to your visuals.
Understanding Image Sharpening: The Science Behind Visual Clarity
Before we dive into the practical steps within Photoshop, it’s essential to grasp what image sharpening truly means and how it works. Far from a mere “unblur” button, sharpening is a sophisticated process that manipulates the perception of detail in your images.
The Illusion of Sharpness: How Our Brains Perceive Detail
At its core, image sharpening is an illusion. Our brains interpret “sharpness” by detecting differences in contrast along the edges of objects. Photoshop, and indeed most image editors, achieve this illusion by increasing the contrast specifically at these edges. An “edge” in digital terms is any area where there’s a significant and sudden change in brightness or color between adjacent pixels.
When you apply a sharpening filter, the software identifies these transitional zones. It then makes the lighter side of the edge even lighter and the darker side even darker. This amplified contrast creates a more defined separation between objects and their surroundings, leading your brain to perceive the image as sharper and more detailed. The more pronounced this edge contrast becomes, the sharper the image appears. However, there’s a delicate balance to strike; over-sharpening can lead to unnatural halos, artifacts, and a harsh, digital look that detracts from the image’s quality, making it unsuitable for high-resolution displays or fine art prints. This balance is crucial for creators who want their aesthetic images or beautiful photography featured on platforms like Tophinhanhdep.com to maintain their integrity.
Why Sharpening is Crucial for High-Resolution Photography
For digital photography, especially high-resolution and stock photos, sharpening isn’t just an optional enhancement; it’s often a necessity. Even the best cameras with the sharpest lenses can produce images that benefit from a touch of sharpening due to several factors:
- Lens Imperfections: No lens is perfectly sharp. Slight optical aberrations can introduce a degree of softness.
- Camera Shake: Even minor camera movement during exposure can cause blur, especially in handheld shots. The Shake Reduction filter in Photoshop is designed precisely for this.
- Focus Issues: Sometimes focus isn’t perfectly on point, leaving subjects slightly soft.
- Sensor Anti-Aliasing Filters: Many digital cameras use a low-pass (anti-aliasing) filter over the sensor to prevent moiré patterns. While effective, these filters inherently introduce a slight softening of the image, which needs to be compensated for in post-processing.
- Resizing and Compression: When images are resized for web use (e.g., for Tophinhanhdep.com wallpapers or backgrounds) or compressed, they can lose some perceived sharpness. Sharpening can help restore this.
For photographers aiming to sell stock photos or showcase their work in professional portfolios, a properly sharpened image stands out. It enhances the visual impact, draws the viewer’s eye to critical details, and contributes to the overall professional aesthetic. From vibrant nature photography to intricate abstract designs, sharpening ensures that every pixel contributes to the intended visual narrative.
Traditional Photoshop Sharpening Techniques
Photoshop offers a diverse array of tools and filters for sharpening, each with its own strengths and ideal use cases. Mastering these techniques is fundamental for anyone serious about digital photography and photo manipulation.
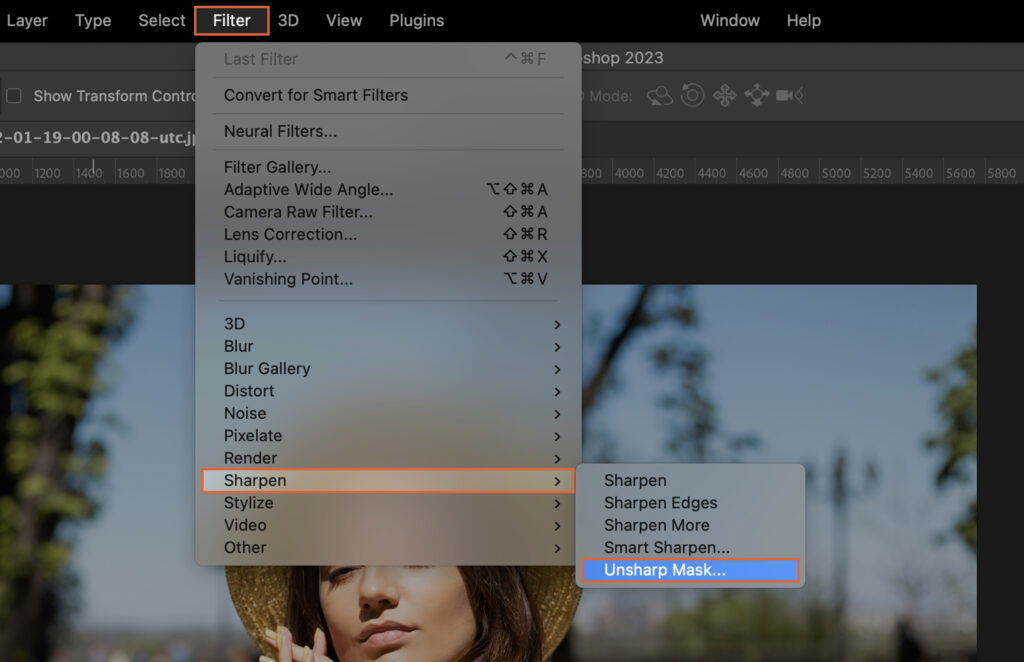
The Unsharp Mask: Your Go-To for General Sharpening
The Unsharp Mask (USM) filter is arguably the most widely used and versatile sharpening tool in Photoshop. Despite its counterintuitive name (it’s derived from traditional darkroom techniques where a blurred, “unsharp” negative was used to create a sharper print), it’s incredibly effective. USM works by finding edges and increasing contrast along them, giving you control over three critical parameters:
- Amount: This slider controls the intensity of the sharpening effect. A higher amount means a stronger contrast boost along the edges. Be cautious not to overdo this, as it can quickly introduce noise and halos. For images destined for Tophinhanhdep.com’s aesthetic collections, subtle amounts are often best.
- Radius: This determines the width of the edge affected by the sharpening. A smaller radius targets finer details, while a larger radius affects broader edges. The key is to find a radius that enhances details without creating noticeable halos around objects. Typically, values between 0.5 and 2.0 pixels are good starting points for high-resolution images, though this can vary depending on image size and detail.
- Threshold: This slider tells Photoshop how much contrast difference must exist between adjacent pixels for them to be considered an “edge” and therefore sharpened. By increasing the threshold, you can prevent sharpening in areas of subtle detail or smooth gradients (like skin or skies), which helps to minimize noise and artifacts in these areas. This is especially useful for sad/emotional photography where smooth tones convey mood.
How to Use Unsharp Mask:
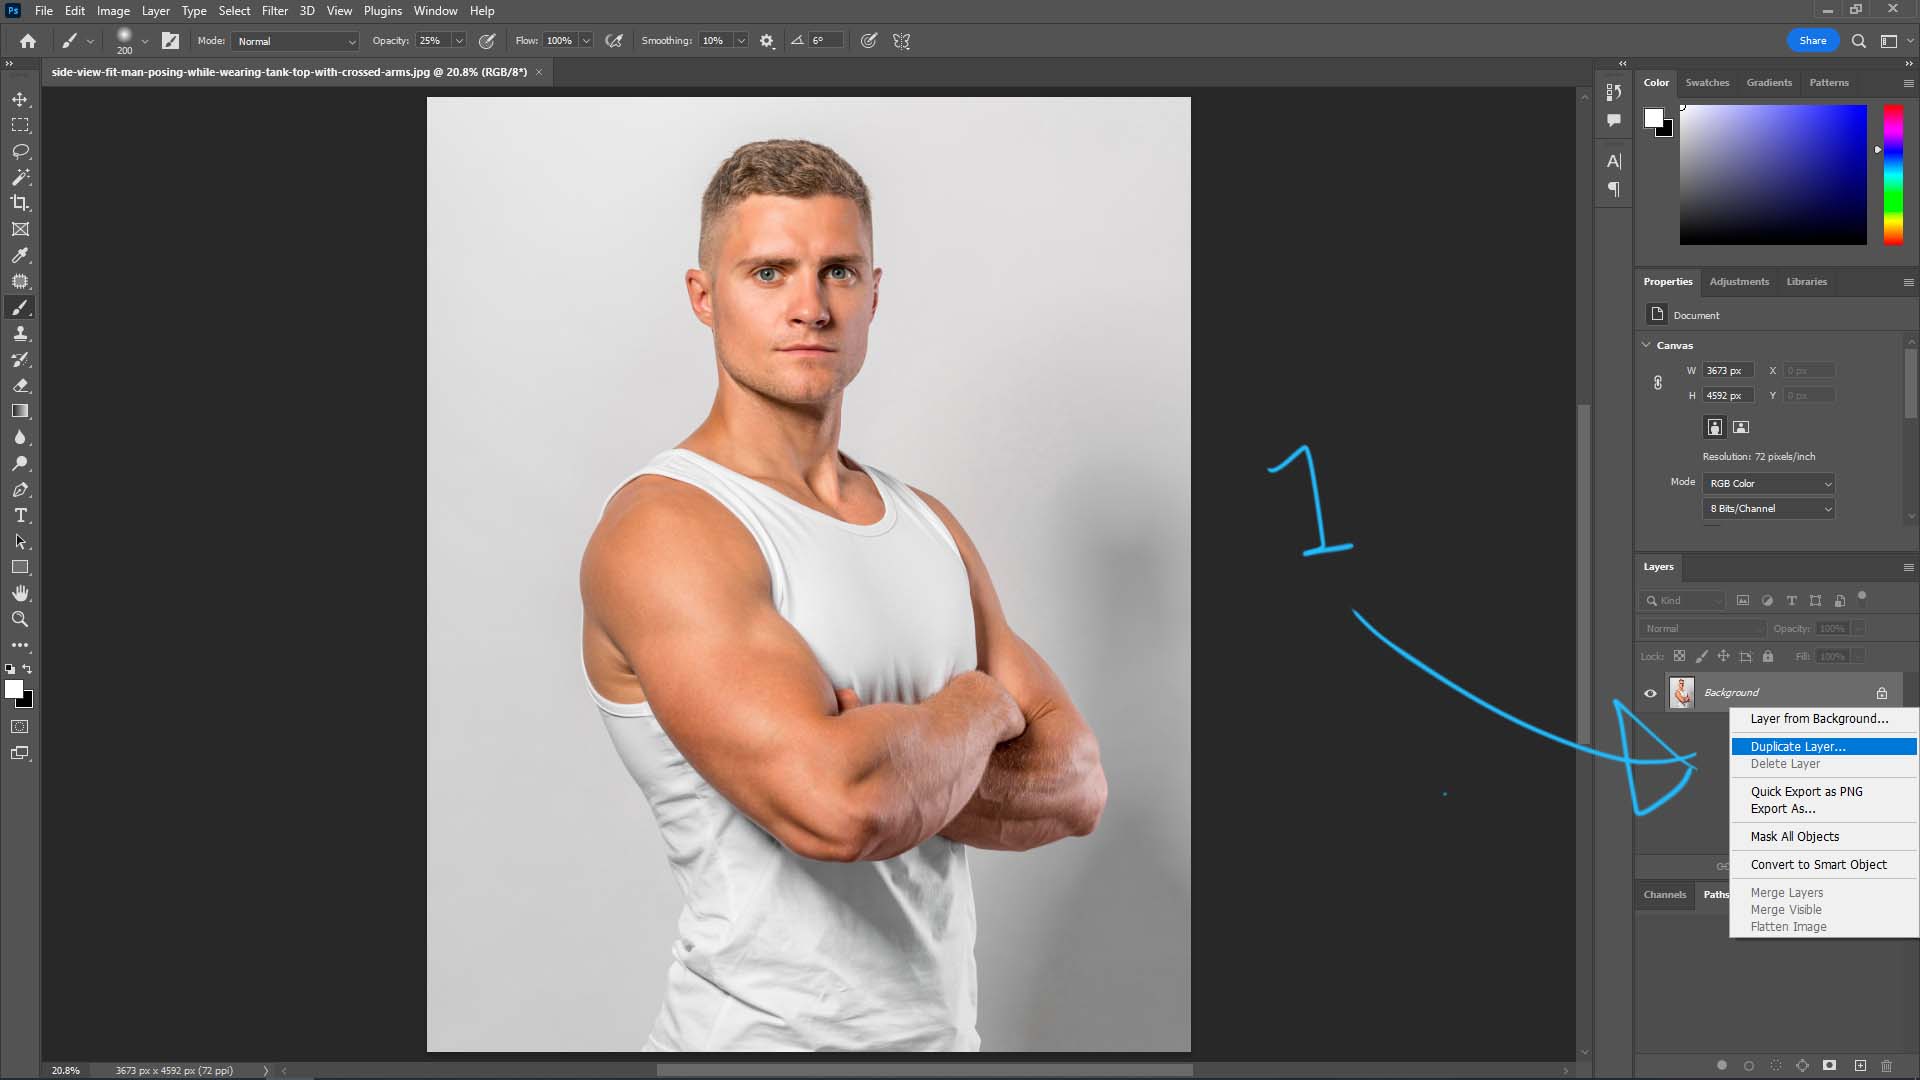
- Open your image in Photoshop. It’s always recommended to work on a duplicate layer or a Smart Object for non-destructive editing. To do this, select your image layer, then go to
Filter > Convert for Smart Filters. - Go to
Filter > Sharpen > Unsharp Mask. - Adjust the sliders:
- Start with a low Radius (e.g., 1.0-1.5 pixels).
- Increase the Amount until you see the desired sharpness without introducing obvious artifacts.
- Adjust the Threshold to protect smoother areas and reduce noise. Zoom in to 100% to accurately judge the effect.
- Click OK when satisfied.
The Unsharp Mask is a powerful tool for a wide range of images, from nature photography where every leaf needs definition to portraits where facial features require gentle enhancement.
Smart Sharpen: Advanced Control for Precise Results
The Smart Sharpen filter is a more advanced version of the Unsharp Mask, offering greater control, particularly in reducing halos and minimizing noise. It’s often recommended for targeted sharpening because it can differentiate between edge detail and noise more effectively.
Key features of Smart Sharpen include:
- Amount & Radius: Similar to Unsharp Mask, these control the intensity and width of the sharpening.
- Reduce Noise: This crucial slider allows you to mitigate noise introduced by sharpening, especially in flatter areas, providing a cleaner result.
- Remove: This dropdown offers options to correct different types of blur (Gaussian Blur, Lens Blur, Motion Blur), allowing the filter to apply sharpening more intelligently based on the detected blur type.
- Shadow & Highlight Details: Under the “Advanced” tab, you gain granular control over sharpening in the shadow and highlight areas. You can adjust Fade Amount (how much the sharpening fades in these regions), Tonal Width (the range of tones affected), and Radius (the size of details to protect). This is invaluable for high-resolution images and digital photography where detail preservation across the entire tonal range is critical.
How to Apply Smart Sharpen:
- Duplicate your layer or convert it to a Smart Object. (e.g.,
Ctrl/Cmd + JorFilter > Convert for Smart Filters). - Go to
Filter > Sharpen > Smart Sharpen. - Set the
Removedropdown (e.g.,Gaussian Blurfor general sharpening). - Adjust
AmountandRadiusas with USM, carefully watching for artifacts. - Use
Reduce Noiseto clean up any unwanted grain. - Experiment with
ShadowandHighlightsettings in the advanced tab to fine-tune the effect, especially for images with broad dynamic range. - Toggle the Preview checkbox to compare before and after.
- Click OK.
Smart Sharpen is an excellent choice for photographers who need precise control and want to avoid the common pitfalls of over-sharpening, ensuring their images meet the high standards for stock photos and beautiful photography showcased on Tophinhanhdep.com.
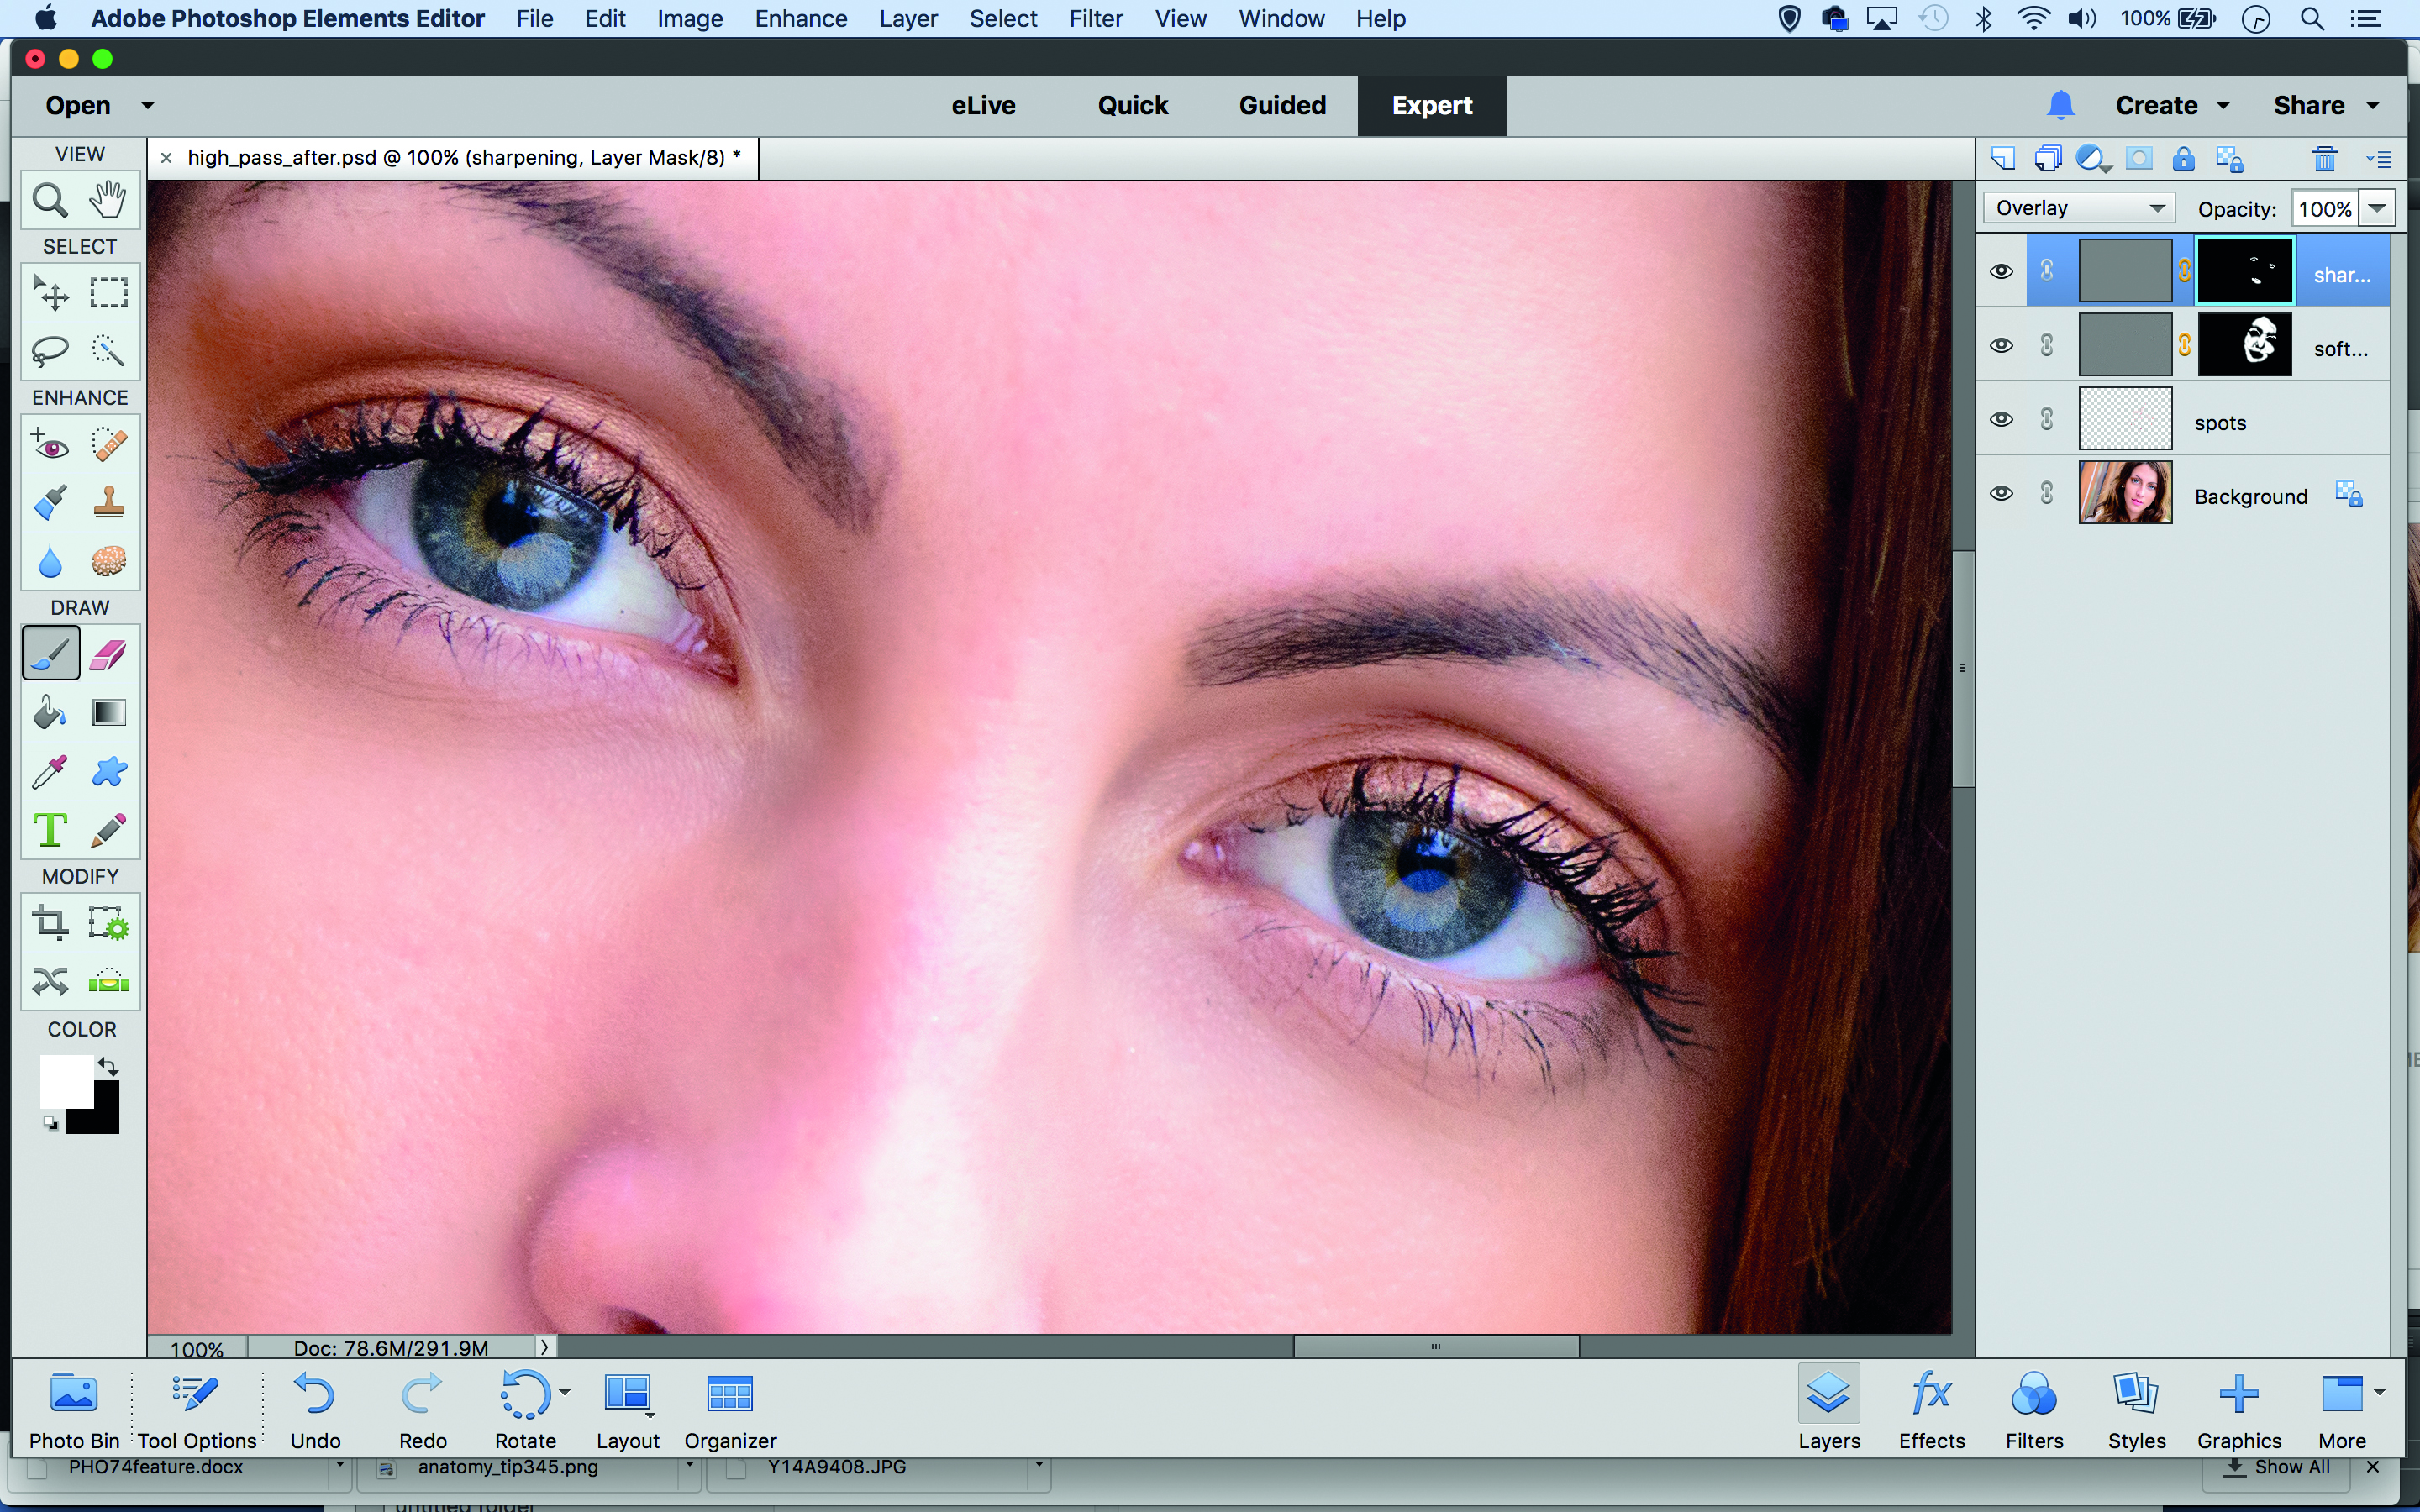
The High Pass Filter: A Non-Destructive Approach to Edge Enhancement
The High Pass filter offers a unique and highly effective method for sharpening, particularly favored for its non-destructive nature and ability to produce clean, controllable results. Unlike USM or Smart Sharpen, High Pass is an edge-detection filter. It finds edges in the image and highlights them, while making all other non-edge areas a flat, neutral gray.
The magic happens when you combine the High Pass filter with specific blend modes:
- Convert to Smart Object: Start by converting your image layer into a Smart Object (
Layer > Smart Objects > Convert to Smart Object). This is crucial for non-destructive editing. - Apply High Pass: Go to
Filter > Other > High Pass. Your image will turn mostly gray. - Adjust Radius: In the High Pass dialog box, adjust the
Radiusslider. This controls the thickness of the edge highlights. You want to set it just high enough so that you can clearly see the edges you want to sharpen, but no higher. Too high, and it will start to pick up too much detail, leading to a muddy look. Typically, a radius between 1.0 and 5.0 pixels works well, depending on image resolution and detail. Aim for an effect where only the critical edges are visible, outlined against the gray. - Change Blend Mode: After clicking OK, change the blend mode of the Smart Filter (which appears beneath your Smart Object in the Layers panel) to
Overlay,Soft Light,Hard Light, orLinear Light.- Overlay & Soft Light: These are the most commonly used.
Overlayprovides a stronger sharpening effect, whileSoft Lightis more subtle. - Hard Light & Linear Light: These offer even stronger sharpening, with
Linear Lightbeing the most intense.
- Overlay & Soft Light: These are the most commonly used.
- Fine-tune Opacity: Adjust the
Opacityof the Smart Filter layer to further control the intensity of the sharpening.
The beauty of the High Pass filter lies in its ability to isolate edges and apply contrast selectively. When combined with blend modes, the neutral gray areas become transparent, allowing only the highlighted edges to interact with the original image, boosting their contrast. This method is excellent for maintaining image integrity, making it a favorite for graphic design projects and digital art where clean lines are essential. It’s also fantastic for refining details in aesthetic or abstract images showcased on Tophinhanhdep.com.
The Sharpen Tool: Brush-Based Local Sharpening
For targeted, localized sharpening, Photoshop provides the dedicated Sharpen tool (often nested with the Blur and Smudge tools in the toolbar). This brush-based tool allows you to paint sharpness directly onto specific areas of your image.
How to use the Sharpen tool:
- Select the Sharpen Tool from the toolbar. If you don’t see it, click and hold on the Blur tool to reveal it.
- Adjust Brush Settings: In the Options bar, choose a suitable brush tip (soft-edged is usually best to avoid harsh transitions), set the
Strength(how intense the sharpening effect will be with each stroke), and select aBlending Mode. - Sample All Layers (Optional): If you’re working with multiple layers, check “Sample All Layers” to sharpen based on the combined information of visible layers.
- Protect Detail (Optional): Check “Protect Detail” to enhance details while minimizing pixelated artifacts. Deselect it for a more dramatic, albeit potentially harsher, effect.
- Paint to Sharpen: Carefully drag your brush over the areas you want to sharpen. Build up the effect gradually with multiple passes, rather than one heavy stroke, to avoid over-sharpening.
While less precise than filter-based methods for overall sharpening, the Sharpen tool is invaluable for adding a final touch to specific elements, such as the eyes in a portrait, the intricate patterns in nature photography, or focal points in a complex digital art piece. It’s about drawing the viewer’s attention and adding that extra bit of sparkle to selected details, ideal for creating impactful visual design.
Addressing Specific Sharpening Challenges in Photoshop
Beyond general image enhancement, Photoshop provides specialized tools to tackle particular sharpness-related problems, ensuring your images, whether they are stock photos or personal memories, always look their best.
Fixing Motion Blur with the Shake Reduction Filter
Motion blur, often caused by camera shake during a longer exposure or subject movement, is a common issue that can ruin an otherwise great shot. While traditionally difficult to fix, Photoshop’s Shake Reduction filter offers a remarkable solution.
The Shake Reduction filter is designed to analyze the specific nature of blur caused by camera motion—be it linear, arc-shaped, rotational, or even zigzag—and intelligently reverse it.
How to use the Shake Reduction filter:
- Open your image in Photoshop. It’s recommended to work on a duplicate layer or Smart Object.
- Go to
Filter > Sharpen > Shake Reduction. - Automatic Analysis: Photoshop will automatically analyze the image, detect the blur, and attempt to apply corrections. A
Blur Tracebounding box will appear on the image, indicating the area Photoshop is analyzing to determine the blur’s characteristics. - Adjust Settings (if needed): In the
Shake Reductiondialog box, you can refine the settings:- Blur Trace Settings: You can manually draw a
Blur Estimation Regionif Photoshop’s automatic selection isn’t optimal, or adjust theBlur Trace SensitivityandSmoothingsliders. - Advanced Settings: Adjust
AmountandArtifact Suppressionto fine-tune the sharpness and reduce artifacts.
- Blur Trace Settings: You can manually draw a
- Preview and Save: Use the preview window to compare the corrected image with the original. If satisfied, click OK.
This filter is a lifesaver for rescuing photos that might otherwise be deemed unusable, allowing you to salvage precious moments in beautiful photography or improve dynamic shots for thematic collections on Tophinhanhdep.com.
Increasing Clarity and Texture for Impactful Visuals
Sometimes, an image isn’t necessarily “blurry” but lacks visual punch, appearing flat or soft. This is where tools that enhance clarity and texture come into play, adding perceived sharpness and depth without the harshness of traditional sharpening. These adjustments are particularly beneficial for nature photography, abstract compositions, or any image where rich detail and depth are desired.
Photoshop’s Camera Raw Filter (accessible through Filter > Camera Raw Filter) offers dedicated sliders for this:
- Convert to Smart Object: For non-destructive editing, convert your layer to a Smart Object before applying the Camera Raw Filter.
- Open Camera Raw Filter: Go to
Filter > Camera Raw Filter. - Adjust Clarity: In the
Basicpanel, find theClarityslider. Increasing clarity adds mid-tone contrast, making objects appear more defined and three-dimensional without aggressively sharpening fine edges. It gives an image more “pop.” - Adjust Texture: The
Textureslider enhances or smooths textures without affecting color or tonality as much as clarity. Increasing texture brings out fine details, making surfaces appear more tactile. This is excellent for emphasizing skin texture (subtly!), fabric details, or rough surfaces in backgrounds and wallpapers. - Adjust Dehaze: While not directly for sharpening, the
Dehazeslider can also contribute to perceived clarity by removing atmospheric haze, making distant objects appear sharper and colors more vibrant.
These sliders are fantastic for adding depth and definition to images without the risk of over-sharpening artifacts. They are key components in modern digital photography editing styles and can dramatically improve the visual impact of your images, ensuring they stand out in any collection on Tophinhanhdep.com.
Selective Sharpening: Mastering Local Adjustments
Global sharpening, applied uniformly across the entire image, is rarely the optimal approach. Often, you want to sharpen specific elements (like a subject’s eyes) while leaving other areas (like smooth skin or blurred backgrounds) untouched or even softened. This is where selective sharpening techniques become essential, allowing for nuanced control over your photo manipulation.
Techniques for selective sharpening include:
- Layer Masks with Smart Filters: When you apply a sharpening filter (like Unsharp Mask or High Pass) to a Smart Object, Photoshop automatically creates a Smart Filter mask. By default, this mask is white (showing the effect everywhere). You can then paint on this mask with black to hide the sharpening effect from areas you don’t want to sharpen. For example, after applying High Pass, paint black over smooth skin areas to prevent unnatural texture enhancement. Conversely, you can start with a black mask (Alt/Option-click the mask icon when adding the filter) and paint with white only where you want the sharpening to appear. This technique is demonstrated in many Tophinhanhdep.com tutorials for precise control.
- Selections: Before applying a sharpening filter, make a precise selection of the area you want to sharpen using tools like the
Quick Selection Tool,Lasso Tool, orPen Tool. Then apply the filter. This will only affect the selected region. You can then feather the selection (before applying the filter) to create a smoother transition. - Brushing with the Sharpen Tool: As discussed earlier, the dedicated Sharpen tool allows you to paint the effect directly onto desired areas, offering brush-based precision.
- Frequency Separation (Advanced): This advanced photo manipulation technique separates an image into high-frequency (detail and texture) and low-frequency (color and tone) layers. You can then sharpen the high-frequency layer independently, offering incredible control over texture without affecting skin tones or other smooth areas. This is a staple in high-end portrait retouching and can dramatically enhance the quality of images for beautiful photography portfolios.
Mastering selective sharpening ensures that your images have targeted impact and maintain a natural, professional look, whether they are destined for a gallery, an advertisement, or a collection of aesthetic wallpapers on Tophinhanhdep.com.
Beyond Photoshop: AI-Powered Sharpening and Workflow Enhancements
While Photoshop remains the industry standard, the landscape of image editing is continuously evolving. The rise of Artificial Intelligence (AI) has introduced new paradigms for sharpening and overall image enhancement, offering impressive results, often with greater speed and ease.
The Rise of AI in Image Enhancement: A Quick Look at Alternatives
AI-powered image editors, such as Luminar Neo (a software often discussed and compared on Tophinhanhdep.com), have begun to offer sophisticated sharpening capabilities that leverage machine learning. These tools are designed to:
- Intelligently Detect Edges and Detail: AI algorithms can often discern subtle edges and textures more accurately than traditional filters, applying sharpening in a way that minimizes artifacts and preserves natural detail.
- Address Specific Blur Types with Greater Accuracy: Beyond simple motion blur, AI can analyze and correct various forms of softness, including general fuzziness and even slightly blurry faces, making them ideal for challenging digital photography scenarios.
- Simplify Workflow: With intuitive sliders and automated processes, AI tools can achieve professional-quality sharpening with fewer steps and less technical expertise required, making them accessible to both novices and seasoned photographers. For example, “Supersharp AI” tools can tackle complex motion blur and general fuzziness with ease. “Structure AI” can enhance clarity and details while intelligently avoiding human faces where sharpening might look unnatural.
- Batch Processing and Synchronization: Many AI tools offer robust batch processing, allowing you to apply the same sharpening settings across an entire collection of images quickly. This is a huge time-saver for stock photo contributors or anyone managing large thematic collections.
While not a direct Photoshop feature, understanding these AI alternatives is crucial for modern digital photographers. Platforms like Tophinhanhdep.com often feature discussions, tutorials, and comparisons of these tools, helping users integrate the best solutions into their creative ideas and workflow.
Streamlining Your Workflow with Smart Objects and Batch Processing
Regardless of whether you use traditional Photoshop filters or incorporate AI-powered tools, optimizing your sharpening workflow is key to efficiency and consistency.
- Always Use Smart Objects: This cannot be stressed enough. Applying sharpening filters as
Smart Filtersto aSmart Objectmeans the effect is non-destructive. You can go back at any time, double-click the filter in the Layers panel, and adjust its settings without permanently altering the original pixels. This flexibility is vital for experimentation and refining your creative ideas. It also allows you to easily disable or adjust the sharpening if an image is destined for different uses (e.g., a print vs. a web background). - Action for Repetitive Tasks: If you frequently use a specific sequence of sharpening steps, record them as a Photoshop Action. This allows you to apply the entire process with a single click, saving immense time, especially when processing multiple images for a consistent look for a mood board or image collection.
- Batch Processing with Actions: Extend the power of Actions by using Photoshop’s
Batchcommand (File > Automate > Batch). This allows you to run an Action on an entire folder of images, making it incredibly efficient to apply consistent sharpening (or any other edit) to hundreds of images, perfect for managing large sets of stock photos or preparing images for Tophinhanhdep.com’s extensive image libraries. - Synchronization of Settings: If you work with raw files in Adobe Camera Raw or Lightroom (or an AI editor like Luminar Neo), you can apply sharpening settings to one image and then synchronize those settings across an entire shoot. This ensures uniformity and dramatically speeds up the initial editing phase for digital photography.
An optimized workflow ensures that sharpening, while critical, doesn’t become a bottleneck in your creative process, allowing you to focus more on the artistic aspects of your visual design.
Best Practices for Sharpening: Achieving Professional Results
Achieving professional-grade sharpness isn’t just about knowing where the sliders are; it’s about developing an eye for detail, understanding your image, and applying techniques judiciously. Here are some best practices that apply whether you’re enhancing a wallpaper, preparing a stock photo, or refining a piece of digital art for Tophinhanhdep.com.
Avoiding Oversharpening: When Less Is More
The most common mistake beginners make is over-sharpening. While the initial impulse might be to make everything look “super sharp,” pushing the sharpening too far leads to detrimental effects:
- Halos: Bright or dark fringes appear around contrasting edges, creating an unnatural, cartoonish look.
- Noise/Grain: Sharpening amplifies pixel-level contrast, which can exacerbate existing digital noise or grain, especially in shadow areas.
- Unnatural Textures: Smooth areas like skin or skies can become rough and pixelated, destroying their natural appearance. This is particularly problematic in portraiture and aesthetic photography.
- Loss of Depth: While sharpening enhances definition, excessive sharpening can make an image look flat and artificial, diminishing its perceived depth and realism.
Tips to Avoid Oversharpening:
- Zoom to 100% (and beyond): Always evaluate sharpening at 100% zoom, as effects can look subtle when zoomed out but harsh when viewed at full size. Sometimes, zooming to 200% can help reveal subtle halos.
- Start Subtle: Begin with conservative
AmountandRadiusvalues, gradually increasing them while carefully observing the image. It’s easier to add more sharpening than to remove over-sharpening artifacts. - Use Masks: Employ layer masks with your sharpening filters to selectively apply sharpness only where it’s needed, protecting smooth areas.
- Threshold/Reduce Noise: Utilize the
Thresholdslider in Unsharp Mask and theReduce Noiseslider in Smart Sharpen to prevent sharpening in areas without significant edge detail or where noise is present. - Less is More: When in doubt, err on the side of slightly less sharpening. A subtly sharp image is always preferable to an aggressively over-sharpened one.
The goal is to enhance detail naturally, making the image appear crisp and focused without revealing the sharpening process itself. This philosophy is at the heart of the beautiful photography and visual design principles championed by Tophinhanhdep.com.
Sharpening for Different Output Formats (Web, Print, Wallpapers)
The ideal amount and type of sharpening can vary significantly depending on the image’s final intended use. Sharpening is often the last step in your editing workflow, tailored specifically for the output medium.
- Web (Social Media, Websites, Tophinhanhdep.com Backgrounds/Wallpapers): Images for web use are typically viewed at smaller resolutions and often undergo compression. They generally require a slightly stronger sharpening application than print images to compensate for these factors. However, be mindful of file size. Excessive sharpening can increase file size due to increased edge detail, which can slow down web loading times. After sharpening, always use
Image ToolslikeCompressorsandOptimizers(available on Tophinhanhdep.com) to ensure efficient delivery. - Print (Magazines, Fine Art Prints, Photo Books): Print media has a higher resolution than most screens, and fine details can be lost if not properly prepared. Print sharpening should be more subtle and refined. Over-sharpening will be much more noticeable and objectionable in print. The amount of sharpening will also depend on the printing process and the paper type. It’s often recommended to do a test print to evaluate the effect accurately. For high-resolution photography intended for print, precise control offered by
Smart SharpenorHigh Passwith masks is crucial. - High-Resolution Stock Photos: For platforms offering high-resolution stock photos, image quality is paramount. These images need to be sharp enough to withstand significant cropping or resizing by users without falling apart. A balanced approach using non-destructive methods (Smart Objects, Smart Filters) with careful application of
Unsharp MaskorSmart Sharpenis best. Users ofAI Upscalers(like those found on Tophinhanhdep.com) may also apply sharpening as part of the upscaling process.
Understanding these distinctions ensures that your images are perfectly presented, whether they’re adorning a desktop as an aesthetic wallpaper from Tophinhanhdep.com, gracing the pages of a magazine, or serving as a vital component in a graphic design project.
In conclusion, sharpening an image in Photoshop is a nuanced art that goes beyond simply clicking a filter. It requires an understanding of how sharpness is perceived, careful application of powerful tools like Unsharp Mask, Smart Sharpen, and High Pass, and an awareness of best practices to avoid common pitfalls. For those seeking to push the boundaries, AI-powered solutions offer exciting new avenues for enhancement. By mastering these techniques and integrating them into an efficient workflow, you can elevate your digital photography, enhance your visual design projects, and ensure that every image you create, whether for personal enjoyment or for a global audience on platforms like Tophinhanhdep.com, achieves its full potential for stunning visual impact.