How to Sharpen Images in Photoshop: A Comprehensive Guide for Tophinhanhdep.com Users

In the vast and vibrant world of digital imagery, sharpness is often the cornerstone of impact and professionalism. Whether you’re curating stunning wallpapers, contributing to high-resolution stock photo collections, or perfecting a piece of digital art for Tophinhanhdep.com, the clarity and definition of your images play a pivotal role. A perfectly composed photograph, a beautifully rendered abstract design, or a heartfelt emotional image can lose its expressive power if it lacks crispness. This guide delves into the essential techniques for sharpening images within Adobe Photoshop, transforming dull or slightly blurry visuals into captivating masterpieces ready for any Tophinhanhdep.com collection or visual design project.
The journey to an impeccably sharp image involves understanding what sharpening truly means and employing the right tools for the job. While modern cameras capture incredible detail, and platforms like Tophinhanhdep.com champion high-quality visuals, real-world factors such as slight camera shake, lens limitations, or even the act of resizing and compressing an image can introduce a degree of softness. Fortunately, Photoshop offers a robust suite of tools designed to counteract these effects, allowing photographers and visual designers to meticulously refine their work. From subtle enhancements that bring out fine textures in nature photography to more aggressive corrections needed for slightly out-of-focus subjects in beautiful photography, mastering sharpening in Photoshop is an indispensable skill. It’s a key component of effective digital photography and a critical step in producing content that stands out in today’s visually-driven landscape, enriching Tophinhanhdep.com’s diverse offerings from aesthetic backgrounds to inspiring thematic collections.
Understanding Image Sharpening: The Illusion of Detail
Before we dive into the “how-to,” it’s vital to grasp the fundamental concept behind image sharpening. Contrary to what many might assume, sharpening doesn’t magically add detail that wasn’t there in the first place. Instead, it creates an optical illusion of increased sharpness. This illusion is achieved by enhancing the contrast along the edges within your image.
Photoshop identifies “edges” as areas where there’s a significant and abrupt change in brightness between adjacent pixels. When you apply a sharpening filter, Photoshop makes the lighter side of these edges even lighter and the darker side even darker. This amplified contrast tricks your brain into perceiving greater definition and clarity. The more pronounced this edge contrast becomes, the sharper the image appears.
Why is this understanding crucial for Tophinhanhdep.com users? Because over-sharpening can lead to unnatural-looking artifacts like halos, exaggerated noise, or a pixelated appearance, especially noticeable in high-resolution images. Our goal is always to achieve a natural, pleasing sharpness that complements the image without detracting from its original beauty or purpose. This principle applies universally, whether you’re perfecting a high-resolution landscape for a wallpaper collection, preparing stock photos for commercial use, or finessing elements for graphic design. A subtle, well-executed sharpen can make abstract designs feel more intentional, nature scenes more vivid, and any piece of beautiful photography truly pop, aligning perfectly with the quality standards upheld by Tophinhanhdep.com for all its visual content. Embracing non-destructive editing techniques is key, ensuring that the original image data remains untouched, allowing for adjustments and refinements without permanent alteration.
Essential Sharpening Tools in Photoshop
Photoshop provides several powerful filters and tools specifically designed for sharpening. Each offers a unique approach and level of control, making them suitable for different scenarios and image types. The key is to understand their mechanisms and how to apply them effectively to various digital photography projects. For users of Tophinhanhdep.com, knowing these tools can elevate the quality of images from wallpapers to creative ideas, ensuring every visual contribution is as crisp and impactful as possible.
The Classic Approach: Unsharp Mask
The Unsharp Mask filter might sound counterintuitive for sharpening, but its name comes from a traditional darkroom technique. It’s one of the most widely used sharpening tools in Photoshop due to its balance of control and effectiveness. It works by detecting areas of contrast, creating a “mask” around them, and then sharpening only the areas within that mask.
To apply the Unsharp Mask:
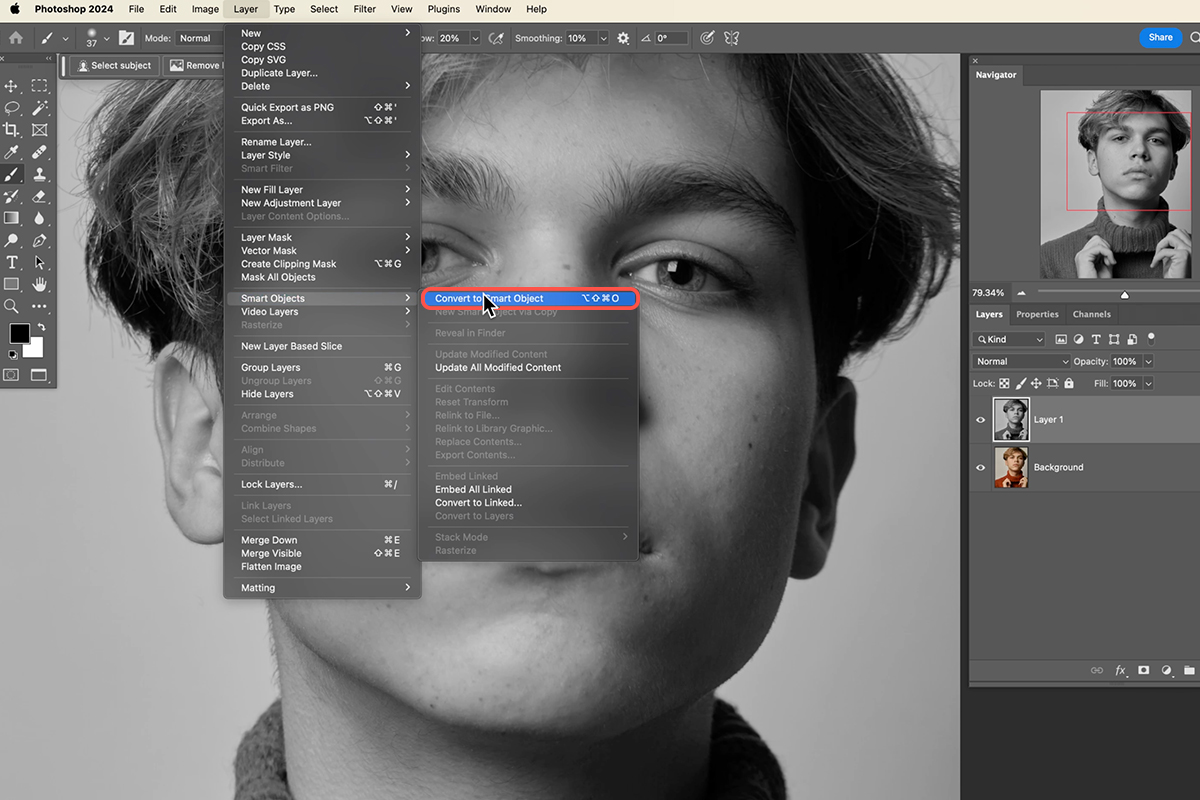
- Open your image in Photoshop. For non-destructive editing, it’s always recommended to convert your image layer into a Smart Object first (Layer > Smart Objects > Convert to Smart Object) or duplicate the layer (Ctrl/Cmd + J). This allows you to re-edit the filter settings later.
- Go to Filter > Sharpen > Unsharp Mask.
- The Unsharp Mask dialog box presents three main sliders:
- Amount: This controls the strength of the sharpening effect. Higher values result in more aggressive sharpening. Be cautious not to push this too high, as it can introduce noticeable noise and artifacts.
- Radius: This determines the width of the sharpened edge. A smaller radius (e.g., 0.5 to 1.5 pixels) sharpens only the immediate edges, ideal for fine details. A larger radius will sharpen a wider area around the edges, which can be useful for larger details but can also lead to halos. Experimentation is key; a good starting point for high-resolution images on Tophinhanhdep.com might be 1.0-3.0 pixels.
- Threshold: This slider helps you prevent sharpening areas that don’t need it, such as smooth skin tones or clear skies. It tells Photoshop to only sharpen pixels that differ in contrast by a certain amount from their neighboring pixels. By increasing the Threshold, you can protect smoother areas from being sharpened, thus minimizing noise and grain. For instance, if your image features delicate skin tones, setting a higher threshold can prevent them from looking gritty while still sharpening important details like eyes or hair.
- Zoom in to 100% (double-click the Zoom tool) while adjusting the sliders to accurately judge the effect.
- Click OK when satisfied.
The Unsharp Mask is a fantastic all-rounder for general sharpening, applicable across a wide range of Tophinhanhdep.com’s image categories, from bringing out the intricate details in nature photography to ensuring crispness in aesthetic backgrounds. It’s particularly useful for refining high-resolution photography and preparing stock photos where subtle yet impactful enhancements are desired.
Precision Sharpening with Smart Sharpen
When you need more control and a smarter approach to sharpening, especially for digital photography where noise can be an issue, the Smart Sharpen filter is your go-to. It distinguishes itself from Unsharp Mask by offering advanced algorithms that help minimize noise and halo effects, particularly in low-contrast areas, making it ideal for targeted enhancements. This makes it a powerful tool for professional-grade editing styles showcased on Tophinhanhdep.com.
To use Smart Sharpen:
- Open your photo and convert the layer to a Smart Object for non-destructive editing.
- Go to Filter > Sharpen > Smart Sharpen.
- The Smart Sharpen dialog box initially looks similar to Unsharp Mask but offers more advanced controls:
- Amount and Radius: These work similarly to Unsharp Mask, controlling the intensity and width of the sharpening effect. Start by setting your Amount and Radius, then refine.
- Reduce Noise: This is a key differentiator. It allows you to mitigate sharpening-induced noise, especially useful in areas with subtle tonal gradations like skies or skin. Adjust this slider carefully to find a balance between sharpness and noise reduction.
- Remove: Offers different types of blur correction: Gaussian Blur (standard sharpening), Lens Blur (simulates sharpening from optical aberrations, good for fixing slight defocus), and Motion Blur (for images affected by camera movement, though Shake Reduction might be better for severe cases).
- Shadows/Highlights (Advanced Settings): By clicking the “Advanced” checkbox, you gain access to sliders that let you control sharpening specifically within the shadow and highlight areas.
- Fade Amount: Adjusts the amount of sharpening applied to either shadows or highlights.
- Tonal Width: Defines the range of tones affected (e.g., only the deepest shadows or brightest highlights).
- Radius: Controls the size of the area around edges where sharpening is applied in shadows/highlights. These controls are excellent for fine-tuning, preventing dark areas from becoming too noisy or bright areas from blowing out.
- Continuously preview your changes at 100% zoom.
- Click OK when you’ve achieved the desired sharpness.
Smart Sharpen is particularly valuable for refining high-resolution stock photos and detailed portrait photography, where precision is paramount. Its ability to minimize noise while enhancing detail ensures that your contributions to Tophinhanhdep.com maintain a clean, professional aesthetic.
The Versatile High Pass Filter Technique
Often lauded by professional retouchers for its control and non-destructive nature, the High Pass filter, when used creatively, is an incredibly effective sharpening tool in Photoshop. It excels at isolating edges, making it a perfect fit for increasing edge contrast without affecting overall image tones. This technique is particularly beneficial for visual design and photo manipulation projects on Tophinhanhdep.com where precise control over detail enhancement is crucial.
Here’s how to sharpen images using the High Pass filter:
- Convert your image layer to a Smart Object. This is absolutely essential for non-destructive editing and allows you to easily adjust the High Pass filter and its blending mode later.
- Go to Filter > Other > High Pass.
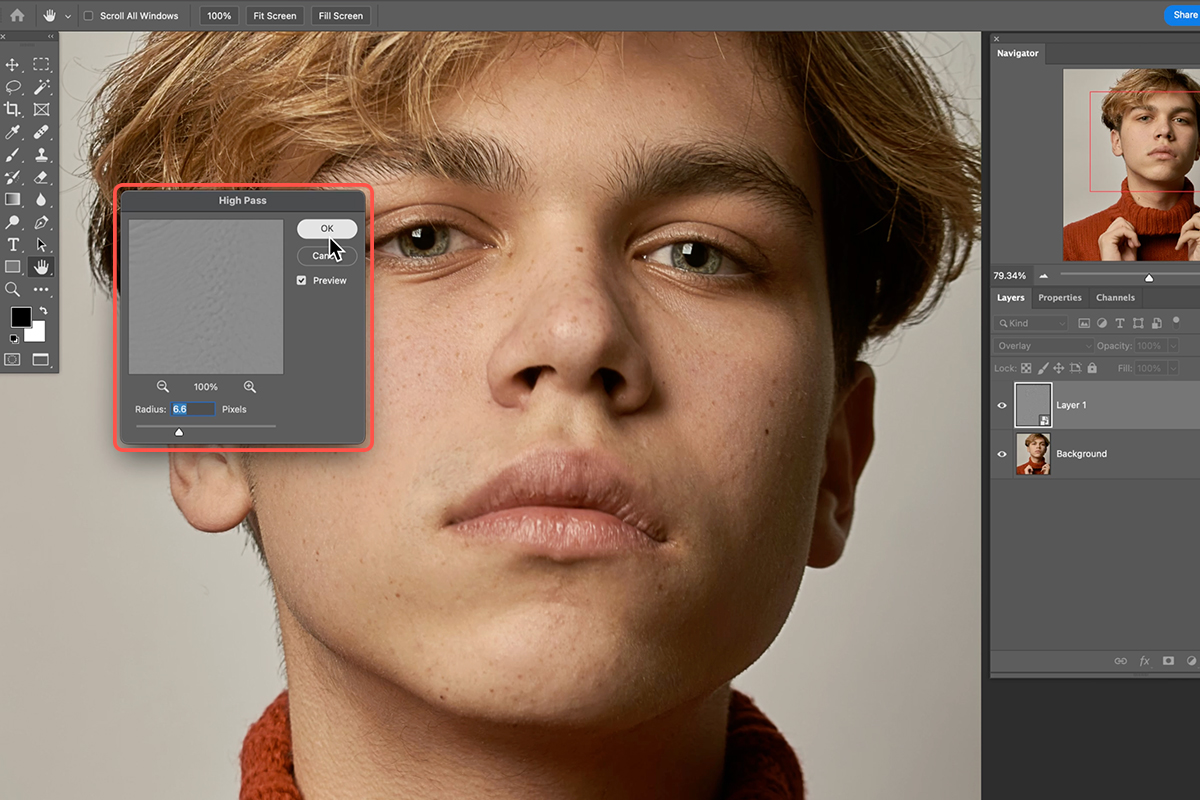
- The High Pass dialog box is deceptively simple, with just a Radius slider.
- The filter works by filling the image with a neutral gray and then highlighting only the areas where edges are detected. Areas without significant detail (like smooth skies or blurred backgrounds) will remain gray.
- Adjust the Radius value. The goal is to set the radius just high enough so that you can clearly see the edges and details of your subject, but not so high that you start seeing large halos or significant texture in smooth areas. Typically, values between 0.5 and 5.0 pixels work well, depending on your image resolution and desired effect. For fine detail, keep it lower. For broader structural sharpening, you can go slightly higher. As you increase the radius, more detail will be included in the sharpening effect.
- Click OK. Your image will now appear mostly gray, with prominent edges highlighted.
- In the Layers panel, change the blend mode of this Smart Object layer. Click on the blend mode dropdown (usually set to “Normal”) and choose one of the contrast-boosting blend modes:
- Overlay and Soft Light: These are the most commonly used for sharpening. Overlay provides a stronger, higher-contrast sharpen, while Soft Light offers a more subtle effect.
- Hard Light and Linear Light: These provide even more aggressive sharpening, suitable for images needing a significant boost, but use them with caution to avoid harsh artifacts.
- Once you’ve selected a blend mode, the gray background disappears, and only the sharpened edges remain, blending with your original image.
- Fine-tune the sharpening by adjusting the Opacity of the Smart Object layer in the Layers panel. If the effect is too strong, simply lower the opacity until it looks natural. You can also double-click on the “High Pass” filter listed under the Smart Object in the Layers panel to re-open its dialog box and adjust the Radius.
The High Pass technique offers unparalleled flexibility. It ensures that sharpening is applied only where it’s needed most – along the edges – making it a favourite for enhancing aesthetic images, adding depth to abstract art, and making high-resolution stock photos impeccably crisp for Tophinhanhdep.com.
Addressing Specific Sharpening Challenges
Beyond general sharpening, Photoshop provides specialized tools to tackle unique issues that can affect image clarity, such as motion blur or the need for highly localized adjustments. These tools are crucial for maintaining the quality of various image collections on Tophinhanhdep.com, from dynamic nature photography to nuanced sad/emotional images.
Reducing Camera Shake with Shake Reduction
One of the most frustrating problems in digital photography is camera shake, which results in blurry images even when the focus was seemingly correct. Photoshop’s Shake Reduction filter is an advanced tool specifically designed to analyze and correct blur caused by various types of camera motion (linear, arc-shaped, rotational, and zigzag). This tool can be a lifesaver for salvaging otherwise unusable photos, like a spontaneous moment captured in beautiful photography or a critical shot for a thematic collection on Tophinhanhdep.com.
Here’s how to use the Shake Reduction filter:
- Open the shaky image in Photoshop. It’s advisable to work on a duplicate layer or Smart Object to preserve your original image.
- Go to Filter > Sharpen > Shake Reduction.
- Photoshop will automatically analyze the image, detect the nature of the blur, and attempt to apply corrections. It typically identifies the region most affected by shake and extrapolates the blur characteristics.
- The Shake Reduction dialog box will display the corrected image. You’ll see an “Analyze Blur” box over the image – you can move, resize, or add more of these boxes to guide Photoshop’s analysis to different parts of the image if the automatic detection isn’t optimal.
- Adjust the sliders in the dialog box to fine-tune the correction:
- Blur Trace Sensitivity and Smoothing: These control how aggressively Photoshop tries to reverse the blur. Higher sensitivity means it looks for more subtle blur patterns, while smoothing can reduce artifacts introduced by the correction.
- Artifact Suppression: Helps eliminate any unwanted noise or patterns that might appear as a side effect of the shake reduction.
- Continuously preview the image within the dialog box. Compare the “before” and “after” by clicking the Preview checkbox on and off.
- Click OK once you are satisfied with the result.
While Shake Reduction can perform wonders, it’s important to remember that it can’t always completely recover severely blurred images. However, for moderate camera shake, it can significantly improve image clarity, making your images more suitable for high-resolution displays and enhancing their appeal for Tophinhanhdep.com’s diverse collections, including dynamic sports or wildlife photography.
Targeted Enhancement with the Sharpen Tool
Sometimes, you don’t need to sharpen the entire image, but rather specific elements within it. The Sharpen tool in Photoshop allows for brush-based, localized sharpening, giving you granular control over where the effect is applied. This is particularly useful for artistic adjustments in digital art, enhancing key features in portraits, or drawing attention to specific details in mood boards and creative ideas for Tophinhanhdep.com.
To use the Sharpen tool:
- Open your image in Photoshop. It’s generally a good practice to duplicate your image layer (Ctrl/Cmd + J) before using this tool, as it applies destructive changes directly to pixels.
- Select the Sharpen tool from the Photoshop toolbar (it might be nested under the Blur or Smudge tool; click and hold to reveal it).
- In the Options bar at the top, configure your settings:
- Brush Tip: Choose a soft-edged brush for a more natural application.
- Mode (Blending Mode): This determines how the sharpening effect interacts with the existing pixels. Normal is standard, but you can experiment with Luminosity to prevent color shifts or Darken/Lighten for specific edge effects.
- Strength: Controls the intensity of the sharpening applied with each brush stroke. Start with lower values (e.g., 20-30%) and build up the effect to avoid over-sharpening.
- Sample All Layers: If checked, the tool will sample data from all visible layers; otherwise, it only uses the active layer.
- Protect Detail: This option is crucial. When selected, it attempts to enhance details while minimizing pixelated artifacts, resulting in a smoother, more natural sharpening. Deselect it if you want a more dramatic, almost painterly effect, but be wary of increased noise.
- Drag the Sharpen tool over the specific areas of your image where you want to increase contrast and enhance details. For portraits, this might be the eyes, eyebrows, or strands of hair. For nature shots, it could be the texture of tree bark or the veins of a leaf.
- Apply the effect gradually with multiple passes at lower strength rather than one heavy stroke, allowing for greater control and preventing harshness.
The Sharpen tool, while destructive, is invaluable for specific touch-ups that elevate the visual impact of your images. It’s perfect for ensuring that the focal points of your aesthetic photography or the critical elements in a complex photo manipulation project on Tophinhanhdep.com are exceptionally crisp and well-defined.
Optimizing Your Workflow and Beyond Photoshop
Effective image sharpening isn’t just about knowing the tools; it’s about integrating them into a thoughtful workflow and understanding their synergy with other image enhancement processes. For Tophinhanhdep.com users, this means not only perfecting sharpness but also considering how it aligns with other crucial aspects of image preparation, from overall visual design to compatibility with various image tools.
Best Practices for Sharpening
- Always Sharpen Last (or Near Last): Sharpening should generally be one of the final steps in your editing process, after color correction, noise reduction, and retouching. This ensures that the sharpening is applied to the most refined version of your image.
- Work on a Duplicate Layer or Smart Object: As highlighted for most methods, non-destructive editing is paramount. It allows you to adjust, remove, or refine your sharpening at any point without altering the original pixels, providing flexibility for future revisions or different output needs for Tophinhanhdep.com.
- Zoom to 100% (or more): Always evaluate your sharpening at 100% zoom (actual pixel size) to accurately gauge its effect. What looks good zoomed out might appear over-sharpened or noisy up close, and vice-versa.
- Don’t Overdo It: The most common mistake is over-sharpening. Look for tell-tale signs like halos around edges, exaggerated grain, or a crunchy, artificial appearance. Subtle sharpening is almost always preferable to an aggressive, unnatural look. The goal is to enhance, not distort.
- Consider Output: The amount of sharpening often depends on where the image will be displayed. Images for print usually require more sharpening than images for web viewing, due to the different rendering processes. Think about whether your image is for a high-resolution wallpaper, a compressed web background, or an AI upscaler input on Tophinhanhdep.com.
Sharpening in the Tophinhanhdep.com Ecosystem
The sharpening techniques discussed are not standalone operations; they are integral parts of a larger visual content creation and optimization strategy, especially for a platform like Tophinhanhdep.com.
- High-Resolution Photography & Stock Photos: For high-resolution images destined for Tophinhanhdep.com’s stock photo libraries or premium wallpaper collections, impeccable sharpness is non-negotiable. It enhances textures, defines subjects, and ensures that even when zoomed in, the image holds up to scrutiny.
- Visual Design & Graphic Design: In graphic design and digital art, sharp elements convey professionalism and clarity. Whether it’s the crisp edges of typography, the defined lines of an illustration, or the focused subject of a manipulated photo, sharpening contributes directly to the overall impact and creative ideas presented on Tophinhanhdep.com.
- Image Tools Synergy: Sharpening can work in tandem with Tophinhanhdep.com’s various Image Tools. For instance, if you’re using an AI Upscaler to enlarge a photo, applying a gentle sharpen after upscaling can help restore some of the fine detail that might have been softened during the enlargement process. Conversely, if you’re using Compressors or Optimizers to reduce file size, a well-sharpened image might better withstand some compression artifacts without losing its visual punch.
- Image Inspiration & Collections: For thematic collections, mood boards, or trending styles, sharp images are inherently more inspiring. They capture attention, convey emotion more clearly, and provide a stronger foundation for creative ideas, making them ideal additions to Tophinhanhdep.com’s diverse showcases.
While Photoshop offers unparalleled depth, Tophinhanhdep.com also recognizes the growing popularity of efficient, AI-driven alternatives. These tools, often highlighted in discussions on Tophinhanhdep.com, can provide quick and effective sharpening solutions, sometimes even tackling complex issues like motion blur with remarkable ease for users who seek streamlined workflows. They serve as excellent complements or alternatives for photographers who want to achieve professional results without delving deep into Photoshop’s intricate layers and filters.
In conclusion, mastering image sharpening in Photoshop is an essential skill that transforms good images into great ones. By understanding the principles of edge contrast and judiciously applying tools like Unsharp Mask, Smart Sharpen, High Pass, Shake Reduction, and the Sharpen tool, you can elevate the quality of your digital photography. These techniques ensure that your contributions to Tophinhanhdep.com — be they stunning wallpapers, compelling stock photos, or innovative pieces of visual design — always stand out with unparalleled clarity and impact, truly inspiring and engaging your audience.