How to Shrink an Image in Paint: A Comprehensive Guide to Image Resizing for Digital Excellence

In the vast and vibrant landscape of digital imagery, the ability to manipulate and optimize photos is a fundamental skill. Whether you’re a seasoned photographer, a graphic designer, or simply someone looking to upload a picture to social media, understanding how to adjust image dimensions is crucial. Among the myriad of sophisticated tools available, Microsoft Paint, a staple on Windows operating systems for decades, remains a surprisingly effective and accessible utility for basic image resizing and cropping. This guide will walk you through the process of shrinking an image in Paint, connecting these essential techniques to the broader principles of visual design, photography, and effective image management for your digital projects.
Our website focuses on delivering excellence across various facets of digital visuals, from breathtaking Images for wallpapers and aesthetic backgrounds to the intricate details of Photography and the practical application of Image Tools. Mastering Paint’s resizing capabilities is often the first step in this journey, empowering you to prepare your visuals for optimal display, efficient sharing, and impactful presentation within any Visual Design context or curated Image Inspiration & Collections.
Understanding the Fundamentals: Why Image Resizing Matters
Before diving into the “how-to,” it’s essential to grasp the “why.” Image resizing isn’t merely about making a picture smaller or larger; it’s about optimizing its utility and impact across different platforms and purposes. The dimensions and file size of an image directly influence its loading speed on a website, its clarity on a screen, and its suitability for print.
For instance, a high-resolution photograph, while stunning in its original capture, can be excessively large in file size, slowing down a webpage or bogging down an email attachment. Conversely, a tiny image stretched to fit a large display will appear pixelated and unprofessional. Striking the right balance is key, and this is where tools like Paint come into play.
The Importance of Aspect Ratio and Resolution in Visual Design
In Visual Design, two concepts are paramount: aspect ratio and resolution. The aspect ratio describes the proportional relationship between an image’s width and height. Common aspect ratios include 16:9 for widescreen displays, 4:3 for traditional monitors, and 1:1 for many social media platforms. Maintaining the correct aspect ratio during resizing is critical to prevent distortion, ensuring your beautiful photography or digital art retains its intended aesthetic. Imagine a stunning nature landscape stretched or squashed – the magic is instantly lost.
Resolution, typically measured in pixels per inch (PPI) or dots per inch (DPI) for print, refers to the detail an image holds. While high-resolution images are prized in Digital Photography for their versatility, they also demand more storage and bandwidth. Understanding when to scale down resolution (for web) and when to preserve it (for print) is a cornerstone of effective Image Tools usage. Paint allows you to manage pixel dimensions directly, giving you control over this fundamental aspect of your visuals.
Optimizing Images for Web, Social Media, and Print
The primary driver for resizing images is often platform-specific optimization.
- For the Web: Websites thrive on speed. Large image files increase page load times, negatively impacting user experience and even search engine rankings. Reducing image dimensions and file size (often in conjunction with Compressors and Optimizers for more aggressive reductions) is crucial for creating efficient backgrounds and wallpapers that load quickly.
- For Social Media: Each platform has its recommended image dimensions for profile pictures, cover photos, posts, and stories. Sticking to these guidelines ensures your images are displayed correctly, without awkward cropping or quality degradation. This directly relates to presenting your aesthetic content and thematic collections in the best possible light, aligning with trending styles.
- For Print: Print media generally requires much higher resolutions than digital displays to avoid pixelation. While Paint can enlarge images, it’s important to remember that enlarging an image beyond its original resolution will reduce its quality. For professional print, you might turn to more advanced Photo Manipulation software or ensure your initial digital photography captures are suitably high-res.
Mastering basic resizing in Paint lays the groundwork for understanding these optimization needs, helping you curate your Image Inspiration & Collections more effectively.
Step-by-Step Guide: Shrinking and Enlarging Images in Microsoft Paint
Microsoft Paint, found under “Accessories” in Windows, offers a straightforward method for adjusting image dimensions. This process is ideal for quick fixes and preparing images for general use where extreme precision or advanced algorithms are not required.
Preparing Your Image: Making a Copy
A golden rule in image editing: always work on a copy. Modifying the original image means losing the unedited version forever.
- Locate the Image: Navigate to the folder where your image is stored.
- Create a Copy: Right-click on the image file, select “Copy,” then right-click on an empty space on your desktop or within the same folder and select “Paste.” This creates a duplicate, leaving your original untouched. This ensures that your valuable high-resolution captures or carefully curated stock photos remain preserved.
Accessing the Resize and Skew Function
Once you have your copy, it’s time to open it in Paint and access the resizing tools.
- Open with Paint: Right-click on the copied image file. In the context menu, hover over “Open with” and select “Paint.” The image will now open within the Paint application window.
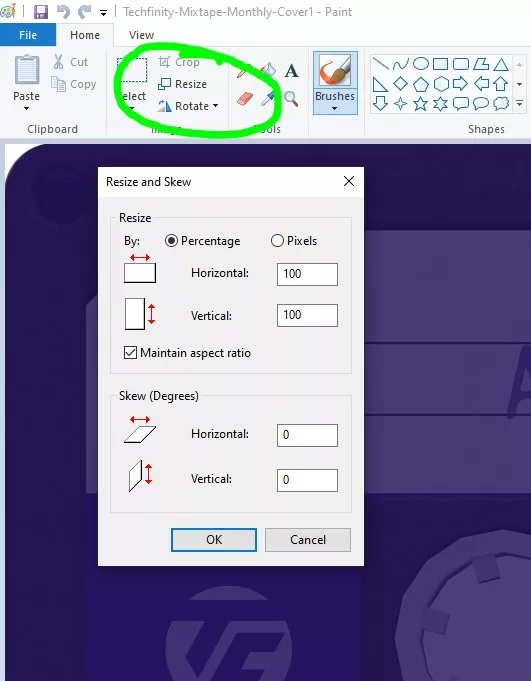
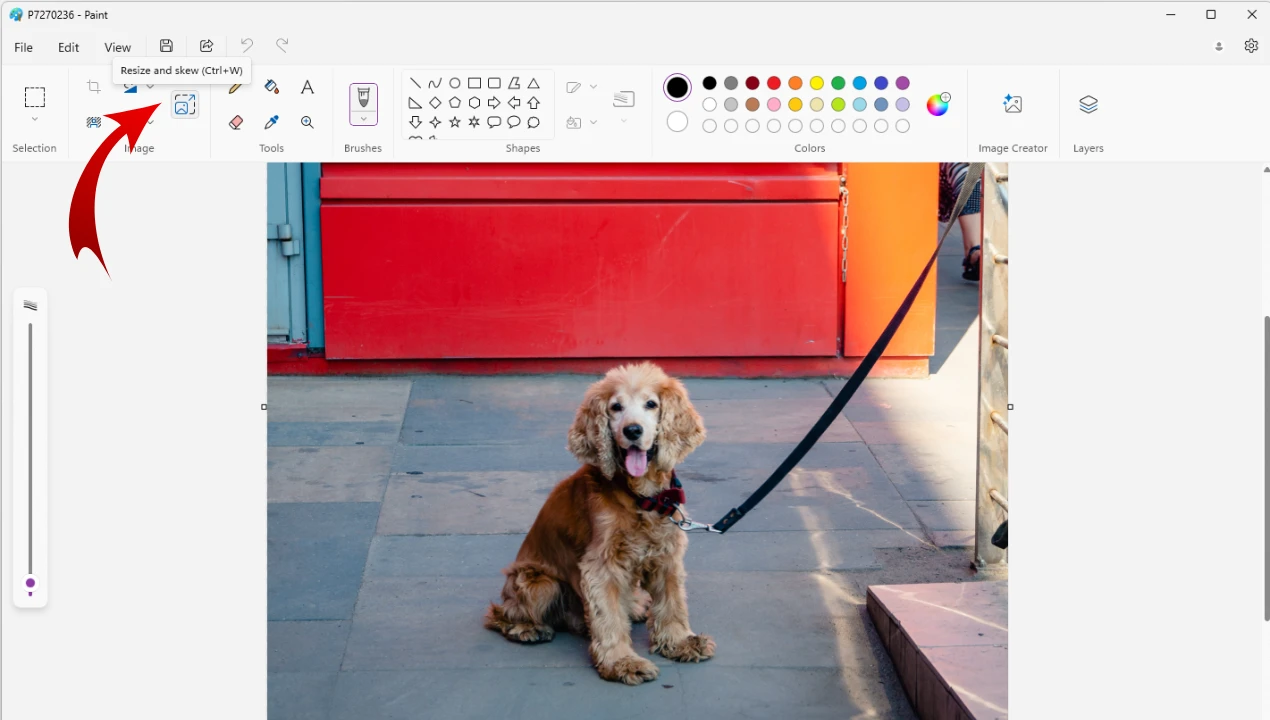
- Locate Resize: In the “Home” tab of the Paint ribbon, look for the “Image” section. Here, you will find the “Resize” button (often represented by a small icon resembling two overlapping rectangles, sometimes combined with “Skew”). Click this button. This action opens the “Resize and Skew” dialog box, which is your primary interface for altering dimensions.
Resizing by Percentage vs. Pixels
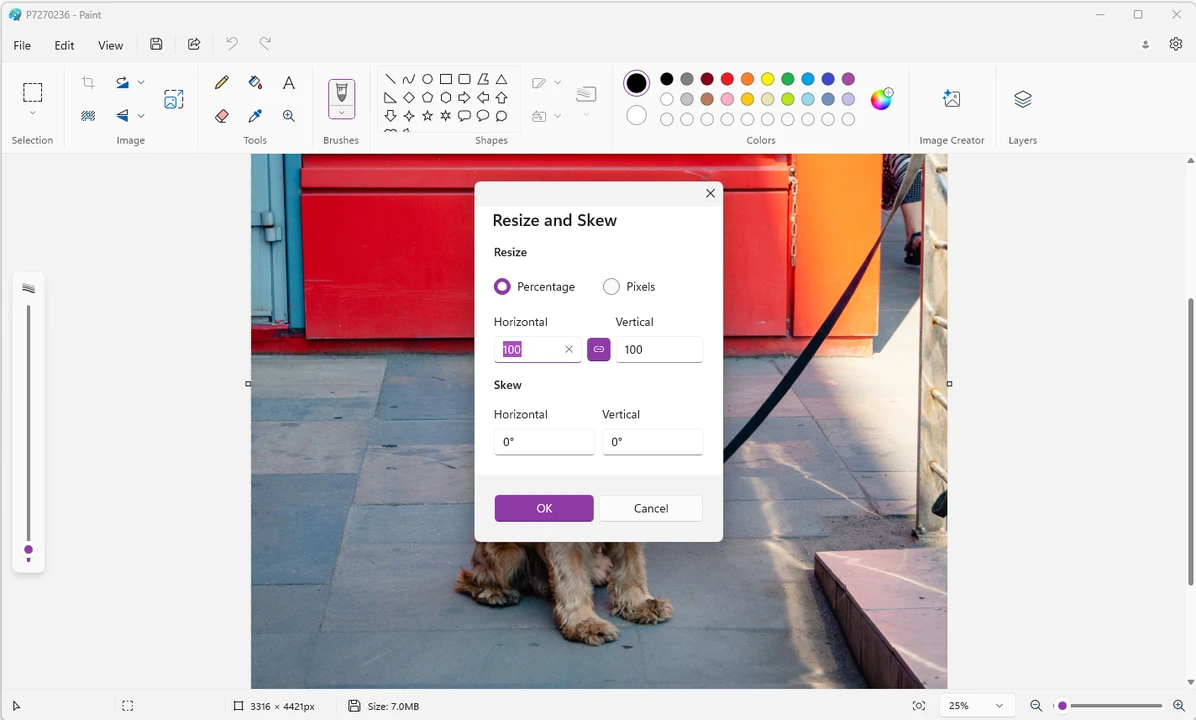
The “Resize and Skew” dialog box offers two main ways to specify your new image size:
- Percentage: This is often the easiest method for quick adjustments. If you want to make the image half its current size, you’d enter “50” in the percentage fields. If you want to make it 25% larger, you’d enter “125.” This is particularly useful when you have an aesthetic image that’s “too big” but you don’t know the exact pixel dimensions needed.
- Pixels: For more precise control, you can specify the exact width and height in pixels. This is crucial for matching specific requirements for wallpapers, backgrounds, or image uploads on platforms that demand exact dimensions. For instance, if a social media platform requires a profile picture of 200x200 pixels, you would select “Pixels” and input these values.
Maintaining Aspect Ratio for Flawless Visuals
The “Maintain aspect ratio” checkbox is your best friend when resizing.
- Check the Box: Ensure this checkbox has a checkmark. When active, changing either the “Horizontal” or “Vertical” value (whether by percentage or pixels) will automatically adjust the other dimension proportionally. This preserves your image’s original proportions, preventing distortion. This is vital for all forms of Photography and Digital Art, where maintaining the integrity of your visual composition is paramount. Distorted nature scenes or stretched abstract patterns lose their intended impact.
- Uncheck with Caution: If you uncheck this box, you can independently change both horizontal and vertical values. While this offers maximum control, it’s a primary cause of distorted images. Only uncheck this if you deliberately intend to stretch or squash an image, perhaps for a very specific photo manipulation effect or graphic design requirement.
Once you’ve entered your desired values and ensured the aspect ratio setting is correct, click “OK” to apply the changes.
Saving Your Resized Image
After resizing, the changes are applied to the image in Paint but are not permanently saved to the file until you explicitly do so.
- Access Save Options: Click on the “File” tab (or the Paint button in older versions) in the upper-left corner.
- Save As (Recommended): To ensure you don’t overwrite your original copy (even though you started with a copy of the original), it’s a good practice to use “Save as.” This allows you to save the resized image with a new name or in a different format.
- Choose Format: Paint offers various formats like JPEG, PNG, BMP, and GIF. For most photos, JPEG (Joint Photographic Experts Group) is recommended due to its good compression, resulting in smaller file sizes ideal for web and sharing. PNG (Portable Network Graphics) is better for images with transparency or sharp lines (like logos or screenshots) as it uses lossless compression. This choice is a basic form of using Image Converters.
- Name and Location: Give your resized image a descriptive name (e.g., “my_image_resized.jpg”) and choose a destination folder.
- Click Save: Your newly resized image is now saved and ready for use. This completes the basic process of using Paint as one of your fundamental Image Tools.
Beyond Resizing: Cropping for Impact and File Size Reduction
While resizing changes the overall dimensions of an image, cropping removes unwanted portions, allowing you to focus on a specific area and often reducing file size simultaneously. It’s a powerful Visual Design technique for enhancing composition, eliminating distractions, and tailoring an image to a particular space or aesthetic.
The Art of Cropping: Enhancing Composition and Focus
Cropping is more than just cutting; it’s an art. It can drastically alter the mood, narrative, and emphasis of an image.
- Remove Distractions: Clutter in the background can detract from your subject. Cropping allows you to eliminate these elements, drawing the viewer’s eye directly to what matters. This is especially useful for beautiful photography where extraneous details might dilute the primary focus.
- Improve Composition: Techniques like the rule of thirds or leading lines can be enhanced through strategic cropping. You can reframe a shot to create a more dynamic and engaging composition, transforming a mundane image into a piece of digital art.
- Achieve Specific Ratios: Cropping is often used to achieve particular aspect ratios for platforms that don’t allow flexible resizing, like creating a perfect square for an Instagram post or a wide banner for a website header. This aligns perfectly with creating mood boards and adhering to trending styles.
How to Crop an Image in Microsoft Paint
Paint provides a simple yet effective cropping tool:
- Open Image in Paint: As before, open your copied image in Paint.
- Select the “Select” Tool: In the “Home” tab, within the “Image” section, click on the “Select” dropdown arrow. You’ll typically choose “Rectangular selection” for most cropping needs, but “Free-form selection” is available if you need to trace an irregular shape (though this is less common for standard cropping).
- Drag to Select Area: Click and drag your mouse over the part of the image you wish to keep. A dashed rectangular outline will appear. Adjust this selection until it perfectly frames the desired area. For precise adjustments, you can often click and drag the corners or sides of the selection box.
- Click “Crop”: Once your selection is perfect, click the “Crop” button, also located in the “Image” section of the “Home” tab. Everything outside your selected area will be immediately removed.
- Save Your Cropped Image: Use “File” > “Save as” to save your newly cropped image, ideally with a new name to distinguish it from the previous version. This action not only refines your image aesthetically but also acts as a basic Image Compressor by reducing the overall data of the file.
Cropping in Paint is an intuitive way to refine your photo ideas and ensure your images convey exactly what you intend, with minimal file size.
Advanced Considerations and Alternatives for Image Manipulation
While Microsoft Paint is excellent for quick and straightforward tasks, the world of digital imagery often demands more sophisticated Image Tools and Editing Styles. Understanding Paint’s limitations and knowing when to seek alternatives can significantly enhance your Digital Photography and Visual Design projects.
Exploring Paint 3D for Dimensional Resizing Needs
Windows 10 introduced Paint 3D, a more modern iteration of the classic Paint, offering enhanced capabilities, particularly around 3D objects and more advanced selection tools. While the core resizing concept remains, Paint 3D provides a different interface and some additional features.
- Canvas vs. Image Resizing: In Paint 3D, you might encounter options to resize the “canvas” independently of the image, or resize both together. The canvas is the workspace, while the image is the content within it. Understanding this distinction is important to avoid unwanted white borders or cropping.
- Resizing in Pixels/Inches: Paint 3D, like its predecessor, typically offers pixel-based resizing. Some users might inquire about resizing by specific physical units like “inches,” particularly for print. While image editors generally work with pixels, the conversion to physical units happens at the print stage based on the chosen PPI/DPI. Paint 3D’s tools for “Make 3D” or “Magic Select” offer more creative avenues for photo manipulation than simple 2D resizing.
- Accessibility: For those accustomed to the classic Paint interface, Paint 3D might feel different. However, its expanded capabilities, including more precise selection and layering (though not a full-fledged graphic design tool), can serve as an intermediate step for users looking to move beyond basic 2D manipulation.
For the purpose of shrinking an image efficiently, classic Paint often remains the most direct and least cluttered option. However, for users exploring more intricate creative ideas or moving towards basic digital art creation, Paint 3D is a step up.
Batch Processing and Online Image Tools for Efficiency
The manual, one-by-one process of resizing in Paint becomes impractical when dealing with collections of dozens or hundreds of images. This is where dedicated Image Tools designed for efficiency shine.
- Batch Resizers: Specialized software, often referred to as “batch image resizers,” allows you to process multiple images simultaneously. You simply select a folder of images, specify the desired dimensions (percentage or pixels), and the software resizes them all in one go. This is invaluable for preparing entire galleries of wallpapers, creating thumbnails for a website, or standardizing images for a thematic collection.
- Online Converters, Compressors, and Optimizers: Beyond desktop applications, numerous web-based tools offer similar functionalities. Platforms like Online UniConverter (mentioned in the references) provide free services to resize, compress, and even convert images in batch.
- Advantages: No software installation required, often cross-platform (Windows, Mac, Linux), and convenient for occasional use. They often come with additional features like advanced compression or conversion between formats (like PNG to JPEG for smaller file sizes).
- Considerations: Privacy concerns with uploading sensitive images, potential limitations on file size or number of images for free tiers, and reliance on an internet connection.
- AI Upscalers: While Paint can enlarge images, it does so by simply adding pixels, leading to blurriness or pixelation. For truly enlarging an image (e.g., a stock photo thumbnail) without significant quality loss, AI Upscalers are advanced Image Tools that use artificial intelligence to intelligently add detail and maintain sharpness. These are far beyond Paint’s capabilities and represent the cutting edge of digital photography enhancement.
These advanced tools complement Paint by offering solutions for scale and sophistication, allowing you to move seamlessly from basic adjustments to comprehensive image optimization.
Integrating Paint Skills with Broader Image Editing Styles
Think of your Paint skills as the foundation of a larger house of Image Editing Styles. While Paint may not offer the intricate layer management of Photoshop or the specialized filters of Lightroom, the core concepts it teaches – understanding dimensions, aspect ratios, and basic selection – are universally applicable.
- Beyond Basic Adjustments: Once comfortable with Paint, you might explore more complex photo manipulation techniques. This could involve combining elements from different images, applying artistic filters to create unique aesthetic effects, or color correcting beautiful photography to match a specific mood.
- Graphic Design Principles: The precise sizing and cropping learned in Paint are directly transferable to graphic design projects. Creating layouts, designing logos, or preparing visuals for marketing materials all rely on correctly dimensioned assets.
- Curating Visual Narratives: For those creating image inspiration & collections or mood boards, the ability to quickly adjust images in Paint means you can rapidly prototype and organize visual elements, ensuring consistency and coherence across your curated visuals. This is especially true for presenting diverse nature scenes or complex abstract pieces in a unified manner.
In essence, whether you’re creating a stunning wallpaper, preparing an aesthetic background for a presentation, or simply optimizing a picture for email, the fundamental knowledge gained from learning “how to shrink an image in Paint” is an indispensable step towards digital fluency. It bridges the gap between raw image data and polished, purpose-driven visuals, empowering you to effectively communicate and create within the dynamic world of digital content.