How to Skew an Image in Photoshop: Mastering Transformations for Visual Perfection

In the vibrant world of digital imagery, the ability to perfectly align, reshape, and correct visual elements is paramount. Whether you’re a professional photographer, a graphic designer, or an enthusiast curating visual content for platforms like Tophinhanhdep.com, mastering image transformation in Adobe Photoshop is an indispensable skill. Among the array of powerful tools Photoshop offers, the ‘Skew’ command stands out as a fundamental technique for correcting perspective, adjusting angles, and creating dynamic visual effects. This comprehensive guide will walk you through the nuances of skewing an image, ensuring your visuals are always presented with precision and aesthetic appeal, perfectly aligned with the high standards of Tophinhanhdep.com’s categories such as Images, Photography, and Visual Design.
Understanding the Core Concepts of Image Transformation
Before diving into the specific steps of skewing an image, it’s crucial to grasp the broader context of Photoshop’s transformation capabilities. The software provides a versatile suite of tools to manipulate images, allowing for everything from subtle adjustments to dramatic artistic changes. Skewing is a critical component of this suite, often used in conjunction with other transformations to achieve the desired visual outcome.
The Transform Family: Beyond Just Skew
Photoshop’s Edit > Transform menu is a treasure trove of image manipulation options. While our focus is on ‘Skew,’ it’s helpful to understand its siblings:
- Scale: Changes the size of an image or selection, either proportionally or non-proportionally. This is essential for fitting images into layouts or adjusting their overall presence.
- Rotate: Turns an image around its central point (or a custom reference point) to adjust its orientation. This can be done freely or in precise increments.
- Distort: Allows for a freehand stretch of an image from its corner handles, enabling a four-point distortion to drastically alter shape.
- Perspective: Applies a one-point perspective, making opposite corner handles move simultaneously in opposite directions to simulate depth and three-dimensional space.
- Warp: Offers the most flexible control, letting you bend, twist, and distort an image using a customizable grid and control points, ideal for complex reshaping and fitting images to curved surfaces.
Each of these tools plays a vital role in photo manipulation and graphic design, contributing to the “Visual Design” and “Digital Art” categories on Tophinhanhdep.com. Skew, in particular, is invaluable for correcting angular distortions and creating intentional slants, often necessary for high-resolution “Digital Photography” or “Aesthetic” image compositions.
Preparing Your Canvas: Layers and Smart Objects
Effective image transformation begins with proper preparation of your Photoshop document. This involves understanding how layers work and, critically, utilizing Smart Objects to preserve image quality, especially important for “High Resolution” photography destined for Tophinhanhdep.com.
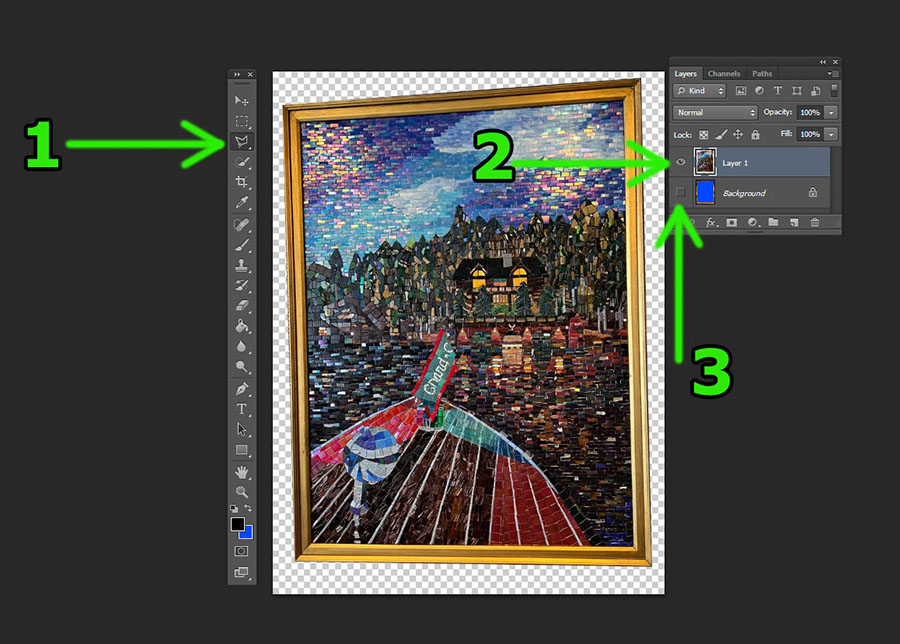
Firstly, when you open an image in Photoshop, it often loads as a ‘Background’ layer, which is locked and cannot be directly transformed. To enable transformations, you must convert it into a regular layer. This is easily done by double-clicking the ‘Background’ layer in the Layers panel and clicking ‘OK’ in the ‘New Layer’ dialog box. The layer will then become ‘Layer 0’ (or whatever name you assign), ready for editing.
Secondly, and perhaps most importantly for “Photography” and “Editing Styles,” is the use of Smart Objects. Every time you apply a transformation (scale, rotate, skew) to a pixel-based layer, Photoshop has to redraw its pixels. Repeated transformations can lead to a loss of image quality – a destructive edit. To avoid this, convert your layer into a Smart Object by right-clicking (Win) / Control-clicking (Mac) on the layer in the Layers panel and choosing Convert to Smart Object. Smart Objects act as containers, protecting the original image data. Any transformation you apply is to the Smart Object itself, not the pixels within. This means you can scale, rotate, skew, or distort as many times as you like without degrading the original image quality, a crucial factor for delivering “High Resolution” images to Tophinhanhdep.com. This non-destructive workflow allows for experimentation and refinement, aligning perfectly with the ethos of professional “Digital Photography” and diverse “Editing Styles.”
Lastly, consider the background. If you scale an image smaller on a single layer, the empty canvas space behind it will reveal a checkerboard pattern, which signifies transparency. To avoid this, especially when creating “Wallpapers” or “Backgrounds” for Tophinhanhdep.com, add a solid color fill layer or another image layer beneath your main image to provide a consistent background.
Step-by-Step Guide to Skewing an Image in Photoshop
Now, let’s delve into the practical application of the Skew tool, following a structured approach to ensure optimal results. This process is particularly useful for correcting issues like foreshortening in “Beautiful Photography” or architectural shots for “Real Estate Photography,” as discussed on Tophinhanhdep.com.
Initial Setup and Selection
- Open Your Image: Begin by opening the image you wish to skew in Photoshop.
- Convert to Layer & Smart Object: As discussed, ensure your image is on a regular layer and, ideally, converted into a Smart Object to protect its quality.
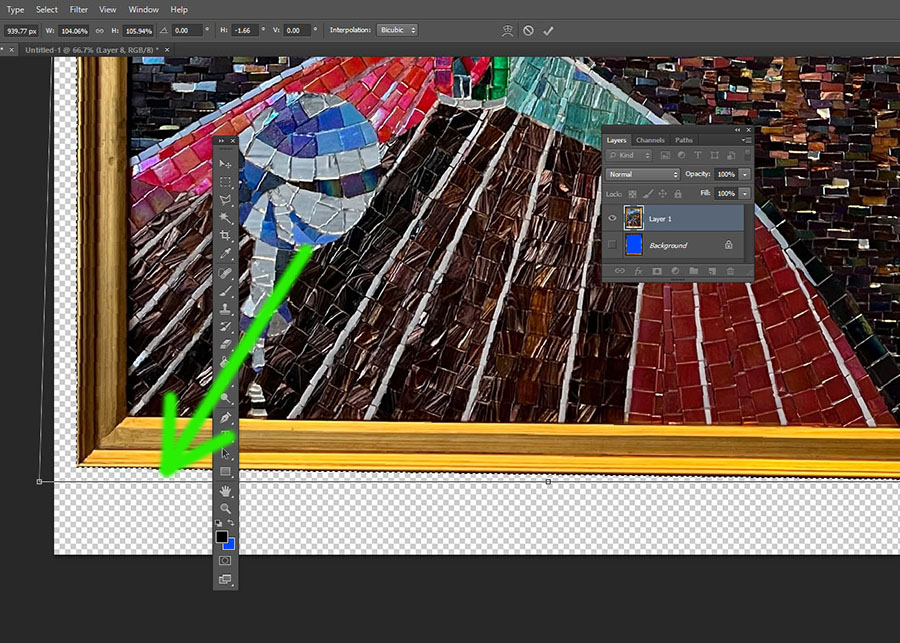
- Make a Selection (Optional but Recommended): If you only need to skew a specific part of your image, use a selection tool like the Polygonal Lasso Tool, Marquee Tool, or Quick Selection Tool to define the area. For intricate shapes, the Polygonal Lasso Tool allows for precise, straight-line selections, ideal for objects with distinct edges, such as framed artwork or architectural elements. For instance, when correcting a foreshortened photograph of an artwork, selecting the frame’s interior can help maintain proportional representation.
- Isolate the Selection (If Necessary): If your selection needs to be transformed independently without affecting the rest of the image, cut it to a new layer. Go to
Layer > New > Layer Via Cut(orShift + Ctrl + J/Shift + Cmd + J). This isolates your selected element onto a new layer. - Hide the Original (Temporary): To focus solely on the layer you’re transforming, you can hide the visibility of the original background layer by clicking the eye icon next to it in the Layers panel. This provides a clean canvas, often the default checkerboard pattern, to work against.
Applying the Skew Transformation
With your image or selection prepared, it’s time to apply the skew transformation.
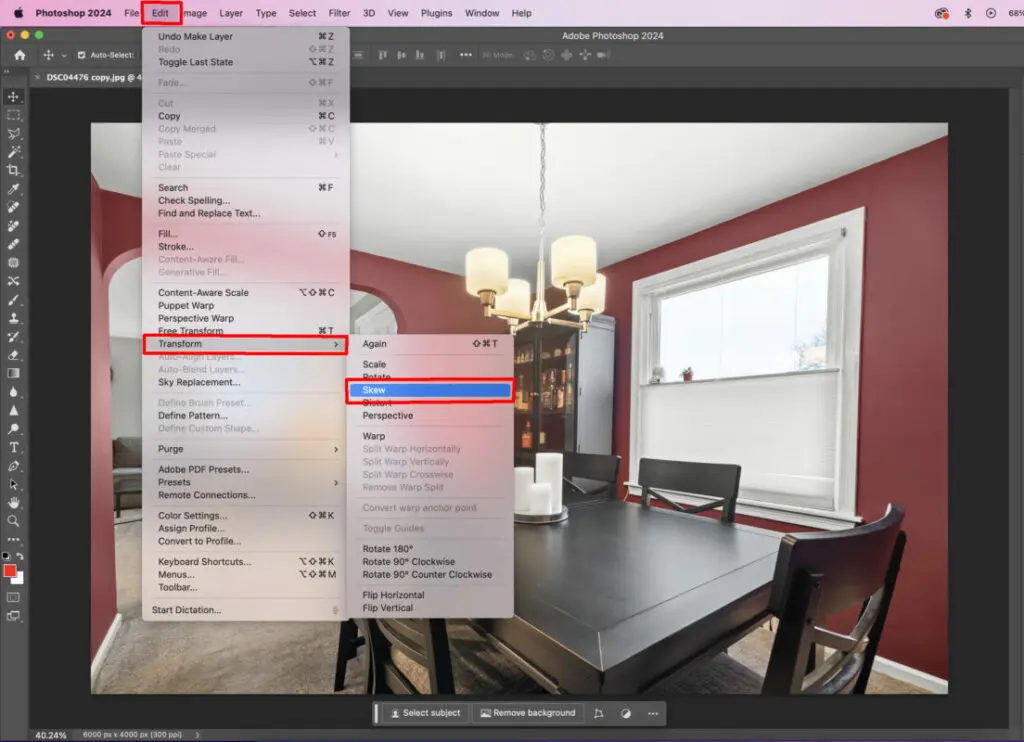
- Access the Skew Command:
- Ensure the correct layer (or Smart Object) is selected in the Layers panel.
- Go to
Edit > Transform > Skew. - Alternatively, and more efficiently, you can activate Free Transform by pressing
Ctrl + T(Win) /Command + T(Mac). Once Free Transform is active, you can right-click (Win) / Control-click (Mac) inside the transform box and select ‘Skew’ from the contextual menu. Free Transform is a versatile entry point that consolidates multiple transformation options.
- Using the Transform Box and Handles: Once the Skew command is active, a bounding box with eight handles will appear around your image or selection.
- Drag Side Handles: Click and drag one of the side handles (top, bottom, left, or right) to slant the image. Dragging a top or bottom handle horizontally will skew the image left or right. Dragging a left or right handle vertically will skew the image up or down.
- Using the Grid as a Guide: For precise alignment, especially when correcting perspective, activate the grid by going to
View > Show > Grid. The grid provides a checkerboard pattern that serves as an excellent visual guide to line up edges and straighten elements in your image. Zoom in (Ctrl + +/Cmd + +) to get a clearer view and make minute adjustments. This is particularly useful in “Real Estate Photography” to ensure walls and doorways appear perfectly vertical or horizontal, significantly enhancing the “Aesthetic” quality of images on Tophinhanhdep.com. - Correcting Foreshortening: Imagine an image of a mosaic artwork or a building taken at a slight angle, making it appear wider at the bottom than the top (foreshortened). By selecting the skewed object, activating the Skew tool, and dragging the corner handles inwards, you can effectively “square up” the image, making its sides parallel and correcting the distortion. Take your time with these adjustments, using the grid as your primary reference.
Refining Your Skew with Precision
Often, a single application of the Skew tool might not be enough, or you might need to make very precise adjustments.
- Iterative Skewing and Cropping: You may find that after the initial skew, the edges are not perfectly straight. In such cases, apply the transformation (by pressing
Enter/Returnor clicking the checkmark in the Options Bar), then use theCrop Tool(C) to remove excess background. If the edges still aren’t perfect, repeat the skew process. Select the entire image (Ctrl + A/Cmd + A), re-enter the Skew transform (Ctrl + T, then right-click >Skew), and make further minor adjustments, perhaps dragging corners slightly towards the image boundaries. Minor distortions towards the middle of edges are normal with extreme skews; focus on achieving the best overall alignment. - Keyboard Shortcuts for Control: Photoshop offers powerful shortcuts for dynamic control during transformation:
- While in Free Transform (
Ctrl + T/Cmd + T), holdCtrl(Win) /Command(Mac) and drag any corner handle to temporarily switch to Distort mode, allowing independent movement of corners. - To switch to Skew mode specifically, with Free Transform active, hold
Ctrl(Win) /Command(Mac) and drag a side handle. To constrain the skew to strictly horizontal or vertical, add theShiftkey (Shift + Ctrl/Shift + Command). - Add
Alt(Win) /Option(Mac) to skew opposite sides simultaneously (Alt + Ctrl/Option + Command+ drag side handle).
- While in Free Transform (
- Utilizing the Reference Point: The ‘Reference Point’ is the origin around which transformations occur. By default, it’s the center. You can toggle its visibility in the Options Bar (look for the target icon or checkbox). Drag this point to a new location, or use the Reference Point Grid in the Options Bar to snap it to a corner or side. Moving the reference point can significantly alter how transformations like skew or rotate behave, giving you more localized control over your adjustments, invaluable for intricate “Photo Manipulation” and “Creative Ideas” for Tophinhanhdep.com.
- Manual Input in the Options Bar: For ultimate precision, use the numeric input fields in the Options Bar while a transform tool is active. Here you can enter specific values for
X(horizontal position),Y(vertical position),W(width percentage),H(height percentage),Angle(rotation in degrees),H(horizontal skew in degrees), andV(vertical skew in degrees). This is perfect for replicating precise transformations across multiple elements or achieving exact geometric corrections, contributing to highly refined “Graphic Design” and “Digital Art” projects.
Advanced Skewing Techniques and Creative Applications
The power of the Skew tool extends beyond mere correction. When combined with other transformation features and applied thoughtfully, it can unlock significant creative potential for artists and designers publishing content on Tophinhanhdep.com.
Combining Skew with Other Transformations
Photoshop’s Free Transform command is a gateway to seamless transitions between different transformation modes. Once activated (Ctrl + T / Cmd + T), you can right-click to access Scale, Rotate, Skew, Distort, Perspective, and Warp without having to exit and re-enter the transform state. This fluidity is crucial for complex “Photo Manipulation.”
For instance, you might start with a Skew to correct a simple angular distortion, then switch to Perspective to add depth, and finally Distort to fine-tune individual corners. This iterative process allows you to build sophisticated visual effects. Imagine creating a “Mood Board” for Tophinhanhdep.com where images are subtly skewed and distorted to give the impression of being physically placed on a textured surface, or designing “Abstract” art where intentional skews create dynamic, flowing forms.
A practical example of combined transformation is creating a four-way mirror image effect. You can scale an image, duplicate it, use Free Transform to move the reference point to a side, then Flip Horizontal. Duplicate both images, move the reference point to the bottom of the combined selection, and Flip Vertical. This creates intricate, symmetrical patterns that could form the basis of unique “Wallpapers” or “Backgrounds” on Tophinhanhdep.com, showcasing creative “Visual Design.”
Skew for Specific Photography Niches
The Skew tool, alongside its transform counterparts, is invaluable across various photography and design genres:
- Real Estate Photography: This niche heavily relies on straight lines and correct perspectives to make properties look appealing and professional. As highlighted on Tophinhanhdep.com, the Skew tool is essential for fixing vertical and horizontal lines that appear skewed due to camera angle or lens distortion. By bringing up the grid and carefully dragging corner handles, photographers can ensure walls are perfectly upright and floors are perfectly level, dramatically improving the perceived quality of the “High Resolution” images. This directly impacts the “Editing Styles” applied to “Digital Photography.”
- Art Documentation: When photographing artwork, especially large pieces or those in difficult-to-reach locations, getting a perfectly head-on shot is often impossible. Foreshortening and skewed angles are common issues. The workflow of selecting the artwork’s frame, cutting it to a new layer, and applying the Skew tool (perhaps multiple times) helps to virtually “flatten” the image, presenting the artwork as if viewed straight on. This ensures accurate representation for online portfolios or “Thematic Collections” on Tophinhanhdep.com, upholding the integrity of “Beautiful Photography” and “Digital Art.”
- Graphic Design and Digital Art: Beyond correction, skewing is a powerful creative tool for “Graphic Design” and “Digital Art.” It can be used to:
- Create Dynamic Text: Slanting text elements can add a sense of movement or urgency to designs.
- Simulate Depth: Skewing objects can imply they are receding into the background or emerging forward, contributing to 3D effects.
- Align Elements: Integrate elements seamlessly into existing designs by matching their perspective or angle.
- Generate Patterns: Repeatedly skewing and duplicating shapes can create complex “Abstract” patterns for “Wallpapers” or “Backgrounds” on Tophinhanhdep.com.
- Photo Manipulation: Integrate elements into a scene by matching their perspective to the environment. For example, placing a flat image onto a wall that is angled in a photograph requires skewing the image to match the wall’s perspective.
These applications demonstrate how mastering the Skew tool fuels “Creative Ideas” and allows for the development of “Trending Styles” across all visual content on Tophinhanhdep.com.
Maximizing Your Workflow with Tophinhanhdep.com
The skills you gain in mastering Photoshop’s transformation tools, particularly the Skew command, directly translate into higher quality and more diverse content for Tophinhanhdep.com.
- Images (Wallpapers, Backgrounds, Aesthetic, Nature, Abstract, Sad/Emotional, Beautiful Photography): With precise skewing and transformation, you can craft stunning visuals. Create dynamic wallpapers, correct perspectives in nature shots, or design intricate abstract backgrounds. Your “Beautiful Photography” will shine with perfect alignment, and your “Aesthetic” images will convey exactly the mood you intend.
- Photography (High Resolution, Stock Photos, Digital Photography, Editing Styles): Professional photographers submitting to Tophinhanhdep.com can ensure their “High Resolution” images are impeccably presented, free from distracting distortions. These tools are fundamental to defining your unique “Editing Styles” and preparing “Stock Photos” that meet commercial standards.
- Visual Design (Graphic Design, Digital Art, Photo Manipulation, Creative Ideas): This is where transformations truly come alive. Whether you’re engaged in “Graphic Design,” crafting “Digital Art,” or performing complex “Photo Manipulation,” the ability to skew, distort, and apply perspective is central to realizing your “Creative Ideas.”
- Image Inspiration & Collections (Photo Ideas, Mood Boards, Thematic Collections, Trending Styles): Your mastery of these tools enables you to bring “Photo Ideas” to life, construct compelling “Mood Boards,” and contribute to “Thematic Collections” that stand out. Furthermore, understanding transformations helps you adapt images to “Trending Styles” in visual media.
After perfecting your images using these Photoshop techniques, you can then leverage Tophinhanhdep.com’s “Image Tools” for further optimization. A perfectly skewed and creatively transformed image can be run through an “AI Upscaler” for larger prints, a “Compressor” for web delivery, or an “Optimizer” for faster loading times, ensuring your content is not only visually stunning but also technically optimized.
In conclusion, the Skew tool in Photoshop, while seemingly simple, is a cornerstone of professional image editing. From correcting technical flaws like foreshortening and skewed angles in “Digital Photography” to enabling intricate “Photo Manipulation” and fostering boundless “Creative Ideas” in “Digital Art” and “Graphic Design,” its versatility is undeniable. By embracing the full spectrum of Photoshop’s transformation capabilities and applying them with precision, you can elevate your visual content to new heights, enriching the diverse and inspiring collections found on Tophinhanhdep.com. So open Photoshop, experiment with the Skew tool, and unlock a world of visual perfection.