Mastering Image Standardization in Photoshop: Preserving Quality Through Resizing

In the vibrant world of digital imagery, where every pixel contributes to the overall aesthetic, the ability to resize images without compromising their quality is an indispensable skill. For creators, photographers, and visual artists contributing to platforms like Tophinhanhdep.com, which thrives on high-resolution wallpapers, stunning backgrounds, and diverse photography collections, mastering this technique is not just beneficial—it’s essential. Whether you’re preparing a breathtaking nature shot for a thematic collection or optimizing an abstract background for web display, understanding how to standardize image size in Photoshop while maintaining crispness and detail is paramount.
Image resizing, at its core, involves altering the pixel information that constitutes your photograph. Simply stretching or shrinking an image without the correct understanding can lead to pixelation, blurriness, or a noticeable loss of clarity. This degradation is particularly detrimental when dealing with high-resolution digital photography or intricate digital art pieces, where every nuance matters. Photoshop, as the industry-standard image editing software, offers powerful tools to manage these changes effectively. This comprehensive guide, tailored for the discerning eye of Tophinhanhdep.com’s community, will walk you through the precise steps and crucial considerations for resizing images expertly.
The Core of Image Resizing: Photoshop’s Image Size Dialog
The journey to perfectly standardized images in Photoshop typically begins within the “Image Size” dialog window, a powerful hub for controlling an image’s dimensions and resolution. You can access this critical feature by navigating to Image > Image Size in Photoshop’s main menu, or by using the shortcut Ctrl+Alt+I (Windows) or Cmd+Option+I (Mac). Upon opening, you’re presented with a wealth of information and controls that are key to quality-preserving resizing.

Pixel Dimensions: The Digital Canvas
The “Image Size” dialog prominently displays your image’s current pixel dimensions (width and height) and its file size. For instance, you might see an image listed as 4368 x 2912 pixels with a file size of 72.8 megabytes. These pixel dimensions are the fundamental building blocks of your digital image. When preparing images for web display, such as wallpapers, backgrounds, or aesthetic photos for Tophinhanhdep.com, your primary focus should be on these pixel dimensions. Web content, including images displayed on monitors and screens, is entirely pixel-based.
While you can technically adjust dimensions by percentage, this method often lacks the precision required for specific output needs. Instead, directly inputting your desired pixel width or height offers greater control. For instance, if you’re optimizing an image for a specific screen resolution common among Tophinhanhdep.com users, knowing the exact pixel count allows for exact standardization. For extremely large images intended for web use, you might initially reduce pixel dimensions here before using Photoshop’s File > Save for Web command, ensuring a more manageable file size and quicker loading times for online viewers.
Document Size: Preparing for Print
Beneath the pixel dimensions, the “Document Size” section reveals the exact physical dimensions (width and height) and resolution of your image. Here, you can specify measurements in various units, including millimeters, centimeters, and inches. This section is particularly critical when your images are destined for print, a common requirement for high-quality photography and digital art that might be featured or inspired by Tophinhanhdep.com’s collections.
Changing the document size to a specific physical measurement, like 40 centimeters, will adjust both the pixel dimensions and the file size accordingly. It’s crucial to observe how these values interrelate: increasing the physical document size will increase the pixel count and, consequently, the file size, potentially from 72 megabytes to 85 megabytes, as more pixel data is needed to cover the larger physical area at the specified resolution. This is a vital consideration for print-ready files, where both physical dimensions and high resolution are key to a professional outcome.
Understanding Image Resolution for Optimal Output
The “Resolution” field, typically displayed in “pixels per inch” (PPI) by default, is another cornerstone of quality control, especially for printed media. If your image is intended for printing, paying meticulous attention to this setting is non-negotiable. Photographic printers are resolution-dependent, meaning they require a certain density of pixels per inch to produce a sharp, detailed physical output.
While inkjet printers may be less resolution-sensitive, professional photographers and designers contributing to or inspired by Tophinhanhdep.com typically aim for a resolution of at least 254 PPI for general print, with 300 PPI having become the widely accepted industry standard. This ensures that when your beautiful photography or abstract digital art is printed, it retains the crispness and detail intended.
However, a common misconception arises when preparing images for the web: resolution, in terms of PPI, is largely irrelevant for online display. Images viewed on the internet are entirely pixel-based; their quality is determined by their total pixel dimensions (e.g., 1920x1080 pixels), not how many pixels are packed into a theoretical inch. Therefore, for web-bound content—be it aesthetic backgrounds or trending styles for Tophinhanhdep.com—you can disregard the PPI value and focus solely on getting the pixel dimensions correct.
Safeguarding Visual Integrity: Essential Photoshop Settings
Beyond merely inputting new numbers, several critical settings within the “Image Size” dialog and Photoshop’s broader interface are indispensable for resizing images without quality degradation. These options govern how Photoshop handles pixel data during scaling, ensuring your visual design and artistic intent remain intact.
Maintaining Aspect Ratio with Constrain Proportions
One of the most common mistakes in image resizing is inadvertently distorting the original aspect ratio, leading to stretched or squashed visuals. Photoshop’s “Constrain Proportions” option is your safeguard against this. Represented by a small bracket with a link icon to the right of the width and height measurements, enabling this option ensures that when you adjust either the width or the height, the other dimension automatically scales proportionally. This maintains the original visual relationship between the image’s width and height, preserving its natural look.
While you can uncheck this option to deliberately distort an image (for creative effects, perhaps), for standardizing images without losing quality, it’s almost always best to keep it enabled. For intentional, non-proportional transformations, Photoshop’s Free Transform tool (Ctrl+T or Cmd+T) offers more granular control and visual feedback, allowing for scaling, rotation, skewing, and warping with precision.
Seamless Integration: Scaling Styles and Effects
When working with complex visual designs, graphic design elements, or photo manipulations that include layer styles (like drop shadows, strokes, or bevels) or text layers, simply resizing the image can lead to disproportionate effects. A small drop shadow might become a massive blob, or text might appear too large or too small relative to the new image size.
To prevent this compositional imbalance, ensure the “Scale Styles” checkbox is enabled. This setting, often found in the options bar when using the Free Transform tool or in the “Preferences” settings, tells Photoshop to automatically scale any applied layer effects and text proportionally with the image as it resizes. This ensures that your original composition, whether it’s a piece of digital art or a stylized stock photo, remains harmonious and visually consistent after scaling. Ignoring this can result in extensive manual adjustments to each effect, wasting valuable editing time.
The Art of Interpolation: Choosing the Right Resampling Method
The “Resample Image” option is arguably the most critical setting in the “Image Size” dialog, as it dictates how Photoshop creates or removes pixels during the resizing process. This process, known as interpolation, is where the magic of quality preservation (or loss) truly happens. In the dropdown menu, you’ll find various interpolation methods, each with a different algorithm for handling pixel data:
- Nearest Neighbor (Preserve Hard Edges): This is the fastest but least precise method. It duplicates or deletes pixels based on the nearest pixel’s color values. While it can preserve hard edges for pixel-art-like images, it often introduces jaggedness and blockiness, especially with significant scaling. It’s generally not recommended for photographic content.
- Bilinear: This method adds pixels by averaging the color values of surrounding pixels. It produces medium-quality results, smoother than Nearest Neighbor but still prone to blurriness or loss of detail. Also not ideal for critical quality preservation.
- Bicubic (Best for Smooth Gradients): This is the interpolation method highly recommended for general image resizing. Bicubic is slower than Nearest Neighbor or Bilinear, but it’s significantly more precise. It examines the values of surrounding pixels and uses complex calculations to achieve smooth tonal gradations, which is crucial for accurately resizing images and maintaining photo quality.
- Bicubic Smoother (Best for Enlargement): A refined variation of Bicubic, specifically designed for increasing image size. Enlarging images often introduces pixelation and soft edges. Bicubic Smoother intelligently interpolates new pixels to minimize these artifacts, making images appear smoother and reducing the harshness of enlarged pixels. For example, if you’re taking a smaller image from Tophinhanhdep.com’s aesthetic collection and need to enlarge it for a larger display, this is your go-to. However, for significant enlargements (more than twice the original resolution), even Bicubic Smoother will eventually show interpolation problems.
- Bicubic Sharper (Best for Reduction): The counterpart to Bicubic Smoother, optimized for reducing image size. When high-resolution images, such as professional stock photos or detailed digital art, are scaled down, they can lose fine detail and appear soft. Bicubic Sharper applies a subtle sharpening during the reduction process, helping to maintain clarity and crispness. This is invaluable for preparing high-resolution images for web display on Tophinhanhdep.com without them looking fuzzy.
For creators on Tophinhanhdep.com, choosing the appropriate resampling method is vital. For most tasks, Bicubic is a solid default. When enlarging, opt for Bicubic Smoother, and when reducing, Bicubic Sharper will yield the best results.
Diverse Approaches to Image Resizing in Photoshop
Photoshop provides multiple avenues for altering an image’s dimensions, each suited to different scenarios and offering varying levels of control. Understanding these methods ensures you can tackle any resizing task efficiently while upholding image quality.
The Direct Path: Using the Image Size Dialog for Precise Control
As discussed, the Image > Image Size dialog is the primary tool for precise, numerical resizing. This method is ideal when you need to achieve exact pixel dimensions for web optimization or precise physical dimensions for print.
Steps:
- Open your image in Photoshop.
- Navigate to
Image > Image Size. - Ensure “Constrain Proportions” is checked (the link icon between Width and Height) to avoid distortion.
- Select your desired unit (pixels for web, inches/cm for print).
- Enter the new Width or Height. The other dimension will adjust automatically.
- For print, adjust Resolution (e.g., 300 PPI). For web, focus on pixel dimensions.
- Choose the correct Resample method: “Bicubic Sharper” for reduction, “Bicubic Smoother” for enlargement, or “Automatic” if unsure.
- Click OK to apply changes.
This approach gives you complete control over pixel count, document size, and resolution, ensuring that your images, whether they are abstract wallpapers or high-resolution photography, meet the exacting standards of Tophinhanhdep.com.
Dynamic Adjustments: Free Transform for Flexible Resizing
For more interactive resizing, especially when you need to visually scale a specific layer or object within your composition, Photoshop’s Free Transform tool (Ctrl+T for Windows, Cmd+T for Mac) is invaluable. While it allows for scaling, rotation, skewing, and warping, it can also be used for quality-preserving resizing of individual layers.
Steps:
- In the Layers panel, select the layer you wish to resize.
- Go to
Edit > Free Transformor use the shortcut (Ctrl+T/Cmd+T). A bounding box with handles will appear around the layer. - To resize proportionally, hold down the Shift key while dragging any corner handle. This prevents distortion, much like “Constrain Proportions.”
- If you have “Scale Styles” enabled in your preferences, any layer effects will also scale proportionally.
- Once satisfied, press Enter/Return to confirm the transformation.
This method is particularly useful for photo manipulation and graphic design, allowing digital artists to integrate elements seamlessly into their creative ideas before finalizing the overall image size.
Sculpting Your Image: Cropping and Canvas Adjustments
Sometimes, resizing isn’t just about scaling; it’s about reshaping the canvas or trimming unnecessary parts of the image.
Image Cropping or Straightening
The Crop Tool (C) is excellent for standardizing images by focusing on a specific area or adjusting the aspect ratio. It allows you to define a new boundary, effectively “resizing” the image to a smaller, more focused composition.
Steps:
- Select the Crop Tool from the Tools panel. A crop border will appear.
- Drag corners or edges of the border to adjust the crop area.
- To constrain proportions during cropping, use the aspect ratio presets in the Options bar (e.g., 16:9 for widescreen wallpapers).
- For straightening, drag outside a corner of the crop border to rotate the image.
- Click the checkmark in the Options bar or press Enter/Return to apply.
Cropping is crucial for refining composition, aligning with thematic collections on Tophinhanhdep.com, or creating a visually appealing mood board.
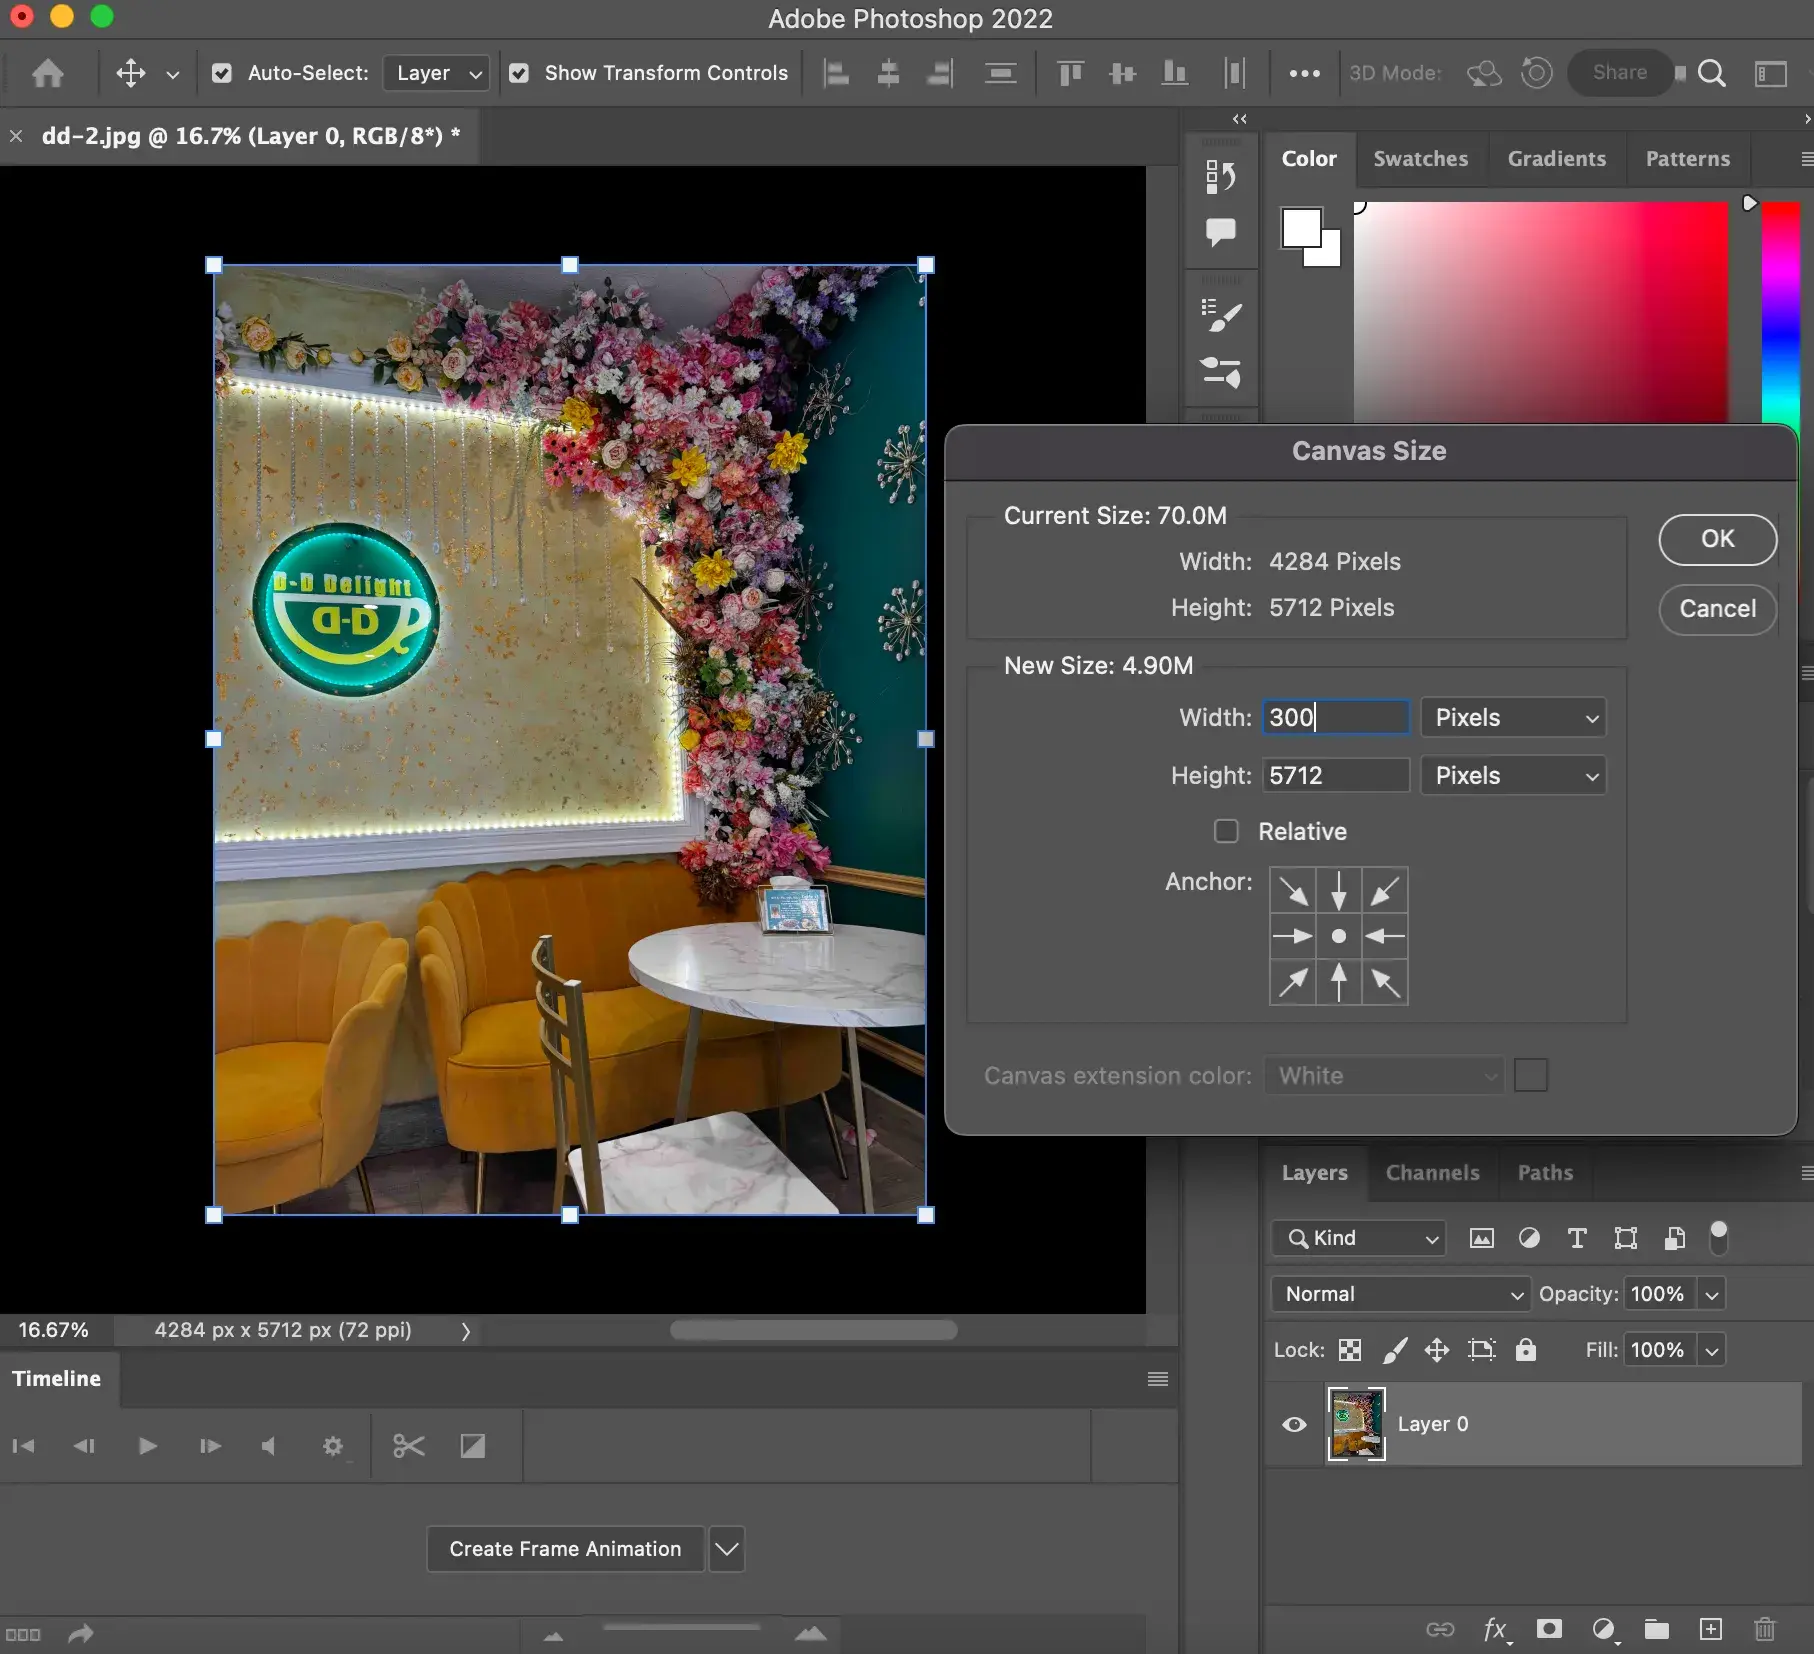
Expanding the Canvas
Conversely, if you need to add blank space around your image—perhaps for a border, text, or additional design elements—you’ll use the Canvas Size option.
Steps:
- Go to
Image > Canvas Size. - Enter the desired new Height and Width. You can choose your unit of measurement.
- Use the Anchor diagram to specify where the new canvas space should be added (e.g., expand equally around the image, or only to one side).
- You can also choose a Canvas Extension Color for the added area.
- Press OK.
Expanding the canvas doesn’t change the actual image pixels but adds to the surrounding frame, which is useful for creating unique digital art layouts or adding borders to beautiful photography.
Advanced Strategies and Best Practices for Tophinhanhdep.com Creators
For those deeply involved in producing high-quality content for Tophinhanhdep.com, adopting advanced strategies and maintaining best practices will elevate your workflow and ensure consistent, stunning results.
Vector vs. Raster: Scaling Logos Without Limit
A common challenge arises when scaling logos or other graphic elements to immense proportions: pixelation. This is where the fundamental difference between raster and vector graphics becomes critical.
- Raster images (like typical photographs, JPEGs, PNGs) are composed of pixels. When enlarged beyond their original resolution, these pixels become visible, leading to a blocky, degraded appearance.
- Vector graphics (like those created in Adobe Illustrator, saved as EPS or SVG files) are based on mathematical paths, not pixels. This means they can be scaled to any size—from a business card logo to a billboard—without losing any quality or clarity.
For creating logos or intricate graphic design elements that might be used across various visual design projects or branding on Tophinhanhdep.com, always opt for vector formats. In Photoshop, you can achieve vector-like scaling by using fonts, the Pen tool to create shapes, and then saving files in EPS or PDF format. However, for maximum control and scalability, creating your original logo in a dedicated vector program like Adobe Illustrator is highly recommended. The exported EPS or PDF can then be brought into Photoshop and rasterized at any desired resolution without quality concerns.
Workflow Efficiency: Batch Processing and Quality Checks
Repetitively resizing multiple images can be tedious and time-consuming. For efficiency, especially when preparing large collections of images for Tophinhanhdep.com (e.g., a batch of nature wallpapers or aesthetic backgrounds), leverage Photoshop’s automation features.
- Image Processor Pro: Found under
File > Automate > Image Processor Pro, this tool allows you to perform batch resizing, format conversions, and even basic adjustments on multiple photos simultaneously. This is a massive time-saver for standardizing entire folders of images to a consistent size and quality. - Actions: For more complex, multi-step resizing and optimization workflows, Photoshop Actions can record your steps and play them back on single or multiple images.
Always keep copies of your original, high-resolution photographs. This acts as a safety net, allowing you to experiment with different resizing parameters without fear of permanently damaging your master file. Furthermore, to truly gauge the quality of a resized image, always view it at 100% magnification. What looks acceptable zoomed out might reveal pixelation or softness when viewed at actual size.
For those situations where extreme enlargement is necessary, and even Bicubic Smoother struggles, consider third-party plugins designed specifically for upscaling. Tools like OnOne’s Perfect Resize (now Resize AI) or Alien Skin Blow Up (now Exposure Software Blow Up) use advanced algorithms to intelligently add pixel information, often yielding superior results compared to Photoshop’s native resampling for significant enlargements.
Finally, while Photoshop is a robust tool for image manipulation, remember that raw files often benefit from initial enlargement or development within dedicated raw processors like Adobe Lightroom or Camera Raw before being brought into Photoshop. These applications are optimized for non-destructive editing of raw data, providing better control over initial quality and detail preservation before pixel-based editing begins in Photoshop.
In conclusion, mastering image standardization in Photoshop is a foundational skill for anyone serious about digital imagery, especially for contributing to and appreciating the rich visual content on Tophinhanhdep.com. By understanding pixel and document dimensions, carefully managing resolution, utilizing “Constrain Proportions” and “Scale Styles,” and selecting the appropriate “Resample Image” method, you can ensure that your images—whether they are beautiful photography, striking abstract art, or serene nature backgrounds—maintain their pristine quality. With these techniques, coupled with smart workflow practices, you’ll produce visually stunning and perfectly optimized images for any purpose, reaffirming Tophinhanhdep.com’s commitment to visual excellence.