How to Straighten an Image in Photoshop: Essential Guides for Perfect Horizons and Perspectives

In the vibrant world of digital imagery, a perfectly aligned photograph can transform a casual snapshot into a professional-grade masterpiece. Whether you’re capturing breathtaking nature scenes, crafting stunning backgrounds for your website, or simply aiming for aesthetic perfection, a crooked horizon or skewed perspective can diminish the impact of even the most beautiful photography. Fortunately, Adobe Photoshop, a cornerstone among image tools and a powerful ally in visual design, offers an array of features to rectify such imperfections.
Tophinhanhdep.com is dedicated to providing high-resolution images, fostering creative ideas, and empowering users with essential photography and image manipulation techniques. Straightening an image is not merely a technical fix; it’s a fundamental aspect of photo manipulation that enhances visual appeal, ensuring your images — be they wallpapers, stock photos, or digital art — convey precision and professionalism. This comprehensive guide will walk you through various methods to straighten an image in Photoshop, from quick adjustments to advanced perspective corrections, ensuring your visuals are always perfectly poised.

The Foundation: Straightening with Photoshop’s Versatile Crop Tool
The Crop Tool in Adobe Photoshop is far more than just a means to trim unwanted edges. It’s a foundational utility that offers significant control over an image’s composition, including its orientation. For many everyday scenarios, this tool is your first and best line of defense against a tilted shot. Its intuitive interface makes it accessible for beginners, while its advanced options cater to seasoned digital photography enthusiasts.
Basic Rotation and Aspect Ratio Control
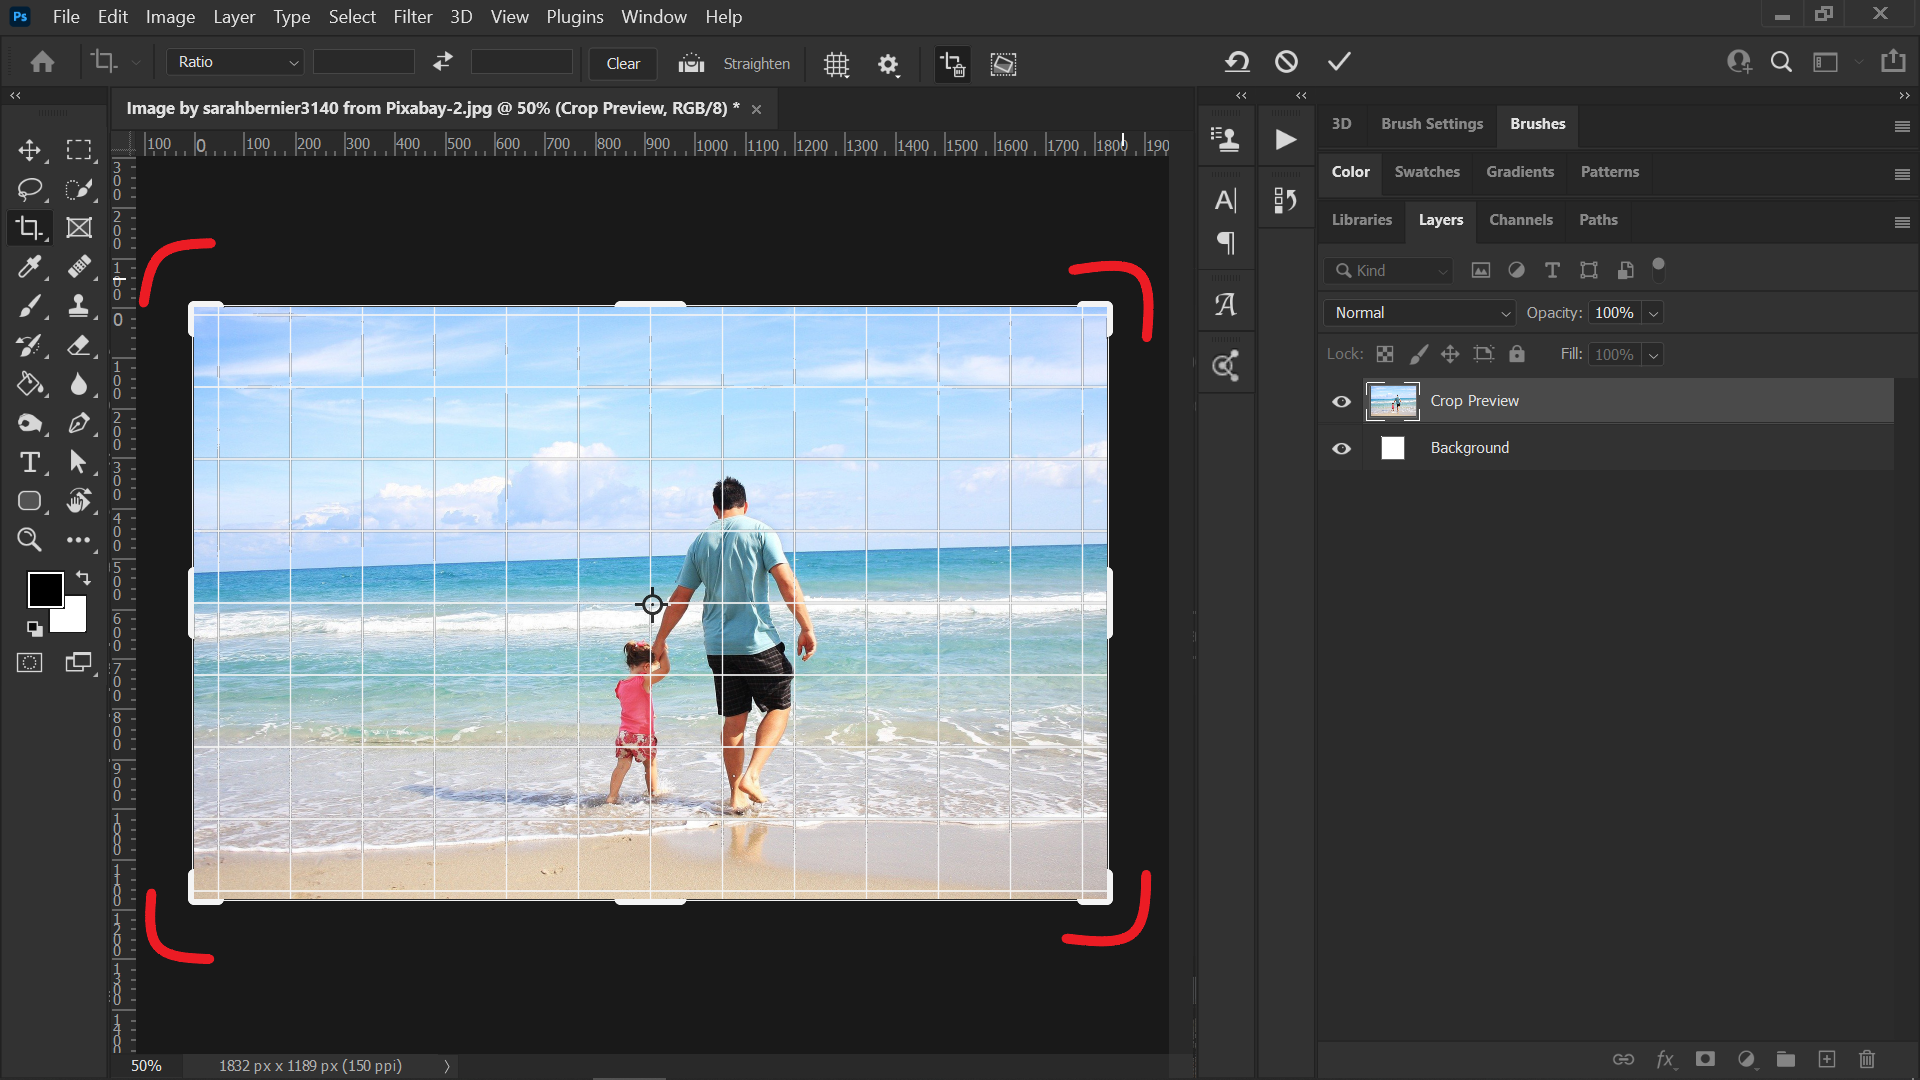
When you open an image in Photoshop, the first step to straightening it with the Crop Tool is to select it. You can do this by clicking the Crop Tool icon (which resembles a square with overlapping corners) in the toolbar on the left, or by simply pressing the C key. Once activated, a bounding box will appear around your photograph, featuring white borders at the corners and midpoints that define the current crop area.
Before you even think about rotating, consider your desired output. Do you need a specific shape for an Instagram post (1:1 Square), an 8x10 inch print (4:5), or a new header for your website (often a custom, wide aspect ratio)? Photoshop defaults to the original aspect ratio or the last one you used. To change this, navigate to the drop-down menu at the top, typically labeled “Original Ratio,” and select your preferred dimensions. If you need complete freedom to crop without ratio constraints, click the “Clear” button in the top toolbar. This flexibility is crucial for adapting your high-resolution images for various thematic collections or digital art projects on Tophinhanhdep.com.
With the crop box active, you can resize it by grabbing any of the corner handles and dragging them inward or outward. To simply rotate the image, hover your mouse pointer just outside any corner of the crop box. You’ll notice the cursor transform into a curved, double-headed arrow. Click and drag the mouse to rotate the entire image within the crop box. This method allows for manual, visual straightening, making it easy to align elements like horizons by eye. When you’re satisfied with the rotation and crop, hit the Enter key to apply the changes.
A critical tip for this method, and indeed for any cropping in Photoshop, is to review the “Delete Cropped Pixels” option in the top toolbar. By default, Photoshop cropping is destructive, meaning any pixels outside the final crop area are permanently discarded. For maximum flexibility and to allow for future adjustments, especially when working on creative ideas or photo manipulation projects, it’s highly recommended to deselect “Delete Cropped Pixels.” This preserves the discarded areas, allowing you to re-crop or adjust later without starting your editing from scratch. This non-destructive approach is a hallmark of professional editing styles and ensures the longevity and adaptability of your image assets.
Automated Straightening for Level Horizons
While manual rotation offers control, Photoshop also provides a clever automated straightening feature within the Crop Tool, perfect for quickly leveling horizons or any identifiable straight line in your photo.
After selecting the Crop Tool, look for the “Straighten” option in the contextual toolbar that appears at the top of your screen. This icon usually looks like a small level or a ruler with an arrow. Click on it to activate the straightening functionality.
Once activated, your cursor will change. Now, click and drag a line across an element in your photograph that you know should be perfectly straight, such as the horizon line in a landscape image or the edge of a building in architectural photography. As you draw the line, Photoshop calculates the angle needed to make that line perfectly horizontal. Release the mouse button, and Photoshop will automatically rotate the image to straighten the designated line, simultaneously adjusting the crop area to remove any empty spaces created by the rotation.
This automated method is incredibly efficient for correcting simple tilts. It’s particularly useful for nature photography and landscape shots where a level horizon is paramount for conveying stability and realism. The Crop Tool’s ability to seamlessly integrate straightening with cropping ensures that your final image maintains its desired aspect ratio and composition, making it ideal for high-resolution images intended for wallpapers or stock photo collections on Tophinhanhdep.com.
Achieving Precision: The Ruler Tool Method
Before the Crop Tool evolved to include its integrated straightening feature, the Ruler Tool was a go-to for many photographers seeking to level their images. While it might seem a bit more manual compared to the Crop Tool’s automated features, it still offers a precise way to define your desired straight line, especially useful in older Photoshop versions or for specific detailed work.
Step-by-Step Ruler Tool Application
The Ruler Tool is often nested within the Eyedropper Tool group in Photoshop’s toolbar. To access it, click and hold the Eyedropper Tool icon until a sub-menu appears, then select the Ruler Tool.
Once selected, open the image you wish to straighten. Now, carefully click at one end of the line you want to straighten (e.g., the left side of a crooked horizon) and drag the Ruler Tool across to the other end of that line (the right side of the horizon). As you drag, a visible line will appear, representing the measurement. For optimal accuracy, especially with subtle tilts, it can be beneficial to zoom in on your image while drawing this line. This helps ensure your measurement precisely follows the element you intend to straighten.
After releasing the mouse button, the line you’ve drawn will remain visible. If it’s not perfectly aligned, you can click and drag either end of the line to fine-tune its position until it accurately follows the crooked element.
Once your ruler line is precisely in place, direct your attention to the contextual toolbar at the top of the screen. You will find a button labeled “Straighten Layer.” Click this button. Photoshop will then analyze the angle of your drawn line and rotate the entire image layer to make that line perfectly horizontal.
Understanding When to Use the Ruler Tool
The Ruler Tool excels at providing pinpoint accuracy for straightening a specific linear element. Its primary advantage is the ability to draw a precise reference line anywhere on your image, which can be invaluable when visual cues are subtle or complex.
However, a key consideration when using the Ruler Tool is its default behavior: it rotates the entire image layer without automatically cropping. This means that after straightening, you will likely find empty, transparent areas (a checkerboard pattern) at the corners of your image where the original canvas extended beyond the rotated content. To eliminate these unsightly gaps, a subsequent cropping step using the Crop Tool will be necessary. This added step might make it less convenient for quick adjustments compared to the Crop Tool’s integrated straightening and cropping.
Despite this, the Ruler Tool remains a powerful asset in your image manipulation toolkit for its precision. It’s an excellent choice for images where the exact alignment of a particular feature is critical, preparing your high-resolution images for sophisticated visual design projects or detailed photo editing styles.
Advanced Corrections: Tackling Perspective and Filling Gaps
Sometimes, a photo isn’t just tilted; it suffers from more complex distortions, such as converging lines in architectural shots or missing areas after extreme rotations. Photoshop’s advanced tools are designed to tackle these challenges, offering solutions that go beyond simple leveling, leveraging artificial intelligence for seamless results.
Fixing Complex Perspectives with the Perspective Crop Tool
Perspective distortion is a common issue in digital photography, especially when shooting wide-angle or looking up at tall objects. This results in lines that should be parallel appearing to converge, creating an unnatural, “leaning” effect. For such scenarios, the Perspective Crop Tool is invaluable.
To access it, click and hold the standard Crop Tool icon in the toolbar until a sub-menu appears, then select the “Perspective Crop Tool.” Alternatively, you can cycle through the crop tool options by pressing Shift+C repeatedly until it appears.
Once selected, draw a rough rectangular box over the area of the photo that you want to preserve and correct. Don’t worry about perfect alignment at this stage. The magic happens next: drag each of the four corner handles of this box. Your goal is to align these handles with the edges of objects in the image that should be straight and parallel. For instance, if you’re correcting a building, drag the top corners outward to make the building’s vertical lines appear truly vertical, and adjust the side corners to ensure horizontal lines are level. The gridlines that appear within the crop box will serve as excellent visual guides, helping you achieve precise alignment.
This tool essentially allows you to “stretch” or “skew” the image within the crop box to correct the perceived distortion. Once you are satisfied that the lines are correctly aligned with the grid, press Enter. Photoshop will then transform the image to correct the perspective, cropping it to the defined area. This capability is essential for professional photography, visual design, and photo manipulation, ensuring that your architectural images or product shots maintain accurate geometric representation, contributing significantly to high-resolution, high-quality stock photos and digital art.
The Power of Content-Aware Straightening (No Crop Needed!)
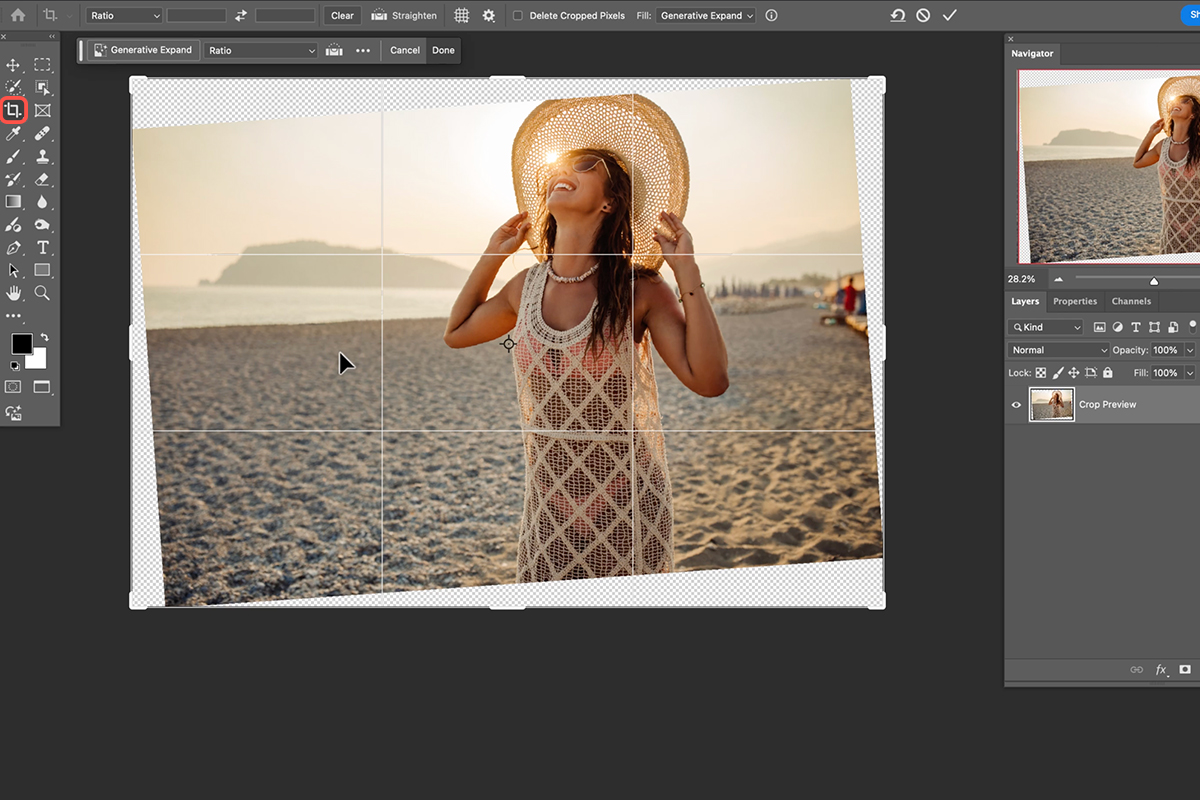
What if you’ve taken a perfect shot, but it’s tilted, and cropping it would sacrifice too much of your composition? This is where Photoshop’s “Content-Aware” technology shines, offering a truly innovative solution to straighten an image without the need for destructive cropping. This feature, leveraging advanced AI, can intelligently fill in the empty spaces created by rotation. It’s an exemplary demonstration of how AI upscalers and similar smart tools enhance modern editing styles.
To utilize this, first select the Crop Tool. Instead of simply rotating the image and accepting the resulting empty corners, locate the “Content-Aware” checkbox in the options bar at the top of your screen (sometimes it’s represented by a small icon or a dropdown menu labeled “Fill”). Ensure this option is checked.
Now, proceed to straighten your image using either the manual rotation method (hovering outside the crop box and dragging) or the automated straighten option (drawing a line along the horizon). As you rotate, you’ll see the empty triangular areas appear at the corners. When you hit Enter to commit the crop, Photoshop’s Content-Aware algorithm will analyze the surrounding pixels and intelligently generate new image content to fill those blank spaces.
The results can be astonishingly good, especially with images containing repetitive textures, skies, or relatively uniform backgrounds. This feature allows photographers to preserve their original composition, even when significant rotation is required, making it ideal for creating stunning wallpapers or backgrounds where every pixel matters. It effectively minimizes the need for drastic resizing or resampling, helping maintain the integrity of high-resolution images for Tophinhanhdep.com’s diverse collections.
Fine-Tuning with the Camera Raw Filter’s Transform Tools
For comprehensive control over rotation, perspective, and other geometric distortions, especially for those who prefer a non-destructive workflow and work with RAW files, Photoshop’s Camera Raw Filter is an exceptionally powerful tool.
To access it, ensure your image layer is selected in Photoshop, then go to Filter > Camera Raw Filter… This opens your image in the Camera Raw interface, which provides a suite of advanced editing controls.
Within Camera Raw, look for the Transform Tools icon in the toolbar (it often looks like a grid or a square with arrows). Clicking this will reveal a panel of sliders and options dedicated to geometric adjustments on the right side of the interface. Here, you’ll find a “Rotate” slider that allows for precise, fine-tuned rotation of your image. Dragging it left or right will rotate the image layer to perfectly level your horizon.
Beyond simple rotation, the Transform panel in Camera Raw offers tools to correct converging verticals, horizontal distortions, and even aspect ratio adjustments with remarkable precision. This integrated environment allows for holistic image correction, making it an indispensable part of advanced photo manipulation and digital photography workflows. Any adjustments made here are non-destructive, preserving the original image data, which is crucial for maintaining the highest quality for stock photos and digital art. This method is particularly suited for creating aesthetic and beautiful photography, ensuring every detail is perfectly aligned before further editing or sharing on Tophinhanhdep.com.
Elevating Your Visuals for Tophinhanhdep.com’s Diverse Collections
The act of straightening an image in Photoshop, while seemingly minor, holds immense significance for the overall quality and impact of your visual content. For a platform like Tophinhanhdep.com, which prides itself on offering a wide array of high-quality images, from vibrant wallpapers to evocative photography, ensuring visual perfection is paramount.
Crafting Immersive Wallpapers and Backgrounds
A straightened image fundamentally enhances its aesthetic appeal and professionalism. Imagine a beautiful nature landscape intended as a desktop wallpaper or website background. A perfectly level horizon conveys stability and peace, drawing the viewer deeper into the scene. Conversely, a crooked horizon can be jarring, creating an unsettling visual imbalance that distracts from the image’s inherent beauty.
By meticulously correcting horizons and perspectives, your images—whether they are abstract art, serene nature scenes, or dynamic digital art—become more impactful. They are better suited for thematic collections, where consistency in visual quality is key, and they contribute to trending styles that demand polished and refined visuals. Every high-resolution image on Tophinhanhdep.com, from emotional portraits to vibrant abstract designs, benefits from this foundational level of precision, making them more desirable for users seeking top-tier visual assets.
Utilizing Tophinhanhdep.com’s Tools for Image Optimization
Once your images are perfectly straightened and creatively enhanced in Photoshop, the journey to becoming a premium asset for Tophinhanhdep.com continues with optimization. The website’s suite of image tools plays a crucial role in preparing your perfected visuals for diverse applications.
- Compressors and Optimizers: A beautifully straightened high-resolution image, while visually stunning, can be large in file size. Tophinhanhdep.com’s compressors and optimizers help reduce file size without compromising visual quality, ensuring faster loading times for wallpapers and backgrounds, and a smoother user experience across various devices.
- AI Upscalers: If aggressive cropping or perspective correction led to a slight reduction in perceived resolution, an AI Upscaler can intelligently enhance the image’s detail, restoring it to a high-resolution standard suitable for stock photos or large prints. This is particularly valuable for photographers who need to adapt images for different output sizes while maintaining pristine quality.
- Converters: Depending on the end-use, you might need your images in specific formats. Image converters simplify this process, allowing you to seamlessly transition between formats like JPEG, PNG, or TIFF, further expanding the utility of your straightened images.
In essence, mastering image straightening in Photoshop is more than just learning a technical skill; it’s about refining your editing styles to produce images that are not only visually pleasing but also technically sound and versatile. By integrating these Photoshop techniques with the powerful image tools offered by Tophinhanhdep.com, you can ensure your contributions truly stand out, inspiring creative ideas and setting new standards for digital photography and visual design.
Conclusion
The ability to straighten an image effectively in Photoshop is an indispensable skill for anyone involved in digital photography, visual design, or image manipulation. From a simple tilted horizon to complex perspective distortions, Photoshop provides a range of tools—the Crop Tool, Ruler Tool, Perspective Crop Tool, and Camera Raw Filter—each offering unique advantages for different scenarios. The integration of “Content-Aware” technology further revolutionizes the process, allowing for non-destructive straightening that preserves original compositions.
At Tophinhanhdep.com, we understand that attention to detail transforms good images into great ones. A perfectly aligned image not only looks professional but also enhances the emotional and aesthetic impact, making it ideal for everything from inspiring wallpapers and backgrounds to meticulous digital art and high-resolution stock photos. By mastering these straightening techniques, you unlock the full potential of your images, ensuring they contribute to the rich tapestry of beautiful photography and creative visuals that Tophinhanhdep.com strives to offer. Experiment with these methods, find what works best for your specific needs, and let your straightened images speak volumes about your commitment to visual excellence.