Mastering Image Stretching in Photoshop: A Comprehensive Guide for Stunning Visuals

In the dynamic world of digital imagery, the ability to manipulate and adapt photographs is an invaluable skill. Whether you’re a burgeoning graphic designer, a seasoned photographer, or simply someone looking to create a perfect custom wallpaper, knowing how to stretch an image in Photoshop is a fundamental technique. At Tophinhanhdep.com, we understand the importance of visual fidelity and creative freedom. This ultimate guide will walk you through various methods of image stretching in Adobe Photoshop, ensuring your aesthetic visions come to life without compromising quality.
From adjusting a beautiful nature shot to fit a specific background dimension, to subtly altering elements in a complex digital art piece, stretching an image opens up a world of possibilities. It’s a core skill in photo manipulation that empowers you to transform ordinary pictures into extraordinary visual statements. By understanding the tools and techniques available, you can effortlessly adapt your images for high-resolution displays, compelling marketing materials, or simply to craft unique artistic expressions that resonate with trending styles.
The Fundamentals of Image Stretching: Why and How
Before diving into the practical steps, it’s crucial to grasp the foundational concepts behind image manipulation. A solid understanding of these principles will not only help you avoid common pitfalls like pixelation and distortion but also ensure that your edits enhance the overall aesthetic of your image, aligning with the high-quality standards promoted on Tophinhanhdep.com.
Understanding Aspect Ratio and Resolution

At the heart of successful image stretching lies the concept of aspect ratio. This is simply the proportional relationship between an image’s width and its height. For example, a 16:9 aspect ratio is common for widescreen displays and video, while 4:3 is often found in older photography formats. When you stretch an image disproportionately, you alter this ratio, leading to a “squished” or “elongated” appearance that can drastically reduce its visual appeal. For maintaining the integrity of beautiful photography or carefully crafted aesthetic images, preserving the aspect ratio (or consciously altering it for artistic effect) is paramount.

Equally important is image resolution. Resolution refers to the number of pixels an image contains, typically measured in pixels per inch (PPI) for print or pixels (width x height) for digital displays. High-resolution images, like those often featured in our high-resolution photography collections on Tophinhanhdep.com, contain a greater density of pixels. This pixel abundance means they can be stretched to a larger extent without a noticeable loss of quality, as Photoshop has more data to work with when interpolating new pixels. Conversely, stretching a low-resolution image too far will result in pixelation, making your image appear blurry, blocky, or simply unprofessional – a common issue we aim to help you avoid in your digital art and photo manipulation projects.
Essential Preparatory Steps
Before you begin any stretching operation, a few crucial preparatory steps can save you considerable time and frustration, especially when working on complex visual designs or valuable digital photography projects:
- Open Your Image in Photoshop: Start by navigating to “File” > “Open” and selecting the image you wish to modify.
- Duplicate Your Layer: In the Layers panel, right-click on your image layer and select “Duplicate Layer” (or use
Ctrl+J/Cmd+J). This creates a copy, allowing you to freely experiment and revert to the original image if needed, embodying a core principle of non-destructive editing. This is particularly vital for preserving your original beautiful photography or valuable stock photos. - Assess Image Quality: Take a moment to evaluate your image’s resolution. As discussed, a low-resolution photo will not yield optimal results when stretched extensively. Aim to start with high-resolution shots whenever possible for better outcomes, especially for backgrounds or wallpapers that need to look crisp. If your image is low-res, consider using Tophinhanhdep.com’s recommended AI Upscalers to enhance it before stretching to achieve better results.
- Perform Initial Adjustments: Before altering dimensions, it’s often a good practice to correct basic elements like exposure, color balance, or any other minor enhancements. This ensures you’re working with the best possible starting point.
- Save a Working Copy: Use “File” > “Save As” to create a new file. This ensures your original photo remains untouched, providing a safety net for all your creative ideas and digital art explorations.
By following these fundamental steps, you’re not just preparing your image; you’re setting the stage for a smooth, high-quality editing experience that aligns with the professional standards of visual design.
Core Methods for Stretching Images in Photoshop
Photoshop offers several powerful tools to stretch and resize images, each suited for different scenarios and desired outcomes. Here, we’ll explore the most common and effective methods, equipping you with the versatility needed for any photo manipulation task.
The Versatile Free Transform Tool
The Free Transform tool is arguably the most frequently used method for stretching and resizing images or layers in Photoshop due to its direct and interactive nature. It’s perfect for quick adjustments and offers a hands-on approach to reshaping your visuals for various aesthetic and creative ideas.
How to Use the Free Transform Tool:
- Open Your File: Ensure your image is open and your duplicated layer is selected in the Layers panel. If your image is a background layer, double-click its thumbnail in the Layers panel to convert it into a regular, editable layer.
- Activate Free Transform: Go to “Edit” in the top menu bar, then choose “Free Transform.” Alternatively, use the highly efficient keyboard shortcut:
Ctrl+T(Windows) orCommand+T(Mac). - Adjust Dimensions: A bounding box will appear around your image, complete with handles at the corners and sides.
- To stretch freely (disproportionately): Click and drag any corner or side handle. This will alter the aspect ratio.
- To maintain proportions (scale): Hold down the
Shiftkey while dragging a corner handle. This is crucial for avoiding distortion when simply scaling. - To transform from the center: Hold down the
Alt(Windows) orOption(Mac) key while dragging a handle. - To maintain proportions from the center: Hold
Shift+Alt(Windows) orShift+Option(Mac) while dragging a corner handle. - Note: In Photoshop CC 2019 and later, the default behavior for Free Transform when dragging a corner is proportional scaling (like holding Shift in older versions). To stretch freely, you typically don’t hold Shift. Adapt your actions based on your Photoshop version.
- Fine-Tune and Confirm: Adjust the size until it perfectly suits your needs. You can also input precise values in the Options bar at the top for width (W) and height (H) or even rotate the image.
- Apply Changes: Once satisfied, press
Enter(orReturnon Mac) or click the checkmark icon in the Options bar to apply the transformation. - Save Your Work: Save the edited image as needed.
The Free Transform tool is invaluable for tasks like stretching a background image to seamlessly fill a wider canvas, subtly elongating elements in abstract photography, or creatively distorting objects for unique digital art compositions.
Precise Adjustments with the Image Size Command
When you require precise numerical control over your image’s dimensions, the Image Size command is your go-to tool. This method allows you to define exact width, height, and resolution values, making it ideal for preparing images for specific output requirements, such as high-resolution stock photos or digital wallpapers.
How to Stretch Images Using the Image Size Command:
- Open Your Image: Ensure your image is open in Photoshop.
- Access Image Size: Go to the top menu bar, select “Image,” then choose “Image Size” (or use the shortcut
Alt+Ctrl+Ion Windows,Option+Command+Ion Mac). - Configure the Dialog Box: In the “Image Size” dialog box, you’ll see various options:
- Dimensions: Shows the current width and height.
- Units: You can change the unit of measurement (pixels, inches, centimeters, percent, etc.).
- Constrain Proportions (Chain Link Icon): This is critical.
- Checked (default): When you change either the width or height, Photoshop automatically adjusts the other dimension to maintain the aspect ratio, preventing distortion. This is ideal for straightforward scaling of beautiful photography.
- Unchecked: Allows you to adjust width and height independently, effectively stretching or squishing the image. Deselect this if you intend to stretch disproportionately for creative effects or to fit exact, non-proportional dimensions.
- Resample: This checkbox determines how Photoshop handles pixel data when changing dimensions.
- Checked: Photoshop will add or remove pixels (resample) to meet the new dimensions. It’s crucial for stretching without losing perceived quality. For enlargement, choose “Preserve Details 2.0” or “Bicubic Smoother” for best results; for reduction, “Bicubic Sharper” is often preferred. “Automatic” is a good general choice.
- Unchecked: Photoshop will only change the document size and resolution, not the actual pixel dimensions. This is useful for print preparation but less so for actual image stretching.
- Enter New Values: Input your desired width and height values. If “Constrain Proportions” is unchecked, you can stretch the image by entering different values for width and height.
- Apply Changes: Click “OK” to implement the new dimensions.
- Review and Save: Examine your edited image and save it as necessary.
This method is particularly effective for resizing images for specific platforms (e.g., website banners with exact pixel requirements) or when converting high-resolution stock photos to different formats.
Expanding Your Canvas: The Canvas Size Method
While the Free Transform and Image Size commands modify the image itself, the Canvas Size command alters the document area surrounding your image. This is incredibly useful when you need to extend the background or add extra space around your subject without directly stretching the image pixels. It’s a key technique for visual design, especially when creating aesthetic backgrounds or expanding existing scenes.
How to Utilize Canvas Size to Stretch an Image in Photoshop:
- Open Your Image: Start with your image open in Photoshop.
- Access Canvas Size: Navigate to the top menu, select “Image,” and choose “Canvas Size” (or use the shortcut
Ctrl+Alt+Con Windows,Command+Option+Con Mac). - Adjust Width and Height:
- Relative Checkbox: Activating the “Relative” checkbox allows you to add or subtract from the current canvas dimensions. If unchecked, the values you enter will be the absolute final canvas size. For extending, “Relative” is often more intuitive.
- Enter Values: Input your desired width and height values to extend the canvas. Remember, there’s no aspect ratio lock for canvas size, so you’ll specify each dimension independently.
- Choose Anchor Points: Adjacent to the width and height options, you’ll see a grid representing anchor points. These dictate the direction of the canvas extension.
- If you click the center anchor, the canvas expands equally in all directions.
- If you click an anchor point on one side (e.g., the left-middle), the canvas will expand primarily to the right. This is useful for extending a background on a specific side, perhaps to create a more expansive nature photo or an abstract backdrop.
- Select Canvas Extension Color: Below the anchor points, you can choose the color that fills the newly added canvas space (Foreground Color, Background Color, White, Black, Gray, or Other). For seamless extensions, you’ll likely use “White” or a custom color that matches your existing background.
- Apply Changes: Click “OK” to apply the canvas changes. Your image will remain its original size, but new empty space will appear around it.
- Fill the New Space (Optional): To “stretch” your image into this new canvas area:
- You can use the Free Transform tool (
Ctrl+T/Cmd+T) on your image layer to scale or stretch it to fill the new canvas. - For sophisticated extensions, consider using Photoshop’s Content-Aware Fill or Generative Fill (if available) on a separate layer in the empty canvas area to intelligently extend your background. This is a game-changer for seamless photo manipulation.
- You can use the Free Transform tool (
- Save Your Image: As always, save your modified image.
The Canvas Size command is particularly valuable when you need to add breathing room to a tightly cropped photograph, prepare an image for a wider banner, or create an extended background for graphic design projects.
Advanced Techniques for Seamless Image Manipulation
Beyond basic stretching, Photoshop offers advanced tools that allow for intricate image manipulation while preserving quality and artistic intent. These techniques are vital for high-resolution photography, complex photo manipulation, and achieving unique digital art effects.
Preserving Quality with Smart Objects and Content-Aware Scale
One of the greatest challenges when stretching images, especially for high-resolution output, is maintaining quality and avoiding pixelation. Photoshop’s Smart Objects and Content-Aware Scale feature are indispensable allies in this endeavor.
-
Smart Objects for Non-Destructive Editing: Before undertaking any significant stretching or transformation, convert your image layer into a Smart Object. To do this, right-click on your layer in the Layers panel and select “Convert to Smart Object.”
- Benefit: Smart Objects embed or link the image’s original data. This means that any transformations you apply (like stretching, scaling, or rotating) are applied to the Smart Object container, not the raw pixel data. You can resize, stretch, and transform a Smart Object multiple times without cumulative loss of quality. If you later decide to downscale it, it will revert to the quality of the original pixels rather than the degraded pixels of previous transformations. This is fundamental for any serious photo manipulation or digital art project, especially when you’re experimenting with creative ideas.
-
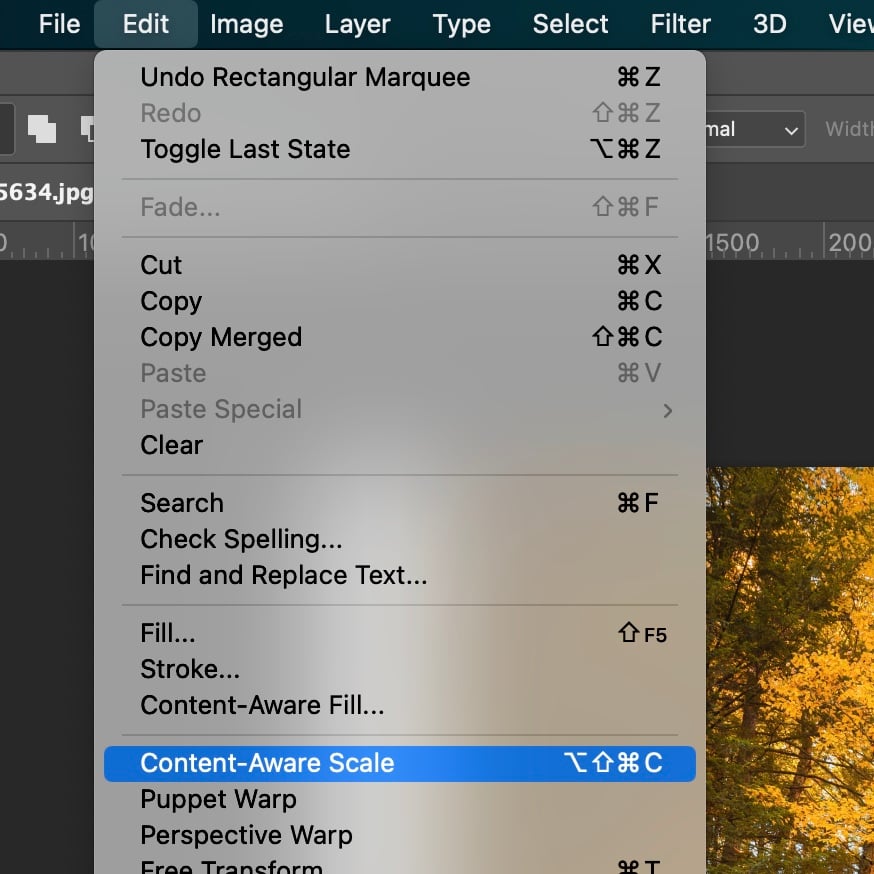
Content-Aware Scale for Intelligent Stretching: The Content-Aware Scale feature is a semi-magical tool for stretching images without distorting important elements, such as subjects or prominent objects. Instead, it intelligently scales the “less important” areas of the image, like the background or empty spaces, preserving the visual integrity of your main subject. This is particularly effective for nature photography where you might want to expand the sky or a scenic backdrop without making trees look unnaturally wide.
How to use Content-Aware Scale:
- Ensure your layer is a Smart Object (recommended) or a regular pixel layer.
- Go to “Edit” > “Content-Aware Scale.”
- A bounding box will appear, similar to Free Transform. Drag the corner or side handles to stretch the image.
- Photoshop’s algorithm will attempt to scale the image in a way that protects the most visually “important” content. You can further refine this by defining areas to protect (e.g., using a selection or alpha channel) in the Options bar if the automatic detection isn’t perfect.
- Press
Enterto apply.
This technique is a cornerstone for professional editing styles and producing high-resolution, aesthetically pleasing images without distortion.
Creative Reshaping with Warp and Distort
For more artistic and non-linear stretching, Photoshop’s Warp and Distort transforms offer incredible flexibility. These tools allow you to push, pull, and bend images in ways that Free Transform or Image Size cannot, opening doors for truly unique photo manipulation and digital art creations.
-
Distort: The Distort command allows you to freely move the corners of a bounding box independently. This is excellent for creating perspective effects, such as making an image appear as if it’s receding into the distance, lying on an angled surface, or aligning a flat image to a non-orthogonal surface within another photograph.
How to use Distort:
- Select your image layer.
- Go to “Edit” > “Transform” > “Distort.”
- Drag any of the corner handles of the bounding box. Each corner can be moved independently, allowing you to skew the image in various directions.
- Press
Enterto apply.
-
Warp: The Warp tool provides even more granular control, allowing you to bend and reshape an image as if it were malleable fabric. You can use preset warp styles or freely drag control points and segments within a grid. This is fantastic for adding subtle curves, creating ripples, or integrating elements into complex, organic shapes for abstract images or photo manipulation.
How to use Warp:
- Select your image layer.
- Go to “Edit” > “Transform” > “Warp.”
- A grid will appear over your image. In the Options bar, you can choose a preset “Warp” style (e.g., Arc, Flag, Twist) or keep it at “Custom” for free manipulation.
- Drag the control points (handles) or directly click and drag within the grid segments to reshape your image.
- Press
Enterto apply.
Warp and Distort are essential tools for creative professionals looking to push the boundaries of visual design and execute complex photo manipulation ideas, particularly for transforming backgrounds or integrating disparate image elements seamlessly.
Utilizing Displacement Maps for Intricate Control
For the most advanced and nuanced stretching and distortion, especially when integrating textures or creating realistic surface effects, Photoshop’s Displacement Map feature is unparalleled. While more complex, it offers superior control, minimizing distortions and preserving image quality even during substantial reshaping.
A displacement map is essentially a grayscale image (or a separate channel within an image) where areas of varying lightness and darkness correspond to how much pixels in another image will be “displaced” or shifted. Lighter areas shift pixels in one direction, darker areas in another, and mid-gray areas cause no displacement. This allows you to apply the topography or texture of one image onto another, creating intricate and highly controlled stretching or warping effects.
How to Use Displacement Maps (Overview):
- Create Your Displacement Map: Design or prepare a grayscale image (e.g., a blurred version of a texture, a pattern, or a custom gradient) that defines the desired distortion. Save this as a separate PSD file.
- Prepare Your Target Image: Open the image you want to stretch/displace. It’s often best to convert this layer to a Smart Object.
- Apply Displacement Filter: Go to “Filter” > “Distort” > “Displace.”
- Configure Displace Settings: In the dialog box, set the Horizontal Scale and Vertical Scale (these determine the strength of the displacement) and other options like “Stretch To Fit” and “Repeat Edge Pixels.”
- Load the Map: Click “OK,” and Photoshop will prompt you to select your previously saved displacement map file.
- Review and Adjust: Photoshop will apply the distortion based on your map. You can then fine-tune the Smart Filter settings in the Layers panel if your target image was a Smart Object.
This advanced technique is invaluable for photorealistic manipulation, such as making text appear to wrap around a textured surface, realistically applying tattoos, or subtly deforming backgrounds to match a foreground element’s perspective. For high-resolution results and intricate digital art, mastering displacement maps provides an unparalleled level of control.
Avoiding Common Pitfalls and Ensuring Professional Results
Even with powerful tools at your disposal, image stretching can lead to undesirable outcomes if common mistakes aren’t avoided. Tophinhanhdep.com emphasizes creating visually appealing and high-quality images, and understanding these pitfalls is key to professional-grade photo manipulation and visual design.
The Importance of Non-Destructive Editing
One of the most frequent mistakes beginners make is performing destructive edits. This means making changes directly to the original pixel data, making it impossible to revert to an earlier state without undoing all subsequent work.
- Always Duplicate Layers: As mentioned in the preparatory steps, always duplicate your image layer (
Ctrl+J/Cmd+J) before applying significant transformations. This creates a backup, allowing you to toggle back and forth between versions and recover if something goes wrong. - Utilize Smart Objects: For any stretching, scaling, or warping, convert your layers to Smart Objects. This allows you to apply transformations as Smart Filters, which are editable and non-destructive. You can always adjust the transformation later without losing the original image quality.
- Work with Layer Masks: Instead of erasing parts of an image, use layer masks. Painting with black on a mask hides portions of the layer, while painting with white reveals them. This non-destructive method provides flexibility for refining blends and effects, especially when extending backgrounds or compositing elements in digital art.
Distinguishing Between Stretching and Scaling
While often used interchangeably, “stretching” and “scaling” have distinct meanings in Photoshop and visual design, impacting the integrity of your images.
- Scaling: Involves adjusting an image or object’s dimensions proportionately. This means both the width and height are changed by the same percentage, maintaining the original aspect ratio. Scaling is ideal when you want to make an image larger or smaller without altering its inherent shape, crucial for preserving the beauty of high-resolution photography. (e.g., holding
Shiftwith Free Transform, or checking “Constrain Proportions” in Image Size). - Stretching: Involves adjusting an image or object’s dimensions disproportionately. This means the width and height are changed by different percentages, altering the aspect ratio and potentially distorting the image. Stretching is used for specific creative effects, fitting non-proportional spaces (like a banner), or for more advanced photo manipulation techniques. (e.g., dragging without
Shiftin Free Transform, or unchecking “Constrain Proportions” in Image Size).
Understanding this difference is vital for making informed decisions during your editing process, ensuring that any distortion is intentional and serves a creative purpose, rather than being an accidental outcome.
Leveraging Tophinhanhdep.com’s Tools for Enhanced Quality
To further enhance your image stretching needs and overall visual design projects, Tophinhanhdep.com offers a suite of image tools that can complement your Photoshop workflow, especially when dealing with resolution and quality concerns.
- AI Upscalers: If you’re starting with a lower-resolution image that needs significant stretching, our AI Upscalers can dramatically increase its pixel density and detail before you bring it into Photoshop. This gives you a much better foundation for stretching without pixelation, allowing you to achieve high-resolution, professional-grade results for wallpapers, backgrounds, and digital art.
- Image Optimizers & Compressors: After stretching and refining your images in Photoshop, especially for web use or digital displays, our optimizers and compressors can reduce file size while maintaining visual quality. This ensures your beautiful photography and aesthetic creations load quickly and efficiently on any platform.
- Converters: Easily convert your stretched images into various formats suitable for different applications, whether for high-resolution print or web-optimized backgrounds.
By integrating these tools with your Photoshop skills, you ensure that every image you create is not only perfectly stretched but also optimized for stunning visual impact across all platforms, truly embodying the spirit of creative ideas and cutting-edge visual design.
Conclusion
Mastering how to stretch an image in Photoshop is a fundamental skill that significantly expands your capabilities in digital photography, visual design, and photo manipulation. It’s a journey that involves understanding basic principles like aspect ratio and resolution, executing core techniques with tools like Free Transform, Image Size, and Canvas Size, and delving into advanced methods such as Smart Objects, Content-Aware Scale, Warp, Distort, and Displacement Maps.
The key to success lies in adopting a non-destructive workflow, making conscious decisions about proportional versus disproportionate stretching, and always aiming for the highest possible quality. Whether you’re crafting unique wallpapers, designing aesthetic backgrounds, or engaging in complex digital art, these techniques empower you to realize your creative ideas with precision and artistic flair.
As you continue your journey in visual creativity, remember to leverage resources like Tophinhanhdep.com for high-resolution images, editing styles inspiration, and cutting-edge image tools that complement your Photoshop skills. With the right knowledge and tools, you can transform your images and elevate your digital artistry to create stunning visuals that impress and inspire. Embrace the power of Photoshop, and let your imagination stretch the boundaries of what’s possible!
Frequently Asked Questions
What is the easiest method to stretch an image in Photoshop?
The Free Transform tool (Ctrl+T / Command+T) is generally considered the easiest method for stretching images. Simply select the layer, activate Free Transform, and drag the corner or side handles. For quick, proportional scaling, hold Shift (or simply drag in newer Photoshop versions).
How do I stretch objects in Photoshop without altering their dimensions?
To stretch an object while maintaining its original proportions (i.e., scaling it), use the Free Transform tool (Ctrl+T / Command+T) and hold down the Shift key while dragging any of the corner handles. This ensures the aspect ratio remains consistent. In Photoshop CC 2019 and later, dragging a corner handle without holding Shift will proportionally scale by default.
How do I stretch a part of an image or a particular object in Photoshop?
To stretch only a portion of an image or a specific object, first use selection tools like the Lasso tool, Marquee tool, or Quick Selection tool to isolate the area you want to manipulate. Once selected, you can then apply the Free Transform tool (Ctrl+T / Command+T) or Content-Aware Scale (Edit > Content-Aware Scale) to just that selected area.
What are the differences between stretching and scaling? Stretching involves adjusting an image or object’s dimensions disproportionately, meaning its aspect ratio changes, which can lead to distortion. Scaling, on the other hand, maintains the image’s original proportions while adjusting its size, preserving its aspect ratio and preventing distortion. Scaling is generally preferred for simple resizing, while stretching is used for specific creative effects or to fit non-proportional spaces.