Mastering Image Stretching: Techniques for Flawless Visuals on Tophinhanhdep.com

In the dynamic world of digital imagery, the ability to manipulate and adapt visuals to various platforms and purposes is a crucial skill. Whether you’re a professional photographer, a graphic designer, or simply someone looking to enhance your personal image collection, understanding “how to stretch an image” effectively is paramount. Poorly executed stretching can lead to distortion, pixelation, and a significant drop in visual quality, undermining the very aesthetic you’re trying to achieve. On Tophinhanhdep.com, we understand the importance of pristine visuals, from breathtaking Wallpapers and Backgrounds to intricate Digital Art and High Resolution Photography. This comprehensive guide will delve into the art and science of image stretching, ensuring your visuals always look their best, without compromising their inherent beauty.
The Importance of Aspect Ratio and the Pitfalls of Distortion
Before diving into the “how-to,” it’s essential to grasp the fundamental concept of aspect ratio and the detrimental effects of ignoring it. An image’s aspect ratio defines the proportional relationship between its width and its height. For instance, a 16:9 aspect ratio means that for every 16 units of width, there are 9 units of height. Common aspect ratios include 4:3 (traditional photography), 3:2 (many DSLR cameras), 16:9 (widescreen displays), and square (1:1, popular on social media).
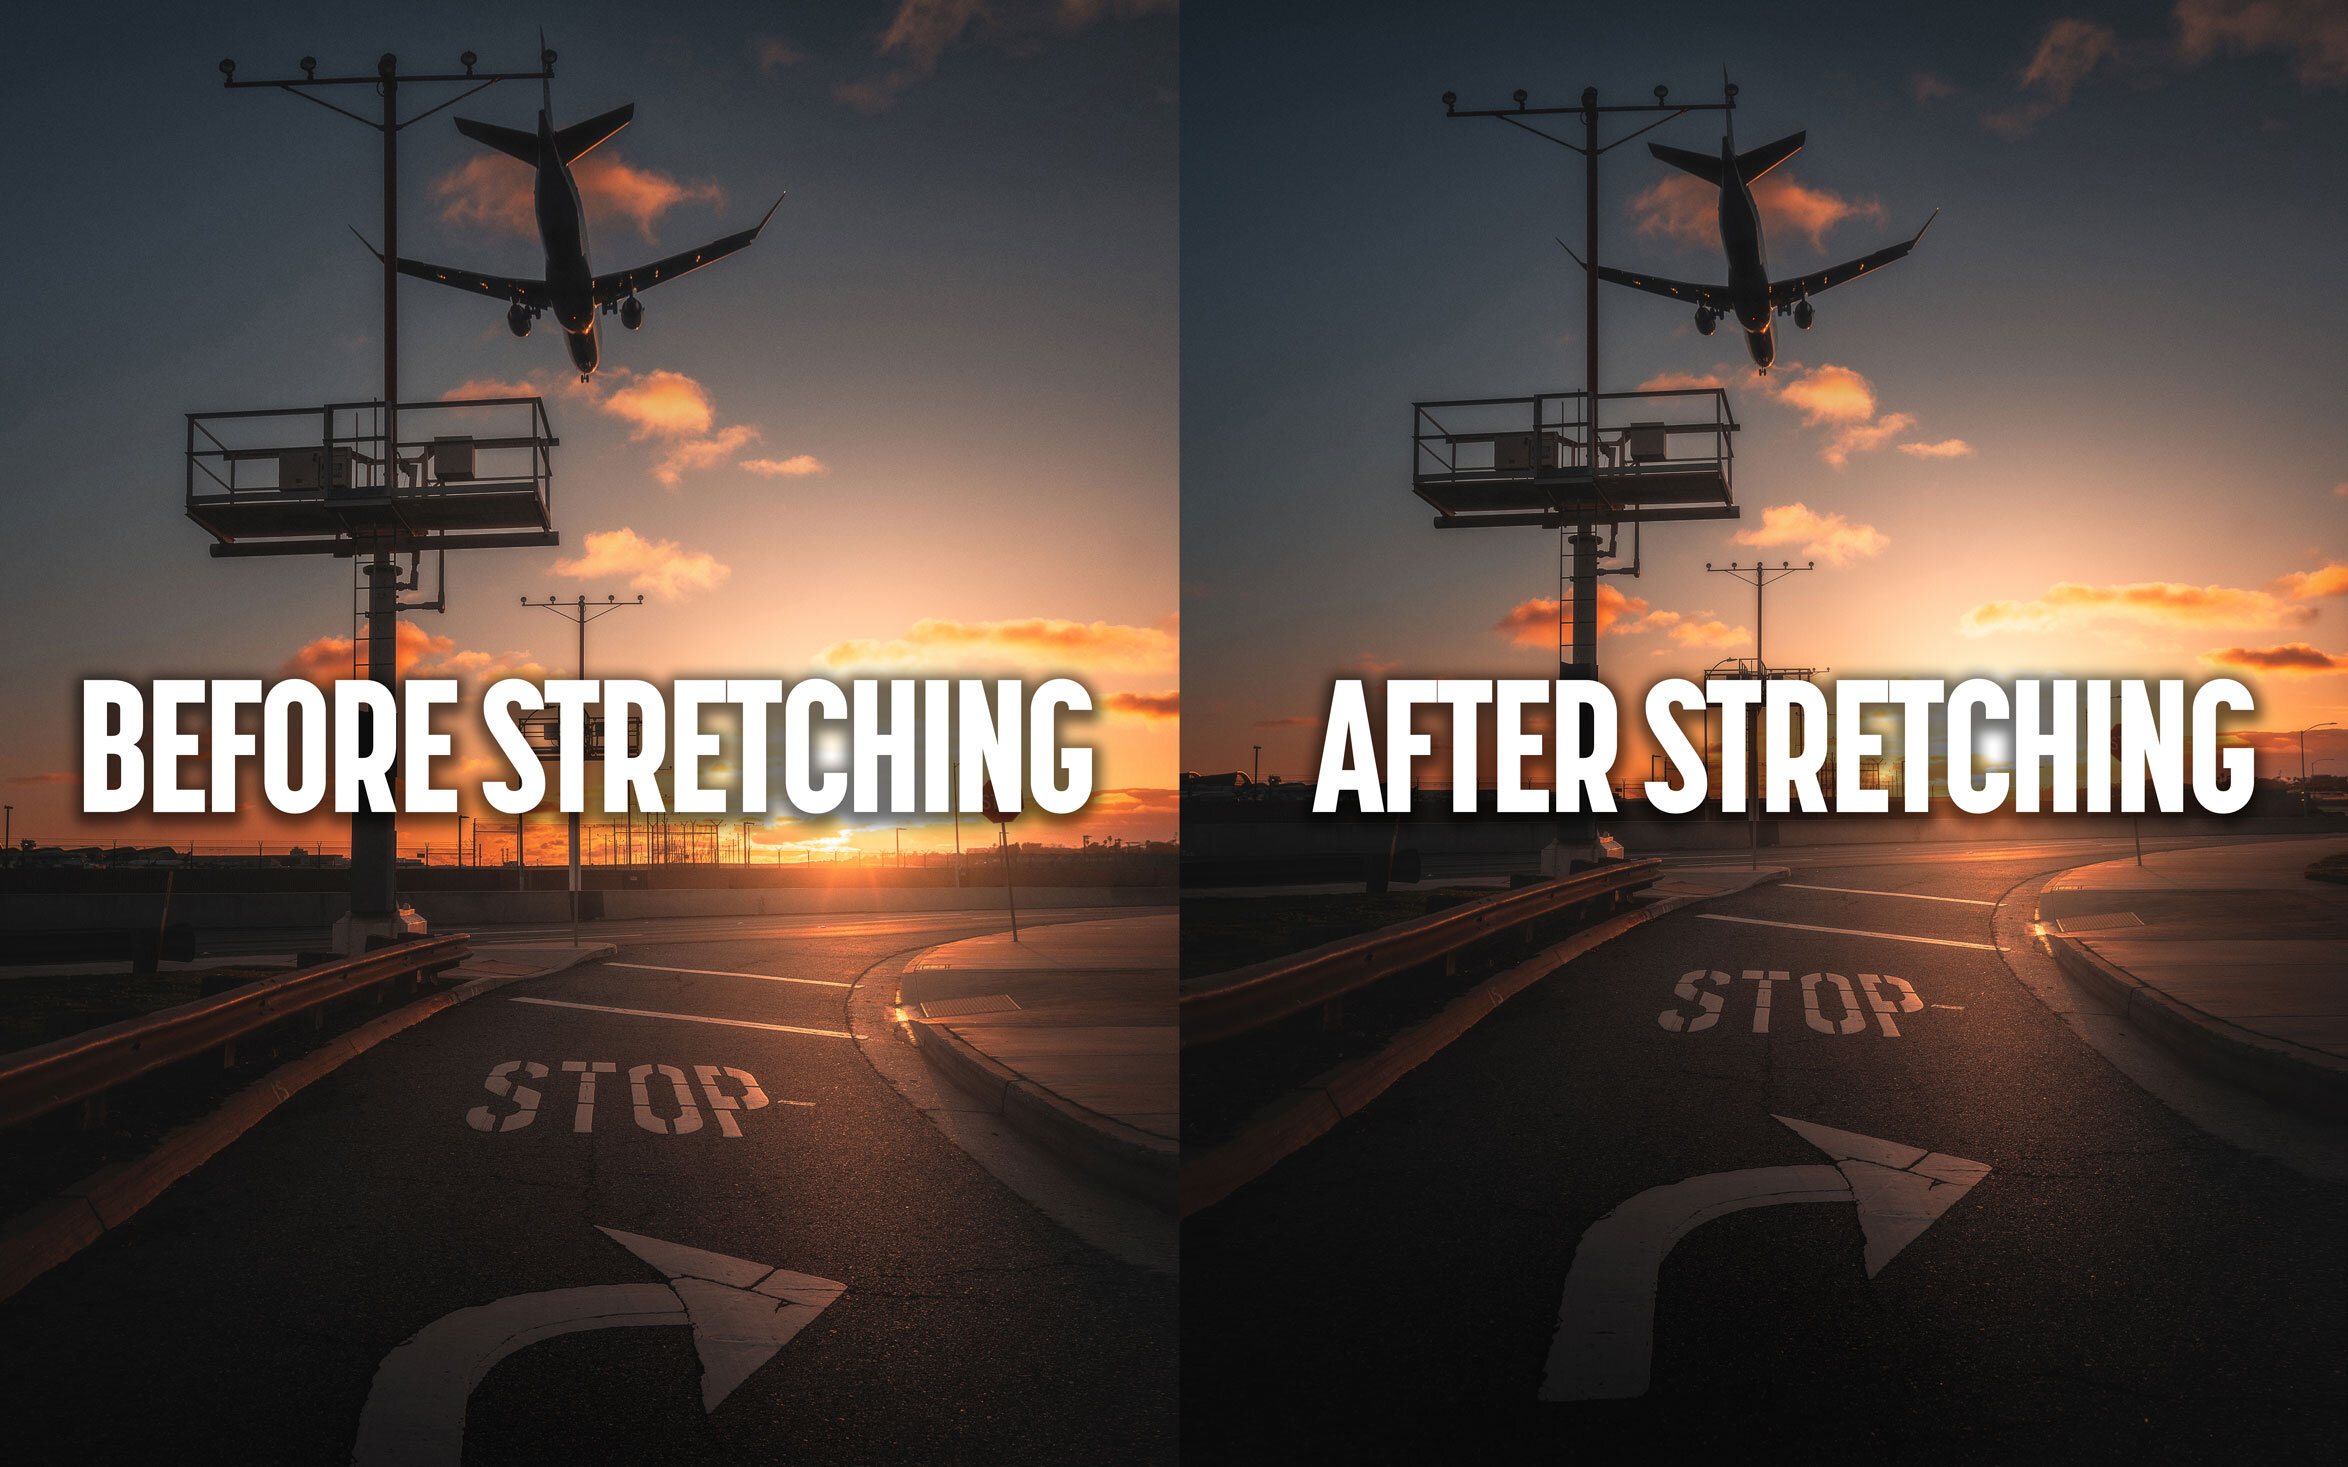
When you stretch an image without maintaining its aspect ratio, you force the image pixels to spread unevenly, either horizontally or vertically. This results in visual distortion, making objects appear unnaturally wide, tall, squashed, or stretched. Faces might look elongated, landscapes might seem warped, and fine details can become blurry or pixelated. For a platform like Tophinhanhdep.com, which prides itself on offering Beautiful Photography and Aesthetic visuals, such distortion is unacceptable. Our commitment to High Resolution and impeccable Editing Styles necessitates techniques that preserve the integrity and clarity of every image.
Beyond mere aesthetics, maintaining aspect ratio is crucial for consistency across different viewing experiences. Imagine a stunning Nature wallpaper stretched incorrectly on a desktop versus a mobile device; the impact would be drastically different and undesirable. For Stock Photos used in professional contexts, distortion can convey amateurism and undermine the credibility of the content. Therefore, learning to stretch images intelligently is not just about technical proficiency, but about upholding the quality and professionalism that Tophinhanhdep.com champions.
Essential Tools and Techniques for Non-Distorting Image Stretching
Fortunately, various software and applications offer sophisticated tools to stretch images while minimizing or even eliminating distortion. These range from professional-grade programs like Adobe Photoshop to simpler, readily available options like built-in operating system tools and mobile apps. Tophinhanhdep.com encourages users to explore these Image Tools to achieve optimal results.
Professional Image Stretching with Adobe Photoshop
Adobe Photoshop remains the industry standard for Digital Photography editing and Photo Manipulation, offering advanced features for precise image stretching. One of the most powerful techniques to expand an image without noticeable distortion is the “Content-Aware Scale.”

Utilizing Content-Aware Scale for Seamless Expansion
The Content-Aware Scale feature in Photoshop intelligently analyzes the image content and scales non-essential areas more aggressively than areas containing important visual information (like faces or prominent objects). This allows for a more natural-looking stretch.
Steps for Content-Aware Scale:
- Prepare Your Image: Open your image in Photoshop. If your image layer is a Smart Object, Rasterize it first (Right-click layer > Rasterize Layer) to allow direct pixel manipulation.
- Expand the Canvas: To create space for stretching, you first need to enlarge your canvas. Navigate to
Image > Canvas Size. You can change the width or height by a percentage (e.g., 120%) or specify new dimensions in pixels. For instance, if you’re aiming for Instagram’s 4x5 ratio from a wider image, expanding the canvas vertically will give you the necessary “breathing room.” This step ensures you have transparent areas to fill. - Initiate Content-Aware Scale: Select the area you wish to stretch. Often, this means using the Rectangular Marquee Tool to select one side of the image, starting from a corner and dragging inwards. This isolates the edge that needs to be expanded.
- Perform the Stretch: Go to
Edit > Content-Aware Scale. Once active, hold down the Shift key and drag the selected edge outwards to fill the expanded canvas area. Holding Shift helps maintain proportions within the selection, while Content-Aware algorithms handle the intelligent scaling. - Repeat for the Opposite Side: Deselect the current area (
Ctrl+Don Windows orCmd+Don Mac) and repeat steps 3 and 4 for the opposite side of the image if you need to expand both sides. - Refinement and Cleanup: After stretching, carefully inspect the edges. Sometimes, subtle distortions or lines may appear, especially with complex backgrounds or non-uniform elements. Use the Clone Stamp Tool or Healing Brush Tool to seamlessly blend any inconsistencies, ensuring a perfectly smooth transition. This crucial cleanup step hides any artifacts that might compromise the Aesthetic of your Abstract or Nature photography.
Other Photoshop Techniques for Control
- Free Transform (Ctrl+T / Cmd+T): While not content-aware, the Free Transform tool allows you to manually stretch an image. To avoid distortion, always hold down the Shift key while dragging a corner handle. This locks the aspect ratio, enabling proportional scaling. If you deliberately want to stretch without preserving aspect ratio for a creative effect (e.g., for Digital Art or certain Photo Manipulation styles), you can do so without holding Shift.
- Puppet Warp: For more localized and intricate non-uniform stretching or reshaping, Puppet Warp (Edit > Puppet Warp) allows you to place pins on an image and move parts of it like a puppet. This is excellent for subtle adjustments to elements within an image without affecting the entire composition.
- Generative Fill (AI Power): Newer versions of Photoshop integrate AI-powered tools like Generative Fill. If you expand your canvas and leave empty transparent areas, Generative Fill can intelligently fill these areas with contextually relevant content, effectively “stretching” the image by generating new pixels rather than merely scaling existing ones. This is a game-changer for expanding complex backgrounds without distortion and links directly to Tophinhanhdep.com’s focus on AI Upscalers.
Everyday Image Resizing: Paint, Preview, and Mobile Apps
Not everyone needs or has access to professional software like Photoshop. For quick adjustments, especially for Wallpapers or images for social media, simpler tools can be quite effective, provided you understand their limitations and how to use them correctly.
Using Paint in Windows
Windows’ built-in Paint application offers basic resizing functionality suitable for straightforward adjustments.
Steps for Paint:
- Open Image: Right-click your image file and choose
Open with > Paint. - Access Resize: Click the “Resize” button found in the “Image” group on the toolbar.
- Choose Dimensions: In the “Resize and Skew” window, you can choose to resize by
PercentagesorPixels. Select the option you’re most comfortable with. - Maintain Aspect Ratio: Crucially, check the box next to “Maintain aspect ratio.” This prevents distortion by ensuring that when you change one dimension (width or height), the other automatically adjusts proportionally.
- Enter Values: Change the numbers for either the horizontal or vertical value. The other value will update automatically. If you uncheck “Maintain aspect ratio,” you can enter independent values, but this will almost certainly result in distortion, which is generally undesirable for Beautiful Photography.
- Apply and Save: Click
OKto apply the changes. If you’re happy, save your work (Ctrl+S).
Using Preview in Mac
Mac users have a similarly straightforward tool in Preview, their default image viewer.
Steps for Preview:
- Open Image: Locate your image in Finder, right-click, and select
Open with > Preview. - Adjust Size: Go to the
Toolsmenu in the top bar and selectAdjust Size. - Select Units: In the adjustment window, use the drop-down menu next to “Width” and “Height” to choose your preferred units (pixels, percent, etc.).
- Scale Proportionally: Ensure the
Scale Proportionallybox is checked. This is vital to prevent distortion. Also, keepResample Imagechecked. - Modify Dimensions: Enter new values for either “Width” or “Height.” The linked dimension will update automatically to maintain the aspect ratio.
- Confirm and Save: Click
OKand then save your changes (Cmd+S).
Leveraging Free Mobile Apps
For on-the-go editing, several free mobile apps can help you stretch and resize images, especially when preparing content for social media Trending Styles or sharing quick Photo Ideas. Apps like Photoshop Express, Image Size - Photo Resizer, or Photo Compress & Resize are popular choices.
General Mobile App Steps:
- Install App: Download a reputable image resizing app from your device’s app store (Google Play Store for Android, App Store for iOS).
- Grant Access: Upon first launch, grant the app permission to access your device’s photos.
- Open Photo: Select the photo you wish to resize or stretch from your gallery within the app.
- Find Resize Tool: Look for a “Resize” or “Transform” tool, often located alongside a “Crop” tool.
- Choose Size Options: Most apps offer preset sizes (e.g., Instagram’s various ratios, Facebook cover photos) or the option to enter custom dimensions. Always ensure there’s an option to “maintain aspect ratio” or “scale proportionally” to prevent distortion. For Sad/Emotional or Abstract images, preserving the original artistic intent is crucial.
- Save/Export: Once satisfied, save or export the edited image to your device’s camera roll or directly share it to social media.
Leveraging Tophinhanhdep.com’s Image Tools for Optimal Stretching
Tophinhanhdep.com isn’t just a repository of stunning Images and Photography; it’s also a hub for powerful Image Tools designed to empower users with comprehensive control over their visuals. When it comes to stretching and scaling, our integrated tools can significantly enhance the process, especially when dealing with challenging scenarios like enlarging lower-resolution images.
AI Upscalers: Redefining Image Expansion
One of the most revolutionary tools in modern image manipulation is the AI Upscaler. Traditional stretching and resizing, particularly when attempting to enlarge a small or low-resolution image, inevitably lead to pixelation and loss of detail, creating an unsightly and unprofessional result. This is where Tophinhanhdep.com’s AI Upscalers shine.
Instead of merely stretching existing pixels, AI upscaling algorithms intelligently analyze the image, detect patterns, and generate new pixels that blend seamlessly with the original content. This allows you to effectively “stretch” an image to a much larger dimension without the typical distortion or blurriness. For creators working with older photos, scanned artwork, or images where a higher resolution source isn’t available, our AI Upscalers can transform them into High Resolution assets suitable for large Wallpapers or detailed Graphic Design projects. This preventative measure ensures that subsequent stretching or cropping operations start from a superior base, preserving the Beauty Photography or intricate Digital Art.
Converters, Compressors, and Optimizers: The Post-Stretch Workflow
Once you’ve stretched and sized your image to perfection, the next step in the workflow often involves preparing it for its final destination. Tophinhanhdep.com offers a suite of Converters, Compressors, and Optimizers that are indispensable in this phase.
- Converters: Different platforms and uses may require specific file formats. Our Converters allow you to easily change your image from one format to another (e.g., JPEG to PNG, WebP) without compromising the quality achieved during stretching. This is crucial for web performance and compatibility.
- Compressors: While stretching can increase file size, Compressors help reduce it without significant visual degradation. A large, high-resolution stretched image can slow down website loading times or consume excessive storage. Our intelligent compression tools ensure your images remain sharp and clear while being efficient to host and share. This balance is key for providing a smooth experience for users browsing Tophinhanhdep.com’s vast collection of Backgrounds and Thematic Collections.
- Optimizers: Optimizers go hand-in-hand with compressors, fine-tuning image settings for specific web or print uses. They can adjust resolution, color profiles, and other parameters to ensure your stretched image looks its best and performs optimally, whether it’s an Abstract piece or a Nature photograph.
By integrating Tophinhanhdep.com’s AI Upscalers early in your process and utilizing our Converters, Compressors, and Optimizers after stretching, you ensure a complete, high-quality workflow from initial concept to final deployment.
Creative Applications and Best Practices for Stretched Images
Beyond simply fitting an image into a frame, intelligent image stretching opens doors to diverse Creative Ideas and Visual Design possibilities. However, it’s crucial to distinguish between intentional artistic stretching and unintentional, quality-degrading distortion.
Stretching for Aesthetic and Visual Design
In Graphic Design and Digital Art, stretching an image can be a deliberate artistic choice to achieve specific effects. For instance, an Abstract image might benefit from exaggerated vertical or horizontal stretching to emphasize certain lines or textures, creating a sense of movement or drama. Photo Manipulation frequently uses non-proportional stretching to achieve surreal or stylized effects.
- Creating Panoramic Effects: By subtly stretching the edges of an image, especially a landscape, you can achieve a wider, more expansive feel without necessarily cropping significant portions. This technique requires a keen eye and often benefits from Photoshop’s Content-Aware Scale for natural blending.
- Stylized Backgrounds: For Wallpapers or Backgrounds, subtle, non-proportional stretching can create interesting textures or emphasize a dominant color scheme, providing an Aesthetic backdrop that doesn’t distract from foreground elements.
- Typographic Integration: When combining images with text in Visual Design layouts, minor stretching can help integrate elements better, ensuring harmony between the image and the overlaying typography. This is particularly relevant for Image-to-Text projects where visual balance is critical.
- Mood Boards and Thematic Collections: Experimenting with slight distortions can help establish a particular mood or theme. For Sad/Emotional imagery, a gentle vertical stretch might evoke a feeling of melancholy or depth, while a horizontal compression could create tension. These experimental stretches can contribute significantly to Mood Boards and Thematic Collections by enhancing emotional resonance.
When intentionally stretching an image for artistic purposes without maintaining the aspect ratio, it’s vital to:
- Work with a Copy: Always duplicate your original image before applying irreversible changes.
- Exercise Restraint: Even artistic distortion should be purposeful and not lead to an unpleasing, pixelated mess.
- Consider the Context: The effect should align with the overall message or aesthetic of your Creative Ideas.
Maintaining Quality Across Platforms
The ultimate goal of stretching an image is often to display it across various digital platforms, each with its own specifications and ideal aspect ratios. Instagram, as highlighted in the provided content, has its famous 4x5 vertical crop that can challenge photographers. Understanding these requirements is key to preventing re-cropping or awkward scaling by the platform itself, which can introduce unwanted distortion.
- Platform-Specific Ratios: Research the optimal image dimensions and aspect ratios for each platform where your images will be shared. For instance, Instagram supports 1:1, 4:5, and 1.91:1. Facebook, Twitter, and other platforms have their own recommendations. Utilizing these ratios from the outset or adjusting to them with minimal distortion ensures your High Resolution Photography looks crisp.
- Start with High Resolution: The golden rule for any image manipulation, especially stretching, is to start with the highest resolution original possible. A High Resolution image provides more data for the software to work with, minimizing pixelation even if slight distortion occurs. Stock Photos often come in various resolutions, so always opt for the largest available.
- Pre-Cropping and Composition: Sometimes, the best “stretch” is no stretch at all. If your original composition doesn’t lend itself well to a desired aspect ratio, consider re-cropping or adjusting your shot rather than forcing a stretch that compromises quality. This is part of mastering Digital Photography and Editing Styles.
- Post-Processing and Optimisation: After stretching, always re-evaluate your image’s sharpness, contrast, and color balance. Fine-tune these elements to compensate for any minor perceived softening. Finally, use Tophinhanhdep.com’s Optimizers and Compressors to prepare the image for web delivery, ensuring fast loading times without sacrificing the visual integrity of your Beautiful Photography or Thematic Collections.
Conclusion
The ability to expertly stretch an image without distortion is an indispensable skill in today’s visually driven world. It’s a delicate balance between technical precision and creative vision, ensuring that your Images, whether they are vibrant Wallpapers, profound Abstract art, or intimate Sad/Emotional photographs, always convey their intended message with clarity and impact. From the sophisticated Content-Aware Scale in Photoshop to the convenient resizing options in Paint, Preview, and mobile apps, various Image Tools are at your disposal.
Tophinhanhdep.com is committed to providing not only a rich collection of High Resolution and Beautiful Photography but also the Image Tools and knowledge necessary for you to master these techniques. By understanding the critical role of aspect ratio, judiciously applying stretching methods, and leveraging advanced features like AI Upscalers, you can confidently adapt your visuals for any purpose. Embrace these techniques to elevate your Visual Design, enhance your Digital Photography, and bring your Creative Ideas to life, ensuring every pixel on Tophinhanhdep.com, and wherever else your images may travel, truly shines.