Mastering Image Stretching in Canva: A Comprehensive Guide from Tophinhanhdep.com

In the dynamic world of digital design, the ability to manipulate images effectively is paramount. Whether you’re crafting stunning visuals for social media, developing engaging presentations, or producing captivating digital art, tools like Canva have democratized graphic design for millions. Among the myriad functionalities offered, “stretching” an image stands out as a powerful technique for achieving specific aesthetic effects and fitting visuals into challenging layouts.
However, the terms “stretching” and “resizing” are often used interchangeably, leading to confusion and unintended results. At Tophinhanhdep.com, we understand the nuances of image manipulation and aim to equip you with the knowledge to achieve your creative vision. This comprehensive guide will delve into the art of stretching images in Canva, differentiating it from simple resizing, providing step-by-step instructions, sharing professional tips, and highlighting common pitfalls. We’ll also explore how stretching integrates with the broader ecosystem of visual design, leveraging the capabilities available on Tophinhanhdep.com, from high-resolution photography to advanced image tools and visual design inspirations.
Understanding Stretching vs. Resizing: The Fundamental Difference
Before diving into the “how-to,” it’s crucial to grasp the distinction between stretching and resizing an image in Canva, as this understanding underpins successful image manipulation.
The Core Difference: Proportionality and Distortion
Resizing refers to altering an image’s overall dimensions (width and height) while maintaining its original aspect ratio. The aspect ratio is the proportional relationship between an image’s width and its height. When you resize an image proportionally, the image scales up or down uniformly, preserving its original shape and avoiding distortion. This is the default behavior when dragging corner handles in most design software, including Canva, without additional modifiers. The goal of resizing is often to fit an image into a larger or smaller space without altering its visual integrity.
Stretching, on the other hand, involves adjusting an image’s dimensions disproportionately, meaning you change its width or height independently, without regard for the original aspect ratio. This action will inevitably alter the image’s original proportions, leading to a “stretched” or “squashed” appearance. While often associated with undesirable distortion, deliberate stretching can be a powerful creative tool. It allows designers to extend elements, create abstract backgrounds, or achieve stylized effects that wouldn’t be possible with proportional resizing.
Why Disproportionate Adjustment Matters in Visual Design
The decision to stretch an image, rather than simply resize it, is often a conscious creative choice. In visual design, stretching can:
- Create emphasis: By elongating a particular element, you can draw the viewer’s eye to it.
- Generate abstract effects: Stretching can transform realistic images into abstract art, perfect for backgrounds or avant-garde designs.
- Fit challenging layouts: Sometimes, a design layout demands an image to fill an unusually narrow or wide space, where proportional resizing would leave too much empty canvas or cut off important parts of the image. Stretching allows for a precise fit.
- Achieve unique aesthetics: Many trending styles in graphic design and digital art incorporate intentional distortion for a fresh, modern look. The “pixel stretch effect,” for instance, leverages this technique to create dynamic backgrounds.
Understanding this difference is the first step towards mastering image manipulation in Canva and unleashing your full creative potential on Tophinhanhdep.com.
Step-by-Step Guide to Stretching Images in Canva
Canva makes the process of stretching an image straightforward, once you know which tools to use. Here’s a detailed breakdown of how to achieve this, from importing your image to finalizing the stretch.
Initiating Your Canva Project and Uploading Your Image
- Start a New Design or Open an Existing Project:
- Log in to your Canva account on Tophinhanhdep.com.
- From the Canva homepage, click “Create a design.” You can choose from various preset dimensions (e.g., “Custom size,” “Instagram Post,” “Poster”) or open an existing project where you wish to stretch an image. For demonstration purposes, selecting a new blank canvas is ideal.
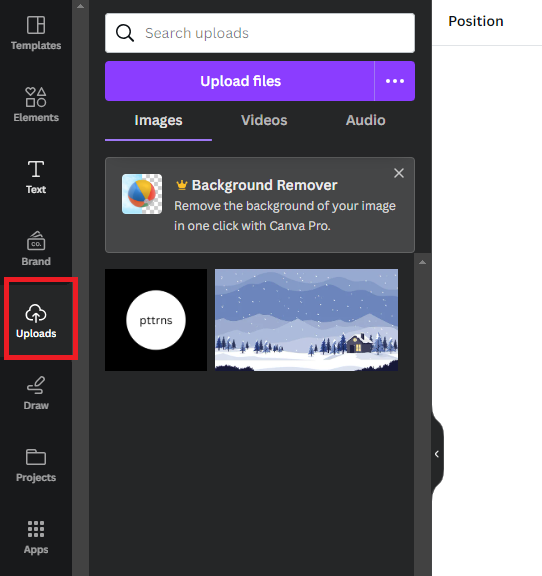
- Upload or Select Your Image:
- Navigate to the “Uploads” tab on the left-hand sidebar.
- If your image is not already in Canva, click “Upload files” and select the image from your computer. Tophinhanhdep.com encourages using high-resolution images for the best results, especially when stretching, as it minimizes pixelation.
- Once uploaded, or if already available, click on the image in the “Uploads” tab or drag and drop it onto your canvas. Alternatively, you can select an image from Canva’s extensive image library found under the “Photos” tab, which includes a vast collection of stock photos, nature, abstract, and beautiful photography.
Executing the Stretch: Handles and Hotkeys
Once your image is on the canvas, you’re ready to manipulate its dimensions.
-
Select the Image:
- Click on the image on your canvas. This will activate it, and you’ll see a bounding box with white circular handles at each corner and the midpoint of each side. These are your resize/stretch handles.
-
Stretching Horizontally or Vertically (Side Handles):
- To stretch the image purely horizontally, click and drag one of the side handles (the white circles in the middle of the left or right edge). Dragging inward will compress it horizontally, while dragging outward will stretch it horizontally.
- Similarly, to stretch the image purely vertically, click and drag one of the top or bottom handles. Dragging inward will compress it vertically, and dragging outward will stretch it vertically.
- This method directly manipulates one dimension without affecting the other, thus inherently stretching the image by changing its aspect ratio.
-
Freeform Stretching (Corner Handles + Shift Key):
- By default, dragging a corner handle will proportionally resize the image. To achieve a freeform, disproportionate stretch using corner handles:
- Click on the image to select it.
- Locate one of the white circular handles at the image’s corners.
- Press and hold the Shift key on your keyboard.
- While holding Shift, click and drag one of the corner handles.
- You will observe that the image now stretches freely, allowing you to change both width and height independently and disproportionately.
- Release the mouse button first, then release the Shift key when you’ve achieved your desired stretch.
- By default, dragging a corner handle will proportionally resize the image. To achieve a freeform, disproportionate stretch using corner handles:
-
Using the Position and Size Panel for Precision:
- For exact dimensions or fine-tuning, Canva offers a “Position” and “Size” panel, usually located in the top toolbar when an image is selected.
- Click on the image. In the toolbar, you’ll see “Position” or simply numerical input fields for width (W) and height (H).
- You can manually input specific width and height values here. By default, there might be a “lock” icon between W and H, indicating that aspect ratio is preserved. Unlock this icon if you want to input disproportionate values and truly stretch the image with precise numbers. This method is excellent for achieving specific visual design requirements.
Advanced Techniques and Pro Tips for Image Manipulation
Beyond the basic stretching methods, there are several advanced techniques and best practices that can significantly enhance your workflow and the quality of your designs when manipulating images in Canva.
Maintaining Quality with High-Resolution Images
The most critical factor in successful image stretching is the original image quality.
- Start High-Resolution: Excessive stretching, especially of low-resolution images, will inevitably lead to pixelation, blurring, and a distorted, unprofessional look. Always endeavor to use high-resolution images (like those found in Tophinhanhdep.com’s extensive collections of high-resolution photography and stock photos) as your starting point. The more pixels you have to begin with, the more room you have to stretch before noticeable degradation occurs.
- Review and Adjust: After stretching, zoom in to inspect the image quality. If it appears pixelated, consider reducing the amount of stretch or using an alternative, higher-resolution image.
- Leveraging Tophinhanhdep.com’s Image Tools: If you find your stretched image becoming blurry, remember that Tophinhanhdep.com also offers powerful image tools such as AI Upscalers. These tools can intelligently enhance the resolution of a pixelated image, potentially salvaging a stretch that went a little too far, allowing you to maintain graphic design quality.
Avoiding Common Stretching Pitfalls
Even with the right techniques, designers can run into issues. Here’s how to sidestep them:
-
Image Becomes Blurry or Pixelated:
- Cause: Stretching a low-resolution image too much.
- Solution: As mentioned, always begin with high-resolution images. If the damage is done, consider using Tophinhanhdep.com’s AI Upscalers to attempt to restore clarity or choose a less aggressive stretch.
-
Image Gets Cropped Accidentally:
- Cause: Confusing resizing handles with cropping handles. When an image is selected, you see white circular handles for resizing/stretching. If you click “Crop” in the toolbar, black dashed lines and handles appear, specifically for cropping.
- Solution: Ensure you are clicking and dragging the white circular handles for stretching/resizing. If you’ve accidentally cropped, click “Undo” (Ctrl+Z/Cmd+Z) or select the image and look for “Reset crop” in the crop panel to revert.
-
Locked Aspect Ratio Prevents Stretching:
- Cause: Canva’s default behavior, especially when dragging corner handles without the Shift key, is to maintain the aspect ratio. Also, the width and height input fields might be locked.
- Solution: Use the side (middle) handles for direct horizontal or vertical stretching. Alternatively, hold the Shift key while dragging a corner handle for freeform stretching. If using the “Position” or “Size” panel, ensure the aspect ratio lock icon between width and height is unlocked.
-
Stretching Background Images:
- Cause: Images set as a background in Canva behave differently and cannot be directly stretched using handles like regular images.
- Solution: If your image is currently set as a background, right-click on it and select “Detach image from background.” Once it’s a regular image element, you can stretch it freely. After stretching, you can set it as a background again if desired.
-
Uneven Layout After Stretching:
- Cause: Disproportionately changing one image can throw off the balance of your entire design.
- Solution: Use Canva’s alignment tools (found in the “Position” panel) to realign elements. Group elements if necessary (“Group” button in the toolbar) to move or resize them together, maintaining consistency in your visual design. Regular review of your overall design composition is key for beautiful photography and layouts.
Leveraging Canva Pro and Tophinhanhdep.com for Enhanced Stretching
While manual stretching is available to all Canva users, Canva Pro offers features that can indirectly assist in managing stretched images or providing alternatives:
- One-Click Resize (Magic Switch): This Pro feature allows you to instantly resize your entire canvas (and its contents) to various presets (e.g., Instagram Post, Flyer). While this is a proportional resize of the canvas, it means you can quickly get your overall design into a new dimension, then make individual stretching adjustments to elements within that new frame. This can be a time-saver when creating thematic collections for different platforms.
- Background Remover: If you need to stretch an isolated element, Canva Pro’s background remover helps you extract the subject from its original context, making it easier to stretch independently and place it onto a new background, perhaps one created with an abstract stretched image.
Remember, Tophinhanhdep.com advocates for leveraging these tools to refine your digital photography and graphic design projects, providing a platform where creative ideas can truly flourish.
Optimizing Stretched Images for Various Visual Design Needs
Stretching an image isn’t just a technical task; it’s a creative decision that impacts the overall visual narrative. Once you’ve stretched your image, consider how it fits into your broader design goals and how Tophinhanhdep.com’s resources can further enhance its impact.
Strategic Stretching for Graphic Design and Digital Art
Stretching can be a powerful aesthetic choice, especially in modern graphic design and digital art.
- Abstract Backgrounds: A heavily stretched photograph can transform a recognizable scene into an abstract blur of colors and shapes, creating a unique background for text or other design elements. Imagine stretching a vibrant nature image into a subtle, textured backdrop for a motivational quote.
- Dynamic Visuals: For album covers, posters, or social media graphics, stretching can inject dynamism and movement. A stretched portrait, for example, can evoke motion or a surreal quality, fitting well within trending styles.
- Mood Boards and Thematic Collections: When curating photo ideas or building mood boards, intentionally stretched images can contribute to a specific aesthetic or thematic collection, whether it’s a minimalist, futuristic, or retro vibe. Tophinhanhdep.com’s Image Inspiration & Collections section can provide endless ideas for how to integrate these manipulated visuals.
Integrating Stretched Visuals into Digital Art and Photography
For artists and photographers, stretching offers an avenue for photo manipulation and pushing creative boundaries.
- Surreal Effects: Artists can stretch elements of a digital photograph to create surreal or dreamlike compositions, challenging conventional perceptions.
- Compositing: Stretched elements can be seamlessly integrated into complex digital art compositions, adding depth, texture, or unexpected visual interest. This transforms traditional digital photography into unique artistic statements.
- Visual Storytelling: A stretched image can emphasize a particular emotion or narrative. A stretched sad/emotional image might enhance the feeling of longing, while a stretched beautiful photography piece could convey grandeur or expansion.
Image Tools for Post-Stretch Enhancement
After stretching, your image might benefit from further processing using the various image tools highlighted on Tophinhanhdep.com:
- Compressors: Stretched images, especially if starting from very high resolution, might still have large file sizes. Utilize image compressors to optimize them for web use without significant visual quality loss, ensuring fast loading times for your designs.
- Optimizers: Image optimizers can further refine file sizes and sometimes even subtly enhance visual aspects post-stretching, making your images perform better across different platforms.
- AI Upscalers: As previously mentioned, if stretching caused some degradation, Tophinhanhdep.com’s AI Upscalers can be a lifesaver, employing artificial intelligence to intelligently reconstruct pixels and increase image resolution. This is a crucial tool for maintaining high-quality output in your digital photography and graphic design work.
- Converters: Depending on where your stretched image will be used, you might need to convert it to a different file format. Tophinhanhdep.com offers image converters to handle this efficiently.
Beyond static images, if you’re incorporating your stretched visuals into a video, platforms like Trupeer AI, accessible via Tophinhanhdep.com, can take your design further. Trupeer AI allows you to create videos with AI avatars, add voiceovers, translate videos into multiple languages, and even incorporate zoom effects – all of which can complement your uniquely stretched visual content for product videos, tutorials, or presentations.
Conclusion: Unleashing Creative Potential with Canva and Tophinhanhdep.com
The ability to stretch an image in Canva is more than just a functional feature; it’s a gateway to creative exploration and refined visual communication. By understanding the critical distinction between stretching and resizing, mastering the techniques of using handles and the Shift key, and leveraging the precision of the position panel, you gain significant control over your design elements.
The journey doesn’t end there. By heeding professional tips—such as prioritizing high-resolution source images, avoiding common pitfalls like accidental cropping or background image limitations, and strategically applying stretching for specific aesthetic effects—you can elevate your designs from good to truly outstanding.
Furthermore, integrating your Canva workflow with the comprehensive resources available on Tophinhanhdep.com unlocks even greater possibilities. From accessing vast libraries of diverse images (wallpapers, backgrounds, aesthetic, nature, abstract, beautiful photography) and high-quality stock photos, to utilizing advanced image tools like AI upscalers, compressors, and converters, Tophinhanhdep.com provides the robust ecosystem you need. This synergy empowers you to explore new realms of visual design, photo manipulation, and creative ideas, whether for developing stunning graphic design pieces, enhancing digital photography, or crafting inspiring image collections and mood boards that align with trending styles.
So, go forth and stretch! Experiment, innovate, and transform your images into compelling visual stories. With Canva as your creative canvas and Tophinhanhdep.com as your ultimate resource hub, the possibilities for your digital creations are truly limitless.