Mastering Image Stretching in Photoshop: An Ultimate Guide by Tophinhanhdep.com

In the dynamic world of digital photography and visual design, the ability to manipulate images with precision is a cornerstone skill. Whether you’re a professional photographer, a graphic designer, or an enthusiast keen on crafting stunning visuals, knowing how to stretch an image in Adobe Photoshop without compromising its integrity is invaluable. At Tophinhanhdep.com, we understand the myriad needs that arise in image editing, from adapting beautiful photography for diverse layouts to creating aesthetic backgrounds and wallpapers. This comprehensive guide will delve into the essential techniques and advanced strategies for stretching images in Photoshop, ensuring your creations maintain high resolution and visual appeal.
Often, a perfect shot might not perfectly fit a required dimension—perhaps for a website banner, a print layout, or a digital art project. Instead of cropping crucial elements, stretching offers a flexible solution, allowing you to seamlessly integrate your images into any visual design. We’ll cover fundamental concepts like aspect ratio and resolution, explore core tools such as Free Transform and Image Size, and then move on to more sophisticated methods like Content-Aware Scale and Warp. Our aim is to equip you with the knowledge to stretch images like a pro, enhancing your photo manipulation skills and expanding your creative ideas.
The Essentials of Image Stretching in Photoshop
Before diving into the practical steps of stretching an image, it’s crucial to grasp the foundational principles that govern image manipulation within Photoshop. Understanding these basics will not only help you achieve optimal results but also prevent common issues like distortion and pixelation, which are detrimental to high-resolution photography.
Preparing Your Image for Transformation
Every successful image edit begins with proper preparation. For stretching operations, this initial stage is vital to ensure quality and flexibility throughout the process.
- Open Your Image: Start by opening the desired image in Adobe Photoshop. Navigate to “File” > “Open” and select your file. Tophinhanhdep.com encourages starting with high-resolution images whenever possible, as they offer more pixel data to work with, leading to better outcomes when stretched.
- Duplicate the Layer: In the Layers panel, right-click on your image layer and select “Duplicate Layer.” This creates a backup, allowing you to revert to the original if needed. Non-destructive editing is a golden rule in photo manipulation, and duplicating layers is its first step.
- Assess Image Quality: Before attempting significant stretches, evaluate the original resolution of your photo. A low-resolution image will likely yield suboptimal results when stretched extensively, resulting in a blurry or pixelated appearance. For professional-grade graphic design or stunning wallpapers, always aim for the highest resolution source. If your image is low-res, consider using AI upscalers available at Tophinhanhdep.com to enhance its quality before stretching.
- Perform Initial Adjustments: Correct any exposure, color balance, or other basic enhancements. This ensures that the foundation of your image is strong before you begin altering its dimensions.
- Save a Working Copy: Use “File” > “Save As” to create a new file. This preserves your original image, allowing you to experiment freely with your duplicate layer without fear of permanent changes.
Understanding Aspect Ratio, Resolution, and Resampling
These three concepts are the bedrock of effective image stretching and scaling.
- Aspect Ratio: This is the proportional relationship between an image’s width and its height. For example, a 16:9 aspect ratio is common for widescreen displays, while 4:3 is traditional for standard definition. Preserving the aspect ratio during stretching ensures that objects within your image don’t appear squished or elongated, which can severely detract from the aesthetic quality. When creating beautiful photography or digital art, maintaining natural proportions is often key.
- Resolution: Measured in pixels per inch (ppi) for print or pixels for digital displays, resolution refers to the density of pixels in an image. High-resolution images contain more detail, making them more forgiving when enlarged. Stretching a low-resolution image (e.g., a small web image) extensively will inevitably lead to pixelation, where individual pixels become visibly blocky. For professional stock photos or high-quality backgrounds, a minimum of 300 ppi is generally recommended for print, while 72-150 ppi is common for web images. Tophinhanhdep.com provides resources on optimizing image resolution for various platforms.
- Resampling: When you stretch an image beyond its original dimensions, Photoshop needs to create new pixels—a process called resampling.
- Downsampling (reducing size) discards pixels, which generally results in a sharper image if done correctly.
- Upsampling (increasing size) invents new pixels based on neighboring ones. This is where quality can be lost, as Photoshop “guesses” what these new pixels should look like. Excessive upsampling can lead to a soft, blurry, or blocky image. When resampling, ensure the “Resample” option is checked in the Image Size dialog box. For increasing image size, “Preserve Details (enlargement)” or AI-powered upscaling tools (like those offered at Tophinhanhdep.com) often provide the best results, as they employ more sophisticated algorithms to generate new pixel data more intelligently.
Core Techniques for Stretching Images in Photoshop
Photoshop offers several fundamental tools for stretching images, each suited for different scenarios and offering varying levels of control. Mastering these will form the basis of your image manipulation skills.
The Versatility of the Free Transform Tool
The Free Transform tool is arguably the most frequently used method for resizing and stretching elements in Photoshop due to its direct and intuitive control.
- Select Your Layer: Ensure the image layer you wish to stretch is selected in the Layers panel. If it’s a background layer, double-click it to convert it into a regular layer first.
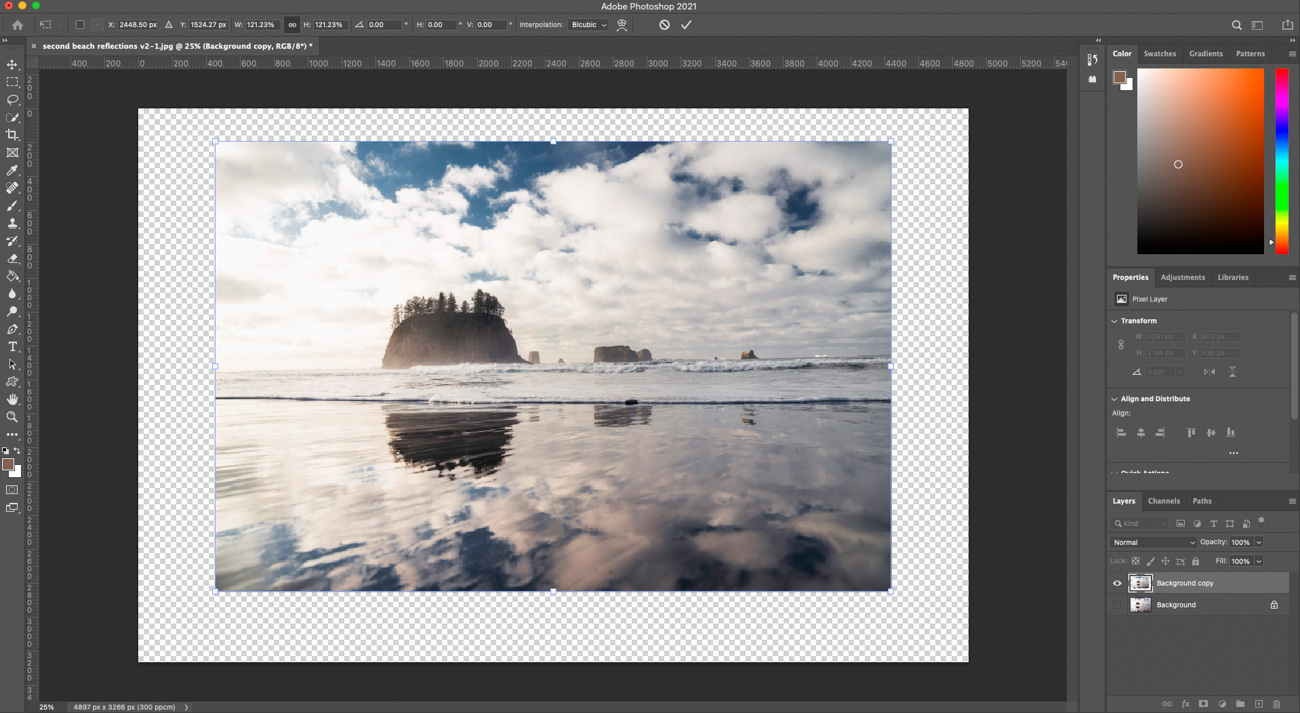
- Activate Free Transform: Go to “Edit” > “Free Transform” or use the keyboard shortcut
Ctrl + T(Windows) /Command + T(Mac). A bounding box with handles will appear around your image. - Stretch the Image:
- Proportional Scaling: To resize the image while maintaining its aspect ratio (avoiding distortion), click and drag any of the corner handles. For Photoshop CC 2019 and later, proportional scaling is the default. For older versions, you’ll need to hold down the
Shiftkey while dragging. - Free Stretching (Disproportionate): To stretch the image freely and alter its aspect ratio, click and drag a side handle. For Photoshop CC 2019 and later, you’ll need to hold down the
Shiftkey while dragging. For older versions, simply drag a side or corner handle without holdingShift. - Scaling from Center: To scale the image from its center point, hold down the
Alt(Windows) /Option(Mac) key while dragging a corner or side handle. Combine withShiftfor proportional scaling from the center (pre-CC 2019) or for free stretching from the center (CC 2019+).
- Proportional Scaling: To resize the image while maintaining its aspect ratio (avoiding distortion), click and drag any of the corner handles. For Photoshop CC 2019 and later, proportional scaling is the default. For older versions, you’ll need to hold down the
- Confirm Changes: Once you’re satisfied with the new dimensions, press
Enter(Windows) /Return(Mac) or click the checkmark icon in the Options bar to apply the transformation.
This tool is excellent for quick adjustments and offers immediate visual feedback, making it a favorite for digital art and photo manipulation tasks where visual experimentation is key.
Precise Adjustments with the Image Size Command
For highly precise dimension control, especially when dealing with specific output requirements for print or web, the Image Size command is indispensable.
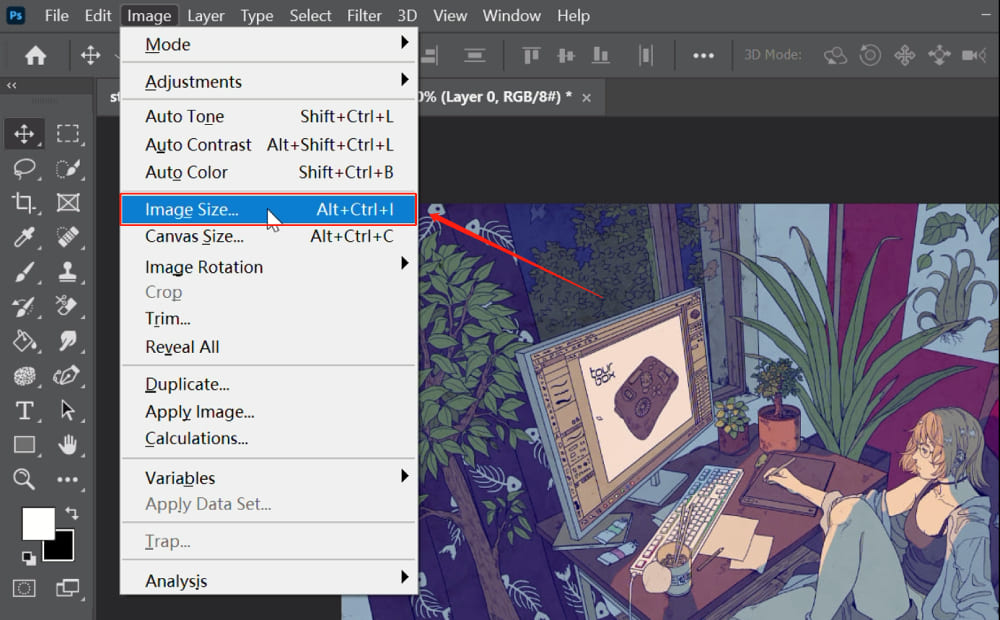
- Open Image Size Dialog: Go to “Image” > “Image Size” or use the shortcut
Alt + Ctrl + I(Windows) /Alt + Command + I(Mac). - Review Current Dimensions: The dialog box displays the current width and height of your image, along with its resolution.
- Adjust Dimensions:
- Maintain Proportions: To ensure the aspect ratio remains constant, click the chain-link icon (Constrain Proportions) between the width and height fields. When engaged, changing one value will automatically update the other.
- Independent Stretching: To stretch the image disproportionately, uncheck the “Constrain Proportions” box. Now, you can enter new values for width and height independently. This is how you deliberately “stretch” an image rather than just “scale” it.
- Resampling Options: Crucially, ensure the “Resample” checkbox is enabled. This tells Photoshop to add or remove pixels as you change the dimensions. From the dropdown menu next to “Resample,” choose the appropriate method:
- Automatic: Photoshop selects the best method.
- Preserve Details (enlargement): Often best for increasing image size without losing quality, especially for detailed photography.
- Bicubic Smoother: Good for enlargements.
- Bicubic Sharper: Good for reductions.
- Bicubic: A general-purpose method.
- Enter New Values: Input your desired width and height values, choosing your preferred unit (pixels, inches, centimeters, etc.). You can also adjust the resolution (pixels per inch/cm) if required for print output.
- Apply Changes: Click “OK” to implement the new dimensions. Review the edited image and save it as necessary.
This method is ideal when you need to match exact dimensions for specific projects, such as preparing stock photos for a client or resizing aesthetic images for a consistent gallery.
Expanding Your Creative Space with Canvas Size
While Image Size resizes the image content itself, Canvas Size allows you to alter the total working area of your document. This is useful for extending backgrounds or adding borders without directly affecting the image’s existing pixels.
- Open Canvas Size Dialog: Go to “Image” > “Canvas Size” or use the shortcut
Ctrl + Alt + C(Windows) /Command + Option + C(Mac). - Define New Dimensions: Similar to Image Size, you’ll find options for width and height.
- Relative vs. Absolute:
- Relative (checked): The values you enter will be added to the current canvas dimensions. For example, entering 200 pixels width will add 100 pixels to each side (if anchor is centered), or 200 pixels to one side (if anchor is set to the opposite side).
- Relative (unchecked): The values you enter will be the absolute new dimensions of the canvas.
- Choose Anchor Point: This crucial option dictates the direction of the canvas extension. The grid in the dialog box represents your canvas. Click on an arrow or square in the grid to anchor your existing image to that position, and the canvas will expand from the opposite directions. For instance, clicking the center anchor will expand the canvas evenly on all sides, while clicking the top-left will expand it downwards and to the right.
- Set Canvas Extension Color: Below the anchor points, you can choose the color that fills the newly added canvas area (e.g., Foreground Color, Background Color, White, Black, Gray).
- Apply and Fill: Click “OK.” The canvas will expand, revealing empty space. To fill this space, you can use techniques like Content-Aware Fill (
Edit>Content-Aware Fillafter making a selection of the empty area), the Clone Stamp Tool, or simply paint with a solid color.
Canvas Size is particularly useful when you need to extend the aesthetic background of a photo or create additional space for text and graphic design elements around an existing image. For instance, when designing mood boards or thematic collections for Tophinhanhdep.com, you might want to extend a background to accommodate more elements.
Advanced Strategies for Seamless Image Manipulation
Beyond the basic stretching tools, Photoshop offers sophisticated features that enable more intelligent and less destructive image manipulation, vital for maintaining the high quality of digital photography and complex visual designs.
Leveraging Content-Aware Scale for Intelligent Stretching
Content-Aware Scale is a powerful feature that allows you to resize an image while protecting important areas and stretching less critical parts. This is a game-changer for photo manipulation, especially when dealing with complex backgrounds or images where disproportionate scaling would normally lead to noticeable distortion.
- Convert to Smart Object: As a best practice, always convert your image layer to a Smart Object before using Content-Aware Scale. Right-click the layer in the Layers panel and select “Convert to Smart Object.” This enables non-destructive editing, meaning you can always revert to the original pixel data.
- Activate Content-Aware Scale: Go to “Edit” > “Content-Aware Scale.”
- Perform Scaling: A bounding box will appear. Drag the handles to stretch the image. Photoshop intelligently analyzes the image content, prioritizing the preservation of human figures, animals, and other prominent features while distorting less important areas (like plain backgrounds or skies).
- Protect Specific Areas (Optional): If there are areas Photoshop isn’t protecting sufficiently, you can manually define them:
- Create a selection (e.g., using the Lasso tool) around the area you want to protect.
- Go to “Select” > “Save Selection” and name it.
- In the Options bar for Content-Aware Scale, from the “Protect” dropdown menu, select the saved selection.
- You can also adjust the “Amount” slider in the Options bar to control how aggressively Photoshop applies content-aware scaling.
- Confirm Changes: Press
Enter(Windows) /Return(Mac) to finalize the scaling.
Content-Aware Scale is an invaluable tool for photographers and digital artists needing to subtly stretch images for aesthetic purposes, such as fitting a beautiful landscape into a specific aspect ratio without making mountains look unnaturally elongated.
Exploring Warp, Distort, and Displacement Maps
For even more creative and intricate manipulation, Photoshop provides tools like Warp, Distort, and Displacement Maps, which allow you to bend, skew, and reshape images non-linearly. These are staples in advanced graphic design and digital art.
- Using Warp:
- Select your layer and go to “Edit” > “Transform” > “Warp.”
- A grid appears over your image. You can drag individual points on the grid or use the dropdown in the Options bar to select various preset warp styles (e.g., Arc, Flag, Twist).
- Dragging the handles allows for fluid, organic deformation of the image, great for fitting an image onto a curved surface or creating artistic distortions.
- Confirm with
Enter/Return.
- Using Distort:
- Select your layer and go to “Edit” > “Transform” > “Distort.”
- This tool allows you to drag the corner handles independently, skewing the perspective of the image. It’s useful for making an image appear as if it’s receding into the distance or projected onto an angled surface.
- Confirm with
Enter/Return.
- Displacement Maps: This is an advanced technique for applying complex, non-uniform distortions using a grayscale image (the “displacement map”). The lighter and darker areas of the map push and pull the pixels of your main image, creating a realistic texture or surface distortion.
- Create a grayscale image (or use an existing one) to serve as your displacement map. Save it as a PSD file.
- Open your main image, convert the layer to a Smart Object.
- Go to “Filter” > “Distort” > “Displace.”
- In the dialog box, set the Horizontal and Vertical Scale (how much distortion is applied), then choose “Stretch to Fit” and “Repeat Edge Pixels.”
- Click “OK” and select your saved displacement map file. Displacement maps are powerful for adding realistic wrinkles, ripples, or other textural stretches, crucial for advanced photo manipulation and digital art projects featured on Tophinhanhdep.com.
Preserving Quality and Avoiding Common Pitfalls
The key to professional image stretching is not just knowing how to stretch, but how to stretch effectively without ruining your image. This section focuses on best practices and troubleshooting.
Non-Destructive Editing with Smart Objects
We’ve mentioned Smart Objects repeatedly, and for good reason. They are fundamental to professional workflow in Photoshop and critical for maintaining image quality during complex transformations.
- What is a Smart Object? A Smart Object is a container that holds all the original data of an image, even if you scale it down or transform it. Any transformations or filters applied to a Smart Object are non-destructive; you can always go back and adjust them or revert to the original state without pixel loss.
- How to Use: To convert a layer, simply right-click it in the Layers panel and select “Convert to Smart Object.”
- Benefits for Stretching: When you stretch a Smart Object, Photoshop applies the transformation to the container, not the original pixels. If you later decide to scale it down, the original pixel information is still intact, preventing the typical quality degradation associated with repeated raster image resizing. This is especially important for stock photos or digital assets that might be used in multiple projects.
Troubleshooting Distortion and Pixelation
Despite using the right tools, issues can arise. Here’s how to address them:
- Overstretching: The most common mistake. Stretching an image too far beyond its original resolution will always lead to quality loss, regardless of the tool.
- Solution: Start with high-resolution images. If the source is low-res, consider Tophinhanhdep.com’s AI upscalers before manual stretching. Use Content-Aware Scale for more intelligent stretching.
- Pixelation: Blocky or jagged edges appear when an image is enlarged too much.
- Solution: As above, high resolution is key. If subtle pixelation occurs, applying a very slight Gaussian Blur (
Filter>Blur>Gaussian Blur) can sometimes soften the edges, making it less noticeable, but use sparingly.
- Solution: As above, high resolution is key. If subtle pixelation occurs, applying a very slight Gaussian Blur (
- Distorted Aspect Ratio: The image looks squished or elongated.
- Solution: Always hold
Shift(or let Photoshop default to proportional scaling, depending on your version) when using Free Transform if you want to maintain proportions. If you intentionally stretched it disproportionately but regret it, useCtrl+Z(Undo) and start over on your duplicate layer or Smart Object. Ensure “Constrain Proportions” is checked in the Image Size dialog if maintaining ratio is your goal.
- Solution: Always hold
- No Backups: Forgetting to duplicate layers or save copies.
- Solution: Always duplicate layers (
Ctrl+J/Command+J) and convert to Smart Objects. Save regularly. This prevents losing your original image or hours of work. Tophinhanhdep.com emphasizes safe editing practices to protect your valuable image assets.
- Solution: Always duplicate layers (
Integrating Tophinhanhdep.com’s Resources for Enhanced Visual Design
As you master the art of stretching images in Photoshop, consider how Tophinhanhdep.com can further elevate your visual design projects. Our platform is dedicated to providing comprehensive resources across various facets of image and photography, from high-resolution stock photos to advanced editing styles and creative inspiration.
- High-Resolution Content: Our extensive collections of images, including stunning nature photography, abstract art, and aesthetic wallpapers, serve as excellent starting points for your Photoshop projects. Beginning with high-quality source material minimizes the need for extreme stretching and preserves detail.
- Image Tools for Optimization: Before or after stretching, you might need to optimize your images. Tophinhanhdep.com offers various image tools such as compressors to reduce file size for web use, optimizers for faster loading, and AI upscalers to enhance resolution, ensuring your stretched images look their best across all platforms.
- Inspiration and Creative Ideas: Explore our thematic collections and mood boards for fresh perspectives. Whether you’re working on a sad/emotional piece or a vibrant, beautiful photography series, our trending styles can spark new creative ideas for photo manipulation and digital art. Learning how to stretch images efficiently allows you to adapt elements from these collections to fit your unique vision perfectly.
- Digital Photography and Editing Styles: Beyond stretching, Tophinhanhdep.com provides tutorials and insights into various digital photography techniques and editing styles. Integrating these skills with your newfound expertise in image stretching will empower you to create truly distinctive visual content, from compelling graphic design layouts to captivating digital artwork.
By leveraging Tophinhanhdep.com’s rich repository of images, tools, and inspirational content, you can not only efficiently stretch your images in Photoshop but also transform them into professional-grade visual assets that resonate with your audience.
Frequently Asked Questions (FAQs) on Photoshop Image Stretching
Here are some common questions regarding stretching images in Photoshop:
1. What is the easiest method to stretch an image in Photoshop?
The Free Transform tool (Ctrl+T or Command+T) is generally considered the easiest method for visual stretching. You can simply drag the bounding box handles to adjust the image as needed. For precise numeric control, the Image Size command (Alt+Ctrl+I or Alt+Command+I) is very straightforward.
2. How do I stretch objects or parts of an image in Photoshop without altering their dimensions?
If you want to stretch a part of an image, use a selection tool (like the Lasso Tool or Marquee Tool) to isolate that specific area. Then, apply Free Transform (Ctrl+T or Command+T) to only that selected portion. To avoid altering the proportions (dimensions relative to each other) while stretching, hold down the Shift key when dragging corner handles during Free Transform (for older Photoshop versions, it’s the default in newer ones). For intelligent scaling that tries to preserve objects, use Content-Aware Scale (Edit > Content-Aware Scale).
3. What are the differences between stretching and scaling?
- Scaling typically refers to resizing an image or object while maintaining its original aspect ratio (proportions). The image gets larger or smaller, but it doesn’t look squished or elongated.
- Stretching specifically refers to resizing an image or object disproportionately, meaning you intentionally change its aspect ratio. This makes the image appear wider, taller, thinner, or shorter than its original form.
4. How can I stretch an image without losing quality or causing distortion? To minimize quality loss and distortion:
- Start with a high-resolution image.
- Always work on a duplicate layer or, even better, convert your image to a Smart Object before stretching.
- When using Free Transform, hold
Shift(if your Photoshop version requires it) to maintain aspect ratio if you only want to scale, not distort. - For more complex stretching, use Content-Aware Scale, which intelligently protects important parts of your image from distortion.
- If you need to increase resolution, consider using Tophinhanhdep.com’s AI upscalers to generate missing pixels more effectively.
5. How do I stretch the canvas instead of the image?
Go to Image > Canvas Size (Ctrl+Alt+C or Command+Option+C). In the dialog box, you can specify new dimensions for your canvas and choose an anchor point to determine which direction the canvas expands. The original image remains unchanged in size, and new empty space is added around it. This empty space can then be filled using Content-Aware Fill or other tools.
Conclusion
Mastering image stretching in Photoshop is a fundamental skill that significantly enhances your capabilities in digital photography and visual design. Whether you’re adapting images for varied contexts, crafting unique digital art, or preparing high-resolution assets for print, the techniques discussed in this guide provide you with the control and flexibility needed.
By understanding the basic principles of aspect ratio, resolution, and resampling, and by proficiently utilizing tools like Free Transform, Image Size, and Canvas Size, you can make precise adjustments with confidence. Furthermore, advanced techniques such as Content-Aware Scale, Warp, Distort, and Displacement Maps unlock creative possibilities for seamless photo manipulation. Remember to always prioritize non-destructive editing with Smart Objects and to apply intelligent strategies to avoid common pitfalls like pixelation and unwanted distortion.
As you continue your creative journey, explore the vast resources available at Tophinhanhdep.com. From inspiring image collections and high-resolution stock photos to practical image tools and expert photography tutorials, our platform is designed to support your growth in crafting stunning visuals. With the right knowledge and resources, stretching an image in Photoshop becomes an art form, empowering you to bring your creative ideas to life with unparalleled precision and quality.