How to Superimpose Images: Unleashing Your Creative Vision with Tophinhanhdep.com

In the dynamic world of digital photography and visual design, the ability to merge or “superimpose” images stands as a powerful technique for creative expression. What was once considered the exclusive domain of Photoshop experts is now accessible to enthusiasts and professionals alike, thanks to a wealth of user-friendly software and mobile applications. Superimposition, at its core, involves blending two or more pictures together, imposing one image onto another in a creative and often imaginative manner. This technique allows artists, photographers, and casual users to craft stunning visual narratives, create surreal dreamscapes, replace mundane backgrounds with breathtaking scenes, or simply add a touch of humor to their photos.
At Tophinhanhdep.com, we understand the desire to transcend ordinary photography and dive into the realm of digital art and photo manipulation. Our extensive resources cover everything from high-resolution wallpapers and aesthetic backgrounds to advanced editing styles and creative ideas. This guide will demystify the process of superimposing images, showcasing various methods—from intuitive desktop software like PhotoWorks to powerful mobile apps such as Superimpose X and the industry-standard Adobe Photoshop. We’ll explore how these tools, often leveraging AI upscaling and optimization, empower you to transform your image collections into inspiring visual stories, perfect for mood boards or trending thematic collections. Get ready to unlock your creative potential and bring your wildest visual ideas to life.
The Transformative Power of Image Superimposition
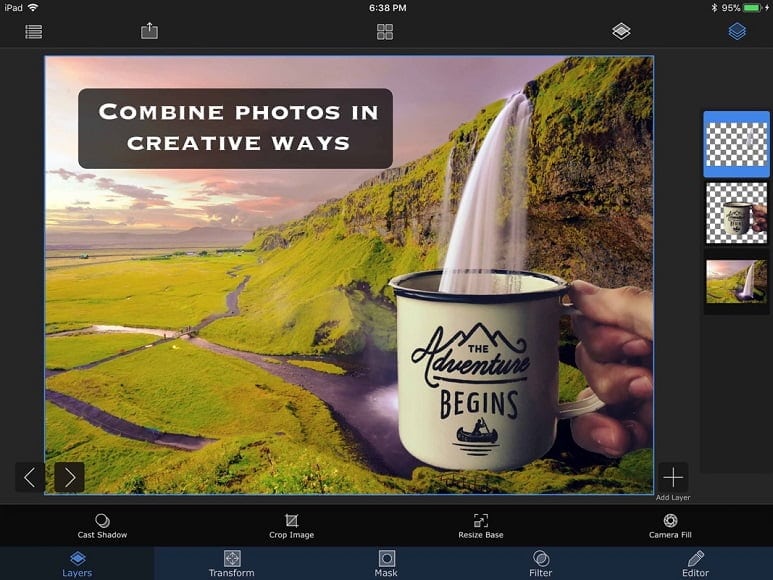
Image superimposition is far more than just layering one picture on top of another; it’s an art form that transforms ordinary photographs into extraordinary visual compositions. It invites viewers to look beyond the obvious, sparking imagination and conveying complex emotions or ideas through blended realities.
What is Image Superimposition? Defining the Digital Artistry
At its heart, image superimposition is the technique of combining visual elements from multiple source images into a single, cohesive photograph. This process can range from subtle blending that enhances a scene to dramatic photo manipulation that creates an entirely new, often surreal, reality. Think of a silhouette against a vibrant sunset sky, a person seamlessly integrated into an alien landscape, or a delicate floral pattern overlaid onto a portrait. These are all examples of superimposition.
Historically, this technique originated in darkroom photography, involving multiple exposures on a single film. With the advent of digital photography and powerful image tools, it has evolved into a versatile digital art form. Modern software and apps utilize layers, masks, and blending modes to allow precise control over how images interact, enabling sophisticated visual design that was once only possible through painstaking manual effort.
For creators looking to explore digital art or enhance their visual design portfolios, superimposition offers a canvas of endless possibilities. It’s a fundamental aspect of photo manipulation, allowing for the construction of imaginary scenes, the fusion of disparate concepts, and the creation of unique aesthetic images that captivate and inspire. Whether you’re working with high-resolution stock photos or personal beautiful photography, superimposition techniques can elevate your work to new artistic heights.
Why Superimpose? Elevating Your Visual Storytelling and Aesthetic
The motivations behind superimposing images are as diverse as the results themselves. This technique serves both artistic and practical purposes, providing a robust toolset for various creative endeavors:
- Artistic Expression and Surrealism: For digital artists and photographers, superimposition is a gateway to creating surreal and dreamlike imagery. By blending elements that wouldn’t naturally coexist, you can evoke emotions, tell abstract stories, or simply produce visually stunning artwork. This directly feeds into creating unique “Aesthetic Images” or exploring “Abstract” themes within your “Image Inspiration & Collections.”
- Enhanced Storytelling: Superimposing can add layers of meaning to an image. Imagine a portrait overlaid with symbols or textures that represent the subject’s personality or journey. This technique allows for richer, more nuanced storytelling, turning a simple photograph into a deeper narrative.
- Background Replacement and Enhancement: One of the most common practical uses is replacing a dull or distracting background with a more appealing one. Whether it’s swapping a plain wall for a vibrant “Nature” scene or an urban backdrop for a serene “Wallpaper” design, superimposition is invaluable for perfecting image compositions. This is particularly useful for product photography or portraits where the environment needs careful curation.
- Creative Composites and Montages: Creating a photo montage involves combining multiple images to form a cohesive whole. Superimposition tools make it easy to assemble these composites, whether for personal memories, promotional materials, or complex graphic design projects. Think of “Mood Boards” and “Thematic Collections” – superimposition is key to creating compelling visual narratives.
- Adding Thematic Elements and Textures: Superimposition is excellent for adding specific elements like text, logos, patterns, or textures to an image. This can be for branding purposes, creating unique “Digital Art,” or simply adding visual interest. For instance, overlaying a subtle grunge texture can give a “Beautiful Photography” piece an edgy “Editing Style.”
- Humor and Pranks: With the right tools, face swaps, unexpected object placements, and funny composites become incredibly easy to create, adding a lighthearted dimension to your image collection.
- Exploring Creative Ideas and Trending Styles: As seen on Tophinhanhdep.com, superimposition is a popular technique in many trending visual styles, from minimalist overlays to complex double exposures. It empowers you to experiment with different “Photo Ideas” and push the boundaries of conventional photography.
Ultimately, superimposition allows you to transcend the limitations of a single shot, opening up a world of “Creative Ideas” and empowering you to craft “Visual Designs” that are truly unique and impactful.
Desktop Mastery: Superimposing Images with Software
For those who prefer the precision and power of a desktop environment, a variety of software options exist for superimposing images. From user-friendly, AI-driven tools to robust open-source alternatives, there’s a solution for every skill level and creative need. These tools are ideal for producing high-resolution outputs suitable for “Digital Photography” projects, “Graphic Design,” or detailed “Photo Manipulation.”
Effortless Blending with Tophinhanhdep.com’s Recommended Tools (PhotoWorks Focus)
Superimposing images doesn’t have to be daunting. Many users mistakenly believe that advanced software like Adobe Photoshop is the only path to creating layered artwork. However, convenient photo editors are now available that offer similar editing arsenals with a significantly gentler learning curve. Tophinhanhdep.com recommends exploring tools like PhotoWorks for its blend of power and simplicity, making complex “Photo Manipulation” accessible to everyone.
PhotoWorks is an AI-driven software available for both Mac and Windows. It provides an intuitive interface and a suite of powerful tools that make blending images together a straightforward process. Here’s a step-by-step guide to superimposing images using PhotoWorks:
- Download and Install PhotoWorks: The first step is to acquire the software. Tophinhanhdep.com encourages you to visit the PhotoWorks website for a free trial and install it on your PC or Mac. This ensures you’re ready to start your creative journey.
- Open the Base Picture: Launch PhotoWorks and open the image that will serve as your background. This foundational picture can be loaded by clicking “Open Photo” or by simply dragging and dropping the file from its folder. This is your canvas for “Creative Ideas.”
- Pick the Image Overlay Tool: Navigate to the “Tools” tab within the software. Here, you will find the “Image Overlay” option. This critical feature allows you to add a secondary image onto your base layer. You can choose from the software’s built-in clipart library or, more commonly, select any image of your choosing from your personal “Image Collections.”
- Superimpose and Adjust the Top Picture: Once you’ve selected your overlay image, it will appear on top of your background. Now, the creative fun begins! You can freely move this new layer around the canvas, rotate it to achieve the desired angle, and resize it to fit your concept perfectly. This step is crucial for “Photo Manipulation” and ensuring your “Visual Design” looks exactly as you envision.
- Save Your Creation: After you’ve meticulously blended and adjusted your images to your satisfaction, the final step is to save your masterpiece. Click the prominent save button (often a big blue one) to export your file. PhotoWorks typically offers various formats such as PNG, JPEG, or BMP, allowing you to choose the best option for “High Resolution” quality or web optimization.
Beyond basic superimposition, PhotoWorks boasts a range of other capabilities that align perfectly with Tophinhanhdep.com’s focus on diverse “Editing Styles” and “Digital Photography”:
- Photo Montage Creation: Easily combine multiple photos for a cohesive narrative.
- Face Swap: A fun tool for humorous “Creative Ideas” or playful “Photo Manipulation.”
- Trendy Filters: Instantly stylize your images with popular “Aesthetic” looks.
- Blur Effects: Create dreamy backgrounds or artistic depth of field.
- Adding People to Photos: Seamlessly integrate subjects into new environments.
- Vintage Styles: Give your photos a classic, timeless “Editing Style.”
- Color Accents: Isolate and enhance specific colors in black and white photos for dramatic effect.
With PhotoWorks, complex “Photo Manipulation” becomes an enjoyable and accessible creative endeavor, enabling you to produce professional-looking results without extensive training.
Free Alternatives for PC and Mac: GIMP and Beyond
While premium software offers extensive features, excellent free alternatives are available for superimposing images on desktop computers. These tools are perfect for users on a budget or those looking to experiment with “Digital Art” without a financial commitment.
GIMP (GNU Image Manipulation Program): GIMP is arguably the most powerful free and open-source image editor available, often touted as a free alternative to Photoshop. It offers a comprehensive set of features for “Photo Manipulation,” “Graphic Design,” and general image editing, including robust capabilities for superimposition. The process in GIMP mirrors professional software:
- Open Base and Top Images: Start by opening your background image in GIMP. Then, open your foreground image.
- Copy and Paste: Select the foreground image, copy it, and then paste it as a new layer over your background image.
- Adjust and Blend: Once pasted, you can use GIMP’s transformation tools (scale, move, rotate) to position and resize the top layer. The Layers panel allows you to adjust the opacity of the top layer, creating a transparent blend, and experiment with various blending modes for different “Editing Styles.” You can also use layer masks to selectively reveal or conceal parts of the superimposed image, offering precise control over the final “Visual Design.”
Microsoft Word (Basic Overlay): For very basic, non-professional image overlays, even a program like Microsoft Word can be used. This method is limited but can suffice for quick, low-fidelity “Creative Ideas” where exact precision isn’t paramount:
- Insert Both Images: Insert both your background and foreground images onto a Word document.
- Remove Background (if needed): For the top image, use Word’s built-in “Remove Background” feature. While not as precise as dedicated image editors, it can work for simple shapes.
- Overlap and Position: Adjust the “Text Wrapping” options for both images (e.g., “In Front of Text” or “Behind Text”) to allow them to be freely moved and overlapped. You can then drag the foreground image over the background.
While Word offers a rudimentary approach, for serious “Photo Manipulation” and “Digital Photography,” GIMP provides a far more capable and flexible environment, allowing for nuanced control over your superimposed images. These tools, accessible at Tophinhanhdep.com, ensure that creative image blending is within reach for everyone.
Mobile Creativity: Superimposing Images on Your Smartphone
The convenience of smartphone photography has revolutionized how we capture and share moments. Complementing this, a new generation of mobile applications has emerged, bringing sophisticated “Photo Manipulation” and “Digital Art” capabilities directly to your fingertips. Superimposing images on your phone is now an intuitive and powerful way to express your “Creative Ideas” and enhance your “Image Collections” on the go.
The In-Depth Guide to Superimpose X: Layers, Masks, and Blends
For iPhone users, Superimpose X stands out as a robust and versatile app for creative photo editing. It offers a comprehensive suite of tools that rival some desktop applications, making it a go-to choice for intricate superimposition. While it has a learning curve due to its depth, the creative possibilities it unlocks are immense, allowing you to easily replace “Backgrounds” or create stunning double-exposures that contribute to your “Aesthetic” “Image Collections.”
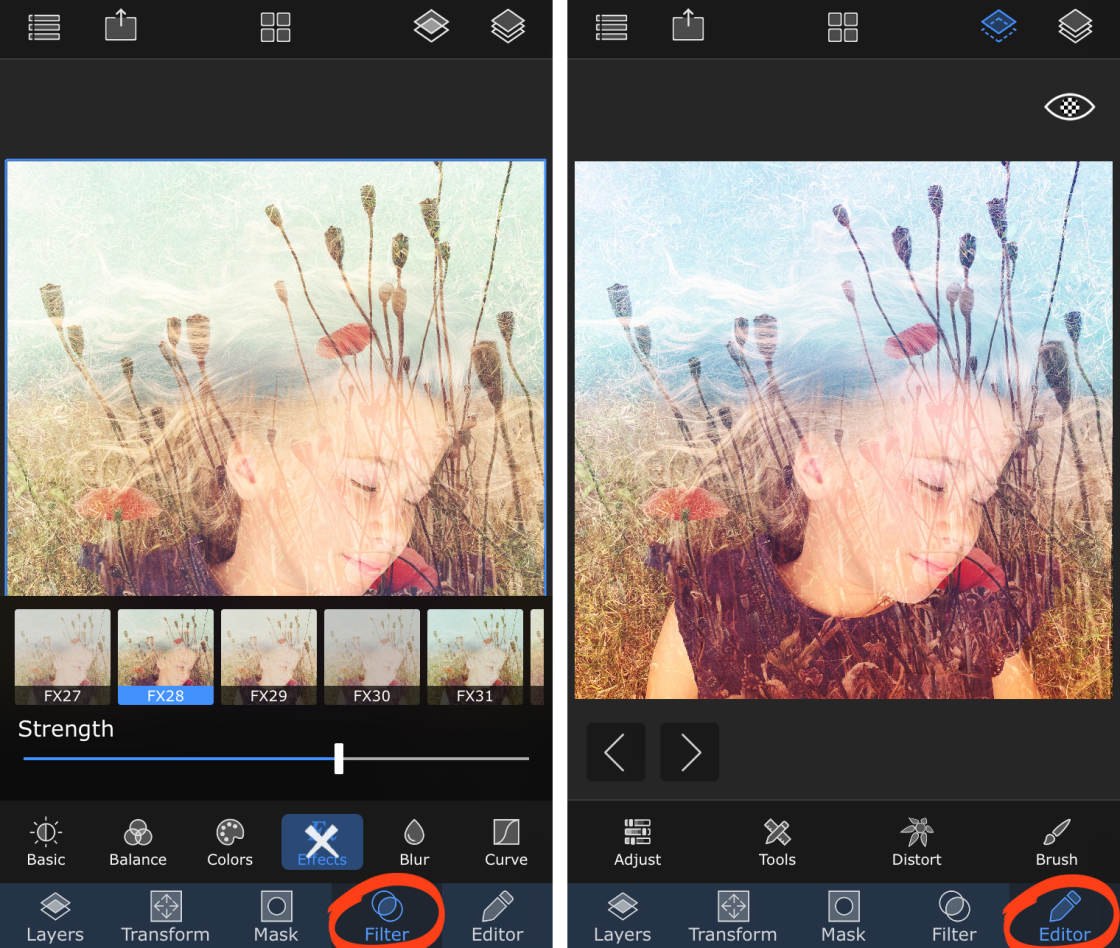
1. Superimpose X Tools & Interface: Upon opening Superimpose X, you’ll encounter a well-organized interface:
- Top Icons:
- Photos: Access your iPhone’s photo library, the primary source for your images.
- Mask Lib: A library to store and reuse your saved masks (cutouts). This is a game-changer for repeatable “Creative Ideas” and “Photo Manipulation.”
- Colors: Create custom colored “Backgrounds” or gradients.
- Paste: Import images copied from other apps.
- Sessions: Save and manage your ongoing projects.
- Bottom Tabs (Main Editing Tools):
- Layers: Add new images, manage existing layers, and adjust their properties.
- Transform: Tools for resizing, rotating, and blending layers, crucial for seamless “Visual Design.”
- Mask: The core tools for erasing unwanted parts of an image.
- Filter: Apply preset filters or make color/exposure adjustments, enhancing “Editing Styles.”
- Editor: Contains advanced tools like paint brushes, smudge, and warp effects, further enabling “Digital Art.”
2. Use Mask Tools to Erase Parts of an Image: Masking is fundamental to superimposition, allowing you to “cut out” subjects from their original “Backgrounds.”
- Accessing Mask Tools: Open your desired image, then tap the “Mask” tab at the bottom. A pop-up list presents 16 different mask tools, each designed for specific erasing tasks.
- Magic Wand: Ideal for quickly removing large blocks of a single color, such as a sky or a plain wall. It automatically selects adjoining areas of similar color, simplifying initial cutouts.
- Smart Brush: Works like a manual brush but intelligently identifies and snaps to edges as you brush over them. This is excellent for accurately selecting around subjects with defined outlines, minimizing manual effort in “Photo Manipulation.”
- Brush: A fully manual tool for precise detail work. Use it to fine-tune selections, erase small errors, or restore mistakenly removed areas. Adjustable brush size, smoothness, and feathering allow for intricate control, crucial for “High Resolution” outputs.
- Tips for Masking: Zoom in for accuracy, work on small sections, and utilize the “Restore” mode to bring back erased pixels. Saving your cutouts to the “Mask Lib” ensures they can be reused across multiple projects, saving time and fostering consistent “Creative Ideas.”
3. Replace the Background Using Masks & Layers: This technique is vital for changing the environment of a subject or integrating new elements into a scene, offering endless “Creative Ideas” for “Backgrounds” and “Aesthetic Images.”
- Open Background: Select your desired background image first.
- Add Second Image as a Layer: Tap “Layers,” then “Add Layer,” and choose “Photo Layer.” You can select a new image from your library or, more efficiently, use a pre-saved mask from your “Mask Lib.”
- Adjust and Erase: Use “Transform” to resize and position the new layer. If you added an entire photo (not a mask), use the “Mask” tools to erase its original background, revealing your chosen background image underneath. The “View” icon lets you toggle between seeing just the current layer or the blended image, aiding in accurate “Photo Manipulation.”
- Add a Shadow: To enhance realism, add a shadow to your cutout subject via the “Layers” tab and “Cast Shadow” option. Adjust opacity, blur, color, and position to integrate the subject seamlessly into the new environment, adding depth to your “Visual Design.”
4. Create a Double-Exposure Image: Double-exposure is a highly artistic form of superimposition, blending two images to create a poetic and often “Surreal” or “Abstract” visual.
- Open Two Images: Select a background image, then add a second image (often a portrait or a silhouette) as a new layer.
- Blend the Layers: With the top layer active, go to “Transform” and then “Blend.” Superimpose X offers 17 different blend modes (e.g., Overlay, Darken, Multiply, Lighten), each creating a unique interaction between the pixels of the two layers. Adjust the opacity to achieve the desired transparency and blend intensity.
- Refine with Mask Tools: Use the “Mask” tab and a feathered brush to gently erase parts of the top layer, allowing more of the background to show through in specific areas. This subtle “Photo Manipulation” helps both images merge more organically, creating a harmonious “Aesthetic.”
- Match Colors: Harmonize the color tones between the layers using the “Match Color” tool found in the “Layers” palette. This is crucial for creating a cohesive “Visual Design” where the images feel naturally integrated.
5. Enhance Your Image with Filters & Editing Tools: Superimpose X extends beyond blending, offering comprehensive “Editing Styles” and “Creative Ideas” for finishing touches:
- Filter & Editor Tabs: Access color adjustments, exposure controls, clarity tools, preset filters, and creative effects like blur and distort.
- Brush Overlays: The “Editor” tab’s “Brush” tool includes a selection of preset overlays (birds, trees, hearts, stars) that can be painted onto your image, adding unique “Digital Art” elements.
6. Manage Your Stored Sessions & Masks: Superimpose X automatically saves your projects as sessions, and you can store custom masks in the mask library. Regularly manage these to optimize storage and streamline your “Creative Ideas” workflow.
With Superimpose X, your iPhone becomes a powerful hub for “Photo Manipulation” and “Digital Art,” allowing you to capture and create stunning superimposed images wherever inspiration strikes.
Quick & Creative Mobile Superimposition: Enlight Photofox and Snapseed
While Superimpose X offers intricate control, other mobile apps provide quicker, more straightforward ways to superimpose photos, ideal for social media sharing or immediate “Creative Ideas.” Tophinhanhdep.com highlights these for their accessibility and unique features.
Enlight Photofox: Photofox is another popular mobile app for iPhone users, focusing on artistic and quick “Photo Manipulation.” While not as robust as Superimpose X, it excels at specific superimposition tasks, particularly its “Double Exposure” feature.
- Double Exposure Feature: Within its “QuickArt” sections, Photofox offers a dedicated “Double Exposure” option. Users select a background image from their library, then can either pick another personal photo or choose from Photofox’s internal “Stock Photos” or “Overlay” tool for a second image.
- Overlay Adjustments: The “Overlay” tool allows for easy adjustment and movement of the top image. Photofox also includes a range of filters to apply creative “Editing Styles” to your superimposed images.
- Subscription Model: While free to download, accessing its full suite of features and saving high-resolution outputs often requires a subscription, an important consideration for frequent users.
Snapseed: Google’s Snapseed is a hugely popular and completely free photo editing app available for both iOS and Android. It’s renowned for its powerful yet intuitive tools, making it a favorite for many mobile photographers. Snapseed’s approach to superimposition is simple and effective, perfect for enhancing “Beautiful Photography” or creating quick “Aesthetic Images.”
- Double Exposure Tool: Like Photofox, Snapseed features a “Double Exposure” tool under its “Tools” icon. Users open their first image, then select a second image to overlay.
- Blending Options and Transparency: Once the second image is loaded, users can freely move and resize it using pinch gestures. The app provides various blending options (represented by different icons) that alter the transparency and interaction between the two layers. This droplet-shaped icon specifically lets you adjust the opacity of the overlay, allowing for artistic “Photo Manipulation.”
- Basic Layer Editing: Snapseed also allows for basic adjustments to the superimposed layers, such as tweaking contrast or brightness, helping to harmonize the blended images and refine your “Visual Design.”
- Free and Accessible: Being free and cross-platform makes Snapseed an excellent entry point for anyone wanting to experiment with superimposition without commitment, providing an easy way to explore “Photo Ideas” and “Creative Ideas.”
Both Enlight Photofox and Snapseed demonstrate that professional-looking superimposed images are entirely achievable on a smartphone. They offer distinct approaches—Photofox leans into artistic effects, while Snapseed provides accessible, high-quality controls—ensuring that everyone can explore “Digital Photography” and “Photo Manipulation” on the go. Tophinhanhdep.com encourages you to experiment with these apps to find the one that best suits your “Editing Styles” and creative workflow.
Professional Precision: Superimposing Images in Adobe Photoshop
For those engaged in “Graphic Design,” “Digital Art,” or intricate “Photo Manipulation,” Adobe Photoshop remains the industry standard. Its unparalleled precision, extensive toolset, and non-destructive workflow make it the ultimate platform for creating complex, “High Resolution” superimposed images. While often perceived as intimidating, mastering its core superimposition features can unlock extraordinary creative potential. Tophinhanhdep.com recognizes Photoshop as a cornerstone for advanced “Visual Design” and sophisticated “Editing Styles.”
Harnessing Layer Masks for Detailed Composites
The most powerful and flexible method for superimposing images in Photoshop involves Layer Masks. This technique allows for incredibly precise control over which parts of each image are visible, enabling seamless blending and complex compositions without permanently altering the original pixels. This aligns perfectly with the needs of “Digital Photography” and professional “Photo Manipulation.”
Here’s how to utilize Layer Masks for superimposition:
- Open and Layer Images:
- Begin by opening both your background image and the image you wish to superimpose (foreground) in Photoshop.
- Drag the foreground image’s layer from its document onto the background image’s document. This automatically places it as a new layer on top of the background. Photoshop’s Layers panel (usually on the lower right) will show both images as distinct layers.
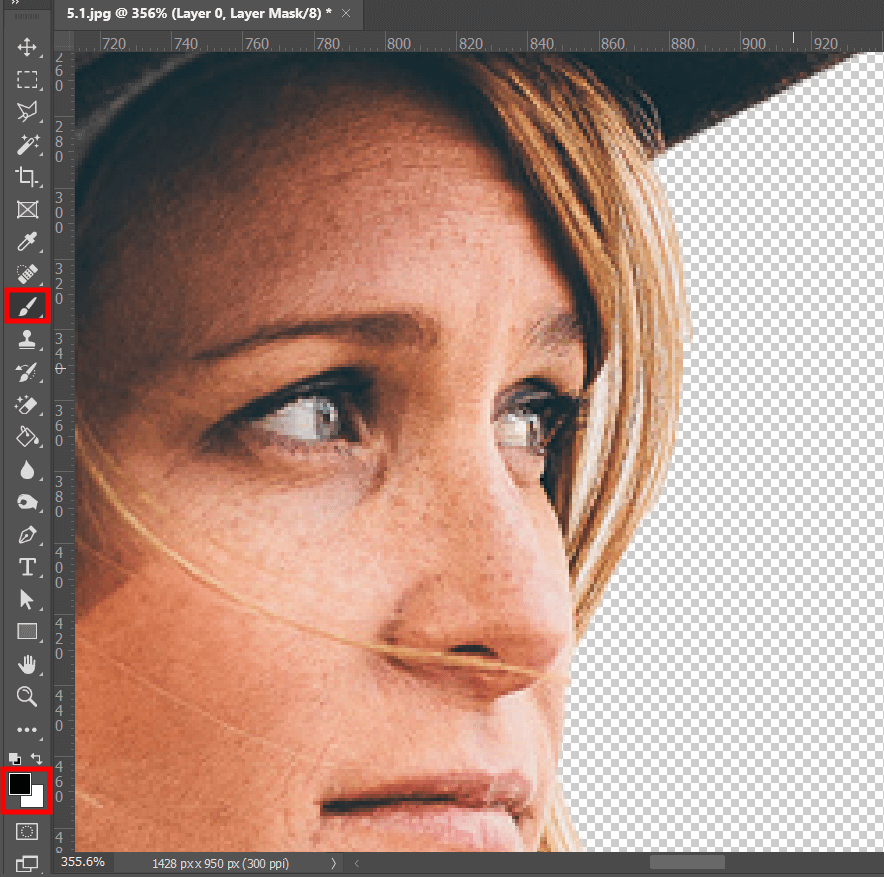
- Create a Layer Mask:
- Select the foreground layer in the Layers panel.
- At the bottom of the Layers panel, click the “Add layer mask” icon (a small rectangle with a hollow circle inside). A white mask thumbnail will appear next to your foreground image’s layer thumbnail. A white mask reveals everything on that layer, while a black mask conceals everything.
- Reveal or Conceal with Brush/Gradient Tools:
- The beauty of a layer mask lies in its non-destructive nature. You use black to conceal parts of the layer and white to reveal them.
- Brush Tool (B): Select the Brush tool. Ensure your foreground color is set to black (press ‘D’ for default colors, then ‘X’ to swap foreground/background). Now, paint over the areas of the foreground image you want to hide. As you paint with black, the underlying background image will show through.
- If you make a mistake and hide too much, simply swap your foreground color to white (press ‘X’) and paint over the areas to reveal the foreground image again. This iterative process allows for meticulous “Photo Manipulation.”
- Adjust the brush size and hardness (feathering) to control the blending edges. A soft brush creates a gradual blend, ideal for natural transitions, while a hard brush creates sharp cutouts, perfect for precise “Graphic Design” elements.
- Gradient Tool (G): For smoother, more gradual blends, especially useful for combining skies or merging textures, use the Gradient tool while the layer mask is selected. Draw a black-to-white gradient across the mask where you want the blend to occur. This creates a soft transition, a hallmark of sophisticated “Aesthetic Images.”
Layer Masks give you complete and reversible control over how images are blended, making them indispensable for achieving professional-grade “Visual Design” and complex “Photo Manipulation.”
Dynamic Blending and Advanced Adjustments for Seamless Integration
Beyond Layer Masks, Photoshop offers additional tools in the Layers panel that are critical for dynamic superimposition, allowing for creative “Editing Styles” and seamless integration of your “Digital Photography” elements.
-
Blend Modes:
- Above your photo layer thumbnails in the Layers panel, you’ll find a dropdown menu, usually defaulting to “Normal.” This is the Blend Mode selector.
- Blend Modes dictate how the pixels of the active layer interact with the pixels of the layers beneath it. Experimenting with these modes can yield remarkable results for “Digital Art” and “Creative Ideas”:
- Multiply: Darkens the combined image, often used for adding textures or shadows.
- Screen: Lightens the combined image, excellent for creating glowing effects or light overlays.
- Overlay / Soft Light / Hard Light: These modes increase contrast and saturation, producing vibrant, intense blends, ideal for “Aesthetic Images” or “Abstract” compositions.
- Darken / Lighten: Only allows pixels darker/lighter than the underlying layer to show through.
- Difference / Exclusion: Creates unique, often abstract, color interactions.
- By selecting a layer and cycling through different Blend Modes, you can instantly see how they transform the superimposed image, offering numerous “Editing Styles” to explore.
-
Opacity Slider:
- Adjacent to the Blend Mode selector in the Layers panel is the Opacity slider. This tool controls the overall transparency of the selected layer.
- By reducing the opacity, you can make a foreground image more translucent, allowing the background to show through more prominently. This is fundamental for creating subtle overlays, ghosting effects, or achieving a delicate balance between blended images. It’s a key component in “Photo Manipulation” for subtle integration.
-
Advanced Photoshop Considerations for Realism:
- Color Matching: One of the biggest challenges in superimposition is making the colors of disparate images appear harmonious. Photoshop offers adjustment layers (e.g., Hue/Saturation, Color Balance, Curves, Levels) that can be applied non-destructively to individual layers. For example, using “Match Color” (Image > Adjustments > Match Color) can attempt to match the color palette of one layer to another, crucial for “Beautiful Photography” composites.
- Lighting Consistency: Pay close attention to light direction and intensity across all images. Use Dodge and Burn tools, or create new layers filled with blend modes (Overlay, Soft Light) and paint with black/white to simulate shadows and highlights, ensuring a consistent lighting environment for your “Visual Design.”
- Perspective and Alignment: Ensure subjects and elements are scaled and positioned correctly relative to each other. The Free Transform tool (Ctrl/Cmd + T) allows for resizing, rotating, skewing, and distorting layers to match the perspective of the background, vital for realistic “Photo Manipulation” and “High Resolution” outputs.
- Fine Details and Edges: When cutting out complex subjects (like hair or intricate patterns), advanced masking techniques are paramount. Tools like “Refine Edge” or specialized plugins (e.g., Topaz ReMask, ON1 Perfect Mask – sometimes found as “Image Tools” or “Editing Styles” on Tophinhanhdep.com) can help create incredibly accurate selections, preventing noticeable artifacts or inconsistencies.
Photoshop provides the ultimate toolkit for “Photo Manipulation” and “Digital Art,” enabling artists to create seamless, high-resolution superimposed images. By mastering Layer Masks, Blend Modes, and adjustment layers, and paying attention to detail, you can produce truly professional and inspiring “Visual Designs” that push the boundaries of “Digital Photography.”
Conclusion
The art of superimposing images is a testament to the boundless creativity possible in digital photography and visual design. As we’ve explored, whether you’re a beginner seeking to experiment with “Creative Ideas” or a seasoned professional striving for “High Resolution” “Digital Art,” there’s a powerful tool and technique available for you. From the user-friendly, AI-driven desktop experience of PhotoWorks to the intuitive “Photo Manipulation” capabilities of mobile apps like Superimpose X and Snapseed, and finally, the unparalleled precision offered by Adobe Photoshop, the journey to blending images is more accessible than ever.
On Tophinhanhdep.com, we believe that every image holds the potential for greater expression. Superimposition allows you to transcend the ordinary, transforming simple photographs into compelling narratives, surreal landscapes, or artistic expressions of “Aesthetic Images.” You can effortlessly replace “Backgrounds,” craft intricate “Photo Montages,” or dive into the nuanced world of “Double Exposure” with a diverse range of “Editing Styles.” The techniques discussed empower you to create everything from vibrant “Wallpapers” and “Nature” scenes to profound “Sad/Emotional” or “Abstract” compositions.
We encourage you to experiment with these tools, explore new “Photo Ideas,” and share your unique “Image Collections.” Let your imagination guide you as you combine elements, adjust transparencies, and refine details to build visual stories that resonate. Tophinhanhdep.com is your premier resource for unlocking the full potential of your “Digital Photography,” offering not just inspiration through “Trending Styles” and “Mood Boards,” but also practical “Image Tools” and comprehensive guides to elevate your “Visual Design” skills. Start creating today, and let your superimposed images speak volumes!