Mastering Image Superimposition on iPhone: A Comprehensive Guide by Tophinhanhdep.com

In today’s visually-driven world, where every scroll and tap brings a cascade of images, the ability to create unique, eye-catching visuals is more important than ever. Whether you’re a budding photographer, a social media enthusiast, a digital artist, or a professional aiming to enhance your portfolio, photo editing has become an indispensable skill. And thanks to the incredible power packed into our smartphones, sophisticated techniques like image superimposition are now easily accessible right on your iPhone.
At Tophinhanhdep.com, we understand the profound impact of compelling visuals. Our platform is a treasure trove for anyone passionate about images, offering everything from stunning wallpapers and backgrounds (aesthetic, nature, abstract, sad/emotional, beautiful photography) to high-resolution stock photos and insights into digital photography and various editing styles. We also provide a suite of essential image tools, including converters, compressors, optimizers, AI upscalers, and image-to-text functionalities. Our focus extends to visual design, graphic design, digital art, photo manipulation, and a wealth of creative ideas and thematic collections to spark your inspiration and keep you abreast of trending styles.
This comprehensive guide, brought to you by Tophinhanhdep.com, will delve into the exciting world of superimposing images on your iPhone. We’ll explore the benefits of layering photos, introduce you to the best apps and native iOS features that simplify this art form, and provide step-by-step instructions to help you transform your ordinary snapshots into extraordinary visual masterpieces. Prepare to elevate your photography and unleash your inner visual designer!
Understanding the Art of Image Overlays and Superimposition
Image superimposition, often referred to as photo overlay or blending, is a powerful technique that involves placing one image on top of another to create a single, composite visual. This method is at the heart of photo manipulation and digital art, allowing you to combine elements, textures, or even entire scenes to tell a new story or evoke a specific emotion. It’s a fundamental aspect of visual design that goes beyond simple filters, opening up a realm of creative possibilities for your digital photography.
What are Overlay Photos?
At its core, an overlay is a visual element added to a base image or video to enhance its appearance, convey additional information, or establish a particular mood. Think of it as adding a transparent or semi-transparent layer to your primary image, where the interaction between the two layers results in a unique visual outcome. This technique is incredibly versatile and can dramatically elevate the aesthetic quality of your images, turning a simple photo into a captivating piece of digital art.
The beauty of overlays lies in their ability to blend seamlessly or starkly, depending on your artistic intent. From subtle enhancements that add depth and texture to bold, dramatic composites that challenge perception, superimposition offers a canvas for endless creative ideas. It allows photographers and designers to go beyond what was captured in a single shot, constructing elaborate visuals that are truly one-of-a-kind.
Different Types of Overlays and Their Creative Applications
The world of overlays is vast, offering various styles, each serving a unique purpose in enhancing your images and contributing to powerful visual design. Understanding these types is key to harnessing their full potential for your photo manipulation projects.
- Image Overlays: These involve placing one complete image on top of another, often with varying levels of transparency or specific blending modes. This technique is commonly used to create composite images, add subtle textures or patterns, or embed graphics onto a base image. For instance, you might overlay a nature scene (like a forest or a starry sky) onto a portrait to create a dreamy, aesthetic effect, or add an abstract pattern to a background for a more dynamic feel. Tophinhanhdep.com offers a wealth of inspiration for beautiful photography, wallpapers, and backgrounds that can be perfect for such creative overlays.
- Filter Overlays: Rather than full images, these overlays apply color adjustments, gradients, or other visual effects across your photo. They are used to create a specific mood or aesthetic, correct color tones, adjust brightness and contrast, or achieve a custom look that aligns with various editing styles. Imagine giving a sad/emotional photo a melancholic blue tint or adding a warm, golden gradient to a landscape to enhance its beauty.
- Text Overlays: These involve adding text to your image, which can be used to convey a message, provide context, or act as a design element. Text overlays can incorporate various fonts, colors, sizes, and styles, turning a simple photograph into a powerful graphic design piece suitable for social media or marketing materials.
- Other Overlay Styles: Beyond these core types, you can also find shape overlays (geometric patterns or custom shapes), frame overlays (decorative borders), and even animation overlays (for video-based content, though less common for static image superimposition on iPhone). Each type can be used individually or combined to create truly unique and visually engaging content, pushing the boundaries of photo manipulation.
At Tophinhanhdep.com, we encourage exploring these diverse overlay styles to fuel your image inspiration and elevate your photography to new artistic heights.
Top-Tier Apps for Superimposing Images on Your iPhone
The proliferation of powerful photo editing apps has democratized digital photography, making advanced techniques like superimposition accessible to everyone. These image tools offer a fantastic array of features for graphic design and photo manipulation, allowing you to create high-resolution, aesthetically pleasing images directly from your iPhone.
Tophinhanhdep.com’s Featured Choice: Fotor
When it comes to versatile and user-friendly overlay applications for iPhone, Fotor stands out as a premier choice and is frequently highlighted on Tophinhanhdep.com. This innovative app provides a robust set of tools for combining multiple images, enabling both beginners and experienced users to craft stunning composite photos with remarkable ease.
Fotor offers more advanced photo-editing features, such as Double Exposure, a One-click enhancer, and an Object Remover. It boasts a rich collection of creative design templates covering diverse themes and occasions, alongside over 100 stylish effects and filters that are updated weekly, ensuring a constant stream of fresh creative ideas.
Key Features of Fotor:
- Intuitive Interface: Designed for ease of use, making complex edits straightforward.
- Customization Options: Easily resize, reposition, and adjust the opacity and blending modes of your superimposed images.
- AI Cutout: A standout feature in the overlay tool, Fotor uses artificial intelligence to intelligently detect and extract desired people or objects from a photo, enabling seamless blending with another image by removing its background with one click. This is incredibly useful for creating clean, high-resolution composites.
- Diverse Tools for Superimposition: Offers two primary methods:
- The Overlay Tool: Allows direct layering of images with granular control over transparency, orientation, and background removal via AI Cutout.
- The Double Exposure Tool: A powerful AI-driven feature for quickly generating creative blending effects, perfect for artistic compositions.
- Extensive Design Resources: Beyond overlays, Fotor provides abundant resources and templates for enhancing your overlaid images with text and stickers, aligning with visual design principles.
- Advanced Adjustments: Fine-tune overlays by adjusting brightness, contrast, saturation, and other parameters, ensuring your digital art achieves the desired aesthetic.
How to Overlay Photos on iPhone with Fotor (using the Overlay tool):
- Open Fotor on your iPhone.
- Tap “Edit” on the home page, then select the photo from your album you wish to use as the bottom layer.
- Select the “Overlay” tool > “Add” to bring in the second photo you want to superimpose.
- Adjust the transparency, orientation, and size of the top image as needed. Utilize the “AI Cutout” tool if you wish to remove the background of the top photo.
- Once satisfied, tap “√” to confirm, then “Save” to download your high-quality, superimposed image to your album.
How to Use the Double Exposure Tool for Creative Images in Fotor:
- Open the Fotor app.
- Choose your primary image for editing.
- Navigate to the “AI Cutout” tab and select “Double Exposure.” Fotor will automatically remove the background of your photo.
- Add your own image or select from Fotor’s preset images to blend with your original photo, creating stunning effects that lean into creative digital art.
- Save your unique, high-resolution image.
Exploring Other Powerful Overlay Applications
While Fotor is a Tophinhanhdep.com favorite for its comprehensive features, several other excellent image tools cater to various photo manipulation needs, offering diverse editing styles and creative ideas.
- Snapseed: Developed by Google, Snapseed is a robust photo editing app providing a plethora of tools to elevate images. Its Double Exposure tool is highly regarded for creating artistic, layered compositions. Users can effortlessly achieve surreal or dreamy effects by overlaying images with numerous blending modes and adjustable opacity settings, making it ideal for beautiful photography and nuanced digital art. Snapseed’s user-friendly interface and precise alignment features contribute to seamless, high-resolution blends.
- Pixlr: This app offers an impressive selection of photo effects, overlays, and filters, making it a good choice for those exploring diverse editing styles. Pixlr’s double exposure feature allows blending multiple effects with adjustable transparency, and it includes textured and stylized overlays. While powerful for photo manipulation, it notably lacks built-in cutout or background removal tools, requiring users to rely on external apps for such functionalities. This distinction emphasizes the value of integrated AI tools found in platforms like Fotor for streamlining creative workflows.
- Photo Blender: A versatile app for scrapbooking, collage-making, and photo overlays, Photo Blender enables users to create striking double-exposure effects with a single tap. It offers numerous layout choices and supports combining two photos seamlessly using over 50 different styles. While excellent for creating thematic collections and basic image composites, its limitations in adding textures or certain overlay types (like snow or rain) mean users might look to more comprehensive tools for advanced effects.
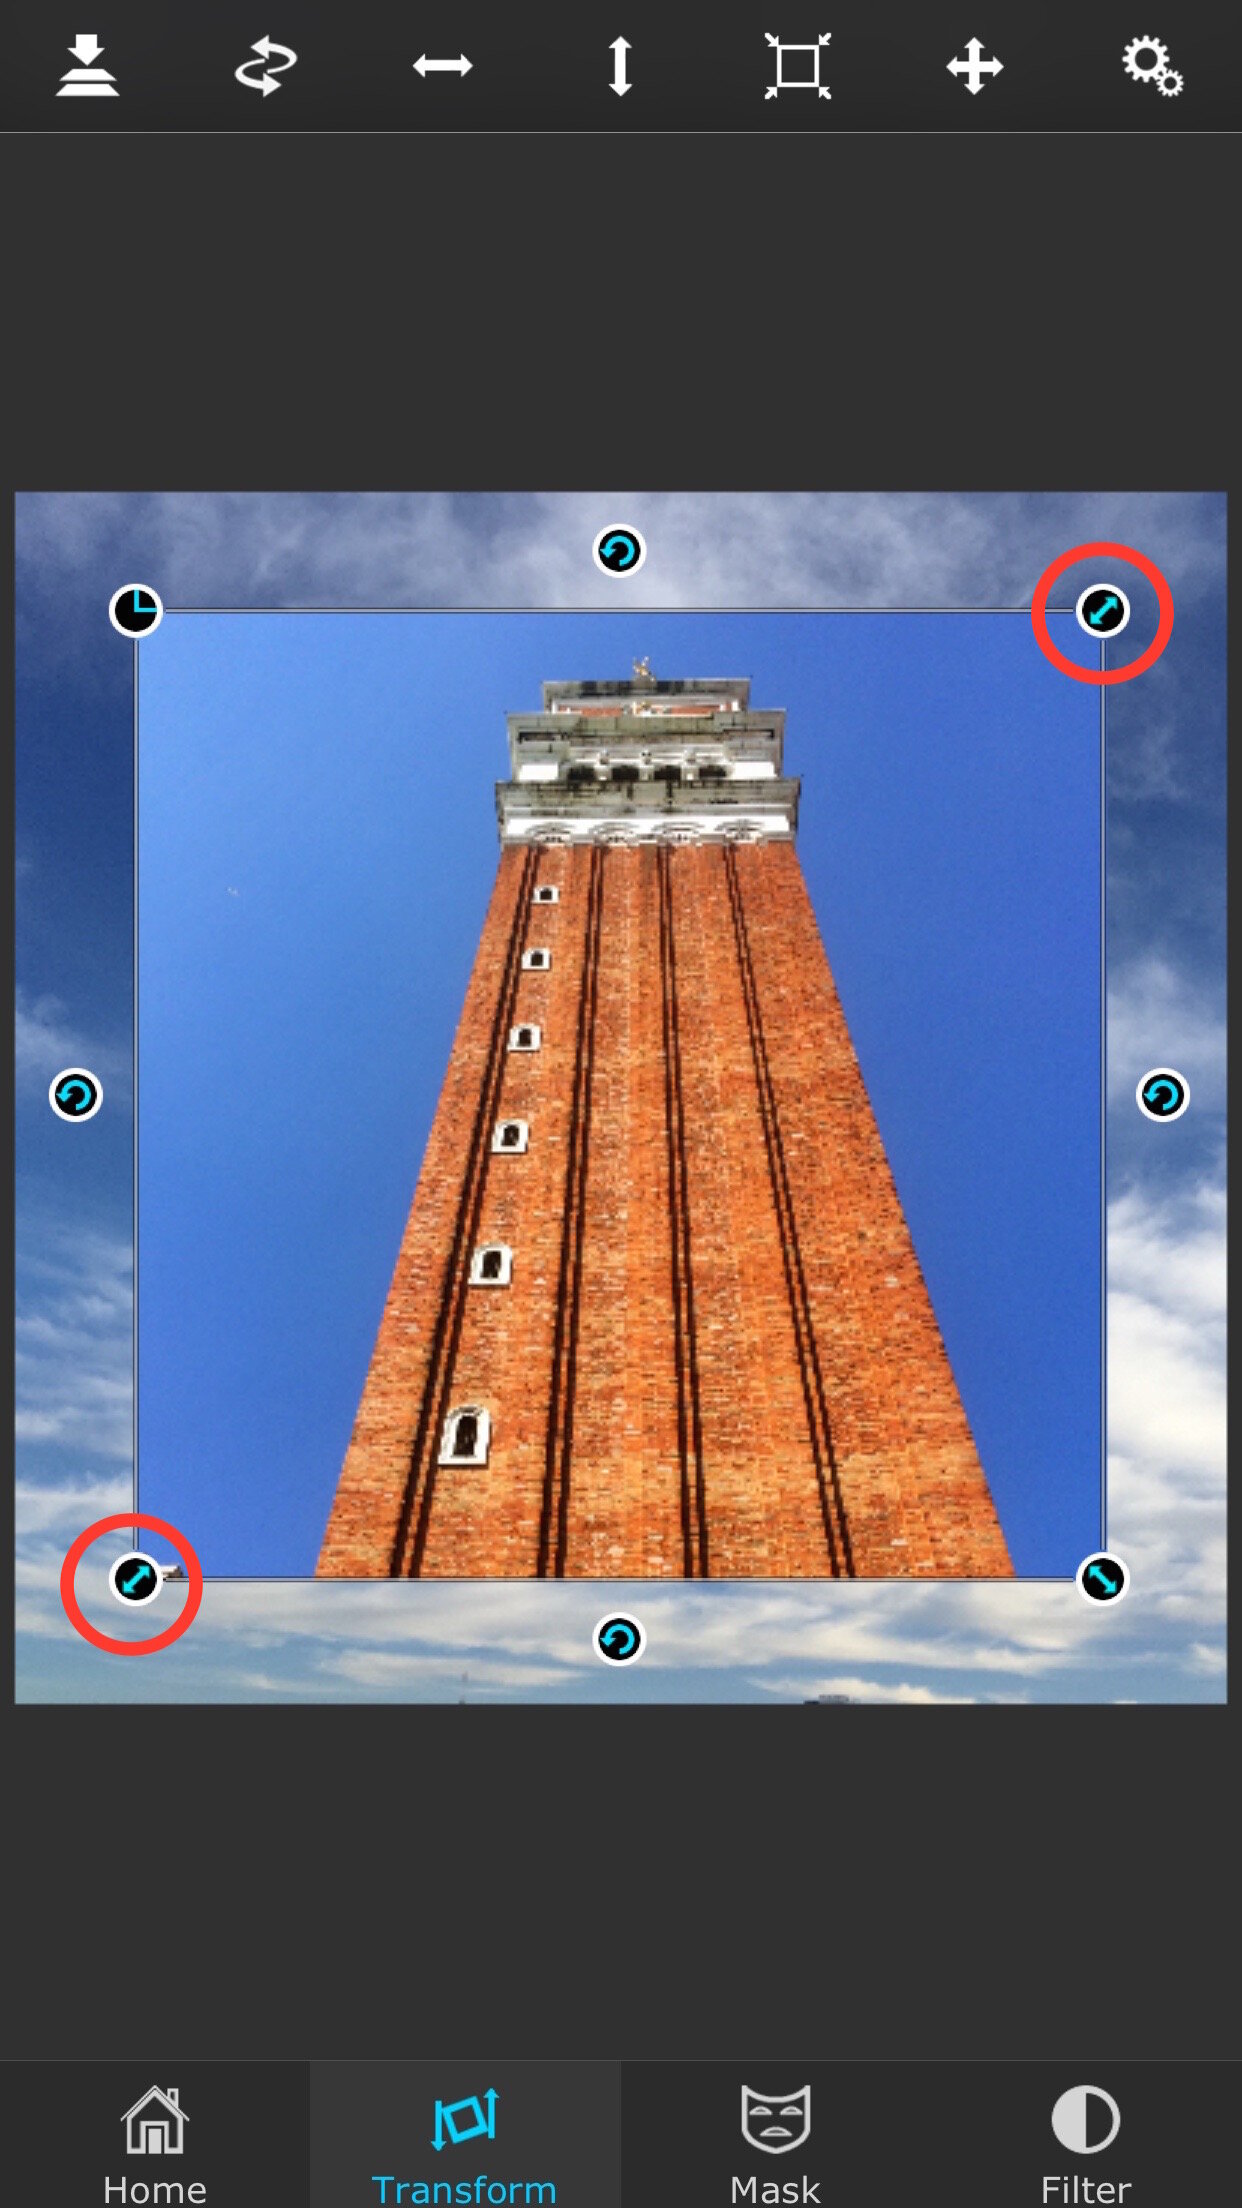
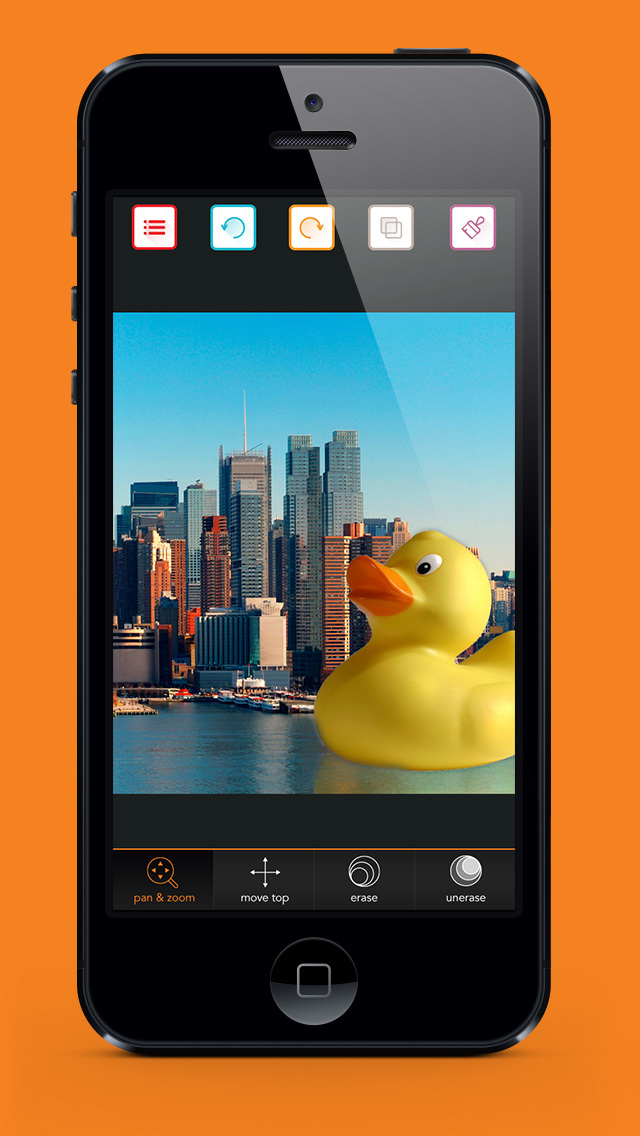
- Superimpose X: For those seeking more granular control and professional-grade photo manipulation, Superimpose X is a powerful iPhone photo editing and Photoshop-like app. It excels in intricate mask tools and layers, allowing precise background replacement and complex double exposures. The app’s interface allows users to open multiple layers, apply precise masking (using tools like Magic Wand, Smart Brush, and Brush for detailed work), and blend them with fine control over opacity and blending modes. Superimpose X is perfect for creating complex digital art and high-resolution composite images that demand meticulous attention to detail.
- Using Mask Tools to Erase: This app allows users to “cut out” subjects by erasing unwanted areas. Tools like the Magic Wand quickly remove large blocks of single color (e.g., skies, grass), while the Smart Brush intelligently identifies edges for accurate selections. The standard Brush tool provides freehand control for fine-tuning details and correcting mistakes.
- Replacing Backgrounds: By combining masked subjects on new layers, users can easily change the backdrop of a photo, integrating the cutout with a new background (e.g., placing a person from a beach onto a mountain scene).
- Creating Double Exposure: Superimpose X’s layered approach makes it ideal for blending two images artistically. Users can adjust blend modes and opacity, and refine the effect using masks to reveal specific parts of each layer.
- Canva: While more known for graphic design and creating visual design elements from scratch, Canva also offers intuitive overlay capabilities. It provides an extensive library of templates, elements, and tools to add images, text, and graphics onto a base layer. Users can adjust transparency, crop, and apply basic effects to achieve a superimposed look. Canva is particularly useful for creating aesthetically pleasing social media posts, mood boards, and thematic collections where design and visual storytelling are paramount.
- HashPhotos: This app features a built-in editor with an “Overlay Image” function, allowing users to easily place one photo onto another. It supports resizing, rotating, repositioning, and adjusting blend modes and opacity. Its Pro version further includes features like background removal, enabling more sophisticated photo manipulation directly within the app, providing another practical image tool for iPhone users.
These apps collectively represent the incredible versatility available for digital photography and image manipulation on your iPhone, offering diverse pathways to achieve your creative ideas and desired editing styles.
Leveraging iOS Shortcuts for Quick Image Overlays
Beyond dedicated apps, your iPhone offers a surprisingly powerful, built-in method for superimposing images: the Shortcuts app. Introduced in iOS 13, Shortcuts allows users to automate a series of actions with quick commands, turning complex tasks into simple taps. This is an excellent alternative for those who prefer a native solution or need to make quick edits for social media posts, memes, or other immediate visual content, perfectly aligning with Tophinhanhdep.com’s focus on efficient image tools and trending styles.
Setting Up Your Overlay Shortcut
The process of setting up an image overlay shortcut involves a few initial steps, but once configured, it provides instant access to superimposition whenever you need it. This method leverages Apple’s robust operating system, offering a unique approach to photo manipulation.
Tools and Requirements:
- An iPhone running iOS 13 or above.
- The Shortcuts app (preinstalled or available from the App Store).
Step-by-step Guide to Create the Shortcut:
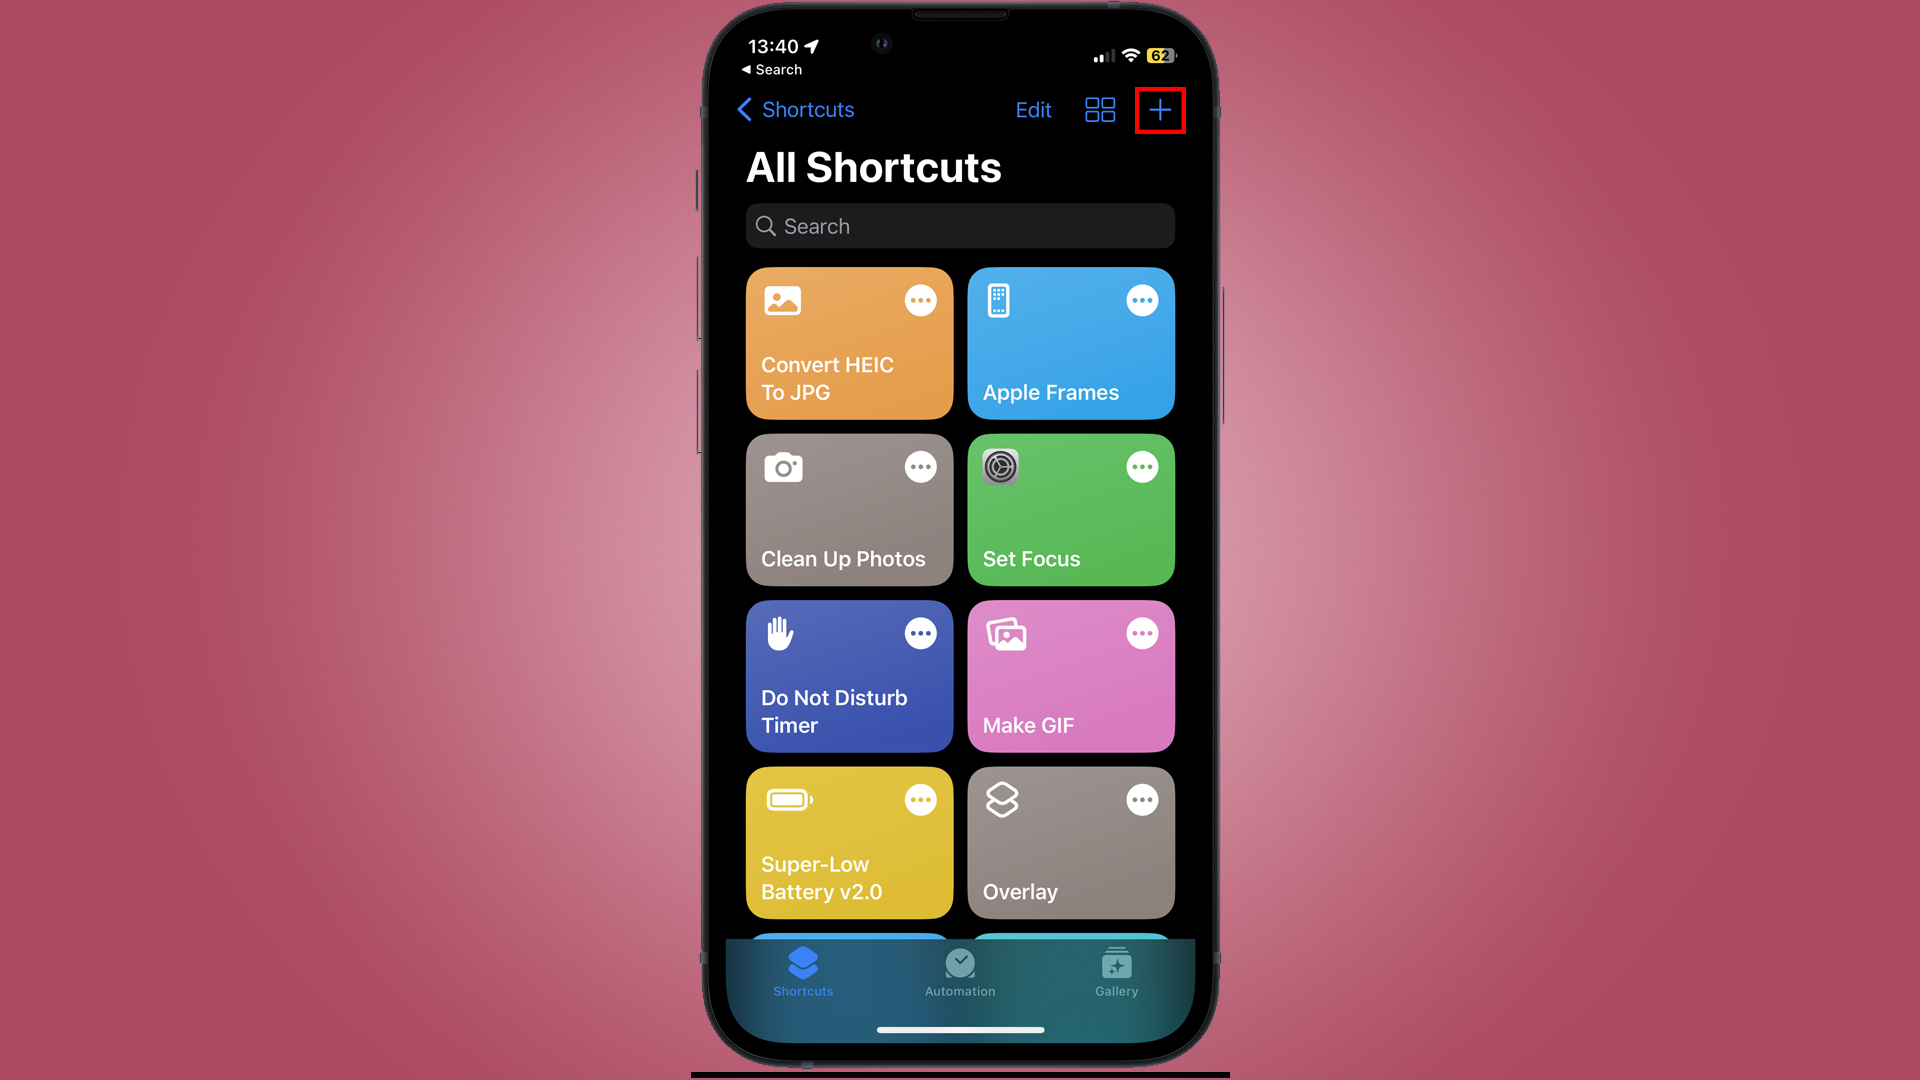
- Open the Shortcuts app: Find the Shortcuts app (it usually has a blue icon with two overlapping squares) and tap the ‘+’ symbol in the top right corner to create a new shortcut.
- Turn on “Show in Share Sheet”: Tap the ‘i’ symbol (info icon) in the toolbar. A settings page will appear. Toggle on the option to “Show in Share Sheet.” This integrates your shortcut directly into your photo sharing options, making it easily accessible. Tap “Done.”
- Select File Formats: Back on the new shortcut page, you’ll see an action “Receive media from Share Sheet.” Tap where it says “Any”/“Images and more” and deselect all media formats except “Images” and “Media.” Tap “Done.” This ensures the shortcut only processes photos.
- Add Two “Select Photos” Actions: From the new shortcut page, tap “Add Action” or use the search bar at the bottom. Type “Select Photos” and add this action. Repeat this step to add a second “Select Photos” action. These actions will prompt you to choose the two images you want to blend.
- Add the “Overlay Image” Action: Again, search for and add the “Overlay Image” action to your shortcut.
- Select Image Variables for the Overlay: In your “Overlay Image” action, you’ll see two “Images” variables.
- Tap the first “Images” variable, choose “Select Variable” from the menu, and then tap the first “Photos” label that appeared after your first “Select Photos” action. This designates the first selected photo as the top layer.
- Repeat this for the second “Images” variable, tapping the second “Photos” label after your second “Select Photos” action. This designates the second selected photo as the bottom layer.
- Add the “Save to Photo Album” Action: Finally, search for and add the “Save to Photo Album” action. This ensures your final, superimposed image is saved directly to your Camera Roll.
- Rename Your Shortcut: Tap the name of your shortcut (e.g., “New Shortcut”) and rename it to something descriptive like “Overlay” or “Superimpose” for easy identification in your Share Sheet.
Executing the Overlay with Your Custom Shortcut
Once your shortcut is set up, the actual process of superimposing images is remarkably fluid, perfect for quickly generating creative ideas or adapting trending styles.
- Open your Photos app: Find the two photos you wish to overlay.
- Initiate the Shortcut: Tap the “Share Sheet” button (the square with an arrow pointing upwards). Scroll down and tap your newly created “Overlay” shortcut.
- Select Your Images: The shortcut will first prompt you to select your top image. After selecting, it will then ask for your bottom image.
- Reposition and Size Your Overlay: You’ll be taken to a simple image editor where you can use pinch-to-zoom gestures to resize and reposition the top image over the bottom one. If you want to overlay a specific subject from a photo, remember to first use iOS 16’s “Lift Subject from Background” feature by long-pressing on the subject, tapping “Share,” and saving it as a separate image before using the shortcut.
- Save Your Image: Once you’re satisfied with the composition, tap “Done,” and the superimposed image will be automatically saved to your Camera Roll, ready for sharing or further refinement.
While setting up the shortcut can be a bit fiddly initially, especially if you’re new to the Shortcuts app, it’s a powerful tool that transforms image manipulation into a native, efficient process on your iPhone. This makes it an invaluable resource for anyone looking for quick, high-resolution photo edits without relying solely on third-party apps.
Advanced Techniques and Creative Inspiration for Superimposed Images
Beyond the basic mechanics, mastering image superimposition involves a blend of technical know-how and artistic vision. For users interested in digital art, photo manipulation, and creating truly unique aesthetic images, Tophinhanhdep.com encourages exploring advanced techniques and drawing inspiration from diverse sources.
Mastering Masking and Layering for Seamless Blends
The real magic of superimposition lies in the meticulous use of masks and layers. These core concepts allow for precise control, transforming simple overlays into sophisticated composite images.
- Understanding Layers: In advanced editing apps like Fotor or Superimpose X, each image or element you add exists on its own layer. This allows for individual editing without affecting other parts of your composition. You can independently resize, rotate, reposition, adjust opacity, and apply specific filters or adjustments to each layer. The ability to manage layers (add, delete, reorder) is fundamental for complex photo manipulation.
- Precision Masking: Masking is the art of selectively revealing or concealing parts of a layer. Instead of permanently erasing pixels, a mask allows you to hide areas of an image, letting the layers beneath show through. This is crucial for seamless blends and creating realistic composites, such as replacing backgrounds.
- Magic Wand Tool: Ideal for quickly selecting and masking large, contiguous areas of similar color, like a clear sky or a uniform background.
- Smart Brush/Lasso Tools: These intelligent tools help you make selections around complex edges, automatically detecting boundaries to create clean cutouts of subjects.
- Standard Brush Tool: Provides manual control for fine-tuning your masks, allowing you to paint precisely to reveal or conceal small details. Adjusting brush size, hardness (feathering), and opacity is key here.
- Replacing Backgrounds: A common and powerful application of masking is to cut out a subject from one photo and place it onto a new background. This technique is perfect for creating bespoke wallpapers, adding elements to nature scenes, or generating abstract compositions. Always choose high-resolution images for the best results.
- Start with your desired background image as the base layer.
- Add the photo containing your subject as a new layer.
- Use masking tools to carefully erase the original background of the subject’s layer.
- Reposition and resize the subject to fit naturally into the new background.
- Adding Shadows: To make the composite look more realistic and three-dimensional, add a subtle shadow cast by the superimposed subject. Many apps provide tools to adjust shadow opacity, blur, color, and position. This small detail dramatically enhances realism.
Crafting Stunning Double Exposure Effects
Double exposure is an inherently artistic technique that blends two images, often a portrait and a landscape or texture, to create a dreamy, surreal, or symbolic visual. It’s a hallmark of creative digital art and offers endless possibilities for aesthetic photography.
- Conceptual Planning: The most successful double exposures begin with careful planning. Think about the narrative or mood you want to convey. A silhouette against a cityscape, a forest within a face, or abstract patterns blending with a human form can create powerful visual statements.
- Blending Layers:
- Open your two chosen images in an app like Fotor, Snapseed, or Superimpose X. Typically, one image will serve as the primary focus (e.g., a portrait), and the other will be the texture or scene (e.g., a nature landscape).
- Place the texture/scene image on top of the primary image.
- Experiment with blending modes (e.g., Multiply, Screen, Overlay, Lighten, Darken). Each mode interacts with the underlying pixels differently, producing unique effects. “Screen” often creates a luminous, transparent effect, while “Multiply” tends to blend darker tones.
- Adjust the opacity of the top layer to control the intensity of the blend. A lower opacity creates a more ethereal, subtle effect.
- Refining with Masks: Use masks to selectively reveal or hide parts of the top layer, guiding the viewer’s eye and enhancing the artistic impact. For example, you might mask out areas of the top layer over the subject’s eyes or mouth to maintain clarity, or reveal more of a landscape texture on one side of a portrait.
- Matching Colors and Tones: For a harmonious look, use color matching tools (available in apps like Superimpose X) to adjust the hue, saturation, and lightness of one image to better align with the other. This creates a cohesive aesthetic, making the two separate images feel like a single, unified piece of digital art. Finally, apply global filters or color adjustments to the entire composite to achieve a consistent mood, drawing on various editing styles.
Essential Tips for High-Quality Superimposition
To consistently produce professional-looking superimposed images that align with the high standards of beautiful photography and visual design found on Tophinhanhdep.com, consider these practical tips:
- Choose High-Quality Images: Always start with high-resolution images. Pixels will be more apparent when blending, so clear, sharp source photos will yield significantly better results. Explore Tophinhanhdep.com’s collection of stock photos and high-resolution backgrounds for excellent starting points.
- Plan Your Composition: Before you start editing, envision your final image. Consider how the elements will interact, where the focal points will be, and the overall mood. This planning phase, similar to creating mood boards or conceptualizing photo ideas, saves time and ensures a stronger artistic outcome.
- Experiment Extensively: Don’t be afraid to try different blending modes, opacity levels, and masking techniques. The beauty of digital photography is the ability to undo and redo. Experimentation is key to discovering unique editing styles and creative ideas.
- Refine with Filters and Editing Tools: After superimposition, apply overall adjustments to the composite image. Tools for color correction, exposure adjustments, clarity, vignettes, and gradients can harmonize the layers and add a polished finish. Many apps also offer “paint” overlays (like birds, stars, or bokeh effects) in their editor tabs to add a final flourish, perfectly complementing your photo manipulation.
- Mind the Details: Pay attention to edges, lighting, and perspective. A misaligned shadow or a harsh cutout can break the illusion. Zoom in to fine-tune masks and ensure smooth transitions between layers.
Conclusion
The ability to superimpose images on your iPhone has truly transformed mobile photography, turning a casual hobby into a sophisticated form of digital art and visual design. As we’ve explored in this comprehensive guide by Tophinhanhdep.com, the journey from understanding basic overlay types to mastering advanced masking, layering, and double exposure techniques is accessible to everyone. With a diverse array of powerful image tools and native iOS features at your fingertips, the creative possibilities are limitless.
Whether you’re aiming to create stunning wallpapers, design compelling social media graphics, craft unique composite images for your portfolio, or simply experiment with new editing styles, your iPhone is a powerful canvas. By harnessing the capabilities of apps like Fotor, Snapseed, Superimpose X, Pixlr, Photo Blender, Canva, or even the native iOS Shortcuts, you can confidently manipulate photos to express your unique vision and elevate your visual storytelling.
We encourage you to experiment, explore different techniques, and continually seek inspiration. The more you practice, the more intuitive and rewarding the process will become, allowing you to create high-resolution, aesthetically pleasing images that truly stand out. For more image inspiration, creative ideas, trending styles, and a full suite of image tools from converters to AI upscalers, explore Tophinhanhdep.com and unlock your full creative potential!