Understanding Image DPI: A Comprehensive Guide for Tophinhanhdep.com Users

In the vibrant world of digital imagery, where stunning visuals reign supreme, understanding the technical specifications of your images is paramount. Whether you’re a photography enthusiast, a graphic designer, or simply someone who loves to personalize their devices with exquisite wallpapers and backgrounds, “Dots Per Inch” (DPI) is a term you’ll frequently encounter, especially when bridging the gap between digital display and tangible print. On Tophinhanhdep.com, where high-resolution images and beautiful photography are at our core, knowing how to ascertain an image’s DPI is a fundamental skill that empowers you to maximize the potential of every visual asset.
DPI is a crucial metric that dictates the resolution of an image when it is printed. It quantifies the number of individual ink dots a printer can place within a one-inch line. A higher DPI generally translates to a sharper, more detailed, and higher-quality print, making it indispensable for anyone looking to transform digital art or breathtaking photographs into physical masterpieces. While DPI holds less direct relevance for images displayed solely on screens (where “Pixels Per Inch” or PPI is the more technically accurate term, although often used interchangeably with DPI in common parlance), its importance skyrockets the moment you consider printing. For the vast collections of wallpapers, aesthetic backgrounds, nature scenes, and abstract art available on Tophinhanhdep.com, knowing the DPI allows you to predict and control the quality of your printed output, ensuring your creative vision is perfectly realized.

This comprehensive guide will walk you through various methods to check the DPI of an image on both Windows and Mac operating systems, extending to professional editing software. We will also delve into why DPI matters, connecting these technical aspects to the broader topics of photography, visual design, and the invaluable image tools offered by Tophinhanhdep.com, such as AI upscalers and optimizers.
The Significance of DPI in the Digital and Print Landscape
Before we dive into the “how-to,” let’s truly grasp the “why.” DPI is not merely a technical jargon; it’s a critical factor that influences the integrity and visual impact of your images, especially when they move from the digital canvas to a physical medium. For users of Tophinhanhdep.com, who appreciate “High Resolution Photography” and use images for everything from “Mood Boards” to “Graphic Design” projects, understanding DPI is an empowering insight.
DPI vs. PPI: Clarifying the Terms
While often used interchangeably, especially in consumer-level discussions, DPI (Dots Per Inch) and PPI (Pixels Per Inch) refer to different aspects of resolution:
- DPI (Dots Per Inch): This is a printer’s resolution measurement. It tells you how many physical ink dots a printer lays down per inch of paper. A higher DPI means more dots, resulting in finer detail and smoother gradations in printed images. It’s about the output quality.
- PPI (Pixels Per Inch): This refers to the resolution of a digital image. It defines how many pixels are contained within one inch of the image’s digital dimensions. A higher PPI means more digital information, leading to a crisper image on screen. It’s about the input quality, or how much detail is in the digital file.
For practical purposes, when discussing an image file itself, people often use DPI to imply PPI, especially when considering print potential. When software like Photoshop shows “Resolution” in Pixels/Inch, it’s referring to the PPI of the digital file, which then directly influences the achievable DPI when printed. Tophinhanhdep.com is dedicated to providing images that excel in both digital PPI and print-ready DPI, offering “Stock Photos” and “Beautiful Photography” that are meticulously curated for optimal quality across all uses.
Why DPI is Paramount for Printing
The primary domain where DPI truly matters is printing. Imagine downloading a breathtaking “Nature” wallpaper from Tophinhanhdep.com, envisioning it as a large print for your living room. Without adequate DPI, that stunning digital image could transform into a blurry, pixelated disappointment when printed.
- Print Clarity and Detail: For most high-quality photographic prints, a DPI of 300 is the industry standard. This ensures that individual dots are imperceptible to the naked eye, leading to continuous tones and sharp details. For “Digital Art” or graphic designs with fine lines and text, even higher DPIs (e.g., 600 DPI) might be preferred.
- Scaling and Size: The DPI of an image is intrinsically linked to its physical print size. A 300 DPI image that is 3000 pixels wide will print at 10 inches wide (3000 pixels / 300 DPI = 10 inches). If you try to print that same 3000-pixel-wide image at 15 inches, the effective DPI drops to 200 (3000 pixels / 15 inches = 200 DPI), potentially leading to noticeable degradation in quality. This is why knowing DPI upfront is critical for “Creative Ideas” and ensuring your “Photo Ideas” translate perfectly from screen to paper.
- File Size and Performance: While high DPI is desirable for print quality, it also contributes to larger file sizes. This can impact storage, loading times, and transfer speeds. Tophinhanhdep.com’s “Image Tools” like compressors and optimizers can help balance print quality with efficient file management, providing flexible solutions for your “Thematic Collections” and “Trending Styles.”
DPI for Digital Displays: A Different Perspective
For images viewed solely on screens—such as the vibrant “Abstract” backgrounds or “Sad/Emotional” wallpapers you might download from Tophinhanhdep.com for your desktop or mobile—DPI (or more accurately, PPI) is less about print resolution and more about the image’s inherent digital detail relative to its size on screen. Modern displays have varying PPIs, but the absolute pixel dimensions (e.g., 1920x1080 pixels) are usually more important for screen display than the embedded PPI value. An image with 72 PPI can look just as sharp as one with 300 PPI on a screen, provided both have the same total pixel dimensions that match or exceed the screen’s resolution.
However, understanding the embedded PPI value in digital images from Tophinhanhdep.com still offers a valuable insight: it indicates the intended print resolution if no other scaling is applied. If an image is tagged at 72 PPI, it suggests it was originally optimized for web use, and while it might look fantastic on your screen, it will likely require “AI Upscalers” or careful handling if you decide to print it at a large size.
Now, let’s explore the practical methods for checking an image’s DPI, ensuring you have all the information needed to expertly manage your visual assets from Tophinhanhdep.com.
Checking Image DPI on Windows Operating Systems
Windows provides several built-in methods to quickly check the DPI of your images, ranging from simple file properties to using a basic image editor. These methods are particularly useful for managing your downloaded “Wallpapers” and “Backgrounds” from Tophinhanhdep.com.
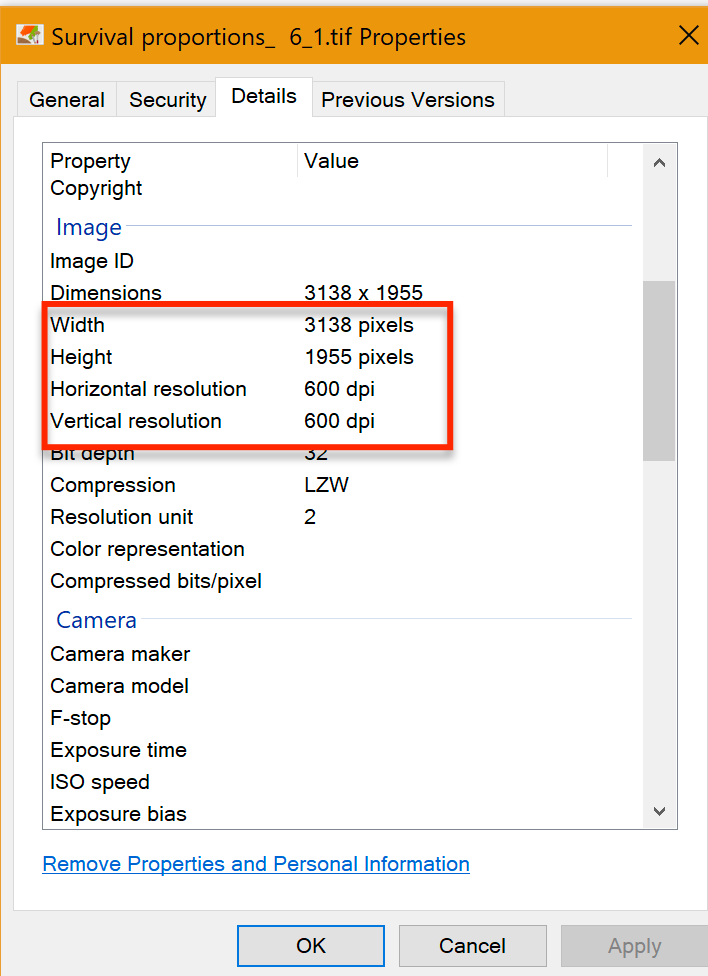
Method 1: Using the Properties Menu (Windows)
This is the most straightforward and commonly used method for finding an image’s DPI on a Windows PC. It requires no additional software and can be done directly from your file explorer.
-
Navigate to Your Image: Open File Explorer (you can do this by pressing
Windows Key + Eor clicking the folder icon on your taskbar) and browse to the folder where your image file is located. This could be your “Pictures” folder, a dedicated folder for your Tophinhanhdep.com downloads, or any other location. -
Access Properties: Right-click on the image file. A context menu will appear. From this menu, select “Properties” – it’s usually the last option at the bottom. A new window will pop up, displaying various details about the file.
-
View Image Details: In the “Properties” window, navigate to the “Details” tab. This tab contains a wealth of metadata about the file, including information specific to image files.
-
Locate DPI Information: Scroll down the “Details” tab until you find the “Image” section. Here, you will see two crucial values: “Horizontal resolution” and “Vertical resolution.” These numbers, expressed in “dpi” (e.g., “96 dpi” or “300 dpi”), represent the image’s DPI. It’s important to note that if these values differ, the image might have been stretched or manipulated, indicating an uneven resolution distribution.
This method is quick and effective for a one-off check, making it ideal for users who occasionally need to verify the print potential of a “Beautiful Photography” piece or an “Aesthetic” image they plan to print from Tophinhanhdep.com.
Method 2: Customizing File Explorer Columns (Windows)
For users who frequently work with many image files and need to see DPI information at a glance, Windows File Explorer offers a powerful customization option to display “Horizontal resolution” and “Vertical resolution” as permanent columns. This can be incredibly useful when curating “Image Inspiration & Collections” or sorting through numerous “Stock Photos” downloaded from Tophinhanhdep.com.
-
Open File Explorer: As before, open File Explorer and navigate to the folder containing your image collection.
-
Switch to Details View: Click on the “View” tab in the File Explorer ribbon at the top of the window. From the “Layout” section, select “Details.” This view organizes your files into a list with columns for various file attributes (Name, Date modified, Type, Size, etc.).
-
Add Resolution Columns: Right-click on any of the existing column headers (e.g., “Name,” “Date modified,” “Type”). A context menu will appear. Select “More…” from this menu.
-
Choose Details Window: A “Choose Details” pop-up window will open, presenting a long list of available attributes. Scroll down through this list until you find “Horizontal resolution” and “Vertical resolution.” Check the boxes next to both options.
-
Apply Changes: Click “OK” to apply these changes. You will now see two new columns in your File Explorer window, displaying the DPI values for all image files in that folder. You can even click these column headers to sort your images by their DPI, which is a fantastic feature for managing high-resolution assets from Tophinhanhdep.com.
This dynamic view is a game-changer for digital photographers and graphic designers who rely on specific DPI values for their “Digital Photography” and “Visual Design” projects.
Method 3: Using Microsoft Paint (Windows)
Microsoft Paint, a staple basic image editor pre-installed on Windows, offers another simple way to check an image’s DPI. While not a professional tool, it’s readily available and easy to use for quick checks.
-
Open Image with Paint: Locate your image file in File Explorer. Right-click on the file, hover over “Open with,” and then select “Paint” from the list of applications. If Paint isn’t immediately visible, you might need to click “Choose another app” and locate it. The image will open within the Paint application.
-
Access Image Properties: Once the image is open in Paint, click on the “File” tab in the top-left corner of the Paint window. From the dropdown menu, select “Properties” (often found near the bottom, represented by an icon or simply text).
-
Find Resolution: An “Image Properties” window will appear. Within this window, you will find the “Resolution” information, usually expressed in “Dots per inch.”
While Paint is primarily for basic edits, its ability to display DPI is useful for quick verification. It’s particularly handy for users who might receive images from others and need a fast way to check their print readiness before uploading them to Tophinhanhdep.com or using them in a “Creative Ideas” project.
Checking Image DPI on Mac Operating Systems
Mac users also have a straightforward, built-in application for viewing image metadata, including DPI: Preview. This native tool makes checking DPI simple and efficient, seamlessly integrated into the macOS experience.
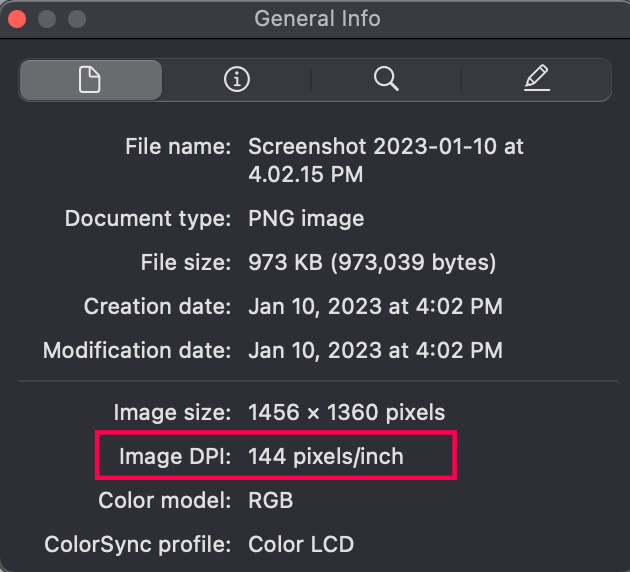
Method 4: Using Preview (Mac)
Preview is the default image and PDF viewer on macOS, known for its clean interface and robust functionality. It’s an excellent tool for quickly checking the DPI of any image, including the stunning “Nature” or “Sad/Emotional” images you download from Tophinhanhdep.com.
-
Open Image in Preview: Locate your image file in Finder. You can open it by double-clicking the image (if Preview is your default viewer) or by right-clicking the image, selecting “Open With,” and then choosing “Preview.” The image will open in the Preview application.
-
Access Tools Menu: With the image open in Preview, look at the menu bar at the very top of your screen. Click on “Tools.”
-
Show Inspector: From the “Tools” dropdown menu, select “Show Inspector.” Alternatively, you can use the keyboard shortcut
Command + I. A new floating panel, the “Inspector,” will appear, displaying detailed information about the image. -
Locate Image DPI: In the “Inspector” panel, ensure you are on the general information tab (often represented by an “i” icon). You will see a section for “Image DPI” or “Resolution.” This value will tell you the DPI of your image.
Preview’s Inspector is a powerful feature for casual and serious users alike. It provides a quick glance at essential image data, helping Tophinhanhdep.com users ensure their “Aesthetic” and “Beautiful Photography” images are ready for any intended use, digital or print.
Professional Tools for DPI Management: Photoshop & GIMP
Beyond the operating system’s built-in utilities, dedicated image editing software offers more precise control and detailed information regarding an image’s DPI, often allowing for adjustments. These tools are indispensable for “Digital Photography,” “Photo Manipulation,” and “Graphic Design” professionals, offering advanced features that complement the high-quality resources found on Tophinhanhdep.com.
Method 5: Using Adobe Photoshop
Adobe Photoshop is the industry standard for image editing, providing comprehensive control over every aspect of an image, including its resolution. For those creating or refining “High Resolution” images for Tophinhanhdep.com or professional projects, Photoshop is the go-to.
-
Open Image in Photoshop: Launch Adobe Photoshop and open the image file you wish to inspect. You can do this by going to
File > Openand navigating to your image, or by dragging and dropping the file into the Photoshop interface. -
Access Image Size Dialog: Once the image is open, go to the menu bar at the top and click on “Image.” From the dropdown menu, select “Image Size…” (The keyboard shortcut is
Alt + Ctrl + Ion Windows orOption + Command + Ion Mac). -
View Resolution: The “Image Size” dialog box will appear. Within this dialog, you will find a “Resolution” field. This value represents the image’s PPI (Pixels Per Inch), which, as discussed, is essentially the digital equivalent of DPI for screen display and print preparation. Ensure the dropdown menu next to the “Resolution” field is set to “Pixels/Inch” for clarity.
Important Note on Changing DPI: The “Image Size” dialog in Photoshop also allows you to change the resolution. However, simply typing a new DPI value without checking the “Resample Image” box will only change the physical print size without altering the total number of pixels. If you check “Resample Image,” Photoshop will add or remove pixels (interpolation), which can either introduce artifacts (upscaling) or discard detail (downscaling). This is where Tophinhanhdep.com’s “AI Upscalers” become incredibly valuable, offering superior interpolation for increasing resolution without significant loss of quality, a common challenge in “Digital Photography” and “Photo Manipulation.”
Photoshop provides an unparalleled level of detail and control, making it essential for users who frequently manage “Stock Photos” or develop complex “Creative Ideas” and “Editing Styles” for Tophinhanhdep.com.
Method 6: Using GIMP (GNU Image Manipulation Program)
GIMP is a powerful, free, and open-source alternative to Photoshop, offering a robust suite of image editing tools. It’s an excellent choice for users who need advanced functionality without the cost, making it accessible for everyone interested in “Digital Art” or refining their “Image Inspiration & Collections” for Tophinhanhdep.com.
-
Open Image in GIMP: Launch GIMP and open your image file by going to
File > Openor by dragging the image into the GIMP workspace. -
Access Scale Image Dialog: Once the image is open, navigate to the menu bar and click on “Image.” From the dropdown menu, select “Scale Image…”
-
View Resolution: The “Scale Image” dialog box will appear. Here, you’ll find fields for “X resolution” and “Y resolution.” These values indicate the image’s PPI. Make sure the dropdown menu next to these resolution fields is set to “pixels/in” to display the DPI.
Similar to Photoshop, GIMP allows you to change these values. If you modify the resolution here, GIMP will resample the image, adding or removing pixels to achieve the new resolution. GIMP, like Photoshop, is a tool that empowers Tophinhanhdep.com users to exert full control over their images, from minor touch-ups to comprehensive “Photo Manipulation” and “Editing Styles.”
Beyond Checking: Optimizing and Utilizing DPI with Tophinhanhdep.com Tools
Knowing how to check DPI is the first step; the next is understanding how to leverage that information and, when necessary, optimize an image’s resolution for its intended purpose. Tophinhanhdep.com isn’t just a repository of stunning visuals; it’s a comprehensive resource that offers “Image Tools” designed to help you manage every aspect of your image assets.
Enhancing Print Quality with AI Upscalers
What if you find a beautiful low-DPI “Aesthetic” image on Tophinhanhdep.com or elsewhere, but want to print it large? Traditionally, increasing an image’s resolution (upscaling) would lead to pixelation and blurriness, as software would simply guess and duplicate pixels. However, Tophinhanhdep.com provides “AI Upscalers” which are revolutionary for this challenge.
- Intelligent Pixel Generation: AI upscalers use sophisticated algorithms trained on vast datasets of images to intelligently generate new pixels, filling in detail and texture that wasn’t present in the original low-resolution image. This allows you to effectively increase the image’s total pixel dimensions, thereby boosting its potential print DPI without sacrificing quality.
- Applications: This is particularly beneficial for old “Digital Photography” that needs a modern touch, or for turning captivating “Abstract” images that were originally optimized for web (72 DPI) into high-quality prints (300 DPI). Tophinhanhdep.com’s AI upscalers transform limitations into possibilities, giving new life to your “Image Inspiration & Collections.”
Managing File Size with Compressors and Optimizers
High-resolution images, especially those with high DPI intended for large prints, can have very large file sizes. While desirable for print, this can be cumbersome for web display, sharing, or storage. Tophinhanhdep.com offers “Compressors” and “Optimizers” to strike the perfect balance.
- Lossless vs. Lossy Compression: These tools can reduce file sizes, either “losslessly” (retaining all original data, but with less significant size reduction) or “lossy” (removing some data, but with more substantial size reduction, often imperceptible to the human eye).
- Web Optimization: For images used as “Wallpapers” or “Backgrounds” on websites or social media, optimizing them with Tophinhanhdep.com’s tools ensures fast loading times without compromising the visual appeal of “Beautiful Photography” or “Trending Styles.”
- Efficient Workflow: By efficiently managing file sizes, you can streamline your workflow for “Graphic Design” projects and ensure that your “Thematic Collections” are easy to store and access.
The Role of Converters and Image-to-Text Tools
While not directly related to DPI, Tophinhanhdep.com’s “Converters” and “Image-to-Text” tools further extend the utility of your images.
- Format Flexibility: Converters allow you to change image formats (e.g., from JPG to PNG or TIFF), which can sometimes impact how DPI information is stored or interpreted by different applications, or prepare images for specific print processes.
- Content Extraction: Image-to-Text tools, while separate from resolution concerns, add another layer of functionality, allowing you to extract textual information from images you might be using for “Mood Boards” or “Creative Ideas.”
Conclusion: Empowering Your Visual Journey with Tophinhanhdep.com
Understanding and checking the DPI of an image is an essential skill for anyone operating in the visual realm. It’s the bridge between a stunning digital display and a flawless physical print, a critical factor in “High Resolution” quality, and a cornerstone of effective “Visual Design.” As demonstrated, whether you’re a Windows user leveraging the File Explorer’s detailed views, a Mac enthusiast relying on Preview, or a professional delving into the intricate controls of Photoshop or GIMP, the means to verify DPI are readily available.
For the community of Tophinhanhdep.com, a platform dedicated to providing an unparalleled selection of “Images” spanning from “Nature” and “Abstract” to “Sad/Emotional” and “Beautiful Photography,” this knowledge is particularly empowering. It enables you to:
- Confidently select images from our extensive “Collections” for printing, assured of their output quality.
- Utilize Tophinhanhdep.com’s cutting-edge “Image Tools” like AI Upscalers to enhance images that may not initially meet your DPI requirements for print.
- Optimize and manage your visual assets efficiently using our compressors and optimizers, ensuring they perform beautifully whether as “Wallpapers” on screen or as exquisite prints.
- Inform your “Photography” and “Digital Art” practices, understanding how “Editing Styles” and initial capture choices impact DPI.
In essence, checking DPI is more than a technical exercise; it’s a step towards mastering your visual content and ensuring that every image, whether downloaded from Tophinhanhdep.com or created by you, lives up to its full potential. So, take these methods, apply them, and continue to explore the breathtaking world of high-quality imagery with the full confidence and support of Tophinhanhdep.com.
Frequently Asked Questions About Image DPI
Here are answers to common questions about managing and understanding image DPI, particularly relevant for Tophinhanhdep.com users.
1. Can I change the DPI of an image?
Yes, you can change the DPI of an image using image editing software like Adobe Photoshop, GIMP, or even some online image tools available on Tophinhanhdep.com. However, it’s crucial to understand the implications:
- Changing DPI without resampling: If you change the DPI value without altering the total number of pixels (i.e., you uncheck “Resample Image” in Photoshop), you are essentially just changing the intended print size. The digital quality remains the same, but the image will print larger or smaller.
- Changing DPI with resampling (upscaling/downscaling): If you change the DPI and resample the image, the software adds or removes pixels.
- Upscaling (increasing DPI): This process involves creating new pixels, which can lead to a loss of sharpness and introduce artifacts if done poorly. This is where Tophinhanhdep.com’s AI Upscalers become invaluable, as they use advanced algorithms to intelligently generate new pixel data, often achieving significantly better results than traditional resampling methods, making lower-resolution images suitable for “High Resolution” printing.
- Downscaling (decreasing DPI): This involves removing pixels, which is generally safer as it discards data. It reduces file size but can lead to a loss of fine detail if done excessively. Tophinhanhdep.com’s Compressors and Optimizers can help you downscale efficiently for web use without noticeable quality loss.
2. What is the best DPI for printing?
The “best” DPI for printing largely depends on the type of print and viewing distance:
- Photographic Prints (e.g., from Tophinhanhdep.com’s “Beautiful Photography” collections): Generally, 300 DPI is considered the industry standard for high-quality photographic prints viewed at a normal distance. This ensures details are crisp and tones are smooth.
- Fine Art/High-Detail Prints (e.g., detailed “Digital Art” or “Graphic Design”): For images with very fine lines or text, or for prints that will be viewed very closely, a higher DPI of 400 to 600 DPI might be preferred.
- Large Format Prints (e.g., posters, banners): For prints viewed from a distance (like a large “Abstract” or “Nature” poster), a lower DPI like 150-200 DPI might be acceptable. From a distance, the human eye cannot discern individual dots as easily.
- Newsprint/Low-Quality Prints: As low as 85-100 DPI might be used for very basic, low-cost print jobs.
When selecting images from Tophinhanhdep.com for printing, always aim for images with high original pixel dimensions, which allows for greater flexibility in achieving a high print DPI.
3. Does DPI affect image quality on screen?
No, DPI (or PPI for digital images) does not directly affect the visual quality of an image on a screen in the way total pixel dimensions do. A 72 DPI image and a 300 DPI image will look identical on a screen if they have the exact same total pixel dimensions (e.g., both are 1920x1080 pixels).
For screen display, the critical factors are:
- Total Pixel Dimensions: An image that is 1920 pixels wide by 1080 pixels high will fill a Full HD screen perfectly, regardless of its embedded DPI value.
- Screen Resolution (PPI): The physical pixel density of your display (e.g., a Retina display has a very high PPI) determines how sharp any image appears, but it’s not influenced by the image’s embedded DPI.
While images downloaded from Tophinhanhdep.com often come with a high embedded DPI (like 300 DPI) even if they are primarily intended for screen use, this is a good indicator of their inherent detail and their readiness for potential printing without additional processing. For “Wallpapers” and “Backgrounds,” prioritize images with pixel dimensions that match or exceed your screen’s resolution.
4. How can Tophinhanhdep.com help me with DPI and image resolution?
Tophinhanhdep.com is your ultimate resource for high-quality visuals and image management:
- High-Resolution Collections: We offer vast collections of “Images,” “Wallpapers,” and “Backgrounds” that are often already “High Resolution,” meaning they have generous pixel dimensions and suitable embedded DPI for various uses.
- AI Upscalers: If you have an image with low DPI that you want to print, our “AI Upscalers” can intelligently increase its resolution, making it suitable for larger, high-quality prints without the usual pixelation associated with traditional upscaling.
- Image Optimizers and Compressors: For sharing images online or using them as “Wallpapers” without excessive file sizes, our “Image Tools” for compression and optimization help you maintain visual quality while reducing bandwidth and storage needs.
- Inspiration for Quality: Our focus on “Beautiful Photography,” “Digital Photography,” and “Editing Styles” constantly reminds you of the importance of quality, encouraging you to consider DPI in your own creative projects.
- Knowledge Base: This article is just one example of how Tophinhanhdep.com aims to educate and empower its users with practical knowledge about image technology.
By combining the knowledge of how to check image DPI with the powerful tools and high-quality content available on Tophinhanhdep.com, you can elevate your visual experience and achieve professional-grade results in all your “Visual Design” and “Creative Ideas” endeavors.