How to Tell if an Image is High Resolution: Your Essential Guide to Crisp Visuals with Tophinhanhdep.com

In today’s visually-driven world, images are everywhere. From stunning wallpapers adorning our desktops to professional photographs gracing annual reports, their impact is undeniable. However, not all images are created equal, and one critical factor that dictates their quality and versatility is resolution. Have you ever downloaded a beautiful image, only to find it pixelated or blurry when you try to use it for a print project or display it on a large screen? This common frustration often stems from a misunderstanding of image resolution.
At Tophinhanhdep.com, we understand the profound importance of high-resolution imagery. Whether you’re searching for breathtaking nature wallpapers, intricate abstract art, stock photos for your next campaign, or tools to enhance your visual projects, resolution is the cornerstone of quality. This comprehensive guide will demystify image resolution, teach you how to identify high-resolution images, and explain why it’s crucial for everything from digital displays to professional printing. We’ll also explore how Tophinhanhdep.com empowers you to manage, optimize, and even upscale your images to achieve unparalleled visual excellence.

Understanding Image Resolution: DPI, PPI, and Pixel Dimensions
Before we dive into the “how-to,” it’s essential to grasp the fundamental concepts that define image resolution. The terms “resolution,” “DPI,” and “PPI” are often used interchangeably, but understanding their subtle differences is key to appreciating what makes an image truly high quality.
The Core Concepts: DPI vs. PPI
At its heart, image resolution refers to the detail an image holds. This detail is measured in different ways depending on whether the image is intended for a screen or for print.
-
DPI (Dots Per Inch): This term primarily applies to printed materials. It refers to the number of individual ink dots a printer places within one linear inch of paper. The more dots per inch, the finer the detail and the smoother the gradients, resulting in a higher quality print. For professional print, a standard of 300 DPI is generally considered “high resolution.” Some demanding projects might even go up to 350 DPI, but exceeding this usually offers no noticeable improvement in print quality and only results in larger file sizes. Conversely, 72 DPI is typically considered “low resolution” for print, leading to pixelated or blurry output if printed at a significant size.
-
PPI (Pixels Per Inch): This term is more relevant to digital displays. It refers to the number of pixels displayed within one linear inch of a screen. While DPI is about physical ink on paper, PPI is about the digital data displayed on an electronic screen. For web images, videos, and on-screen presentations, the resolution is often quoted as 72 PPI because most monitors historically displayed images at approximately this density. However, with the advent of high-density “Retina” displays and 4K/8K monitors, modern screens can display significantly more pixels per inch, making images with higher PPI values appear sharper on these devices.
It’s crucial to remember this distinction: DPI for print, PPI for screens. While they both convey density of visual information, their application differs. A common misconception is that simply changing an image’s DPI value in an editing program will transform a low-resolution image into a high-resolution one. As we’ll discuss later, this isn’t true for the base image quality.
Pixels: The Building Blocks of Your Images
Beyond DPI and PPI, the absolute measure of an image’s detail lies in its pixel dimensions. An image is composed of a grid of tiny squares called pixels. The pixel dimensions specify the total number of pixels along the width and height of an image (e.g., 1920 pixels wide x 1080 pixels high).
Consider two images:
- An image that is 1800 pixels wide x 1200 pixels high.
- Another image that is 600 pixels wide x 400 pixels high.
The first image has significantly more pixels overall. This raw pixel count is the true indicator of an image’s native resolution. The more pixels an image has, the more detail it contains, and the larger it can be printed or displayed without appearing pixelated.
For example, an image with dimensions of 1800 pixels by 1200 pixels, when printed at 300 DPI, would yield a print size of 6 inches by 4 inches (1800/300 = 6, 1200/300 = 4). If that same 1800x1200 pixel image were only 72 DPI, it would theoretically print at 25 inches by 16.6 inches, but the quality would be incredibly poor and pixelated due to the low density of pixels per inch. The key takeaway here is that while DPI/PPI tells you the density, pixel dimensions tell you the total amount of information available. A large pixel dimension provides more “room to move” when scaling for different uses.
Why High Resolution Matters: From Web to Print
The choice between high and low resolution profoundly impacts how your visuals are perceived and used. For a platform like Tophinhanhdep.com, which specializes in diverse visual content, understanding this impact is paramount.
The Web vs. Print Divide
For Web and Digital Displays (Lower Resolution Often Sufficient): When an image is destined for a website, social media, or a digital presentation, the primary concern is often file size and loading speed. A 72 PPI image is generally sufficient for on-screen viewing because most screens don’t display individual pixels at higher densities unless specifically designed to. High-resolution images (e.g., 300 DPI meant for print) can have very large file sizes, which slows down website loading times and consumes more bandwidth. For this reason, images displayed on Tophinhanhdep.com, while originating from high-resolution sources, are often optimized and compressed for web viewing to ensure a smooth user experience. This optimization reduces the file size without sacrificing noticeable visual quality on a screen.
However, even for web, higher pixel dimensions are beneficial. They allow for images to be displayed crisply on large, high-resolution monitors and provide flexibility for responsive design across various device sizes without immediate pixelation. When sourcing wallpapers or backgrounds from Tophinhanhdep.com, selecting images with ample pixel dimensions ensures they look stunning on any screen.
For Print (High Resolution is Essential): This is where high resolution truly becomes non-negotiable. If you’re printing an image – whether it’s a small photo for a newsletter, a large poster of a nature landscape, a page in an annual report, or a piece of digital art – anything less than 300 DPI at the final desired print size will likely result in a noticeable drop in quality. You’ll see jagged edges, blurriness, or blocky pixels, a phenomenon commonly known as “pixelation.”
Consider the beautiful photography or aesthetic collections available on Tophinhanhdep.com. If you want to print a stunning landscape photo to hang on your wall, it must be high resolution (e.g., 300 DPI at the poster’s final dimensions). Non-profits often face this challenge when using event photos taken on phones; a low-res (72 DPI) phone photo might look fine on their website, but printing it in a newsletter could be disastrous. For any graphic design, photo manipulation, or digital art project intended for physical output, always prioritize high-resolution source files.
Elevating Your Visual Design and Photography
The implications of resolution extend across all categories found on Tophinhanhdep.com:
- Images (Wallpapers, Backgrounds, Aesthetic, Nature, Abstract, Sad/Emotional, Beautiful Photography): High resolution ensures that every intricate detail, vibrant color, and subtle nuance of these images is preserved, offering an immersive and satisfying visual experience, whether on screen or in print. A low-res abstract piece, for instance, loses its texture and impact.
- Photography (High Resolution, Stock Photos, Digital Photography, Editing Styles): Professional photographers who contribute to Tophinhanhdep.com meticulously capture and process their images in high resolution. This provides the flexibility for clients to use stock photos for anything from website banners (optimized to smaller file sizes) to billboard advertisements (requiring massive pixel dimensions at high DPI). Editing styles also shine brightest on high-resolution canvases, allowing for precise adjustments without introducing artifacts.
- Visual Design (Graphic Design, Digital Art, Photo Manipulation, Creative Ideas): Designers depend on high-resolution assets. For creating compelling posters, brochures, or even complex digital art, starting with high-resolution images prevents quality degradation during manipulation, scaling, or final output. Creative ideas come to life with crisp, clear visuals.
- Image Inspiration & Collections (Photo Ideas, Mood Boards, Thematic Collections, Trending Styles): The power of inspiration is in the clarity of its presentation. A mood board built with blurry, low-resolution images fails to convey its intended aesthetic or thematic strength. High-resolution images ensure that every element contributes to a cohesive and inspiring visual narrative.
In summary, high resolution is not just a technical specification; it’s a gateway to versatility, professionalism, and ultimately, a superior visual experience.
Practical Steps: How to Check Image Resolution on Your Computer
Now that you understand what high resolution is and why it matters, let’s get practical. Knowing how to quickly check an image’s resolution and pixel dimensions on your own computer is an invaluable skill. These methods apply universally, whether you’re reviewing images downloaded from Tophinhanhdep.com or your personal photos.
On Windows PCs
Checking image resolution on a Windows computer is a straightforward process, requiring just a few clicks. This method works reliably across various Windows versions, including Windows 7, 8, 10, and 11.
- Locate the Image File: Navigate to the folder where your image file is stored. You need to access the file itself, not an image opened in a web browser or a photo viewer.
- Right-Click the Image: With your mouse, right-click directly on the image file. A contextual menu will appear.
- Select “Properties”: From the menu, choose the “Properties” option, usually found towards the bottom. This will open a new window displaying various attributes of the file.
- Go to the “Details” Tab: In the “Properties” window, you’ll see several tabs at the top (e.g., General, Security, Details). Click on the “Details” tab.
- Scroll Down to Image Information: Within the “Details” tab, scroll down until you find the “Image” section. Here, you will see crucial information:
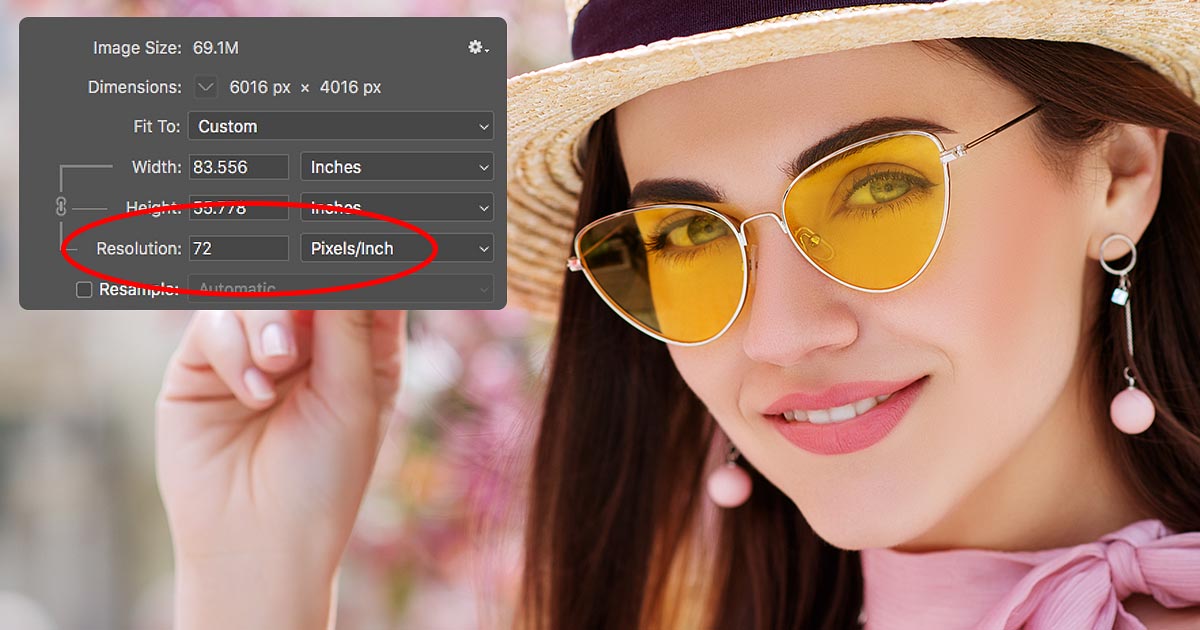
- Dimensions: This shows the pixel width and height (e.g., 1920x1080). This is your raw pixel count.
- Resolution: This will display the horizontal and vertical resolution, usually in DPI (e.g., 300 dpi or 72 dpi).
Example Interpretation: If you see “Dimensions: 3000 x 2000” and “Resolution: 300 dpi,” you have a high-resolution image with substantial pixel data. This image could be printed at 10x6.6 inches (3000/300 x 2000/300) with excellent quality. If you see “Dimensions: 900 x 600” and “Resolution: 72 dpi,” this is a low-resolution image. While it might look fine on a small screen, printing it even at a modest 3x2 inches (900/300 x 600/300) would likely result in pixelation because it only contains enough pixel data to be 300 DPI if shrunk considerably.
On Mac OSX
For Mac users, checking image resolution is equally simple, using a similar “Get Info” function.
- Locate the Image File: Find the image file in your Finder.
- Right-Click or Control-Click: Right-click (or Control-click) on the image file.
- Select “Get Info”: From the contextual menu, choose “Get Info.” Alternatively, you can select the file and press
Command + Ion your keyboard. This will open the “Info” window. - Expand “More Info” or “General”: In the “Info” window, look for a section labeled “More Info” or “General.” You might need to click the small disclosure triangle next to it to expand the details.
- View Dimensions and Resolution: Within this expanded section, you will find:
- Dimensions: The pixel width and height of the image.
- Resolution: The DPI or PPI value.
Additional Mac Tip (for quick glance):
You can also select the photo on your desktop, then press Command + J (Show View Options). Within the “Item Info” section, you can toggle its visibility to quickly see some basic details. For comprehensive resolution and dimension data, “Get Info” is the preferred method.
By regularly checking these properties, you can quickly assess the quality and suitability of any image for your intended purpose, whether it’s for a wallpaper from Tophinhanhdep.com or an image for a client’s print project.
Beyond Checking: Managing and Optimizing Your Image Resolution
Identifying high-resolution images is only part of the journey. What happens when you encounter a low-resolution image that you absolutely need to use? Or when you have a high-resolution image that’s too large for web use? This section delves into managing and optimizing image resolution, including the limitations of traditional resizing and the potential of modern tools, many of which Tophinhanhdep.com makes accessible.
The Limitations of Simple Resizing
A crucial concept to grasp is that you cannot simply “convert” a low-resolution image into a high-resolution one by merely increasing its DPI value in image editing software like Photoshop. The core problem lies in the original pixel data.
-
Decreasing Image Size: If you have a high-resolution image with large pixel dimensions (e.g., 4000x3000 pixels at 300 DPI) and you want to use it for a smaller application (e.g., a web thumbnail at 200x150 pixels), you can easily decrease its size. The software will discard unnecessary pixel data, resulting in a smaller file size and a perfectly sharp image at the new dimensions. This is a common practice for optimizing images from Tophinhanhdep.com for web use, ensuring fast loading times without compromising on visual quality for screens.
-
Increasing Image Size (The Pitfall): The inverse is not true for quality. If you take a small, low-resolution image (e.g., 600x400 pixels at 72 DPI) and try to “upscale” it to a larger print size (e.g., to print at 10x7 inches requiring 3000x2100 pixels at 300 DPI), traditional software will try to “create” new pixels based on the existing ones. This process, known as interpolation, doesn’t add real detail. Instead, it estimates what the new pixels should look like, usually by averaging the colors of surrounding pixels. The result is almost always a blurry, soft, or pixelated image. You’re effectively spreading the same limited amount of information over a larger area, making the imperfections more visible.
This is a common frustration for graphic designers and anyone trying to print images. A truly high-resolution image must originate that way, with sufficient pixel data captured by the camera or created by the artist.
Leveraging Tophinhanhdep.com’s Image Tools: Upscalers, Converters, and Optimizers
While traditional resizing has its limitations, advancements in technology, particularly Artificial Intelligence, have begun to bridge the gap. Tophinhanhdep.com offers a suite of image tools designed to help you manage and optimize your images, even addressing some of these resolution challenges:
- AI Upscalers: This is where modern technology truly shines. Unlike traditional interpolation, AI Upscalers on Tophinhanhdep.com use sophisticated algorithms trained on vast datasets of images to intelligently add detail and refine edges when increasing an image’s size and resolution. While no AI upscaler can magically create information that wasn’t there to begin with, they can produce remarkably better results than conventional methods, making a low-resolution image more palatable for larger displays or even small prints. If you find a fantastic aesthetic image on Tophinhanhdep.com that’s slightly too small for your wallpaper or a nature photo that needs a bit more oomph for a specific project, our AI Upscalers can be a game-changer.
- Compressors and Optimizers: For web use, large high-resolution images can be a hindrance. Tophinhanhdep.com provides image compressors and optimizers that reduce file size without a noticeable loss of quality for screen display. This is essential for fast-loading websites, efficient social media sharing of beautiful photography, and ensuring that your digital art and creative ideas reach your audience quickly and clearly. You can take a stunning high-resolution stock photo, optimize it for your website, and still retain the original high-res version for print projects.
- Converters: Sometimes, an image is in the wrong format (e.g., a TIFF that’s too large for web, or a webP that needs to be a JPEG for compatibility). Tophinhanhdep.com’s converters allow you to change image formats efficiently, often with options to adjust resolution or quality settings during the conversion process.
- Image-to-Text Tools: While not directly related to resolution, tools like image-to-text (OCR) rely on clear, readable images. High-resolution source images greatly improve the accuracy and efficiency of such processes, especially for graphic design elements or documents.
These tools provided by Tophinhanhdep.com empower users to not only check and understand image resolution but also to actively manage and improve their image assets, bridging the gap between ideal and practical usage.
Cultivating a High-Resolution Workflow with Tophinhanhdep.com
Building a habit of prioritizing and managing image resolution will significantly enhance the quality of your visual content, whether for personal enjoyment or professional output. Tophinhanhdep.com is designed to be your comprehensive resource in this endeavor.
1. Start with Quality: Whenever possible, always begin with the highest resolution image available. This provides maximum flexibility for scaling, cropping, and editing without quality degradation. All premium photography, backgrounds, and aesthetic images on Tophinhanhdep.com are sourced and presented with this principle in mind, ensuring you have access to top-tier visual assets from the outset.
2. Understand Your Output: Before you even acquire an image, consider its final destination.
- For Web/Digital: File size and screen compatibility are key. Large pixel dimensions are good, but excessive DPI isn’t necessary and can lead to bloated files. Optimize using Tophinhanhdep.com’s compressors.
- For Print: 300-350 DPI at the final desired print size is the golden rule. Check your image’s pixel dimensions carefully to ensure it can support the print size you need.
3. Utilize Tophinhanhdep.com’s Collections for Inspiration and Assets: Explore our vast collections of wallpapers, backgrounds, nature photography, abstract art, and sad/emotional imagery. Each category is carefully curated to offer high-quality options suitable for various uses. When you download an image, you can trust that its base resolution is optimized for stunning visuals. For graphic design projects or mood boards, delve into our thematic collections and trending styles to find high-resolution inspiration that truly elevates your creative ideas.
4. Employ Image Tools Wisely: If you inherit a low-resolution image or need to adapt an image for a different purpose, don’t despair.
- Use Tophinhanhdep.com’s AI Upscalers to attempt to enhance the resolution of smaller images, making them more suitable for larger displays or minor print applications.
- Leverage our compressors and optimizers to prepare high-resolution images for fast web loading without sacrificing perceived quality.
- Use converters to ensure format compatibility across different platforms and software.
5. Continuous Learning in Digital Photography and Visual Design: The world of digital imagery is constantly evolving. Staying informed about best practices in high-resolution photography, editing styles, and visual design principles will only strengthen your ability to produce and appreciate stunning visuals. Tophinhanhdep.com continuously updates its resources and provides expert insights into these areas, helping you refine your skills and expand your creative horizons.
In conclusion, knowing how to identify and manage high-resolution images is a fundamental skill for anyone interacting with digital content. From the simplest wallpaper to the most complex visual design project, resolution dictates clarity, impact, and versatility. By understanding the principles of DPI, PPI, and pixel dimensions, and by effectively utilizing the tools and resources available on Tophinhanhdep.com, you can ensure that your images always convey the quality and message you intend, transforming good visuals into truly great ones. Embrace the power of high resolution and unlock a world of crisp, captivating imagery.