Mastering Image Tracing in Adobe Illustrator: A Comprehensive Guide

In the dynamic world of visual design, the ability to manipulate and optimize images is paramount. Whether you’re crafting stunning wallpapers, designing intricate logos for a clothing brand, or preparing high-resolution stock photos for large-scale printing, the fidelity and scalability of your visuals are non-negotiable. At Tophinhanhdep.com, we understand the critical role that image quality plays in every aspect of digital art and graphic design. This comprehensive guide will delve into one of Adobe Illustrator’s most powerful features: the Image Trace tool, a cornerstone for transforming raster images into versatile vector artwork. Beyond automatic tracing, we’ll also explore manual vectorization techniques, equipping you with the skills to bring your creative ideas to life with unparalleled precision.
From aesthetic backgrounds and nature-inspired photography to abstract compositions and profound sad/emotional imagery, every visual can benefit from the crisp, scalable nature of vector graphics. Imagine taking a beautiful photograph of a serene landscape, initially captured as a raster image, and transforming it into a piece of digital art that can be resized from a tiny web icon to an expansive billboard without a single pixel of degradation. This is the magic of vectorization, and Adobe Illustrator’s Image Trace tool is your key to unlocking this potential.

Understanding Raster vs. Vector Images: The Foundation of Digital Art
Before we dive into the mechanics of tracing, it’s essential to grasp the fundamental difference between raster and vector images. This distinction isn’t just technical jargon; it’s the bedrock upon which all scalable graphic design rests, influencing everything from the clarity of your backgrounds to the sharpness of your high-resolution photography.

The Pixelated World of Raster Graphics
Raster images are the most common type of image we encounter daily. Think of every photo you take with your phone, every image downloaded from the web, or even the aesthetic backgrounds you adore on Tophinhanhdep.com. These are all raster images, composed of a grid of tiny colored squares known as pixels. Each pixel holds specific color information, and together, millions of them form the complete picture.
Common raster file formats include:
- .JPG (or JPEG): Widely used for photographs and complex images due to its efficient compression, though it’s lossy, meaning some data is discarded during compression.
- .PNG: Supports transparency and is excellent for web graphics, logos, and images requiring a clear background.
- .GIF: Best for simple animations and images with limited color palettes.
- .PSD: Adobe Photoshop’s native file format, which preserves layers and editing capabilities.
- .TIFF: Often used in professional printing and photography for its high quality and lossless compression.
The primary limitation of raster images is their resolution dependency. They have a fixed number of pixels. When you try to enlarge a raster image beyond its original dimensions, the individual pixels become visible, resulting in a blurry, “pixelated” appearance. This becomes a significant challenge when you need to use a beautiful photograph as a large wallpaper or when scaling a detailed background for a high-resolution display. This is why for professional graphic design, especially for elements that need to be resized frequently, raster images present a significant hurdle. For instance, if you have a stunning piece of nature photography you want to use for both a website banner and a large print advertisement, a raster version will inevitably lose quality at larger scales.
The Infinite Scalability of Vector Graphics
In stark contrast, vector images are not composed of pixels but are built from mathematical equations that define geometric primitives like points, lines, curves, and polygons. These paths are filled with colors or gradients and are interpreted by the software to render the image. This mathematical definition is what grants vector graphics their incredible superpower: infinite scalability.
Key characteristics of vector images:
- Scalability: Vector images can be resized to any dimension—from the smallest icon to the largest billboard—without any loss of quality, sharpness, or detail. The mathematical instructions simply recalculate to display the image perfectly at the new size.
- Crispness: Lines and curves remain perfectly smooth and sharp, regardless of magnification. This is crucial for logos, typography, and illustrations where precision is key.
- Editability: Individual components of a vector image (points, paths, colors) can be easily selected, moved, reshaped, and recolored without affecting other parts of the design. This makes them ideal for creative ideas and iterative visual design.
- Smaller File Sizes (often): For simpler designs like logos or line art, vector files are often much smaller than their raster counterparts, as they store mathematical descriptions rather than pixel data.
Common vector file formats include:
- .AI: Adobe Illustrator’s native file format, preserving all vector data.
- .EPS: Encapsulated PostScript, a versatile format for vector graphics, often used for print.
- .SVG: Scalable Vector Graphics, an XML-based format ideal for web graphics, offering excellent scalability and interactivity.
- .PDF: While it can contain raster images, PDF is also a powerful vector format, especially for print-ready documents and sharing.
The shift from raster to vector is particularly crucial for tasks like screen printing, where clean lines are essential, or for any graphic design project that demands high-resolution output across various mediums. When you’re curating image inspiration, developing mood boards, or collecting thematic images for a project, considering their vector potential can dramatically expand their utility. Whether it’s an abstract design or a detailed illustration, converting it to vector ensures it’s always print-ready and perfect for digital art applications.
The Power of Image Trace in Adobe Illustrator: Transforming Your Visuals
Adobe Illustrator’s Image Trace tool stands as a bridge between the pixel-based world of raster images and the scalable realm of vectors. It’s an indispensable feature for graphic designers, digital artists, and anyone looking to prepare images for professional use, especially for tasks requiring crisp, resizeable artwork. On Tophinhanhdep.com, where high-resolution imagery and creative ideas converge, mastering Image Trace can elevate your visual design projects from concept to polished reality.
What is the Illustrator Image Trace Tool?
At its core, Image Trace automatically converts a raster image into a vector graphic. It analyzes the pixels of your original image, identifies areas of contiguous color, and then redraws those areas as vector shapes with paths and anchor points. This intelligent conversion allows you to take existing images—be it a hand-drawn sketch, a scanned logo, a piece of beautiful photography, or even complex digital art—and transform them into scalable vector artwork that retains its clarity at any size.
The utility of Image Trace extends across numerous applications:
- Logo Design: Converting hand-sketched logos or low-resolution client logos into crisp, editable vector formats.
- Screen Printing & Apparel Design: Essential for creating clean, printable separations from raster artwork.
- Illustration & Digital Art: Turning traditional drawings or textures into digital vector assets.
- Web Graphics: Optimizing images for responsive web design, ensuring they look sharp on all screens.
- Signage & Large-Format Printing: Preparing images for billboards, banners, and vehicle wraps where scalability is paramount.
- Iconography: Creating scalable icons from simple drawings.
This tool is a true “image converter” in the most transformative sense, allowing you to move seamlessly between different image “editing styles” and adapt your “stock photos” for diverse “visual design” needs.
Getting Started with Image Trace: Your First Steps to Vectorization
Embarking on your Image Trace journey is straightforward. The process begins with importing your raster image into Adobe Illustrator and accessing the dedicated Image Trace panel.
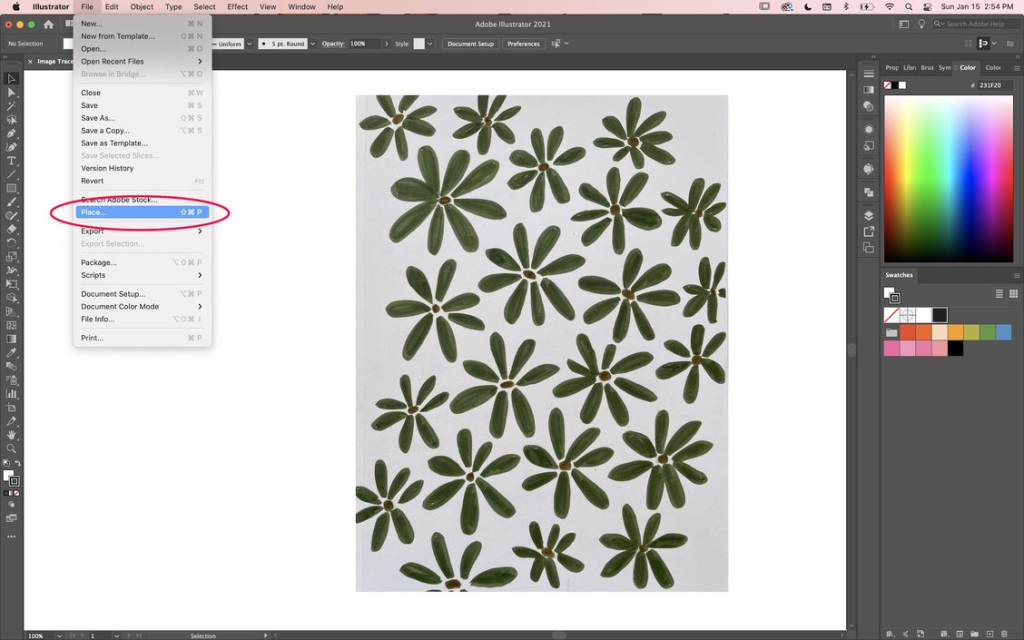
- Open a New Document: Start by opening Adobe Illustrator and creating a new document (File > New). The size of your artboard isn’t critical at this stage, as vector graphics are resolution-independent.
- Place Your Raster Image: Go to File > Place. Navigate to your computer and select the raster image you wish to trace. Click “Place” and then click on your artboard to position the image. It’s often helpful to place the image onto its own layer and lock it, or make a copy of the original raster image for reference, dragging it to the side of your canvas. This allows you to compare the traced result with the original.
- Pro Tip: For optimal results, choose images with clear subjects and good contrast. Images with high noise, blurry edges, or overly complex gradients can be more challenging to trace accurately. However, with advanced settings, even these can yield interesting artistic effects.
- Access the Image Trace Panel:
- Option 1 (Properties Panel): With your image selected using the Selection tool (V), look at the Properties panel on the right side of your screen. In the “Quick Actions” section, you’ll see an “Image Trace” button. Clicking this will apply a default trace and reveal a dropdown menu for presets.
- Option 2 (Window Menu): For full control, go to Window > Image Trace. This will open the dedicated Image Trace panel, offering a comprehensive suite of settings.
- Important Note: If the Image Trace panel options appear greyed out, it means your raster image is not currently selected. Simply use the Selection tool (V) to click on your image, and the options will become active.
Once you have your image placed and the Image Trace panel open, you are ready to begin the transformation. Remember, this tool is not just about conversion; it’s about giving your images on Tophinhanhdep.com a new life as infinitely scalable assets for all your “graphic design” and “digital art” endeavors.
Exploring Image Trace Presets and Modes: Quick Transformations
The Image Trace panel comes equipped with a variety of presets designed to offer quick, effective vectorization for different types of images. These presets act as excellent starting points, allowing you to achieve diverse “editing styles” with minimal effort.
-
Understanding Presets:
- High Fidelity Photo: Ideal for detailed photographs, aiming to retain as much color and detail as possible. This preset will generate a large number of paths and colors. Great for converting “beautiful photography” into a more artistic, painterly vector style.
- Low Fidelity Photo: A simpler version of High Fidelity, using fewer colors and paths. It’s useful for giving photos a more abstract, illustrative feel, fitting for “abstract” image collections.
- 3 Colors, 6 Colors, 16 Colors: These presets are perfect for simplifying photographic or complex images into a defined number of colors, creating a stylized, often graphic-novel-like effect. Excellent for creating “aesthetic backgrounds” with a limited color palette.
- Grayscale: Converts color images into shades of gray, useful for monochrome illustrations or converting “sad/emotional” photography into a starker, vector-based representation.
- Black and White Logo: Optimized for crisp, high-contrast black and white images, such as scanned line art, sketches, or simple logos. This is a go-to for many basic vectorization tasks.
- Silhouette: Creates a solid black shape from the darkest areas of your image, ideal for generating basic outlines of objects.
- Sketched Art / Line Art / Technical Drawing: These presets aim to capture the lines and contours of drawings, focusing on edge detection to mimic a hand-drawn or diagrammatic style. Perfect for transforming “photo ideas” or “mood board” sketches into clean, editable vector lines for “digital art.”
-
Choosing a Mode: The “Mode” dropdown menu in the Image Trace panel allows you to specify the color output of your trace:
- Black and White: Produces a monochrome vector with only black and white shapes.
- Grayscale: Outputs a vector image using various shades of gray.
- Color: The most versatile mode, retaining the original colors of the image or limiting them based on the selected preset or custom settings.
As you select different presets, you’ll immediately see the results on your image (ensure the “Preview” box is checked in the Image Trace panel). This real-time feedback is invaluable for quickly determining which preset best suits your “visual design” goals. For example, applying “Black and White Logo” to a detailed nature photograph will yield a very different, and likely less desirable, outcome than applying it to a simple ink drawing. The key is to experiment and observe how each preset interprets the pixel data and translates it into vector paths.
Advanced Customization: Fine-Tuning Your Trace Results
While presets offer a quick solution, the true power of Image Trace lies in its advanced settings. These sliders and options allow for meticulous control over the vectorization process, enabling you to capture subtle nuances or create highly stylized effects, essential for sophisticated “graphic design” and “photo manipulation” on Tophinhanhdep.com. To access these, click the “Advanced” triangle in the Image Trace panel.
Understanding the Sliders: Precision Control
-
Threshold (for Black & White Mode): This slider determines how dark a pixel needs to be to be converted to black.
- Lower Threshold: More lighter areas will remain white, resulting in thinner lines and more negative space.
- Higher Threshold: More pixels will be converted to black, making lines thicker and filling in more detail.
- Application: Useful for adjusting the boldness of lines in scanned drawings or creating more solid shapes from “abstract” or “sad/emotional” line art. For instance, if you trace a delicate sketch, a lower threshold might preserve the fine lines, while a higher one could thicken them to create a bolder style for “digital art.”
-
Paths: This controls the fidelity of the vector paths to the original image’s shape.
- Lower Percentage: Creates fewer, simpler paths, often resulting in a more geometric or angular look. This reduces file complexity.
- Higher Percentage: Generates more paths, closely following the contours of the original raster image, retaining finer details.
- Application: For “high-resolution” illustrations or detailed “beautiful photography” you want to vectorize precisely, a higher path percentage helps. For stylized “abstract” art, a lower percentage might be preferable to simplify shapes.
-
Corners: This slider determines the sharpness of corners in the traced output.
- Lower Percentage: Produces smoother, more rounded corners.
- Higher Percentage: Results in sharper, more angular corners.
- Application: Crucial for maintaining the integrity of precise logos or “technical drawing” elements. If you’re tracing a geometric design for a “wallpaper” or “background,” adjusting corners helps retain its intended sharpness.
-
Noise: This setting helps to ignore or include small, isolated areas of color (noise) in the original image.
- Lower Noise (e.g., 1 pixel): Retains more small details, potentially including unwanted speckles or imperfections.
- Higher Noise (e.g., 100 pixels): Filters out smaller details, smoothing the image and removing stray pixels.
- Application: In “digital photography” or “stock photos,” minor imperfections or grain can be “noise.” Increasing noise helps clean up the trace, especially for “aesthetic” or “clean” designs. For a rugged “nature” background with intentional texture, a lower noise might preserve those details.
Additional Advanced Options: Further Refinement
-
Max Colors (for Color Mode): When using a color mode, this slider (or input field) allows you to specify the exact number of colors in your vectorized image, ranging from 2 to 30.
- Application: Essential for creating “thematic collections” or “mood boards” with specific color palettes. Reducing colors can give a posterized, graphic effect to “beautiful photography,” making it more suitable for specific “creative ideas” or “editing styles.”
-
Method: This determines how overlapping areas are handled.
- Abutting: Creates paths that sit side-by-side, sharing edges. This is often preferred for solid, contiguous shapes.
- Overlapping: Creates paths that overlap slightly. This can be useful for maintaining color integrity in complex multi-color designs but might lead to more complex file structures.
- Application: Consider “abutting” for “graphic design” where clean separations are important, like preparing an image for a “screen printing” process from Tophinhanhdep.com’s “image collections.”
-
Ignore White: When checked, this option automatically makes all white areas of your original raster image transparent in the vectorized output.
- Application: Invaluable for logos, line art, or any image where you want a transparent background. If you’re tracing a black and white sketch for “digital art,” checking “Ignore White” means you only get the black lines, which can then be placed seamlessly over any “background” or “wallpaper.”
-
Preview Checkbox: Always ensure the “Preview” checkbox (located in the lower-left corner of the Image Trace panel) is selected. This allows you to see the real-time effects of your slider adjustments, saving you time and guesswork.
Saving Custom Presets
Once you’ve achieved a desired look through custom settings, you can save your configuration as a new preset. Click the menu icon (three horizontal lines) in the Image Trace panel and choose “Save as New Preset.” Name it something descriptive, like “Tophinhanhdep.com Sketch Style” or “Nature Photo Vector,” so you can quickly apply it to similar images in the future, streamlining your workflow for “image inspiration” projects.
By meticulously adjusting these advanced settings, you can transform any raster image, from a piece of “sad/emotional” art to a vibrant “nature” photograph, into a precise, editable vector graphic, perfectly tailored for your “visual design” and “graphic design” needs on Tophinhanhdep.com.
Finalizing and Refining Your Vector Artwork: Bringing It to Life
Once you’ve applied Image Trace and adjusted the settings to your satisfaction, the work isn’t quite done. The traced image is still, in a sense, a “live” trace, linked to the Image Trace panel. To fully unlock its potential as an editable vector graphic, you need to expand it and then ungroup its components. This crucial step transforms the temporary trace into a permanent collection of editable paths and anchor points, ready for detailed “photo manipulation” and “digital art.”
Expanding the Image Trace: Solidifying Your Vector
After tracing, your image will still have a bounding box around it, and the Image Trace panel will be active. To convert this “live” trace into actual, editable vector paths:
- Select the Traced Image: Ensure the traced image is selected on your artboard using the Selection tool (V).
- Click “Expand”:
- You’ll typically find an “Expand” button in the control panel at the top of your Illustrator window (just below the menu bar) or in the “Quick Actions” section of the Properties panel.
- Alternatively, you can go to Object > Image Trace > Expand.
Once you click “Expand,” the bounding box will disappear, and you’ll see a multitude of anchor points and paths outlining the shapes that Illustrator has created. This signifies that your raster image has now been successfully converted into a true vector graphic. You can zoom in infinitely, and the lines will remain perfectly crisp and sharp, ready for any “high-resolution” output.
Ungrouping: Isolating Elements for Editing
Immediately after expanding, the entire vectorized image will likely be grouped as a single object. This means if you try to select a part of the image, the entire traced result moves. To edit individual components, you need to ungroup them:
- Right-Click and Ungroup: With the newly expanded vector image still selected, right-click on it. From the context menu, choose “Ungroup.”
- Keyboard Shortcut: Alternatively, with the object selected, you can use the shortcut Ctrl + Shift + G (Windows) or Cmd + Shift + G (Mac).
- Re-grouping: If you later want to re-group elements, select them with the Selection tool and press Ctrl + G (Windows) or Cmd + G (Mac).
After ungrouping, you can use the Direct Selection tool (A) to select individual anchor points and paths, or the Selection tool (V) to select entire shapes or groups of shapes. This allows for detailed “photo manipulation” and precise adjustments to your “digital art.” For example, if you traced a “nature” scene and want to isolate a particular tree or flower, ungrouping makes that possible.
Simplifying Paths: Cleaning Up Your Vector Art
Automated tracing can sometimes generate an excessive number of anchor points, making the vector file larger and more complex than necessary, and potentially harder to edit smoothly. The “Simplify” function helps streamline your paths.
- Select Paths: Use the Selection tool (V) to select the vector shapes you wish to simplify.
- Access Simplify: Go to Object > Path > Simplify.
- Adjust Sliders: A panel will appear with a slider that controls the amount of simplification. Moving the slider to the left will reduce more points, making the path smoother but potentially less accurate to the original. Moving it to the right retains more points, closer to the original trace. There’s also an “Auto Simplify” button for a quick adjustment.
- Application: Simplifying paths can make your “graphic design” cleaner, reduce file size for web-based “image collections” (especially SVG files), and make the editing process smoother. It’s particularly useful for reducing complexity in “abstract” or highly detailed traces.
Editing Individual Elements: The Power of Vector
With your image expanded and ungrouped, you now have complete control over every vector path and shape.
- Direct Selection Tool (A): This tool is your best friend for detailed editing.
- Click on individual anchor points to move them, adjusting the shape of a path.
- Click on a path segment to drag and reshape it.
- Select multiple anchor points or path segments to move them together.
- Adjust Bézier handles associated with anchor points to fine-tune the curves.
- Coloring and Styling:
- Select any individual shape or group of shapes.
- Use the Fill and Stroke panels or the Color panel to change their colors, add gradients, or adjust stroke properties. This is perfect for customizing “aesthetic backgrounds” or giving new “editing styles” to your “digital art.”
- Removing Unwanted Backgrounds: If you didn’t use “Ignore White” during the trace, or if you have a complex background you want to eliminate:
- After ungrouping, use the Selection tool (V) or Direct Selection tool (A) to select unwanted background shapes.
- Press the Delete key on your keyboard to remove them. This is often the quickest way to isolate a subject from “stock photos” or “beautiful photography” for your “creative ideas.”
By following these steps, you transform a simple raster image into a fully editable, infinitely scalable vector graphic, ready for any application. This mastery of Image Trace and subsequent refinement is a core skill for anyone working with “visual design” and curating “image inspiration” on Tophinhanhdep.com.
Beyond Automatic Tracing: Manual Vectorization Techniques for Precision
While Adobe Illustrator’s Image Trace tool is remarkably powerful for automating vector conversion, there are instances where manual tracing offers superior control, precision, and artistic nuance. For specific “visual design” projects, especially those requiring brand-perfect logos, intricate “digital art,” or stylized “photo manipulation,” a hands-on approach can yield more refined and intentional results. Tophinhanhdep.com recognizes the value of both efficiency and craftsmanship in creating stunning “images” and “photography.”
When to Choose Manual Tracing
Manual tracing, while more time-consuming, is often the preferred method for:
- Complex Logos or Typography: Where every curve and corner needs to be exact and perfectly smooth for branding consistency.
- Original Illustrations: To digitally ink or color hand-drawn artwork with crisp, editable paths.
- Stylized Portraits or Cartoons: Where you want to interpret a photo into a vector illustration with a specific artistic style, rather than relying on automatic interpretation.
- Simple Geometric Shapes: For creating clean, precise vector shapes without the potential for excess anchor points from an automatic trace.
- Artistic Control: When you want complete control over the number of anchor points, the smoothness of curves, and the overall aesthetic.
Essential Tools for Manual Tracing
To begin manual tracing, you’ll typically place your raster image onto a locked template layer in Illustrator. Then, on a new layer above it, you’ll use various drawing tools to create vector paths directly over the image.
-
The Pen Tool (P): The undisputed champion of vector drawing, the Pen tool allows you to create precise straight lines and perfectly smooth Bézier curves by strategically placing anchor points.
- Application: Ideal for outlining crisp edges of objects, creating custom typography, or tracing intricate details in “high-resolution” images. Mastery of the Pen tool is a fundamental skill for any “graphic designer.”
- Technique: Click to create corner points for straight lines. Click and drag to create smooth points with Bézier handles for curves. Hold Alt/Option to adjust one handle independently, creating sharp corners on a curved path.
-
Shape Tools (Rectangle, Ellipse, Polygon, Star, etc.): For creating perfect geometric shapes.
- Application: Use these for any foundational geometric elements within your design, such as tracing a circular “aesthetic background” element or a rectangular frame for “beautiful photography.”
- Technique: Select the tool, then click and drag on your artboard. Hold Shift to constrain proportions (e.g., perfect square or circle).
-
Pencil Tool (N): For freehand drawing, allowing you to sketch paths more organically.
- Application: Useful for quick, spontaneous lines or for tracing elements that require a more natural, hand-drawn feel, especially if you’re adapting “photo ideas” into loose “digital art” sketches.
- Enhancement: Double-click the Pencil tool to adjust its fidelity (smoothness vs. accuracy).
-
Blob Brush Tool (Shift + B): Creates filled shapes as you draw, rather than just strokes. If you draw two overlapping Blob Brush strokes of the same color, they will merge into a single shape.
- Application: Excellent for creating organic shapes, hand-lettering, or filling in areas quickly, especially when working with a pen tablet. It’s often used for a painterly “editing style” in “digital art.”
- Technique: Draw as you would with a physical brush. The strokes create solid filled shapes.
-
Brush Tool (B): Creates paths with editable strokes, applying various brush styles (calligraphic, art brushes, etc.).
- Application: Great for artistic effects, creating textured lines, or adding specific “editing styles” to your vector illustrations. You can convert these brush strokes to outlines (Object > Expand Appearance) to make them solid shapes.
The Manual Tracing Process
- Prepare Your Raster Image: Place the raster image in Illustrator (File > Place).
- Create a Template Layer: In the Layers panel (Window > Layers), double-click the layer containing your raster image. Check the “Template” box and set a dimming percentage (e.g., 50%). This will lock the layer and dim the image, making it easier to see your new vector lines.
- New Layer for Tracing: Create a new layer above your template layer. This is where you will draw your vector paths.
- Trace with Chosen Tools: Select your preferred tool (Pen, Blob Brush, etc.) and begin tracing the contours and shapes of your underlying image. Pay attention to precision for “high-resolution” outputs.
- Pro Tip: Start with an easily visible stroke color (e.g., bright red or blue) and no fill, so you can clearly see your paths over the dimmed image.
- Refine and Detail: Once the basic outlines are complete, refine your paths using the Direct Selection tool (A) to adjust anchor points and Bézier handles. Add interior details as needed.
- Color and Style: Apply fills and strokes to your vector shapes, using the Color, Swatches, or Gradient panels. Experiment with different “editing styles” and color palettes to bring your vision to life. This is where your “creative ideas” truly manifest in “digital art.”
- Hide or Delete Template Layer: Once your vector tracing is complete, you can hide or delete the original raster template layer, leaving you with a perfectly crisp, scalable vector image.
Manual tracing, while demanding more time and skill, offers unmatched artistic control and precision. It’s an invaluable technique for “graphic designers” on Tophinhanhdep.com looking to create truly unique “digital art” and transform “image inspiration” into polished, professional vector assets. Combining both automatic Image Trace and manual methods equips you with a versatile toolkit for any “visual design” challenge.
Final Thoughts on How to Vectorize an Image in Illustrator
The ability to vectorize images is more than just a technical skill; it’s a gateway to unlocking endless creative possibilities in “visual design.” As we’ve explored, Adobe Illustrator’s Image Trace tool provides an efficient and powerful means to transform pixel-based raster images into infinitely scalable vector graphics. From preparing “high-resolution” “stock photos” for expansive billboards to converting “beautiful photography” into stylized “digital art” for “aesthetic backgrounds,” the versatility of vectorization is undeniable.
Whether you’re leveraging the quick presets to turn a hand-drawn “sad/emotional” sketch into clean “line art,” or meticulously fine-tuning advanced sliders to capture the nuances of “nature” photography, Image Trace streamlines a traditionally complex process. It acts as an invaluable “image converter,” allowing you to adapt your “images” for any context, be it “wallpapers,” “mood boards,” or “thematic collections.”
Furthermore, understanding the principles of manual tracing empowers you with ultimate precision and artistic control. For critical “graphic design” tasks like logo creation or intricate “photo manipulation,” the Pen tool and other drawing instruments allow you to craft bespoke vector artwork that is perfectly aligned with your “creative ideas” and specific “editing styles.”
At Tophinhanhdep.com, we are dedicated to providing resources that inspire and equip you with the tools to create stunning visuals. Mastering image tracing in Adobe Illustrator is a fundamental step in this journey, ensuring that your “images” are always sharp, adaptable, and ready for any challenge. Embrace these techniques, experiment with different settings, and watch your “image inspiration” transform into captivating, professional-grade vector art. Your journey into advanced “visual design” starts here, with the power to scale your creativity without limits.