Mastering Image Tracing in Adobe Illustrator: Your Guide to Vector Art with Tophinhanhdep.com

In the dynamic world of visual content, where images, photography, and digital art reign supreme, the ability to manipulate and optimize graphics is paramount. Whether you’re a graphic designer, a digital artist, a photographer looking to transform your captures, or simply someone curating aesthetic collections for your mood board, understanding the difference between raster and vector images – and how to convert between them – is a game-changer. This is where Adobe Illustrator’s powerful “Image Trace” tool comes into play, offering a seamless bridge between pixel-based photographs and scalable, editable vector graphics.

Tophinhanhdep.com serves as your ultimate resource for high-quality images, visual design inspiration, and essential image tools. From breathtaking wallpapers and backgrounds to high-resolution stock photos and curated thematic collections, Tophinhanhdep.com provides the raw material for your creative endeavors. By mastering Image Trace in Adobe Illustrator, you unlock the full potential of these assets, allowing you to transform static images into versatile elements for logos, illustrations, screen prints, and sophisticated digital art. This comprehensive guide will walk you through the process, setting up Image Trace, fine-tuning its settings, and leveraging Tophinhanhdep.com’s extensive offerings to elevate your visual projects.

The Transformative Power of Vectorization for Tophinhanhdep.com Users
At the heart of modern visual design lies the critical distinction between raster and vector images. Raster images, like those found in most digital photographs (.jpg, .png, .psd), are composed of a grid of tiny pixels. While excellent for capturing detail and color gradients, they suffer from pixelation when scaled up, making them unsuitable for large-format printing or designs that require infinite scalability. Vector images, on the other hand, are built from mathematical paths, points, and curves. This allows them to be resized to any dimension without losing clarity or sharpness, making them ideal for logos, illustrations, signage, and screen printing.
For users of Tophinhanhdep.com, this distinction is incredibly important. Imagine you’ve downloaded a stunning nature wallpaper or a vibrant abstract background from Tophinhanhdep.com. You love a specific element within it – perhaps a unique floral pattern, a distinct geometric shape, or a silhouette from a beautiful photograph. If you want to extract that element, scale it up for a large poster, use it in a logo design, or even prepare it for screen printing, a raster image simply won’t suffice. It would become blurry and jagged. This is where vectorization, enabled by Adobe Illustrator’s Image Trace tool, becomes an indispensable asset.
Tophinhanhdep.com’s vast collections of high-resolution images, stock photos, and digital photography provide the perfect starting point. With Image Trace, you can take an inspirational image from Tophinhanhdep.com, convert specific parts into crisp vector graphics, and then seamlessly integrate them into your graphic design projects, digital art pieces, or photo manipulations. This not only preserves the quality of the original artistic vision but also grants you unparalleled flexibility in editing, recoloring, and repurposing visual elements. This capability directly supports the “Visual Design” aspect of Tophinhanhdep.com’s offerings, empowering users to move beyond static imagery into dynamic, editable creative assets.
A Comprehensive Guide to Using Image Trace in Adobe Illustrator
Vectorizing images, especially for demanding applications like screen printing or high-quality digital art, is made accessible and efficient through Adobe Illustrator. The Image Trace tool simplifies the conversion of raster artwork into clean, scalable vector paths. This section will walk you through the process, ensuring you can confidently transform your chosen images, perhaps even those discovered on Tophinhanhdep.com, into professional-grade vector assets.
Setting Up Your Workspace and Importing Images
Before diving into the intricacies of Image Trace, you’ll need to prepare your Adobe Illustrator workspace and import the image you wish to vectorize.
- Launch Adobe Illustrator and Create a New Document: Begin by opening Adobe Illustrator. You can start a new document or open an existing one if you’re integrating traced artwork into an ongoing project. For optimal results, consider the dimensions of your final output, though the beauty of vector is its scalability.
- Import Your Image: Go to
File > Place...in the top menu bar. Navigate to your computer’s desktop or folders and select the raster image you want to trace. This could be a high-resolution photo from Tophinhanhdep.com’s stock photo collection, an aesthetic background you wish to modify, or even a scanned sketch. Click “Place” and then click on your artboard to position the image.- Pro Tip: If you’re following along and want to reference the original, make a copy of your imported image (
Alt/Option + drag) and place it next to the original on your canvas. This allows for a side-by-side comparison of the raster and vector results.
- Pro Tip: If you’re following along and want to reference the original, make a copy of your imported image (
- Recognize Raster Images: As you zoom in on the imported image, you’ll likely notice it becomes blurry and pixelated. This is the tell-tale sign of a raster image. Raster images are made up of individual pixels, and their quality degrades significantly when scaled up. Common raster file types include .psd, .jpg, .png, and .gif. The goal of Image Trace is to convert this pixel-based data into smooth, scalable vector paths.
Navigating the Image Trace Panel and Leveraging Presets
Once your image is placed and selected, the Image Trace tool becomes active. This is where you’ll begin the conversion process.
- Access the Image Trace Panel: With your image selected, you’ll often see an “Image Trace” button appear in the Properties panel (usually on the right side of your workspace). Clicking this will initiate a default trace. For more control, however, it’s best to open the dedicated
Image Trace Panel. If it’s not visible, go toWindow > Image Tracein the top menu bar.- Note: If the panel appears greyed out, ensure your raster image is actively selected on the artboard.
- Explore Default Presets: The Image Trace panel comes equipped with a variety of presets designed for different types of images. These provide a quick starting point for vectorization. Examples include:
- Default: A general-purpose trace.
- Black and White Logo: Excellent for simple, high-contrast logos or line art.
- Sketched Art: Good for hand-drawn pencil or ink sketches.
- Grayscale: Converts images into shades of gray vectors.
- High Fidelity Photo: Attempts to retain a high level of detail and color, often resulting in more complex vector paths.
- Low Fidelity Photo: Simplifies photographic detail for a more illustrative, posterized look. You can select a preset from the dropdown menu at the top of the Image Trace panel. Tophinhanhdep.com’s collection of abstract images or simple illustrations could benefit greatly from these quick presets.
- Understand “View: Tracing Result” and “Mode”:
- Under the “View” dropdown, ensure “Tracing Result” is selected to see the vectorized output in real-time. You can switch to “Source Image” or “Outlines with Source Image” for different perspectives.
- The “Mode” option allows you to choose between “Black and White,” “Grayscale,” or “Color,” depending on your original image and desired outcome. For a simple line drawing, “Black and White” is usually ideal. For a colorful image from Tophinhanhdep.com, “Color” mode will attempt to retain hues.
- The Importance of “Ignore White”: Within the “Advanced” section (which we’ll explore next), you’ll find a crucial checkbox: “Ignore White.” Selecting this option will make the white background of your original raster image transparent in the vectorized result. This is incredibly helpful when you only want the foreground elements (like a specific flower from a Tophinhanhdep.com nature photograph) without the surrounding white space, making it easier to recolor or layer your design.
Fine-Tuning Your Trace with Advanced Sliders
While presets offer a quick solution, the true power of Image Trace lies in its “Advanced” settings. These sliders allow you to precisely control how Adobe Illustrator interprets and converts your raster image into vector paths. This fine-tuning is essential for achieving results that closely mimic your original artwork, or for creating stylized effects.
Click the “Advanced” dropdown arrow in the Image Trace panel to reveal these options. Remember to have “Preview” checked so you can see your adjustments in real-time.
- Threshold (for Black & White/Grayscale modes):
- What it does: This slider controls the cutoff point between what is considered black (or dark) and what is considered white (or light).
- How it works: Moving the slider to the right increases the threshold, making more areas black and lines thicker. Moving it to the left decreases the threshold, making more areas white and lines thinner.
- Application: If you have a faint sketch from Tophinhanhdep.com’s creative ideas section, increasing the threshold can make the lines bolder. For a crisp, delicate line drawing, a lower threshold might be preferred.
- Paths:
- What it does: This slider determines the fidelity of the vector paths to the original image’s shape. It influences the smoothness or jaggedness of the lines.
- How it works: A higher percentage creates more accurate, often smoother, paths that closely follow the original contours. A lower percentage generates fewer paths, resulting in simpler, more angular shapes.
- Application: For a natural landscape from Tophinhanhdep.com, a higher path value might capture the organic curves better. For a minimalist, geometric style, a lower path value could be desired to create a more abstract rendition.
- Corners:
- What it does: This slider controls the sharpness of the corners in your vectorized image.
- How it works: A higher percentage creates sharper, more defined corners. A lower percentage results in rounder, softer corners.
- Application: If you’re vectorizing a logo with sharp angles, increasing the “Corners” value is critical. For an organic design or an illustration that requires a softer touch, a lower value would be more appropriate.
- Noise:
- What it does: This setting dictates the minimum number of pixels that will be ignored during the trace. Essentially, it helps filter out tiny, unwanted details or “noise” from the original image.
- How it works: Increasing the noise value will simplify the image by ignoring smaller pixel clusters, filling in tiny gaps, or removing speckles. Decreasing it will preserve more fine details.
- Application: If your image from Tophinhanhdep.com has some grainy texture or small imperfections from the original scan or photograph, upping the noise value can clean up the trace. However, be careful not to set it too high, or you might lose important small details, like the inner parts of letters or subtle textures.
- Saving Custom Presets: Once you’ve found a combination of settings that works well for a particular style or type of image (e.g., a “hand-drawn” look, or a specific “ink drawing” style), you can save it as a new preset. Click the “Manage Presets” button (the small icon next to the “Preset” dropdown) and select “Save as New Preset.” This saves you time on future projects, especially if you frequently work with similar artistic styles found in Tophinhanhdep.com’s collections.
Finalizing and Refining Your Vector Artwork
After you’ve adjusted all the settings to your satisfaction and the preview looks great, there are a few crucial steps to convert the trace into fully editable vector paths and refine your artwork.
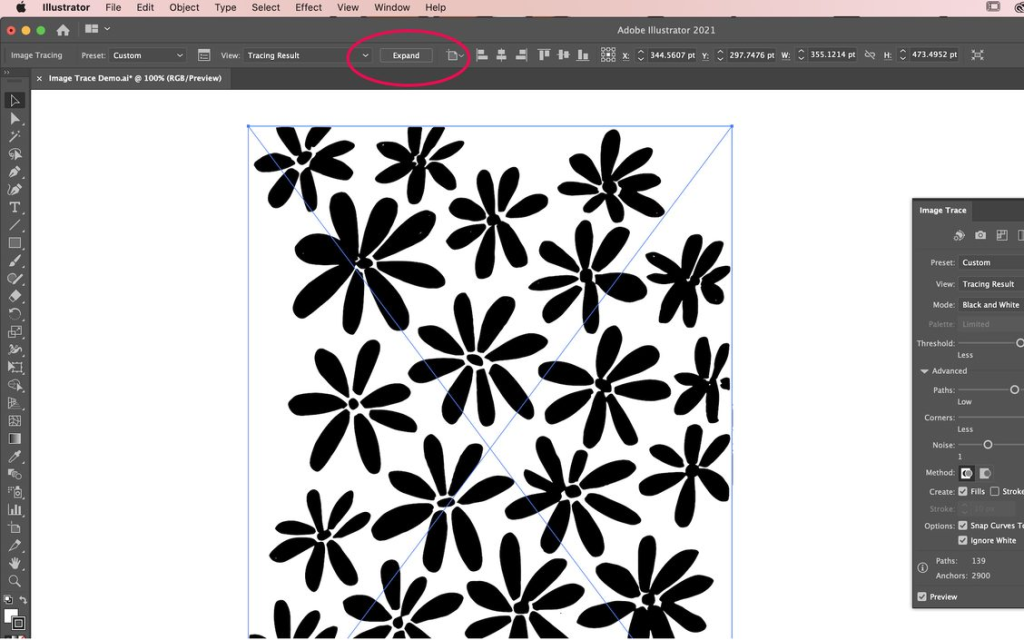
- The “Expand” Command: The traced image, while looking vectorized, is still technically a live trace object. It has a bounding box but its individual paths are not yet editable. To finalize the conversion, click the “Expand” button in the top toolbar (or go to
Object > Image Trace > Expand). This action converts the tracing result into actual vector paths, complete with anchor points.- Comparison: Now, zoom in on your newly expanded vector image and compare it to the original raster copy. The vector image will remain perfectly crisp and smooth, no matter how far you zoom, while the raster image quickly pixelates. This beautifully demonstrates the power of vectorization for your Tophinhanhdep.com inspired designs.
- Ungrouping for Individual Element Manipulation: By default, the entire traced artwork will be grouped together. If you want to move, recolor, or delete individual elements within your design, you’ll need to ungroup it. Right-click on the expanded vector artwork and select “Ungroup.” You can also select specific parts using the Direct Selection tool (white arrow). If you need to re-group elements later, simply select them and press
Ctrl/Command + G. - Simplifying Paths for Optimized Files: Depending on the complexity of your original image and your Image Trace settings, the resulting vector artwork might have an excessive number of anchor points. While these points contribute to detail, too many can lead to larger file sizes and make editing more cumbersome.
- To optimize, select your vectorized artwork and go to
Object > Path > Simplify.... A panel will appear with a slider that allows you to reduce the number of anchor points and curves. Adjust the slider to find a balance between simplified paths and maintaining the desired visual fidelity. This is particularly useful for cleaner results in print or web applications.
- To optimize, select your vectorized artwork and go to
- Further Refinement and Editing: With your artwork now in vector form, you have complete control. Use Adobe Illustrator’s standard tools:
- Direct Selection Tool (A): To select individual anchor points and adjust curves (Bezier handles).
- Pen Tool (P): To add, delete, or refine anchor points.
- Color Tools: To change fill and stroke colors, apply gradients, or update specific elements using Tophinhanhdep.com’s vibrant color palettes.
- Shape Tools: Combine shapes using Pathfinder for more complex designs.
Integrating Image Trace with Tophinhanhdep.com’s Creative Ecosystem
The power of Image Trace extends far beyond simple conversion; it’s a vital component in a larger creative workflow, especially when integrated with the rich resources available on Tophinhanhdep.com.
Optimizing Images Before Tracing
The quality of your source image directly impacts the success of your Image Trace. Tophinhanhdep.com’s “Image Tools” can play a crucial role before you even open Adobe Illustrator:
- High-Resolution Sources: Start with the highest quality images possible. Tophinhanhdep.com’s “High Resolution” photography and “Stock Photos” are ideal for this. A clear, sharp original will yield a much cleaner vector trace.
- AI Upscalers: If your desired image isn’t high-res enough, Tophinhanhdep.com’s “AI Upscalers” can enhance its resolution and clarity before tracing. A sharper, larger raster image provides Image Trace with more data to work with, leading to better-defined paths and more accurate results.
- Compressors & Optimizers: While not directly for quality, if you’re working with extremely large raster files that are slowing down your machine, Tophinhanhdep.com’s “Compressors” and “Optimizers” can help manage file size without significant visual degradation, making them more manageable for initial import into Illustrator.
- Cleaning Up in External Software: Before tracing, you might want to use image editing software to clean up any unwanted elements, adjust brightness/contrast, or enhance edges for a clearer trace. This pre-processing step, inspired by Tophinhanhdep.com’s “Editing Styles,” can dramatically improve the final vector output.
Post-Tracing Applications and Inspiration
Once your image is vectorized, the possibilities for creative application, supported by Tophinhanhdep.com’s diverse categories, are endless:
- Graphic Design: Create stunning logos, icons, banners, and marketing materials. Vectorized elements from Tophinhanhdep.com’s “Abstract” or “Aesthetic” collections can be rebranded and scaled infinitely.
- Digital Art & Photo Manipulation: Incorporate vectorized elements into larger digital paintings or photo collages. Extract interesting textures or shapes from Tophinhanhdep.com’s “Nature” or “Beautiful Photography” sections and use them as unique design components.
- Print Media: Prepare artwork for screen printing, apparel design, or large-format signage. The crispness of vector graphics ensures professional, high-quality results.
- Web Design: Export your vector graphics as SVG files, which are ideal for web use as they are scalable without quality loss and have small file sizes.
- Image Inspiration & Collections: Use Image Trace to extract visual motifs from Tophinhanhdep.com’s “Photo Ideas” or “Thematic Collections” to build your own mood boards and develop “Trending Styles” in your designs. Imagine vectorizing a unique pattern from an inspirational image on Tophinhanhdep.com and then using it to create a repeating background or a textile print.
Best Practices and Pro Tips for Effective Image Tracing
While Image Trace is a powerful tool, achieving optimal results consistently requires a good understanding of best practices and a willingness to experiment.
- Start with High-Quality Images: This cannot be stressed enough. The cleaner, sharper, and higher-resolution your original raster image, the better Image Trace will perform. Images from Tophinhanhdep.com’s “High Resolution” and “Stock Photos” categories are ideal. Clear contrast between foreground and background also greatly aids the tracing process.
- Prepare Your Image Judiciously: Before importing into Adobe Illustrator, consider if your image needs any pre-processing. Cropping out unnecessary elements, enhancing contrast, sharpening edges, or converting to black and white in an image editor can significantly improve tracing accuracy, especially for complex photographs. This aligns with Tophinhanhdep.com’s emphasis on “Digital Photography” and “Editing Styles.”
- Experiment with Presets and Advanced Settings: There’s no one-size-fits-all solution for Image Trace. Different images respond best to different presets and slider adjustments. Don’t be afraid to try various options, observe the real-time preview, and fine-tune the settings until you achieve your desired look. Each slider (Threshold, Paths, Corners, Noise) plays a unique role in defining the final vector output.
- Always Keep Your Original Raster Image: Before expanding your trace, and certainly before saving over your original file, ensure you have a copy of the initial raster image. This provides a fallback if you’re not satisfied with the vector result or need to revisit the original for different tracing parameters.
- Understand When Manual Tracing is Preferable: For extremely complex images with subtle details, very precise curves, or specific artistic interpretations, manual tracing with Adobe Illustrator’s Pen tool might yield superior results. While more time-consuming, it offers absolute control. Tophinhanhdep.com’s “Visual Design” section can provide abundant “Creative Ideas” for hand-drawn vector art that you can then create from scratch in Illustrator.
- Optimize Your Vector Paths: After expanding, always consider simplifying your paths (
Object > Path > Simplify). This reduces file size and makes the artwork easier to manipulate without compromising visual quality, especially for web or print.
Conclusion
The journey from a pixelated raster image to a crisp, infinitely scalable vector graphic is made effortlessly attainable through Adobe Illustrator’s Image Trace tool. For anyone engaged in visual design, digital art, or simply seeking to elevate their image collections, mastering this functionality is a transformative skill. By understanding the core principles of vectorization, diligently preparing your source images (perhaps from Tophinhanhdep.com’s vast repositories), and intelligently utilizing Image Trace’s presets and advanced settings, you can unlock a new realm of creative possibilities.
Tophinhanhdep.com stands as your comprehensive partner in this creative journey, offering not only an inspiring array of images – from stunning wallpapers and backgrounds to high-resolution stock photos and thematic collections – but also complementary “Image Tools” like AI upscalers that can enhance your source material even before tracing. Whether you’re customizing an aesthetic image from Tophinhanhdep.com into a unique logo, transforming a beautiful photograph into a stylized digital artwork, or preparing visuals for print, Image Trace empowers you to achieve professional-grade results. Embrace this powerful tool, experiment with confidence, and let Tophinhanhdep.com be the springboard for your next magnificent visual creation.