How to Trace Images in Adobe Illustrator: Vectorizing Your Visuals for Tophinhanhdep.com

In the dynamic world of digital imagery and visual design, the ability to transform a static, pixel-based image into a scalable, editable vector graphic is an invaluable skill. For creators, designers, and enthusiasts contributing to or leveraging platforms like Tophinhanhdep.com – a hub for high-quality images, photography, and visual design inspiration – mastering this transformation is essential. Adobe Illustrator, a cornerstone of graphic design, provides an exceptional tool for this purpose: Image Trace.
Whether you’re working with stunning “Beautiful Photography” that you want to integrate into a logo, converting “Aesthetic” backgrounds for responsive web design, or preparing “High-Resolution Stock Photos” for large-scale print, Image Trace empowers you to achieve crisp, clean lines and infinitely scalable artwork. This comprehensive guide will walk you through the process of using Image Trace in Adobe Illustrator, ensuring your visuals are always production-ready, no matter the application.

Understanding Raster vs. Vector: The Foundation for Flawless Design
Before diving into the mechanics of Image Trace, it’s crucial to understand the fundamental difference between raster and vector images. This distinction is at the heart of why vectorization is so important for diverse visual needs, particularly for content hosted and utilized through Tophinhanhdep.com.
Raster images, like those typically captured by cameras or created in programs like Photoshop, are composed of a grid of tiny colored squares known as pixels. Common file formats include .jpg, .png, .gif, and .tiff. While excellent for capturing rich detail and tonal gradations, raster images suffer from a significant drawback: scalability. When you zoom in on a raster image or enlarge it beyond its original resolution, the individual pixels become visible, leading to a blurry, “pixelated” appearance. This limitation makes them unsuitable for designs that need to be reproduced at various sizes, from a small icon on a website to a massive billboard. Imagine trying to use a standard “Nature Wallpaper” from Tophinhanhdep.com for a large print advertisement – without vectorization, it would quickly lose its visual integrity.
![]()
Vector images, on the other hand, are built from mathematical equations that define points, lines, curves, and shapes. These equations describe paths that are filled with color. Common vector file formats include .ai, .eps, .svg, and .pdf (when saved with vector data). The key advantage of vector graphics is their infinite scalability. Because they are defined by mathematical formulas rather than pixels, vector images can be scaled up or down to any size without any loss of quality or sharpness. Lines remain crisp, and colors stay solid, making them ideal for logos, illustrations, typography, and complex graphic designs. For “Visual Design” and “Graphic Design” projects on Tophinhanhdep.com, such as creating new “Creative Ideas” for branding or “Digital Art” pieces, vectorization is not just a preference, but a necessity.
Why Vectorization Matters for Tophinhanhdep.com’s Visuals
For users and contributors of Tophinhanhdep.com, vectorization unlocks a world of possibilities:
- Versatile Application: Transform a “Beautiful Photography” piece into stylized “Digital Art” or a “Nature Background” into an intricate illustration that can be used across web, print, and merchandise without quality degradation.
- Professional Output: Ensure that any “High Resolution” image or “Stock Photo” integrated into a design maintains impeccable quality, whether it’s for a small web banner or a large exhibition print. This is especially crucial for projects where “Editing Styles” demand precision.
- Design Flexibility: Easily manipulate individual elements of a traced image – change colors, alter shapes, or extract components – to fit new “Creative Ideas” or “Mood Boards” without affecting resolution. This empowers graphic designers to adapt existing visuals into fresh, “Trending Styles.”
- Reduced File Size (for certain applications): While complex vector art can be large, simple vector logos or line art are often smaller than their high-resolution raster counterparts, making them faster to load on websites or easier to share. This complements Tophinhanhdep.com’s “Image Tools” like “Compressors” and “Optimizers.”
- Cross-Media Adaptability: A vectorized image can seamlessly transition from a “Wallpaper” to a detailed component of a complex “Graphic Design” project, maintaining consistency and quality across all visual touchpoints.
The Image Trace tool in Adobe Illustrator bridges the gap between these two image types, providing a powerful and efficient way to convert raster art into scalable vector graphics.
The Core Process: Using Adobe Illustrator’s Image Trace
Adobe Illustrator’s Image Trace tool automates the process of converting raster images into vectors. It analyzes the pixel data and generates vector paths that approximate the original image. Here’s a step-by-step guide to using it effectively.
Preparing Your Image for Tracing
Before you even touch the Image Trace tool, a little preparation can go a long way in achieving optimal results.
- Open a New Document: Start by opening Adobe Illustrator and creating a new document (File > New).
- Place Your Image: Go to
File > Place...and select the raster image you wish to vectorize. Click “Place” and then click on your artboard to position the image. For best results, use an image where the subject stands out clearly against its background. While Image Trace can handle complex images, simpler graphics, line art, or designs with clear distinctions often yield cleaner, more manageable vector outputs. If you’re starting with a low-quality image, consider using “Tophinhanhdep.com’s AI Upscalers” first to improve its resolution before tracing. - Understand Your Source: As you zoom in on your placed raster image, you’ll immediately see the pixelation – a stark reminder of its limitations. This visual contrast will underscore the power of vectorization once the process is complete.
- Reference Copy (Optional but Recommended): A useful practice, especially for beginners or those aiming for precise replication, is to make a copy of your original raster image and drag it to the side of your artboard. This allows you to visually compare the traced vector result with the original raster, helping you fine-tune your tracing settings.
Navigating the Image Trace Panel and Presets
With your image placed and selected on the artboard, it’s time to engage the Image Trace tool.
-
Access the Image Trace Panel: If the Image Trace panel isn’t visible by default, go to
Window > Image Trace. The panel might appear greyed out initially if no image is selected. Click on your placed image with theSelection Tool (V)to activate the panel’s options. -
Quick Actions (Properties Panel): In newer versions of Illustrator, you might also find a quick “Image Trace” button directly in the Properties panel (Window > Properties) when an image is selected. Clicking this will apply a default trace and often open the Image Trace panel for further adjustments.
-
Applying Presets: The Image Trace panel comes equipped with a variety of built-in presets designed for different types of images. These presets offer a fantastic starting point and can often deliver excellent results with a single click.
- Default: A general-purpose trace.
- High Fidelity Photo / Low Fidelity Photo: Ideal for photographs, aiming to retain more (or fewer) details and colors. This can be great for transforming “Beautiful Photography” into a stylized digital painting.
- 3 Colors / 6 Colors / 16 Colors: Useful for reducing complex images to a specific number of colors, perfect for simpler logos or graphic illustrations.
- Grayscale / Black and White: Best for sketches, line art, or converting a color photo to a monochrome vector graphic, aligning well with “Abstract” or “Sad/Emotional” art styles.
- Outline / Sketched Art / Line Art / Technical Drawing: Excellent for converting hand-drawn sketches, scanned line art, or technical diagrams into clean vector paths. This is particularly valuable for “Digital Art” creators who start with physical sketches.
- Logo: A specialized preset for corporate logos, often resulting in flatter, bolder shapes.
Experiment by selecting different presets to see how they affect your image. The result will appear dynamically on your artboard if the “Preview” checkbox (located at the bottom of the Image Trace panel) is enabled.
Mastering Advanced Image Trace Settings
While presets are convenient, the true power of Image Trace lies in its advanced settings, allowing for fine-tuned control to achieve precise results. Click the “Advanced” dropdown arrow in the Image Trace panel to reveal these options.
- Mode: This determines the color output of your trace:
- Black and White: For pure black and white line art.
- Grayscale: For images with shades of gray.
- Color: For images with multiple colors. When “Color” is selected, you can also specify the
Palette(Automatic, Limited, Document Library) and the maximum number ofColors(ranging from 2 to 30 or more), giving you control over the complexity of your color vector. This is perfect for achieving specific “Aesthetic” looks or conforming to brand color palettes.
- Threshold (for Black and White mode): This slider controls the intensity of the black areas. Moving it to the right makes more pixels black, thickening lines and filling in more detail. Moving it to the left thins lines and reduces black areas. Adjust this to capture the desired line weight from your original “Sketched Art.”
- Paths: This slider controls how closely the vector paths follow the edges of the original raster image.
- Lower percentage: Creates more jagged, less smooth paths, often retaining more texture but with more anchor points.
- Higher percentage: Produces smoother paths with fewer anchor points, which can be beneficial for cleaner graphics but might lose some subtle detail. Aim for a balance that preserves detail without creating excessive, unnecessary anchor points.
- Corners: This setting influences how sharp or rounded the corners in your traced image will be.
- Lower percentage: Results in more rounded corners.
- Higher percentage: Creates sharper, more angular corners. This is crucial for maintaining the integrity of precise “Graphic Design” elements or geometric “Abstract” patterns.
- Noise: This slider determines the minimum number of pixels that can be ignored as noise (insignificant detail).
- Lower noise (e.g., 1 pixel): Retains more small details and textures but can also pick up unwanted speckles or imperfections from the original raster.
- Higher noise: Ignores smaller details, effectively cleaning up the image by eliminating minor blemishes or dust specs. This is useful for decluttering scanned “Photography” or simplifying backgrounds.
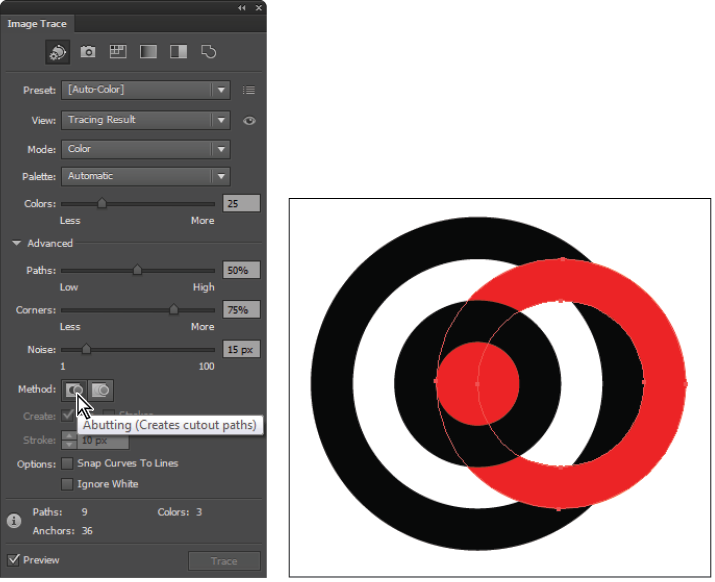
- Method:
- Abutting: Creates paths that touch each other, with no overlaps.
- Overlapping: Creates paths that overlap, which can be useful for certain complex shapes or when you intend to use Pathfinder operations later.
- Ignore White: This crucial checkbox (especially for black and white line art or images with a solid white background) eliminates the white background from your traced vector, leaving only the colored or black elements. This is immensely helpful when transferring the art to another background or recoloring individual motifs, supporting various “Creative Ideas” for composite images.
- Save as New Preset: Once you’ve found a combination of settings that works well for a specific type of image, you can save it as a custom preset by clicking “Manage Presets” > “Save as New Preset.” This saves time and ensures consistency for future projects, especially if you frequently work with similar source images on Tophinhanhdep.com.
Remember to keep the “Preview” checkbox ticked while adjusting these settings to see the changes in real-time, allowing for iterative refinement.
Refining and Utilizing Your Vector Art
Tracing is just the first step. To fully leverage your vectorized image, you need to finalize it for editing and creative application.
Expanding and Ungrouping for Editable Paths
After you’ve achieved the desired trace result with your chosen settings, the image is still a “Live Trace” object. This means it’s still linked to the original raster and can be re-traced if settings are changed. To convert it into editable vector paths, you must “Expand” it.
- Expand the Image: With the traced image selected, go to the top control panel (or the Properties panel) and click the “Expand” button. Alternatively, you can go to
Object > Image Trace > Expand. This action converts the live trace object into a group of vector paths, each made up of anchor points. Zoom in now, and you’ll see perfectly crisp, scalable lines and shapes, a testament to the power of vectorization. - Ungroup for Individual Elements: Once expanded, the entire traced image is typically grouped. To manipulate individual elements (e.g., change the color of a specific part, remove a shape, or move a motif), you need to “Ungroup” it.
- With the expanded vector selected,
Right-click > Ungroup. - Alternatively, go to
Object > Ungroup. - You may need to ungroup multiple times if the tracing resulted in nested groups.
- To re-group elements later, select them and press
Ctrl+G(Windows) orCommand+G(Mac).
- With the expanded vector selected,
- Clean Up and Simplify (Optional but Recommended): Vectorization, especially of complex photos, can sometimes result in an excessive number of anchor points or tiny, unwanted shapes.
- Direct Selection Tool (A): Use this tool to select and delete unwanted background shapes or small artifacts.
- Simplify Path: Go to
Object > Path > Simplify.... This feature allows you to reduce the number of anchor points on selected paths without significantly altering their shape, making your vector file cleaner and easier to work with. Use the sliders to find a balance between smoothness and detail.
Manual Tracing for Precision and Artistic Control
While Image Trace is powerful, there are instances where manual tracing offers superior control and artistic expression. For intricate designs, highly stylized “Digital Art,” or when converting specific hand-drawn “Sketched Art” into clean vector lines for logos or illustrations, manual tracing methods are invaluable.
- Preparation: Place and embed your raster image as usual. Lock the image layer (select the layer in the Layers panel and click the empty box next to the eye icon to show a padlock) to prevent accidental movement. Create a new layer above it for your vector artwork.
- Tools of Choice:
- Pen Tool (P): For precise control over curves and straight lines, the Pen Tool is the industry standard. It allows you to create anchor points and manipulate Bezier handles to draw smooth, custom paths. This is ideal for detailed “Graphic Design” and creating clean corporate logos.
- Pencil Tool (N) / Blob Brush Tool (Shift+B): If you have a drawing tablet, these tools offer a more natural, freehand drawing experience, akin to sketching with a pencil or brush. The Blob Brush creates expanded, filled shapes rather than just strokes, making it excellent for painting-like vector art or bold outlines. This method is perfect for converting “Creative Ideas” from a digital sketch into scalable vector art, offering the fluidity of drawing with the power of vectors.
- Shape Tools: For basic geometric elements (circles, squares, polygons), the Rectangle Tool (M), Ellipse Tool (L), and other shape tools provide perfect starting points that can then be modified.
- Process: Carefully trace the outlines and internal details of your image using your chosen tool. Focus on creating clean, minimal anchor points for smoother, more editable paths. You can adjust stroke weights, colors, and fills as you go, building up your vector illustration piece by piece.
- Refinement: After tracing, unlock your original raster image layer and hide or delete it. You’re left with a purely vector image. Refine your paths using the
Direct Selection Tool (A)to adjust anchor points and handles. You can then apply colors, gradients, and effects to achieve your desired aesthetic, turning a simple trace into a sophisticated piece of “Digital Art.”
This manual approach, though more time-consuming, grants unparalleled artistic control and is often preferred for high-fidelity “Photo Manipulation” or when a unique, hand-drawn vector style is desired.
Creative Applications and Beyond for Tophinhanhdep.com
Vectorizing images isn’t just a technical exercise; it’s a gateway to boundless creative possibilities, particularly for content featured on Tophinhanhdep.com.
Enhancing Tophinhanhdep.com’s Image Collections with Vector Art
- Custom Wallpapers and Backgrounds: Take a beloved “Nature” or “Abstract” photograph, vectorize it, and apply various artistic effects. You can create unique, stylized “Wallpapers” that retain sharp details even on large, high-resolution screens. This adds a distinctive flair that standard raster images cannot replicate.
- Digital Art from Photography: Convert “Beautiful Photography” into stunning “Digital Art” illustrations. Imagine transforming a landscape photo into a watercolor-style vector painting or a portrait into a graphic novel aesthetic. These “Creative Ideas” can be explored, saved, and shared as unique collections.
- Aesthetic and Thematic Collections: Develop cohesive “Mood Boards” or “Thematic Collections” by vectorizing diverse images and applying consistent styles. For instance, turn various “Sad/Emotional” images into monochrome vector art for a poignant collection, or bright, vibrant “Aesthetic” photos into flat vector graphics for a modern look.
- Stock Photos for Graphic Design: Offer vectorized versions of “Stock Photos” for graphic designers who need scalable assets for print, web, or merchandise. This adds immense value for users seeking “High Resolution” and versatile imagery.
- Photo Manipulation and Compositing: Use vectorized elements from different images to create intricate “Photo Manipulation” pieces. Extract vector silhouettes or line art from multiple sources and combine them into entirely new compositions, ready for further editing.
- Creative Inspiration: The act of vectorizing can itself spark “Image Inspiration.” Seeing how Image Trace interprets lines and colors can lead to new “Photo Ideas” or design approaches, pushing the boundaries of “Trending Styles” in visual art.
Tophinhanhdep.com, with its wide array of “Images,” “Photography,” and focus on “Visual Design,” serves as an ideal platform to experiment with these vectorization techniques. From “Converters” and “Compressors” to “AI Upscalers” among its “Image Tools,” the site offers a comprehensive ecosystem for all your visual needs, with Image Trace being a powerful complement to your creative arsenal.
In conclusion, the ability to trace images in Adobe Illustrator using the Image Trace tool is a fundamental skill that every digital artist, graphic designer, and visual content creator should master. It unlocks the power of vector graphics, transforming pixelated limitations into infinitely scalable possibilities. By understanding the nuances of its settings and applying these techniques thoughtfully, you can elevate your “Visual Design” projects and contribute stunning, versatile artwork to platforms like Tophinhanhdep.com, ensuring your creative vision is always presented with clarity and precision. Dive in, experiment, and watch your images transform from ordinary to extraordinary.