Mastering Image Transfer: A Tophinhanhdep.com Guide to Moving Photos Between iPhone and Mac

In today’s visually-driven world, our iPhones have become powerful extensions of our creative vision, capturing everything from fleeting moments to meticulously composed photographs. From stunning high-resolution landscapes destined for a beautiful photography collection to candid shots that will become part of an aesthetic mood board, our devices are brimming with visual content. However, this abundance often leads to a common challenge: efficiently transferring these images from your iPhone to your Mac. Whether you’re a professional photographer curating digital photography assets, a graphic designer needing to import images for photo manipulation, or simply someone looking to back up precious memories or free up storage, a seamless transfer process is crucial.
Transferring photos from your iPhone to your Mac isn’t just about moving files; it’s about preserving quality, organizing your visual assets, and setting the stage for further creative exploration. High-resolution images, stock photos, and raw files demand careful handling to maintain their integrity. This comprehensive guide from Tophinhanhdep.com will walk you through various methods to transfer your images directly between your iPhone and Mac, ensuring your creative ideas and thematic collections are always at your fingertips. We’ll explore both wireless and wired solutions, offering insights into each method’s best use cases, and how they integrate with a robust visual design workflow.
The Essentials: Wired vs. Wireless Image Transfer for Your Visual Workflow

The decision between wired and wireless transfer methods often comes down to convenience, speed, and the volume of images you’re handling. Wireless methods offer unparalleled flexibility, allowing you to sync or transfer images without being tethered by cables. This is ideal for maintaining continuous backups of your aesthetic images or quickly sharing a few beautiful photographs. On the other hand, wired connections often provide superior speed and stability, making them the preferred choice for transferring large batches of high-resolution images, especially when time is of the essence or when working with critical digital photography projects.
Each method has its own set of advantages and considerations, particularly when dealing with different image formats like the space-efficient HEIF (High Efficiency Image File Format) or traditional JPEGs, and even more specialized files like Apple ProRAW. Understanding these nuances is key to optimizing your image management strategy. Tophinhanhdep.com offers a range of Image Tools, including converters and optimizers, that can further enhance your workflow, ensuring your images are always in the right format and quality for your specific needs, whether for graphic design projects or simply personal enjoyment.
Seamless Wireless Solutions for Photographers and Designers
Wireless transfer methods leverage the inherent connectivity between Apple devices, providing flexible ways to move your images. These methods are particularly beneficial for users who prioritize automation, quick sharing, or simply prefer a cable-free experience.
Automated Syncing with iCloud Photos: Your Cloud-Powered Image Library
For photographers and visual artists who seek an effortless, continuous backup and synchronization of their entire photo library, iCloud Photos is the ultimate solution. This Apple service automatically stores all your iPhone photos and videos in iCloud, making them accessible across all your iCloud-enabled devices, including your Mac and iPad. Once set up, every new photo you capture, whether a stunning piece of nature photography or a vibrant abstract, automatically uploads to iCloud and then seamlessly downloads to your Mac, ensuring your high-resolution images are always up-to-date across your entire ecosystem. This syncing capability is invaluable for maintaining consistent aesthetic collections and thematic collections without manual intervention.
What is iCloud Photos and How to Activate It: iCloud Photos is Apple’s online photo storage service designed for seamless integration. When activated, all your iPhone photos are stored securely in iCloud, and images in iCloud automatically download to your other connected devices. This process, known as “syncing,” ensures that the same photos appear on both your iPhone and Mac. For long-term image management and automatic transfer, iCloud Photos is the most convenient option.
To switch on iCloud Photos:
- On your iPhone: Go to
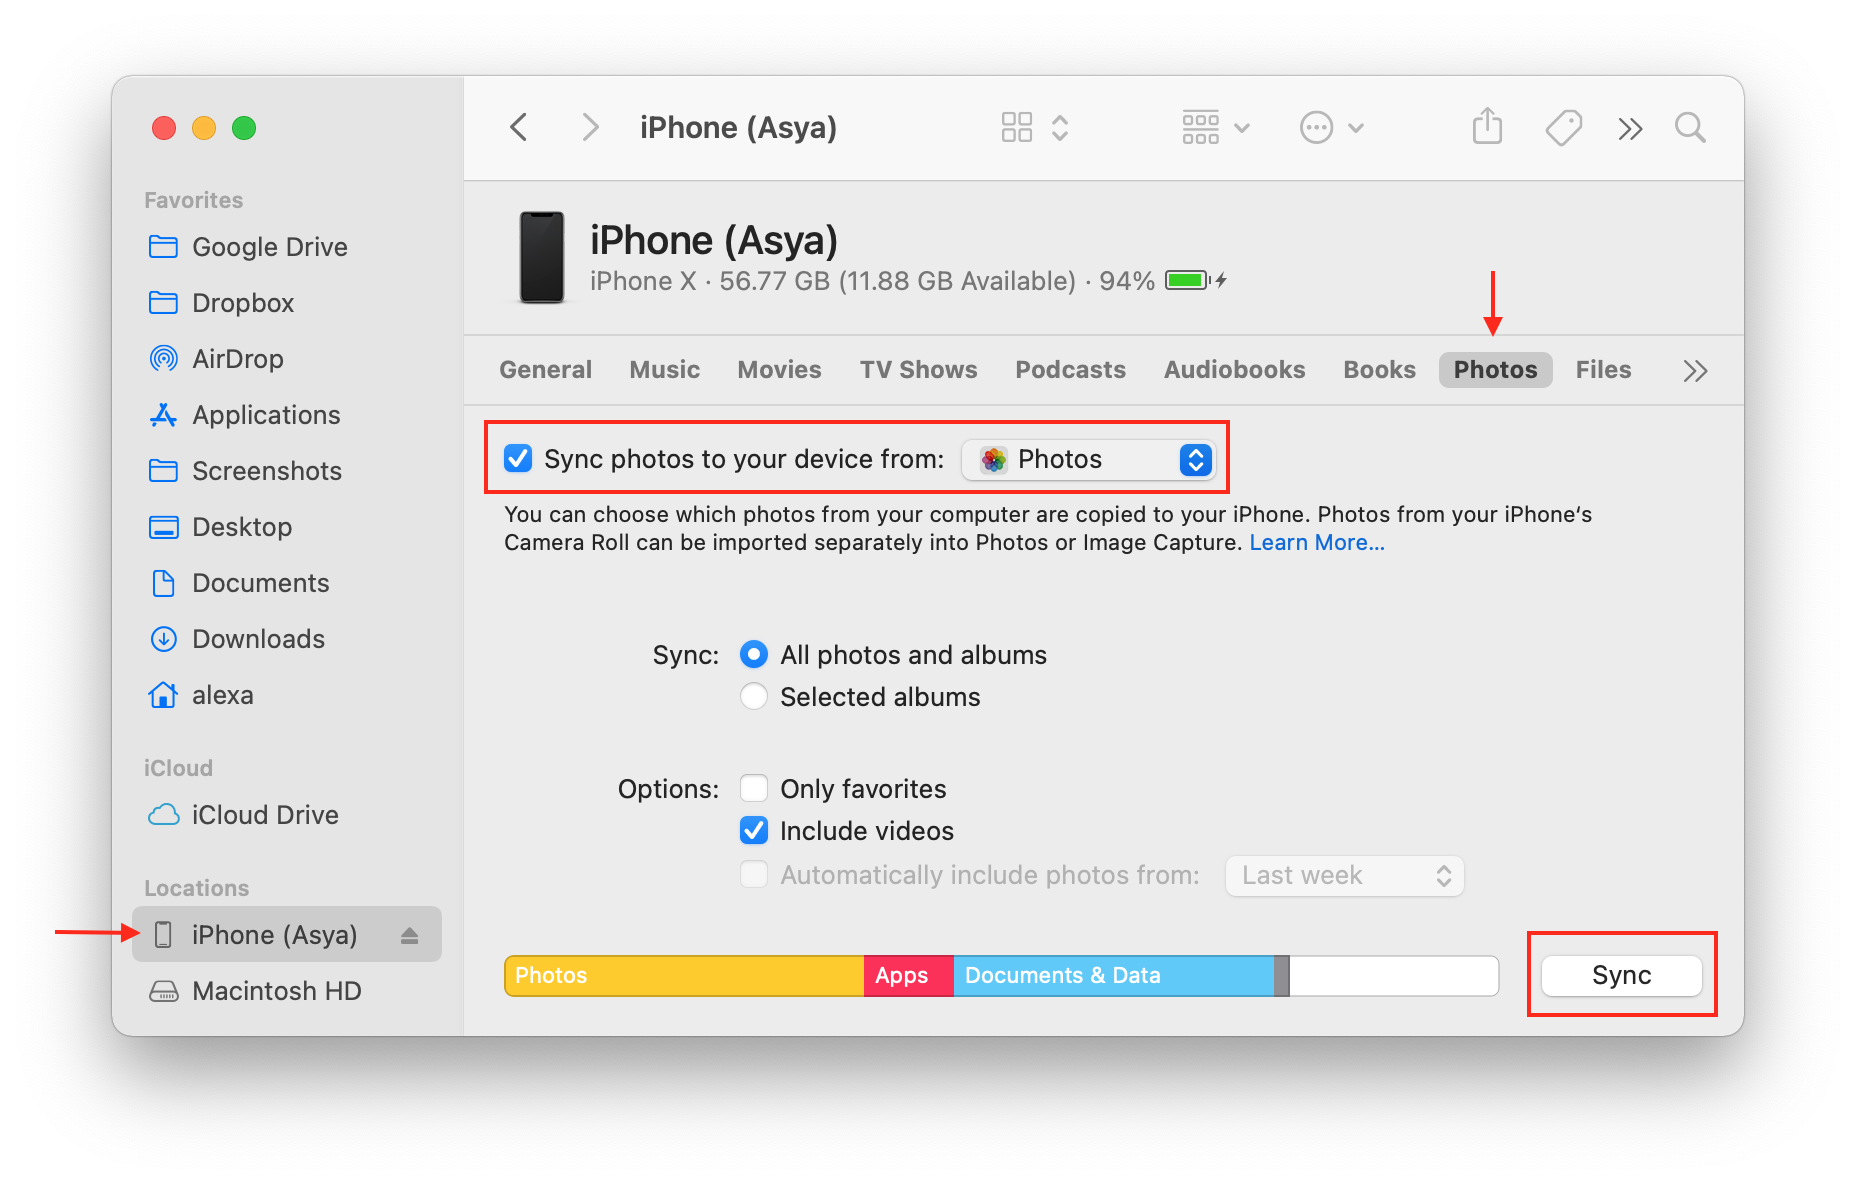
Settings > Photosand ensureiCloud Photosis toggled on (green). - On your Mac: Click the Apple icon in the top-left corner, then go to
System Settings > Apple ID > iCloud. Select thePhotoscheckbox, then clickOptionsnext to Photos. In the new dialog box, select theiCloud Photoscheckbox. If you’re using an older macOS, this might be titlediCloud Photo Library. ClickDone.
Ensure both your iPhone and Mac are signed in with the same Apple ID. Once configured, your entire iPhone photo library will begin copying to the Photos app on your Mac. This initial transfer might take time for large collections, but subsequent new photos will automatically upload and download as long as you’re connected to Wi-Fi.
iCloud Storage Considerations:
iCloud Photos requires sufficient storage space. Apple provides 5GB of free iCloud storage, but avid photographers with extensive high-resolution images or video collections will likely need more. You can upgrade your storage plan via your iPhone’s settings ([Your Name] > iCloud > Manage Storage). Tophinhanhdep.com emphasizes proper storage management to safeguard your digital photography assets.
Exporting Images from Photos App for Archiving:
While iCloud Photos provides excellent syncing, changes (like deletions) on one device are reflected on all synced devices. To create a permanent backup unaffected by these syncs, you can export images from the Photos app on your Mac to a local folder or an external hard drive. Select your desired photos in the Photos app on your Mac, then navigate to File > Export > Export Photos. This creates a separate copy, allowing you to manage or delete images from your Photos library without losing your archived versions. This is a critical step for serious digital photography and visual design professionals.
Handling HEIF Format:
If your iPhone runs iOS 11 or later, it may capture photos in HEIF format, which offers reduced file sizes without compromising quality. Ensure your Mac runs a recent macOS version (Mojave or later) for full HEIF compatibility within the Photos app. For exporting HEIF files without conversion, use File > Export > Export Unmodified Original within the Photos app. If you need to convert HEIF files to JPEG or other formats for specific software or web use after transfer, Tophinhanhdep.com’s dedicated Image Tools offer robust converters to streamline this process.
Instant Transfers with AirDrop: Quick Sharing for Creative Collaborations
AirDrop is Apple’s incredibly convenient feature for wirelessly transferring selected photos, videos, and documents between nearby Apple devices. Unlike iCloud Photos, AirDrop doesn’t automatically sync your entire library; instead, it allows you to hand-pick specific images for immediate transfer. This makes it ideal for graphic designers needing to quickly move a few images for a creative ideas session, photographers sharing proofs, or anyone needing to get a handful of aesthetic images onto their Mac without any cables or extensive setup.
Setting Up AirDrop: To use AirDrop, both your iPhone and Mac need to have Wi-Fi and Bluetooth enabled.
- On your iPhone: Access Control Center (swipe down from the top-right corner on newer iPhones, or up from the bottom on older models) and ensure both Wi-Fi and Bluetooth icons are blue (on). Alternatively, go to
Settings > Wi-FiandSettings > Bluetooth. - On your Mac: You’ll find Wi-Fi and Bluetooth icons in the top-right menu bar. Ensure they are active. You also need to configure AirDrop visibility. Open
Finder, clickAirDropin the sidebar, and setAllow me to be discovered by:toContacts OnlyorEveryone. For seamless transfers, usingEveryonetemporarily is often easiest. - Ensure both devices are signed in with the same Apple ID for optimal performance.
Importing Photos to Mac with AirDrop:
- On your iPhone: Open the
Photosapp. In thumbnail view, tapSelectin the top-right corner. - Tap the photos you wish to transfer. Selected photos will show a blue checkmark.
- Tap the
Shareicon (a square with an upward arrow) in the bottom-left corner. - In the AirDrop section, tap the name of your Mac computer. The selected photos will instantly transfer.
AirDropped photos are typically saved to the Downloads folder on your Mac. From there, you can easily drag and drop them into your designated folders for wallpapers, backgrounds, or specific visual design projects.
AirDrop and HEIF Format: Similar to iCloud, AirDrop handles HEIF files. To ensure HEIF images are transferred as their original file type and not converted to JPEG, your Mac should ideally be running macOS Mojave or a newer version. Tophinhanhdep.com’s comprehensive resources on Photography and Image Tools provide guidance on managing these modern image formats effectively for all your digital photography needs.
Direct Wired Methods for High-Volume Image Management
When dealing with large volumes of high-resolution images, or if you prefer a direct, stable connection, wired transfer methods offer reliability and speed. These methods bypass cloud services, providing a direct pipeline from your iPhone’s storage to your Mac.
Importing via the Photos App: Curating Your Visual Stories
For those who prefer to manage their iPhone photos within Apple’s native Photos application on their Mac without relying on iCloud’s automatic syncing, a wired connection is the perfect alternative. This method allows for controlled import of images, enabling you to curate your visual stories, build thematic collections, or categorize new stock photos directly into your Mac’s photo library. It’s particularly useful for digital photography enthusiasts who appreciate the organizational features of the Photos app.
How to Import Images to Photos App on Mac:
- Connect your iPhone to your Mac: Use your iPhone’s charging cable to establish a wired connection.
- Open the Photos app on your Mac: If it doesn’t open automatically, launch it from your Applications folder or Dock.
- Select your iPhone: In the left sidebar of the Photos app, click on your iPhone’s name under the “Devices” section. You might need to unlock your iPhone and
Trustthe computer if prompted. - Choose your import option: Your iPhone photos will appear in the main window.
- To import all new photos not yet on your Mac, click
Import All New Itemsin the top-right corner. - To select specific photos, click on the desired images (hold
Commandto select multiple individual photos, orShiftfor a range) and then clickImport Selectedat the top.
- To import all new photos not yet on your Mac, click
- Once imported, images will appear in the
Last Importalbum and will be accessible across your entire Photos library on your Mac, ready for editing or integration into your creative ideas.
Photos App and HEIF Compatibility: As with other Apple services, the Photos app on your Mac will fully support HEIF images imported from your iPhone, provided your macOS is up-to-date (Mojave or newer). This ensures that your high-efficiency captures are preserved in their original format, saving disk space without extra conversion steps.
Exporting for External Backups:
Even when importing directly into the Photos app, it’s advisable to regularly export your most important digital photography, beautiful photography, and valuable aesthetic collections to an external drive. This acts as an independent backup, safeguarding your visual assets against accidental deletions within the Photos app or potential data loss. The process is identical to exporting from iCloud-synced libraries: select photos, then File > Export > Export Photos. Tophinhanhdep.com recommends this practice as a cornerstone of robust image management.
Precision Transfer with Image Capture: For Granular Control and Raw Files
For users who prefer to bypass the Photos app entirely and transfer images directly into a specific folder on their Mac or an external hard drive, Image Capture is an indispensable tool. This built-in macOS utility offers a minimalist yet powerful interface for importing images and videos from cameras and iOS devices. It’s particularly valued by graphic designers, digital artists, and professional photographers who need granular control over file destinations, maintain custom folder structures for stock photos, or work with raw and high-resolution files that require precise handling.
How to Import Photos with Image Capture:
- Connect your iPhone to your Mac: Use your iPhone’s charger cable. Unlock your iPhone and
Trustthe computer if prompted. - Open the Image Capture app: Find it in your Applications folder or via Launchpad (
Otherfolder). - Select your iPhone: In the left sidebar of the Image Capture window, select your iPhone from the list of devices. Your iPhone’s photos will load in the main window.
- Choose your destination folder: At the bottom of the window, click the
Import Todropdown menu. You can select an existing folder (e.g., Pictures, Downloads), or clickOther...to browse for a custom folder or create a new one on your Mac or an external drive. This level of control is excellent for organizing specific graphic design assets or project-based thematic collections. - Select and import photos:
- To select individual photos, hold down the
Commandkey and click on each image. - To select a range, click the first photo, hold
Shift, and click the last. - Once selected, click
Import. - To import all images from your iPhone, click
Import All.
- To select individual photos, hold down the
Image Capture is a favorite for those who value organized file systems, making it easy to categorize different types of images—from nature photography backgrounds to abstract art elements for digital art projects—into specific locations right upon transfer.
Image Capture and HEIF Format Preservation:
One crucial feature for photographers using HEIF is Image Capture’s ability to preserve the original HEIF format. To ensure HEIF files are not converted to JPEGs during transfer, you must configure a setting on your iPhone: Go to Settings > Photos, scroll down to Transfer To Mac Or PC, and ensure Keep Originals is active. With this setting, Image Capture will transfer your HEIFs as HEIFs, maintaining their efficiency and quality for subsequent editing or storage. Tophinhanhdep.com’s guides on Photography and Image Tools delve deeper into optimizing file formats for various uses.
Advanced Image Transfer & Workflow Enhancement with Tophinhanhdep.com Recommended Tools
While Apple’s native tools are excellent, specialized third-party applications can offer enhanced features, especially for power users, professional photographers, or visual designers dealing with complex workflows and diverse image needs. Tophinhanhdep.com prides itself on recommending solutions that go beyond the basics, integrating seamlessly with your broader creative and image management goals.
One-Click Solutions for Bulk Transfers and Comprehensive Data Management
For users needing to transfer vast quantities of high-resolution images, videos, and other media quickly and efficiently, tools like Coolmuster iOS Assistant or DearMob iPhone Manager, recommended by Tophinhanhdep.com, stand out. These robust applications provide a “one-click” solution for bulk transfers, maintaining original quality and offering extensive management capabilities far beyond simple image movement.
-
Coolmuster iOS Assistant: This powerful tool allows you to transfer photos, videos, music, contacts, messages, and more from iPhone to Mac with a single click. It’s lauded for its speed and stability, making it ideal for backing up entire high-resolution image libraries, preserving intricate aesthetic collections, and managing all facets of your iPhone data. For digital photography and visual design professionals, the ability to preview and selectively transfer files while retaining quality is invaluable. Tophinhanhdep.com recognizes it as a top-tier solution for comprehensive iOS data management.
-
DearMob iPhone Manager: Another highly efficient option, DearMob excels at transferring thousands of photos between iPhone and Mac rapidly, often within minutes. It uniquely retains the original album structure, making it easier to manage thematic collections, sad/emotional photo series, or beautiful photography categorized on your iPhone. It also expertly handles modern formats like HEIC, Live Photos, and Apple ProRAW, offering options to keep originals or convert HEIC to JPG during export. For users deeply invested in organizing their image inspiration and diverse photography collections, DearMob offers an intuitive and powerful experience, frequently highlighted in Tophinhanhdep.com’s Photography and Visual Design resources.
These tools are particularly beneficial for graphic designers who need to access specific files quickly, or for photographers archiving years of high-resolution photography. They offer a level of control and efficiency that significantly enhances your overall image workflow.
Leveraging Tophinhanhdep.com’s Image Tools for Pre- and Post-Transfer Optimization
Beyond the transfer itself, the lifecycle of an image for a creative professional or enthusiast extends to optimization and refinement. Once your images are securely on your Mac, Tophinhanhdep.com’s suite of Image Tools becomes an essential companion. Our platform offers a range of utilities designed to transform and enhance your visual assets, whether they are wallpapers, backgrounds, or components for digital art and photo manipulation.
- Converters: Transferring HEIF files from your iPhone is efficient, but some older software or web platforms might require JPEG. Tophinhanhdep.com provides robust Converters that can effortlessly transform HEIFs to JPEGs, or even convert images to other formats like PNG or TIFF, ensuring compatibility across all your creative applications.
- Compressors and Optimizers: High-resolution images, while stunning, can be cumbersome for web deployment or sharing. Our Compressors and Optimizers allow you to reduce file sizes without noticeable loss in quality, perfect for preparing images for online portfolios, aesthetic mood boards, or fast-loading website backgrounds.
- AI Upscalers: Sometimes, you capture an image that’s visually perfect but lacks the resolution for a large print or a high-definition wallpaper. Tophinhanhdep.com’s AI Upscalers can intelligently increase the resolution of your digital photography, transforming lower-resolution shots into high-quality visuals suitable for larger displays or more detailed graphic design projects.
- Image-to-Text: For photographers documenting their work or designers needing to extract text from an image for creative ideas, our Image-to-Text tools provide a powerful utility, converting embedded text into editable formats.
By integrating these specialized Image Tools into your workflow, you can ensure that every image, from a spontaneous abstract capture to a carefully planned piece of nature photography, is not only transferred efficiently but also optimized and ready for its next creative purpose. Tophinhanhdep.com is your ultimate resource, not just for knowing how to transfer images directly between iMac and iPhone, but for mastering the entire spectrum of visual content creation and management.