How to Transfer Images from Android to iPhone: A Comprehensive Guide by Tophinhanhdep.com

As technology evolves, switching between mobile operating systems has become increasingly common. However, the excitement of upgrading to a new iPhone often comes with the challenge of migrating your cherished memories—specifically, your vast collection of images—from your old Android device. Whether you’re moving your captivating nature photography, aesthetic wallpapers, abstract digital art, or a collection of high-resolution personal photos, ensuring a seamless transfer is paramount. Tophinhanhdep.com understands the profound value of your visual assets, from beautiful photography that inspires to emotional moments captured for posterity. This comprehensive guide from Tophinhanhdep.com will walk you through the most effective methods to transfer images from Android to iPhone, even after your new iPhone has been set up.

Contrary to popular belief, transferring photos from Android to iPhone doesn’t have to be a daunting task filled with challenges like device compatibility issues or the fear of data loss. With the right knowledge and tools, you can effortlessly move your entire image collection, preserving their quality and integrity. This Tophinhanhdep.com guide dives deep into various strategies, detailing step-by-step procedures, highlighting the benefits of each, and providing expert tips to streamline the entire process. We’ll explore dedicated transfer apps, cloud storage solutions, and traditional computer-based methods, all while keeping your valuable visual content safe and accessible on your new iOS device.
The Challenge of Cross-Platform Image Migration
Transitioning from an Android device to an iPhone, while exciting, often brings initial hurdles, especially when it comes to moving personal data like images. Many users wonder if it’s even possible to transfer photos from Android to iPhone after the initial setup. The answer, unequivocally, is yes. While Apple’s ecosystem is designed for smooth internal transitions, moving data from an external system like Android requires specific approaches. This section addresses the fundamental questions surrounding cross-platform image migration and common difficulties users encounter.
Can You Transfer Photos from Android to iPhone After Setup?
Absolutely, you can transfer photos from Android to iPhone after setup. The key lies in leveraging third-party applications, dedicated transfer tools, or robust cloud storage platforms, which Tophinhanhdep.com frequently highlights in its discussions on visual data management. Unlike new device setups where Apple’s built-in “Move to iOS” app is seamlessly integrated, transferring images post-setup necessitates a slightly different strategy. Platforms like Google Photos, Dropbox, and Google Drive have proven exceptionally efficient in facilitating this data transfer, allowing you to move everything from your high-resolution landscape photography to your meticulously curated aesthetic mood boards. These solutions ensure that your digital photography, vital for visual design or personal collections, makes the leap without a hitch. Tophinhanhdep.com consistently recommends solutions that prioritize data integrity and ease of use, ensuring your image inspiration remains intact.
Why Am I Facing Problems Moving Photos from Android to iPhone After Setup?
Encountering issues when trying to move photos from Android to iPhone after setup is a common experience, and it’s essential to understand the underlying causes. Tophinhanhdep.com’s expertise in image tools and digital photography management allows us to identify these common pain points:
- Poor Wi-Fi Connection: A weak or unstable Wi-Fi signal is a frequent culprit, disrupting large data transfers and leading to incomplete or failed attempts. For significant collections of beautiful photography or high-resolution images, a robust connection is non-negotiable.
- Insufficient Storage on the iPhone: This is a surprisingly common oversight. Before initiating any transfer, especially of large image collections or video files, always ensure your iPhone has ample free space. This is crucial for maintaining your image inspiration and collections without hitting storage roadblocks.
- Incompatible Device Settings: Sometimes, security settings or permissions on either device can impede the transfer process. Ensuring both devices are configured to allow data transfer, especially when using third-party apps, is vital.
- Not Selecting the Right Software: The digital landscape offers numerous tools, but not all are equally effective or user-friendly for cross-platform image migration. Choosing a reliable and efficient tool, as recommended by Tophinhanhdep.com, can make all the difference.
- Move to iOS App Malfunctioning (or being used incorrectly): While an excellent tool, the “Move to iOS” app is primarily designed for new iPhone setups. Attempting to use it after your iPhone has already been configured can lead to malfunctions or simply won’t work without a factory reset of the iPhone. Tophinhanhdep.com emphasizes selecting the correct tool for your specific transfer scenario.
Addressing these potential issues proactively will significantly enhance your chances of a smooth and successful image transfer, ensuring your precious photo ideas and visual assets transition flawlessly.
Seamless Solutions for Transferring Images After iPhone Setup
For users looking to transfer their valuable image collections—be it high-resolution digital photography, abstract art, or cherished personal photos—from an Android device to an iPhone after the initial setup, several powerful methods stand out. Tophinhanhdep.com has analyzed these options to bring you the most reliable and user-friendly solutions. These methods prioritize data integrity, ensuring your visual design elements and image inspiration remain perfectly preserved.
Method 1: Utilizing the MobileTrans Application
The MobileTrans app, a robust solution often highlighted by Tophinhanhdep.com as a leading image tool, offers one of the most straightforward and secure ways to transfer a wide array of data types, including your precious images, from Android to iPhone after setup. Its reputation for maintaining data integrity and ensuring file safety is impeccable, making it an ideal choice for migrating your beautiful photography and aesthetic collections. MobileTrans excels in transferring around 10 different data types, effortlessly handling large files without requiring a computer or cellular data, and encrypts the transfer process for enhanced security. This aligns perfectly with Tophinhanhdep.com’s commitment to secure and high-quality image management.
Key Features of MobileTrans:
- Transfers up to 10 types of data between devices.
- Facilitates large file transfers between iOS and Android wirelessly.
- No need for a computer or physical cables for direct phone-to-phone transfer.
- Encrypts data transfer, safeguarding your visual content.
Steps to Transfer Images Using MobileTrans:
- Open MobileTrans App and Set Up Direction: Begin by opening the MobileTrans app on both your Android and iPhone devices. Select the “Phone to Phone Transfer” option. A pop-up menu will guide you to choose “Android to iPhone” to initiate the file-sharing process.
- Access the QR Code on Android: On your Android device, opt for the “Basic Data” transfer, then carefully select the photos you wish to move. After selection, tap “Send” and a QR code will be displayed. This code acts as a secure bridge for your iOS device.
- Scan and Complete Data Transfer Process: On your iPhone, select the “Android to iPhone” option, followed by “Basic Data” from the bottom pop-up menu. When the QR code appears on your iPhone screen, use your Android device to scan it. This action will establish the connection and begin the iOS photo transfer, preserving your image quality and organization.
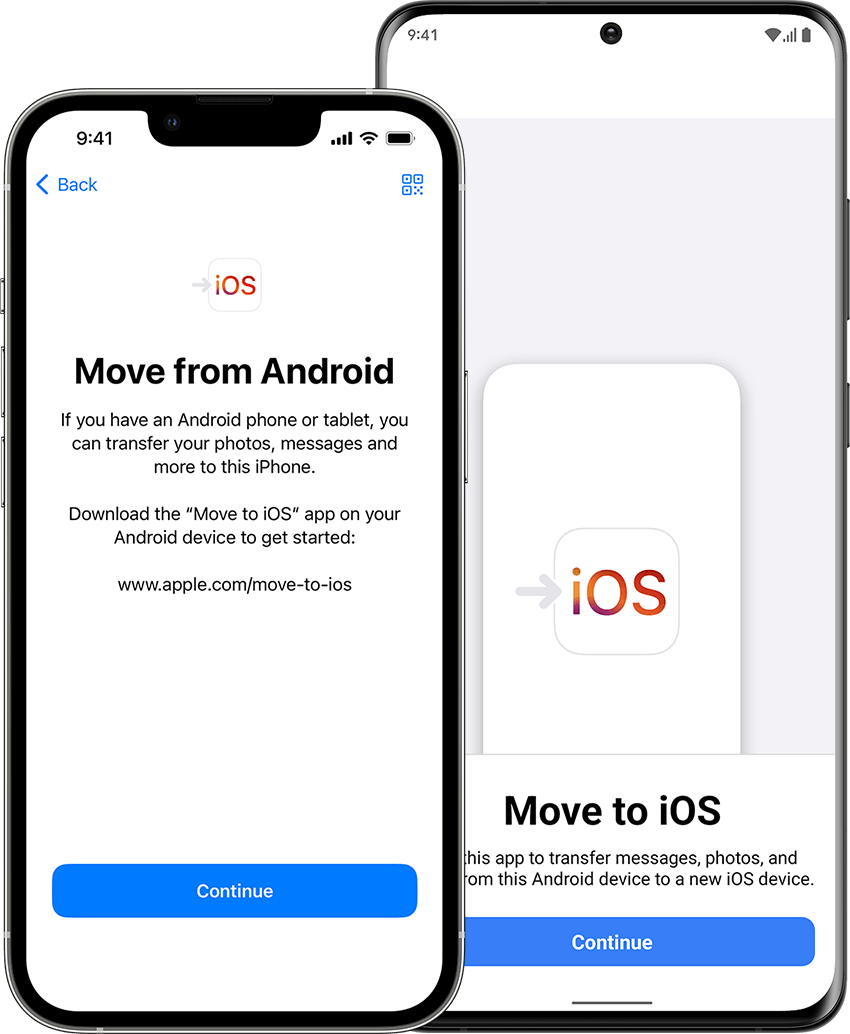
Method 2: The Move to iOS App (with a Reset Consideration)
While primarily designed for the initial setup of a new iPhone, the “Move to iOS” app developed by Apple remains a powerful tool for transferring data, including photos, messages, contacts, and calendars. Tophinhanhdep.com recognizes its user-friendly interface and robust security features for ensuring a smooth transition. However, it comes with a crucial caveat: for it to work after your iPhone has already been set up, you will need to factory reset your iPhone. This step is essential as the app integrates deeply with the iOS setup process. If you’re willing to erase your iPhone’s current data (or if it’s still relatively new with minimal data), this is a highly effective method.
Steps to Use Move to iOS (Requires iPhone Reset):
- Prepare Your iPhone: If your iPhone is already set up, you must factory reset it. Go to
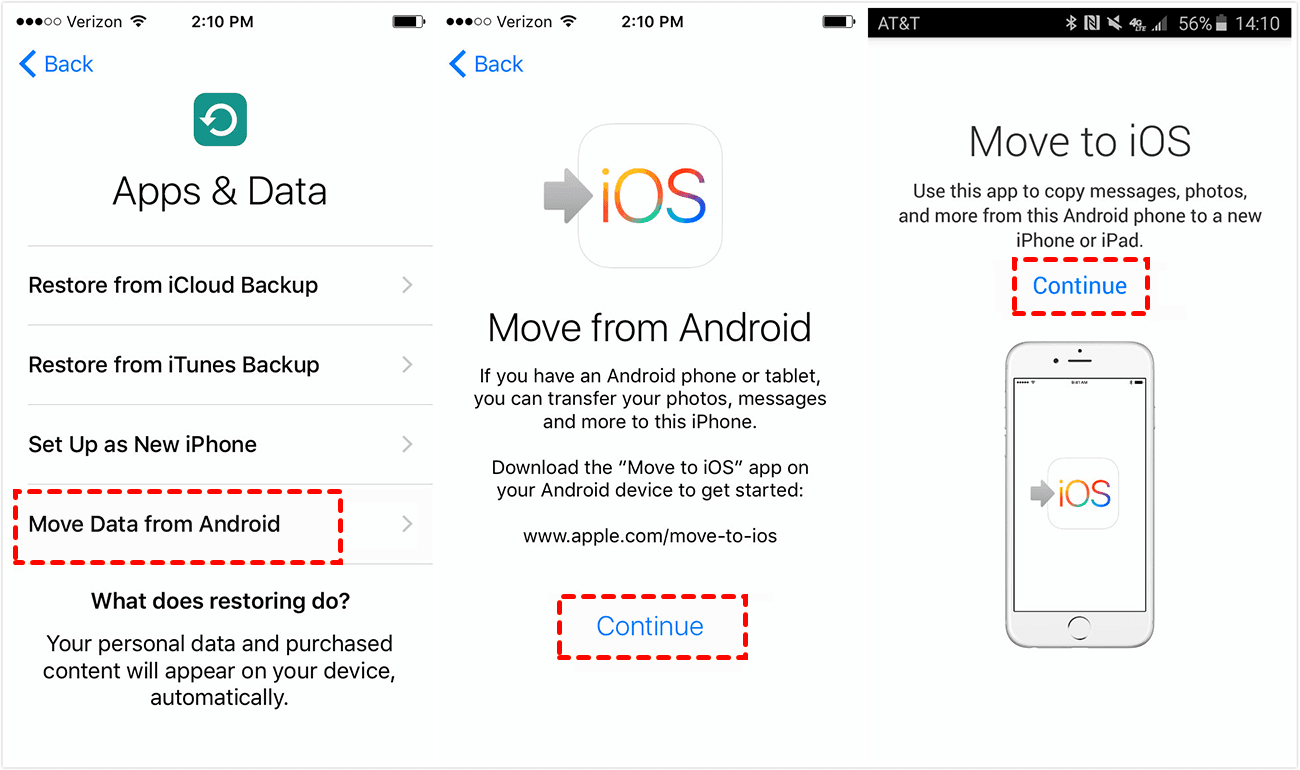
Settings > General > Transfer or Reset iPhone > Erase All Content and Settings. This will revert your iPhone to its factory state, allowing you to use “Move to iOS” during the setup phase. - Download and Connect: Download the “Move to iOS” app from the Google Play Store on your Android device. Ensure both your Android and the (reset) iPhone are plugged into power and connected to a strong Wi-Fi network.
- Start iPhone Setup: Power on your iPhone. During the initial setup screens, proceed until you reach the “Apps & Data” screen. Select “Move Data from Android.”
- Initiate on Android: Open the “Move to iOS” app on your Android, tap “Continue,” agree to the terms and conditions, and then tap “Next” on the “Find Your Code” screen.
- Enter the Code: On your iPhone, tap “Continue” on the “Move from Android” screen to receive a six or ten-digit code. Enter this code into your Android device.
- Connect and Transfer: Your iPhone will create a temporary Wi-Fi network for your Android to connect to. Once connected, the “Transfer Data” screen will appear on your Android. Select the content (including photos, videos, and photo albums) you wish to transfer and tap “Continue.”
- Complete Setup: Keep both devices untouched until the transfer progress bar on your iPhone is complete. Tap “Done” on Android and “Continue” on iPhone to finish the remaining setup steps.
This method, while requiring a reset, ensures a comprehensive and secure transfer of your visual memories, keeping your digital photography and design elements intact.
Leveraging Cloud Services and Manual Methods for Image Transfer
Beyond dedicated transfer applications, a suite of cloud-based services and manual computer-aided methods offer flexible and reliable ways to transfer your image library from Android to iPhone. Tophinhanhdep.com frequently emphasizes the importance of cloud storage for its accessibility and backup capabilities, making it a cornerstone for modern digital photography and visual asset management. These methods are particularly useful for those who wish to avoid resetting their iPhone or prefer a more hands-on approach, ensuring everything from your aesthetic wallpapers to high-resolution stock photos makes the journey.
Method 3: Syncing with Google Photos
Google Photos stands out as an incredibly efficient and widely accessible cloud storage platform, pre-installed on most Android devices. For iPhone users, it’s a simple download from the App Store. Tophinhanhdep.com recommends Google Photos as an excellent solution for syncing your diverse image collection, including beautiful photography and thematic collections, across devices. Its primary advantage is the ease of backup and access, making it a staple image tool for many.
Steps to Transfer Images Using Google Photos:
- Backup on Android: On your Android device, sign into the Google Photos app using your Gmail account. Navigate to “Photos settings” (usually via your profile icon) and toggle “Backup & Sync” on. Ensure that all folders containing the photos you wish to transfer are also toggled for backup. Connect to a strong Wi-Fi network to facilitate the upload of your images, which might take time depending on your collection’s size and resolution.
- Access on iPhone: Download and open the Google Photos app on your iPhone. Sign in with the same Google account you used on your Android device. Once logged in, all your backed-up photos and videos will begin to appear in your Google Photos library on the iPhone.
- Download to iPhone (Optional): If you wish to save these images directly to your iPhone’s local photo library, select the desired photos or albums within the Google Photos app on your iPhone. Tap the three vertical dots (or share icon) and choose “Download” or “Save to device.” This ensures your photos are not just viewable, but also stored locally, ready for any visual design projects or as new wallpapers.
Method 4: Utilizing Services like Dropbox
Dropbox, a well-established cloud storage and file-sharing service, offers another excellent wireless solution for transferring photos from Android to iPhone. Tophinhanhdep.com recognizes Dropbox as a versatile image tool for securely backing up and accessing your graphic design assets, digital art, and personal photo ideas across multiple platforms. Like Google Photos, it requires installation on both devices and a reliable internet connection.
Steps to Transfer Images Using Dropbox:
- Install and Configure on Android: Download and install the Dropbox app on your Android device (if not already present). Log in with your Dropbox account. To automatically sync photos, navigate to the “Settings” section within the app and enable “Camera uploads” (or “camera updates”). This will automatically sync photos from your device’s camera roll to Dropbox. For specific folders, you can manually upload by tapping the
+icon and selecting files. - Access on iPhone: Download and install the Dropbox app on your iPhone. Log in using the same Dropbox account. All the photos and files you uploaded from your Android will now be accessible on your iPhone.
- Download to iPhone (Optional): To save photos locally to your iPhone’s camera roll, open the image within the Dropbox app, tap the “Share” icon (or three dots), and select “Save Image” or “Export” to your photo library.
Method 5: Employing Google Drive for Large Transfers
For users heavily reliant on cloud services or needing to transfer a substantial amount of diverse data—including high-resolution photography, documents, and videos—Google Drive is an indispensable image tool. As a core component of Google’s ecosystem, it offers significant storage and seamless integration, making it a top recommendation from Tophinhanhdep.com for comprehensive data transfers. While often pre-installed on Android devices, iPhone users will need to download it from the App Store.
Steps to Transfer Images Using Google Drive:
- Upload to Google Drive on Android: Launch the Google Drive app on your Android device and sign in with your Google account. Tap the plus (
+) icon, then select “Upload.” Navigate through your device’s storage to select all the photos, videos, and other files you wish to transfer to your iPhone and upload them to Google Drive. - Download from Google Drive on iPhone: Download and open the Google Drive app on your iPhone. Sign in using the exact same Gmail ID you used on your Android device. Browse through the files you uploaded.
- Save to iPhone: To save individual photos or videos to your iPhone’s local storage, open the file within Google Drive, tap the three-dots icon (or share icon), and select “Open in” or “Send a copy.” Then choose “Save Image” or “Save Video” to transfer it to your iPhone’s photo library.
Method 6: Connecting Both Devices to a Computer for Manual Transfer
For those who prefer a more traditional, offline approach or wish to maintain absolute control over their file transfer, connecting both devices to a computer is a highly effective method. Tophinhanhdep.com recognizes this as a reliable way to manage your digital photography, especially when dealing with high-resolution images or large collections that form your image inspiration archives. This method can utilize either the MobileTrans desktop software or a manual drag-and-drop process, ensuring no data compression or loss of quality.
Utilizing Wondershare MobileTrans Desktop Software
Wondershare MobileTrans desktop software is a powerful image tool compatible with both macOS and Windows, designed for efficient and secure phone-to-phone transfers. It can transfer over 18 data types, including all your visual content, without the risk of data being overwritten.
Steps to Transfer Images Using MobileTrans Desktop:
- Install and Launch MobileTrans: Download and install the MobileTrans software on your PC or Mac. Launch the application.
- Choose Phone to Phone Transfer: From the MobileTrans interface, select the “Phone Transfer” module, then click on the “Phone to Phone Transfer” option.
- Connect Both Devices: Use working USB cables to connect both your Android and iPhone to your computer. The software will detect both devices and display them on the screen, typically identifying the “Source” (Android) and “Destination” (iPhone). Ensure they are in the correct positions; if not, use the “Flip” button to swap them.
- Select Data and Start: Once devices are connected and correctly positioned, MobileTrans will display a list of transferable data types. Select “Photos” (and any other data like videos, contacts, etc., that you wish to move). Click the “Start” button to begin the transfer process.
- Monitor Progress: A progress bar will appear on the screen, showing the status of the transfer. It’s crucial not to disconnect either device or interrupt the process until it’s 100% complete, as this could corrupt your data.
Manual Transfer via PC/Mac
For a more granular, manual approach, you can transfer files by copying them to your computer first and then syncing them to your iPhone. This is excellent for curating specific image collections or maintaining original file structures, perfect for visual design projects.
Steps for Manual Transfer via PC (Windows):
- Copy from Android to PC: Connect your Android phone to your Windows PC using a USB cable. Open “This PC” (or “My Computer”), locate your Android device, and access its internal storage. Navigate to the “DCIM” folder (or any other folder where your photos are stored) and copy all desired images and videos to a new folder on your PC.
- Sync from PC to iPhone using Apple Devices App/iTunes:
- Disconnect your Android and connect your iPhone to the PC via USB.
- Open the “Apple Devices” app (for Windows 10/11) or “iTunes” (for older Windows versions). If you don’t have it, download it from the Microsoft Store.
- Select your iPhone device icon within the application.
- Go to the “Photos” tab on the left-hand menu.
- Check the “Sync Photos” box. Choose the folder on your PC where you saved your Android photos. You can select to sync “All folders” or “Selected folders” and whether to “Include videos.”
- Click “Apply” or “Sync” at the bottom right to begin transferring photos to your iPhone.
- Important Note from Tophinhanhdep.com: Be aware that syncing photos from a computer can remove existing synced photos on your iPhone that originated from other computer libraries. Photos taken directly on your iPhone will not be affected. Review your iPhone’s photo library if you have existing synced content before proceeding.
Steps for Manual Transfer via Mac:
- Copy from Android to Mac: Connect your Android phone to your Mac. If it’s your first time, you might need to install “Android File Transfer” (downloadable from android.com/filetransfer). Launch the app, navigate to your Android’s photo folders (e.g., DCIM), and drag and drop your desired photos and videos to a folder on your Mac.
- Sync from Mac to iPhone using Finder/iTunes:
- Disconnect your Android and connect your iPhone to your Mac via USB.
- Open “Finder” (macOS Catalina or later) or “iTunes” (older macOS versions).
- Select your iPhone in the sidebar of Finder (or iTunes).
- Click on the “Photos” tab.
- Check the “Sync Photos” box and choose the folder on your Mac where you stored the Android photos. Configure options like “All photos and albums” or “Selected albums” and “Include videos.”
- Click “Apply” or “Sync” to start transferring your images to the iPhone.
- Tophinhanhdep.com Reminder: Similar to Windows, syncing photos can potentially replace previously synced photo libraries on your iPhone. Always review before confirming the sync if you have existing synced photo content.
These diverse methods provide robust options for ensuring your valuable collections of images, ranging from abstract art to thematic photo ideas, are safely and efficiently moved to your new iPhone, upholding the quality essential for beautiful photography and visual design.
Method 7: Sending Selected Images via Email
For transferring a small selection of images, the simplest method remains the venerable email. Tophinhanhdep.com recognizes this as a quick-fix image tool for when you only need a handful of photos—perhaps an urgent aesthetic wallpaper or a specific sad/emotional photograph to share immediately. While not suitable for large collections, its universality makes it incredibly convenient.
Steps to Send Images via Email:
- Select and Share on Android: On your Android device, open your “Photos” or “Gallery” app. Long-press on an image to select it, then tap on any other photos you wish to send.
- Choose Email: Tap the “Share” icon (usually a sideways V or three connected dots). From the sharing options, select your preferred email app (e.g., Gmail, Outlook, default Email app).
- Send to Yourself: Enter your own email address in the “To” field and hit “Send.” Be mindful of attachment size limits (e.g., Gmail limits to 25MB per email), which may restrict the number of high-resolution images you can send at once.
- Access and Save on iPhone: On your iPhone, open the “Mail” app and access the email you just sent to yourself. Open the email and tap on the image attachments. Long-press on an image or tap the share icon, then select “Save Image” or “Save Images” (if multiple) to download them to your iPhone’s Photos app.
This method is quick and easy for minimal transfers, perfectly suited for those moments when a specific image inspiration or a single piece of digital art needs to be moved without delay.
Tophinhanhdep.com’s Pro Tips for a Smooth Image Transition
Moving your precious image collection from Android to iPhone after setup doesn’t have to be a source of stress. Tophinhanhdep.com, with its expertise in digital photography, visual design, and image tools, provides these pro tips to ensure a seamless and successful transfer of your photos, whether they are high-resolution aesthetic shots, cherished family moments, or abstract art for inspiration.
- Ensure Sufficient iPhone Storage: Before initiating any transfer, especially of large photo albums or collections of high-resolution digital photography, always verify that your iPhone has ample free storage space. Nothing halts a transfer faster than hitting a storage limit. This is crucial for migrating extensive photo ideas and thematic collections.
- Verify Device Compatibility: While most modern Android and iPhones are compatible with the described transfer methods, it’s wise to ensure your specific device models and operating system versions are supported by the chosen transfer app or service. Tophinhanhdep.com always advocates for checking system requirements.
- Maintain a Strong Wi-Fi Connection for Wireless Transfers: When utilizing cloud services (like Google Photos, Dropbox, Google Drive) or dedicated wireless apps (like MobileTrans, Move to iOS), a strong, stable Wi-Fi connection is paramount. Avoid using mobile data for large transfers, as it can be slower and costly, potentially leading to interruptions. This ensures your beautiful photography and visual assets transfer efficiently.
- Choose the Right Third-Party Software Thoughtfully: Not all image tools are created equal. Tophinhanhdep.com recommends selecting reputable, reliable third-party software that guarantees data integrity and ease of use. Research and reviews can guide you towards the best option for your specific needs, ensuring your graphic design files or digital art pieces are handled with care.
- Check App Functionality Beforehand: If using an app like “Move to iOS” (with an iPhone reset) or MobileTrans, ensure the app is updated to its latest version and functioning correctly on both devices before starting the transfer. A quick test with a few non-critical images can save headaches later.
- Back Up Your Android Device First: As a fail-safe, Tophinhanhdep.com always advises performing a full backup of your Android device before beginning any major data transfer. This ensures that even in the unlikely event of data loss during the transition, your original photos, including all your wallpapers, backgrounds, and image inspiration, are safe.
- Keep Devices Charged: Ensure both your Android and iPhone are sufficiently charged, or ideally, plugged into a power source throughout the transfer process. An unexpected power-off can corrupt data and halt the transfer.
- Organize Photos on Android Before Transfer: If you have specific photo ideas or thematic collections, consider organizing them into folders on your Android before the transfer. Some tools may preserve this structure, making post-transfer organization on your iPhone easier for your visual design workflows.
Being mindful of these pro tips will significantly smooth out the image transfer process, allowing you to fully enjoy your new iPhone with all your cherished visual memories and digital photography intact. Tophinhanhdep.com is dedicated to helping you manage your visual content with confidence and ease.
Conclusion
Navigating the journey of transferring your invaluable image collection from an Android device to a new iPhone, especially after initial setup, can seem intricate. However, as this comprehensive Tophinhanhdep.com guide has illustrated, a plethora of effective and secure methods are available to ensure your beautiful photography, aesthetic wallpapers, abstract art, and emotional visual memories make a seamless transition.
From robust dedicated applications like MobileTrans, which Tophinhanhdep.com often highlights as a premier image tool for its versatility and security, to the convenience of cloud services such as Google Photos, Dropbox, and Google Drive, you have multiple avenues to explore. Even traditional computer-aided transfers offer meticulous control over your high-resolution images and digital photography assets. While the “Move to iOS” app presents a direct route for new iPhone setups, Tophinhanhdep.com has provided alternatives for those who have already configured their devices.
Ultimately, the best method for you will depend on the volume of your image collection, your comfort with cloud platforms, and your willingness to potentially reset your iPhone. Regardless of your choice, the key is to prioritize data integrity and follow the steps carefully. Tophinhanhdep.com’s pro tips serve as a final layer of guidance, ensuring you prepare adequately and execute the transfer flawlessly, preserving every detail of your visual inspiration and collections.
Tophinhanhdep.com is committed to empowering you with the knowledge and resources to manage all your visual content with confidence. With these methods, you can successfully transfer your digital photography, visual design elements, and cherished image collections to your new iPhone, allowing you to continue capturing, creating, and enjoying stunning visuals without missing a beat.