How to Transfer Images to iPhone: A Comprehensive Guide

Acquiring a new iPhone is an exciting moment, full of anticipation for new features and a seamless user experience. However, this excitement often comes with a common challenge: transferring all your cherished memories—thousands of photos and videos—from your old device to its shiny, new successor. Whether you’ve just unboxed the latest iPhone model, are upgrading from an older generation, or simply wish to share a collection of stunning visuals with friends and family, ensuring your precious images make the leap safely and efficiently is paramount.
In an age where our smartphones serve as our primary cameras, capturing nearly two trillion photos annually, the volume of personal photography stored on our devices is immense. The thought of manually moving each image can be daunting, but thankfully, Apple and various third-party solutions offer a multitude of methods to streamline this process. From integrated wireless options to robust desktop applications and cloud services, transferring your photo library has never been easier. This comprehensive guide, brought to you by Tophinhanhdep.com, will walk you through the most effective ways to transfer photos from one iPhone to another, ensuring not a single memory is left behind. We’ll explore both Apple’s native tools and highlight how Tophinhanhdep.com can further enhance your visual journey, helping you not only transfer but also manage, beautify, and find inspiration for your images.

Leveraging Apple’s Integrated Solutions for Seamless Photo Transfers
Apple has designed its ecosystem with user convenience in mind, offering several built-in features that simplify the process of moving data, including vast photo libraries, between iPhones. These methods are often the first port of call for users due to their native integration and straightforward nature.
Quick Start: Effortless Device-to-Device Migration
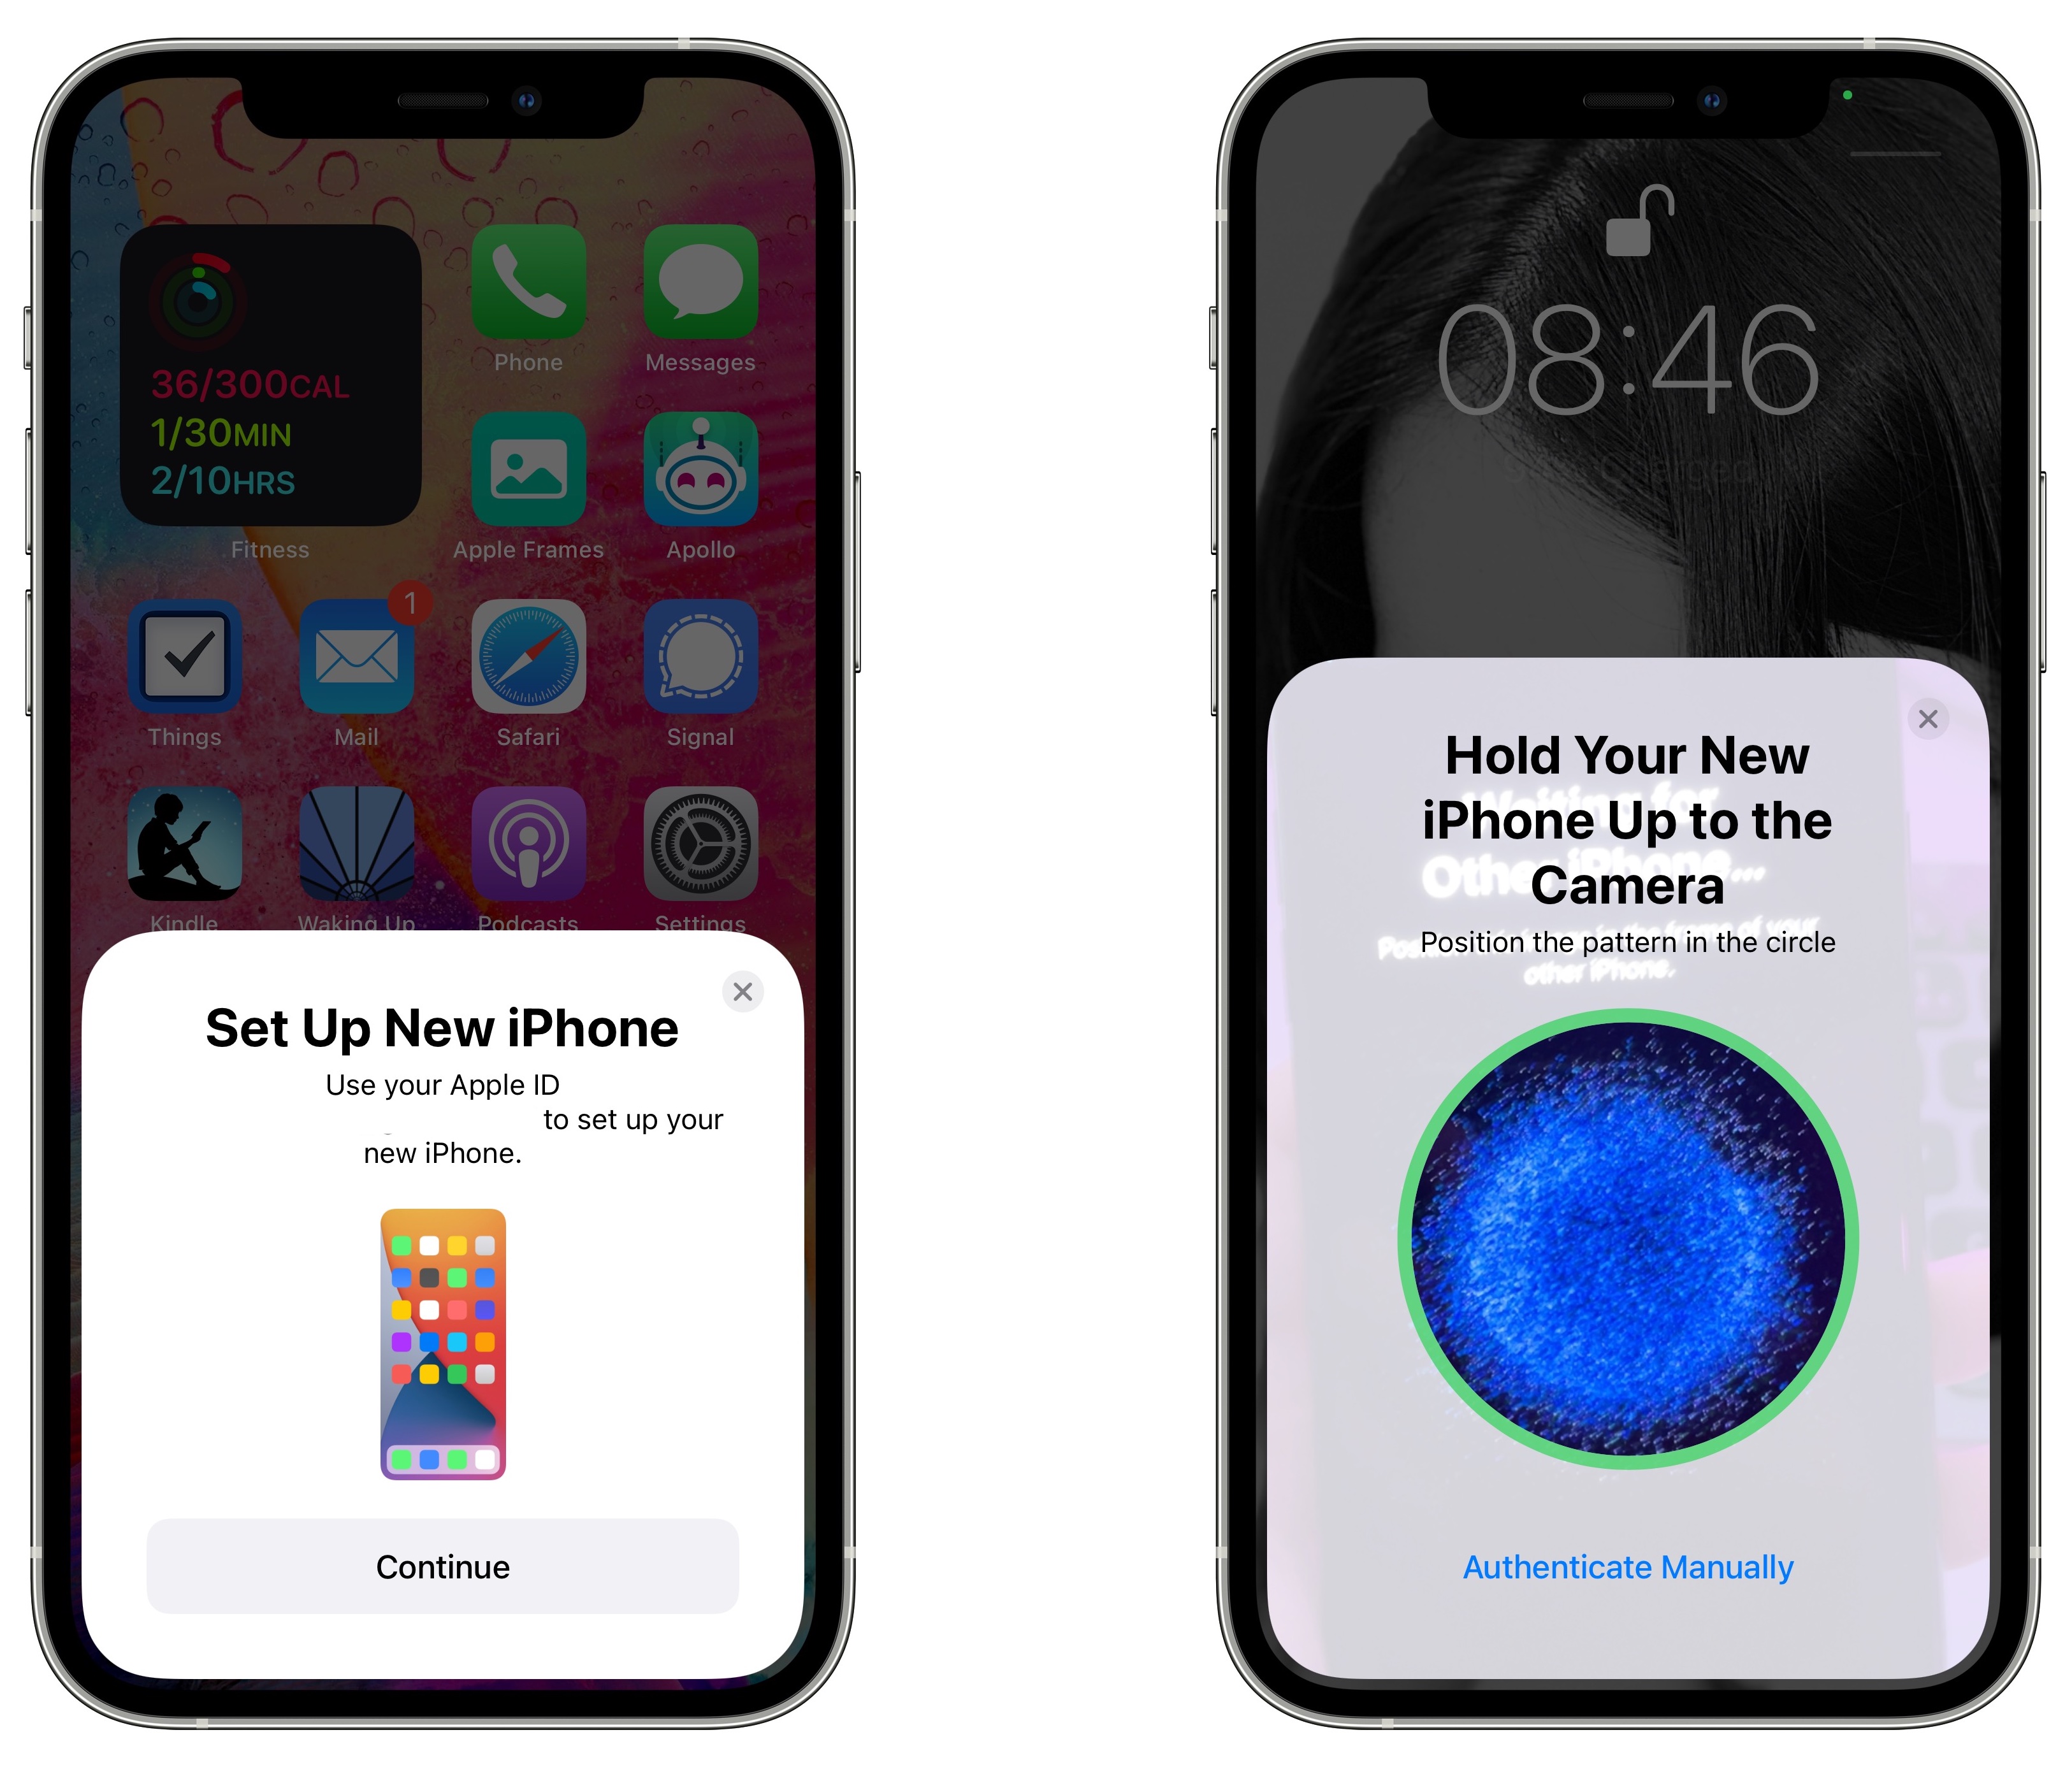
For anyone setting up a brand-new iPhone, Quick Start is arguably the most convenient and powerful option for transferring all your data, including your entire photo library, directly from your old iPhone. Introduced with iOS 11, Quick Start facilitates a wireless, direct migration, saving you the hassle of intermediary steps involving a computer or extensive cloud syncing. This method is ideal when you have both your old and new iPhones physically present and charged.
How Quick Start Works:
- Preparation: Ensure both your old iPhone (running iOS 12.4 or later) and your new iPhone are plugged into a power source to prevent battery drainage during the transfer. Turn on your new iPhone and place it near your current one.
- Initiate Quick Start: The “Quick Start” screen will automatically appear on your old iPhone, prompting you to set up your new device using your Apple ID. Confirm the Apple ID is correct and tap “Continue.”
- Visual Pairing: An animation will appear on your new iPhone. Hold your old iPhone over the new one, aligning the camera’s viewfinder with the animation. This establishes a secure connection between the two devices.
- Authentication: When prompted, enter your current iPhone’s passcode on your new iPhone.
- Setup and Transfer: Follow the on-screen instructions to set up features like Face ID or Touch ID on your new device. Crucially, when you reach the “Transfer Your Data” screen, select “Transfer from iPhone” to begin the direct data migration. You may also be asked to transfer other settings like Apple Pay or Siri.
- Completion: Keep both iPhones near each other and connected to power until the transfer process is complete. The duration varies depending on the amount of data, but Apple provides an estimated time on screen.
![]()
Wired Quick Start for Faster Transfers: If your wireless network is slow or you prefer maximum speed, Quick Start can also be performed via a wired connection. You’ll need a Lightning to USB 3 Camera Adapter for your old iPhone and a Lightning to USB Cable for your new iPhone. Connect the adapter to your old iPhone, then plug one end of the Lightning to USB Cable into your new iPhone and the other end into the adapter. Once physically connected, follow the same Quick Start steps outlined above. This method ensures a swift and robust transfer, especially for very large photo libraries.
AirDrop: Swift Sharing for Smaller Collections
When you only need to transfer a handful of photos, or share a select album with another nearby Apple user, AirDrop is an indispensable and incredibly convenient feature. It uses Wi-Fi and Bluetooth to create a direct, secure connection between devices, allowing for quick, high-quality transfers without consuming cellular data or requiring cloud uploads. While excellent for small to medium batches, AirDrop becomes less practical for transferring thousands of photos due to the need for continuous oversight.
Requirements for AirDrop:
- Both iPhones must be iPhone 5 or later, running iOS 7 or newer.
- Both devices need Wi-Fi and Bluetooth turned on.
- They must be within Bluetooth range of each other.
- Personal Hotspot must be turned off on both devices.
How to Use AirDrop:
- Enable AirDrop on Both iPhones:
- Swipe down from the top-right corner of the screen (or swipe up from the bottom for older iPhones) to open Control Center.
- Press and hold the network settings card (top-left box) to expand it.
- Tap the “AirDrop” icon and choose either “Contacts Only” (if the recipient is in your contacts) or “Everyone” for 10 minutes (for temporary sharing with anyone nearby). Repeat this on both the sending and receiving iPhones.
- Select Photos to Share: Open the Photos app on the sending iPhone. Tap “Select” in the top-right corner, then tap on all the photos you wish to transfer.
- Initiate AirDrop: Tap the “Share” icon (a square with an arrow pointing upwards) at the bottom-left of the screen. The AirDrop option will appear at the top, showing nearby AirDrop-enabled devices.
- Choose Recipient: Tap the icon of the receiving iPhone.
- Accept Transfer: On the receiving iPhone, a pop-up will appear asking if you want to accept the incoming photos. Tap “Accept.” The photos will then appear in the Photos app on the new iPhone.
iCloud: Cloud-Based Syncing and Backup
iCloud Photo Library is Apple’s cloud-based solution for seamlessly syncing your entire photo and video collection across all your Apple devices linked to the same Apple ID. It’s an excellent method for ensuring your photos are always accessible and automatically backed up, making it a powerful tool for transferring photos to a new iPhone. When you enable iCloud Photos on your new device, your entire library, once uploaded from your old device, will begin to download.
Key Considerations for iCloud:
- Storage: Apple provides 5GB of free iCloud storage. For extensive photo libraries, you will likely need to upgrade to a paid iCloud+ plan.
- Internet Connection: A stable Wi-Fi connection is required for uploading and downloading photos to and from iCloud. Fast internet significantly speeds up the process.
- Apple ID: Both devices must be signed in with the same Apple ID.
- iOS Version: Ensure both devices are running iOS 8.3 or later.
How to Transfer Using iCloud Photos:
- Enable iCloud Photos on Old iPhone:
- Go to “Settings” > Tap on your Name (Apple ID banner) > “iCloud” > “Photos.”
- Toggle on “iCloud Photos.”
- Choose your desired photo quality setting: “Optimize iPhone Storage” (saves space by storing full-resolution originals in iCloud and device-optimized versions on your phone) or “Download and Keep Originals” (stores full-resolution versions on both iCloud and your device, requiring more device storage).
- Your iPhone will begin uploading your photo library to iCloud. This process can take a considerable amount of time depending on your library size and internet speed.
- Enable iCloud Photos on New iPhone:
- Once your old iPhone has finished uploading, sign in to your new iPhone with the same Apple ID.
- Go to “Settings” > Tap on your Name > “iCloud” > “Photos.”
- Toggle on “iCloud Photos” and choose your preferred quality setting.
- Your new iPhone will begin downloading your entire photo library from iCloud to the Photos app.
Restoring from an iCloud Backup during Setup: If you haven’t manually synced photos via iCloud Photos but have a general iCloud backup enabled, you can also restore your new iPhone from this backup during the initial setup. After powering on your new iPhone and selecting your language/Wi-Fi, choose “Restore from iCloud Backup” on the “Apps & Data” screen. This will restore not just your photos, but all your apps, data, and settings as they were at the time of the backup.
iTunes/Finder: Traditional Backup and Restore
Before the advent of direct device-to-device transfers and robust cloud syncing, iTunes (and now Finder on macOS Catalina and later) was the primary method for backing up and restoring iPhone data. This method involves using a computer as an intermediary to first back up photos from your old iPhone, and then transfer them to your new one. It offers a reliable local backup, independent of internet speed for the transfer itself (once the backup is made).
Important Considerations:
- Data Overwrite: Syncing photos from a computer can overwrite your existing photo library on the receiving iPhone, especially if iCloud Photos is enabled on that device. It’s crucial to understand these implications and back up your new iPhone if it already contains important photos.
- App Compatibility: For Windows users, the “Apple Devices” app (from Microsoft Store) is now often used instead of iTunes for managing devices on Windows 10/11. Older Windows versions or macOS Mojave (or earlier) still use iTunes.
Step 1: Transfer Photos from Old iPhone to Computer
- Mac (macOS Catalina or later - using Finder):
- Connect your old iPhone to your Mac via USB cable.
- Open Finder, select your iPhone from the sidebar under “Locations.”
- Click “Trust” on both devices if prompted.
- In the Finder window, click “General,” then “Back Up Now” to create a full backup. (To import just photos, open the Photos app, select your device, and click “Import All New Items” or “Import Selected”).
- Mac (macOS Mojave or earlier - using iTunes):
- Connect your old iPhone to your Mac via USB cable.
- Launch iTunes, click the device icon.
- In the “Summary” tab, click “Back Up Now.”
- Windows PC (Apple Devices app/iTunes):
- Connect your old iPhone to your PC via USB cable.
- If the AutoPlay window appears, select “Import Pictures and Videos.” Choose a destination folder and click “Import.”
- Alternatively, use the “Apple Devices” app (Windows 10/11) or iTunes (older Windows versions). Open the app, select your device, and follow prompts to import photos or create a full backup.
Step 2: Transfer Photos from Computer to New iPhone
- Mac (macOS Catalina or later - using Finder):
- Connect your new iPhone to your Mac via USB cable.
- Open Finder, select your iPhone.
- Go to the “Photos” tab.
- Check “Sync photos to your device from:” and choose the application (e.g., Photos app) or the specific folder on your computer where you saved the photos.
- Click “Apply.”
- Mac (macOS Mojave or earlier - using iTunes):
- Connect your new iPhone to your Mac via USB cable.
- Launch iTunes, click the device icon.
- Go to the “Photos” tab.
- Check “Sync Photos” and choose the application or folder on your computer.
- Click “Apply.”
- Windows PC (Apple Devices app/iTunes):
- Connect your new iPhone to your PC via USB cable.
- Launch the “Apple Devices” app or iTunes, click the device icon.
- Go to the “Photos” tab.
- Check “Sync photos onto your device from:” (Apple Devices app) or “Sync Photos” (iTunes) and select the folder where you saved your photos.
- Click “Apply.”
This method ensures a complete transfer of selected photos, although it can be a multi-step process.
Advanced Tools for Comprehensive Image Management
While Apple’s native tools are highly effective, some users may seek more granular control, faster bulk transfers, or features that operate independently of cloud services. This is where third-party software and alternative methods come into play, offering robust solutions for even the most extensive photo libraries. Tophinhanhdep.com, as a hub for all things visual, recommends exploring these options for enhanced flexibility and power.
Tophinhanhdep.com’s Preferred Solutions for Bulk Transfers
For users looking for powerful, dedicated software to manage and transfer their iPhone photos, Tophinhanhdep.com recognizes the value of specialized tools. Such software often excels in speed, offers more control over which specific files are moved, and can handle massive volumes of data with ease, often without relying on internet connectivity once installed on your computer.
While specific software names are beyond the scope of this general guide, Tophinhanhdep.com recommends looking for reputable desktop applications that allow you to:
- Directly Connect Both iPhones: Many advanced tools allow you to connect both your old and new iPhones to your computer simultaneously. This eliminates the need for an intermediate step of saving to your computer first, streamlining the transfer.
- Select Specific Photo Albums or Categories: Instead of a full backup, these tools often present your photo library in a clear, browsable interface, allowing you to select entire albums, specific dates, or even just photos from your Camera Roll, WhatsApp chats, or other app-specific image folders.
- One-Click Transfer Options: For those who need to move everything, many of these programs include a “phone switcher” or “one-click transfer” feature that intelligently migrates all your photos, videos, messages, contacts, and other data types from your old device to the new one with minimal user input.
- Offline Operation: A significant advantage of desktop software is its ability to operate largely offline. Once the software is downloaded and installed, the data transfer between your iPhones (via your computer) does not depend on your internet speed, making it reliable for very large transfers.
- Manage Other Data Types: Beyond photos, these tools often offer comprehensive iPhone management, allowing you to copy music, videos, messages, contacts, call logs, and even apps, providing an all-in-one solution for new iPhone setup.
General Steps for Using Tophinhanhdep.com’s Recommended Software (Conceptual):
- Download and Install: Visit Tophinhanhdep.com and find our recommended software for iPhone data transfer. Download and install it on your PC or Mac.
- Connect Devices: Launch the software and connect both your old and new iPhones to your computer using USB cables. The software will detect both devices.
- Select Transfer Option: Look for a “Phone to Phone Transfer,” “Data Migration,” or similar option within the software’s interface.
- Choose Data Type: Specify that you want to transfer “Photos” (and any other data like videos, messages, etc.). You may be able to preview and select specific albums or choose to transfer your entire photo library.
- Initiate Transfer: Confirm the source and target devices, then click “Transfer” or “Start.” The software will handle the migration, often with progress indicators.
- Verify: Once complete, disconnect your iPhones and check your new device to ensure all photos have been successfully transferred.
This approach offers unparalleled control and efficiency, especially for users with extensive digital media collections.
Email: A Last Resort for Minimal Transfers
While highly inefficient for bulk transfers, email remains a universally accessible method for sending a very small number of photos (typically just one or two) when no other option is readily available or feasible. It’s a straightforward approach for quick, individual shares.
Limitations:
- Attachment Size: Email providers often have limits on attachment size, making it impractical for high-resolution images or multiple photos.
- Time-Consuming: Attaching and downloading photos one by one (or in small batches) is very slow for any significant quantity.
- Quality Loss: Some email clients may automatically compress images, leading to a reduction in quality.
How to Use Email for Photo Transfer:
- Compose Email on Old iPhone:
- Open the Photos app and select the single photo (or very few photos) you wish to transfer.
- Tap the “Share” icon.
- Choose the “Mail” app from the sharing options.
- Compose an email to yourself (enter your own email address as the recipient).
- Attach the selected photos.
- Tap “Send.”
- Retrieve Photos on New iPhone:
- Open the Mail app on your new iPhone.
- Access your inbox (or the “Sent” folder if you sent it to yourself).
- Open the email you just sent.
- Tap and hold on each photo attachment, then select “Save Image” to download it to your Photos app.
This method is best reserved for emergencies or when only one or two quick images need to be moved.
Maximizing Your iPhone’s Visual Potential with Tophinhanhdep.com
Beyond the technicalities of transferring images, Tophinhanhdep.com serves as your ultimate resource for everything related to visual content. Once your photos are safely on your new iPhone, the journey of visual exploration and enhancement truly begins. Our platform extends far beyond simple transfers, offering a rich ecosystem designed to help you curate, optimize, and draw inspiration from the world of images.
Curating Your Visual Library
With your vast collection of images now residing on your new iPhone, the next step is often to organize and integrate them into your daily life. Tophinhanhdep.com provides a wealth of resources that directly complement your personal photo library:
- Wallpapers and Backgrounds: Your transferred photos can serve as deeply personal wallpapers, but Tophinhanhdep.com also offers an extensive collection of high-quality wallpapers and backgrounds across various styles – from Aesthetic and Nature to Abstract and Sad/Emotional. Explore these to give your new iPhone a fresh look that resonates with your mood or preferences.
- Thematic Collections: Use your personal photos alongside our curated Thematic Collections to create mood boards or visual narratives on your device. Whether you’re looking for serene landscapes or vibrant cityscapes, our collections provide diverse options to categorize and appreciate your images.
Elevating Your Photography and Design
Your iPhone is a powerful photographic tool, and the images you transfer represent a snapshot of your life’s captured moments. Tophinhanhdep.com helps you take these images further:
- High-Resolution Photography: Many of the photos you transfer are likely high-resolution. Tophinhanhdep.com celebrates High Resolution photography and offers tips on maintaining image quality. We also provide access to Stock Photos and discussions around Digital Photography techniques to inspire your next great shot.
- Editing Styles: Whether your transferred photos need a subtle tweak or a dramatic transformation, Tophinhanhdep.com covers various Editing Styles. Learn how to enhance colors, adjust lighting, or apply artistic filters to make your images truly pop.
- Image Tools for Optimization: To ensure your photos look their best and are manageable on your device or for sharing, explore Tophinhanhdep.com’s range of Image Tools. Our resources guide you through using Converters to change file formats, Compressors to reduce file size without significant quality loss, and Optimizers to fine-tune images for web or device display. For older or lower-resolution photos you’ve transferred, our recommended AI Upscalers can magically enhance their detail and clarity. We even touch upon Image-to-Text tools for extracting information from your visual content.
- Visual Design and Creative Ideas: Your photos are raw material for Visual Design. Learn about Graphic Design principles, delve into Digital Art techniques, or experiment with Photo Manipulation to create something entirely new from your existing images. Tophinhanhdep.com is a wellspring of Creative Ideas to help you transform your personal photos into works of art.
Finding Inspiration and New Ideas
With your entire photo history in hand, it’s a perfect time to reflect and plan future photographic endeavors. Tophinhanhdep.com is dedicated to fueling your creative spark:
- Photo Ideas and Mood Boards: Browse our sections on Photo Ideas to discover new subjects, compositions, and themes. Use your transferred photos as a starting point for Mood Boards that define your next creative project or personal aesthetic.
- Trending Styles: Stay abreast of the latest Trending Styles in photography and visual design. Whether it’s a popular color palette, a new compositional trick, or an emerging aesthetic, Tophinhanhdep.com keeps you informed, helping you apply these trends to your own photography.
By integrating the practical task of transferring images with the vast resources available on Tophinhanhdep.com, you don’t just move your memories; you unlock their full potential, ensuring your new iPhone becomes a canvas for continued visual creativity and enjoyment.
Conclusion
The journey of upgrading to a new iPhone is not merely about acquiring a device; it’s about seamlessly transitioning your digital life, with your cherished memories being at the forefront. As we’ve explored, the methods for transferring images from your old iPhone to a new one are diverse and accessible, catering to every need and comfort level. From Apple’s intuitive Quick Start and efficient AirDrop for direct wireless transfers, to the robust cloud-syncing capabilities of iCloud, and the reliable local backups offered by iTunes and Finder, you have a wealth of native options at your disposal. For those seeking enhanced control, faster bulk transfers, or features that operate independently of cloud services, Tophinhanhdep.com champions the use of specialized third-party software, which often provides powerful, one-click solutions for comprehensive data migration. Even the simplest method, email, serves as a last resort for very small, urgent transfers.
No matter which path you choose, the goal is the same: to ensure that your invaluable collection of photos, capturing moments big and small, makes the leap safely to your new device. Once transferred, the utility of Tophinhanhdep.com truly comes into its own. Our platform goes beyond the mere act of transfer, empowering you to manage, optimize, and draw inspiration from your visual assets. Explore our extensive collections of wallpapers, delve into photography tips and editing styles, leverage our image tools for conversion and optimization, and immerse yourself in the world of visual design and creative ideas.
In a world overflowing with imagery, Tophinhanhdep.com is your trusted partner for navigating the visual landscape. So, go ahead, transfer those images, and then let us help you transform your new iPhone into a vibrant hub of creativity and visual delight. Your memories are safe, and your visual journey is just beginning.