How to Turn an Image into a JPEG: Your Comprehensive Guide with Tophinhanhdep.com

In today’s visually driven digital world, images are everywhere – from cherished personal photographs to professional graphics and inspiring digital art. However, a common challenge many users face is the need to convert an image file from one format to another, especially to the ubiquitous JPEG. Whether you’re trying to upload a photo to a website, share it on social media, or integrate it into a design project, you’ve likely encountered the frustrating message: “This file format is not supported.” Often, the solution is to convert your image to a JPEG or JPG file.

At Tophinhanhdep.com, we understand the importance of seamless image management and creative freedom. Our platform is dedicated to providing high-quality visual content, from stunning wallpapers and aesthetic backgrounds to resources for digital photography and graphic design. We also offer a suite of essential image tools, including powerful converters, compressors, and AI upscalers, all designed to enhance your visual experience. This comprehensive guide will walk you through various simple yet effective methods to convert almost any image into a JPEG, ensuring your visuals are always ready for their intended purpose. We’ll explore built-in software on different operating systems, popular third-party applications, and convenient online solutions, all while keeping in mind the balance between image quality and file size that is so crucial in digital imaging.
Understanding JPEG: The Universal Language of Digital Images
Before diving into the conversion processes, it’s beneficial to understand what a JPEG (or JPG) file is and why it holds such a prominent position in the digital landscape. JPEG stands for Joint Photographic Experts Group, the committee that created the standard in 1992. It is by far the most common file format for digital images, particularly photographs, and is universally supported across virtually all devices, software, and online platforms.
The primary reason for JPEG’s widespread adoption lies in its ingenious use of “lossy” compression. This compression algorithm works by selectively discarding certain image data that the human eye is less likely to perceive, allowing for a significant reduction in file size – often by a factor of 10:1 or more – with minimal noticeable degradation to the visual quality. This efficiency makes JPEGs ideal for web use, where smaller file sizes translate to faster loading times, and for storing large collections of photos on devices with limited storage. When you scroll through “Beautiful Photography” collections or browse “Nature” and “Abstract” images on Tophinhanhdep.com, a vast majority of those stunning visuals are likely in JPEG format, showcasing its capability to retain rich color information and detail within a compact package.
It’s worth noting that “JPEG” and “JPG” refer to the exact same file format. The only difference is historical: older versions of Windows operating systems required file extensions to be three characters long, leading to “.jpg” becoming standard. macOS and Linux systems, which didn’t have this restriction, often used “.jpeg”. Today, both extensions are interchangeable and widely recognized.
While JPEG excels in compressing complex photographic images with smooth color gradients, it does have limitations. Because of its lossy nature, repeated saving and re-editing of a JPEG can lead to a cumulative loss of quality. For images with sharp lines, text, or transparent backgrounds, other formats like PNG might be more suitable. However, for the vast majority of photographic and general image sharing needs, JPEG remains the undisputed champion for its excellent balance of “High Resolution” appearance and manageable file size. Understanding these characteristics helps you make informed decisions about when and why to convert your images to this versatile format, aligning perfectly with Tophinhanhdep.com’s goal of empowering users with comprehensive knowledge in “Digital Photography” and “Image Tools.”
Essential Methods for JPEG Conversion Across Platforms
Converting an image to JPEG doesn’t require advanced technical skills. Whether you’re using a desktop computer, a mobile device, or prefer cloud-based solutions, there’s a method tailored for you. At Tophinhanhdep.com, we advocate for accessible “Image Tools,” and these methods reflect that philosophy. Here’s a detailed look at the most effective ways to make the conversion.
Leveraging Online Converters for On-the-Go Conversion
In an increasingly mobile world, online image converters offer unparalleled convenience. This method is perfect for anyone needing to convert images quickly without installing any software, whether you’re on an Android device, an iPhone, an iPad, or even a public computer. Tophinhanhdep.com, among other reputable online platforms, provides robust “Converters” as part of its “Image Tools” suite.
Why use an online converter?
- Accessibility: Works on any device with a web browser and internet connection.
- No Installation: Avoids cluttering your device with additional software.
- Variety of Formats: Many online tools can handle a wide array of input formats, from common PNGs and GIFs to more specialized TIFFs and even RAW files (though RAW files might have size limitations online).
How to use an online converter:
- Choose a Web Converter: Start by searching online for “convert [your file type] to jpg online.” Tophinhanhdep.com recommends choosing a reputable site that clearly outlines its capabilities and privacy policy. Our “Image Tools” section offers direct links to reliable converters.
- Upload Your Image: On the chosen converter’s website, you’ll find a button usually labeled “Choose file,” “Upload,” or “Drag & Drop.” Click this and navigate to the image you wish to convert on your device. Be mindful of any maximum file size limits imposed by the service, especially for large “High Resolution” photos. If your image is already online, some converters also allow you to paste its URL directly.
- Verify Conversion Settings: Most converters will have a dropdown menu or clear option to select “JPEG” or “.JPG” as the output format. (Remember, these are interchangeable.) Some advanced tools, often found on platforms like Tophinhanhdep.com, might also allow you to adjust the output image’s “Quality” and “Resolution” at this stage, giving you control over the final file size.
- Convert and Download: Locate and click the “Convert” or “Save” button to initiate the process. Depending on the file size and your internet speed, this could take a few moments. Once complete, the converted JPEG will either download automatically to your device’s default downloads folder or prompt you to select a save location.
Important Considerations for Online Converters:
- Privacy: Always read the terms of service and privacy policy. Ensure the site deletes your uploaded images after conversion to protect your data.
- Internet Connection: For large image files, a stable Wi-Fi connection is highly recommended to avoid consuming your mobile data plan and to ensure faster processing.
- Functionality: While powerful, online tools are best suited for straightforward conversions. For extensive “Photo Manipulation” or fine-tuning, dedicated desktop software might offer more granular control.
Online converters are excellent for quickly transforming “Wallpapers” or “Backgrounds” into a web-friendly format for sharing, aligning with the “Image Inspiration & Collections” focus of Tophinhanhdep.com.
Native Conversion on Windows: Utilizing Paint
For Windows users, one of the simplest and most accessible ways to convert an image to JPEG is by using Microsoft Paint. This basic graphic editor comes pre-installed on every Windows PC, making it a readily available “Image Tool” without needing any downloads. It’s perfect for quick, straightforward conversions, particularly for users who aren’t looking for advanced editing capabilities.
How to use Paint to convert to JPEG:
- Open Paint:
- Press the Windows key + S to open the search bar.
- Type “paint” and click on “Paint” when it appears in the search results.
- This will open the application, which is available on Windows 10, Windows 11, and older versions.
- Open Your Image in Paint:
- Ensure the image you want to convert is saved on your computer.
- In Paint, click on the “File” menu (usually in the top-left corner).
- Select “Open.”
- Navigate to the location of your image, select it, and click “Open.” The image will now be displayed in the Paint window.
- Initiate “Save As” Function:
- Click on the “File” menu again.
- Hover your mouse over “Save As.” A submenu will appear showing various image file types.
- Select JPEG Picture:
- From the submenu, click on “JPEG picture.”
- A “Save As” dialog box will open, allowing you to specify details for your new JPEG file.
- Configure and Save:
- In the “Save As” dialog box, navigate to the folder where you want to save the converted image.
- (Optional) You can rename the file in the “File name” field.
- Crucially, ensure that “JPEG” or “JPEG (*.jpg, *.jpeg, *.jpe, *.jfif)” is selected in the “Save as type” dropdown menu.
- Click “Save.”
Your image has now been successfully converted and saved as a JPEG file. This method, while basic, is a reliable way for anyone to perform common “Image Conversion” tasks, making basic “Digital Photography” adjustments and sharing much easier.
Native Conversion on Mac: Harnessing Preview and Photos
Mac users have excellent built-in options for converting images to JPEG, namely the Preview app and, for iPhone/iPad photos, the Photos app. These integrated “Image Tools” offer seamless conversion capabilities, particularly useful when dealing with Apple’s proprietary HEIC format.
Using Preview on a Mac
Preview is the default application for viewing images and PDFs on macOS, but it’s also a surprisingly versatile tool for simple “Image Editing Styles” and conversions.
How to use Preview to convert to JPEG:
- Open Your Image with Preview:
- Locate the image file on your Mac.
- If Preview is your default image viewer (which it usually is), simply double-click the image.
- If not, right-click (or Ctrl-click) the image, select “Open With,” and then choose “Preview” from the list.
- The image must be stored on your computer for this method to work.
- Access the Export Function:
- Once the image is open in Preview, go to the “File” menu in the top-left corner of your screen.
- Select “Export” from the dropdown menu. A dialog box will appear.
- Change the Format to JPEG:
- In the export dialog box, find the “Format” dropdown menu.
- Select “JPEG” from the available options.
- You’ll typically see a “Quality” slider (from Least to Best) and sometimes a “Resolution” option. Adjusting these allows you to balance the image quality with the final file size. Higher quality means a larger file. This is crucial for retaining “High Resolution” for “Beautiful Photography.”
- Rename and Save:
- (Optional) You can rename your file in the “Export As” field. Ensure the new name ends with “.jpg” or “.jpeg” (case doesn’t matter).
- Choose a “Tags” if you wish for easier organization.
- Select the desired “Where” location (folder) to save your converted image.
- Click “Save.”
Your image is now converted to JPEG, and the original file remains untouched.
Converting HEIC to JPEG using the Photos App on Mac
For users who sync photos between their iPhone/iPad and Mac via iCloud, the Photos app provides a convenient way to convert HEIC (High-Efficiency Image Codec) files to JPEG. HEIC is Apple’s default format, known for its small file size, but it’s not universally compatible.
How to use Photos to convert HEIC to JPEG:
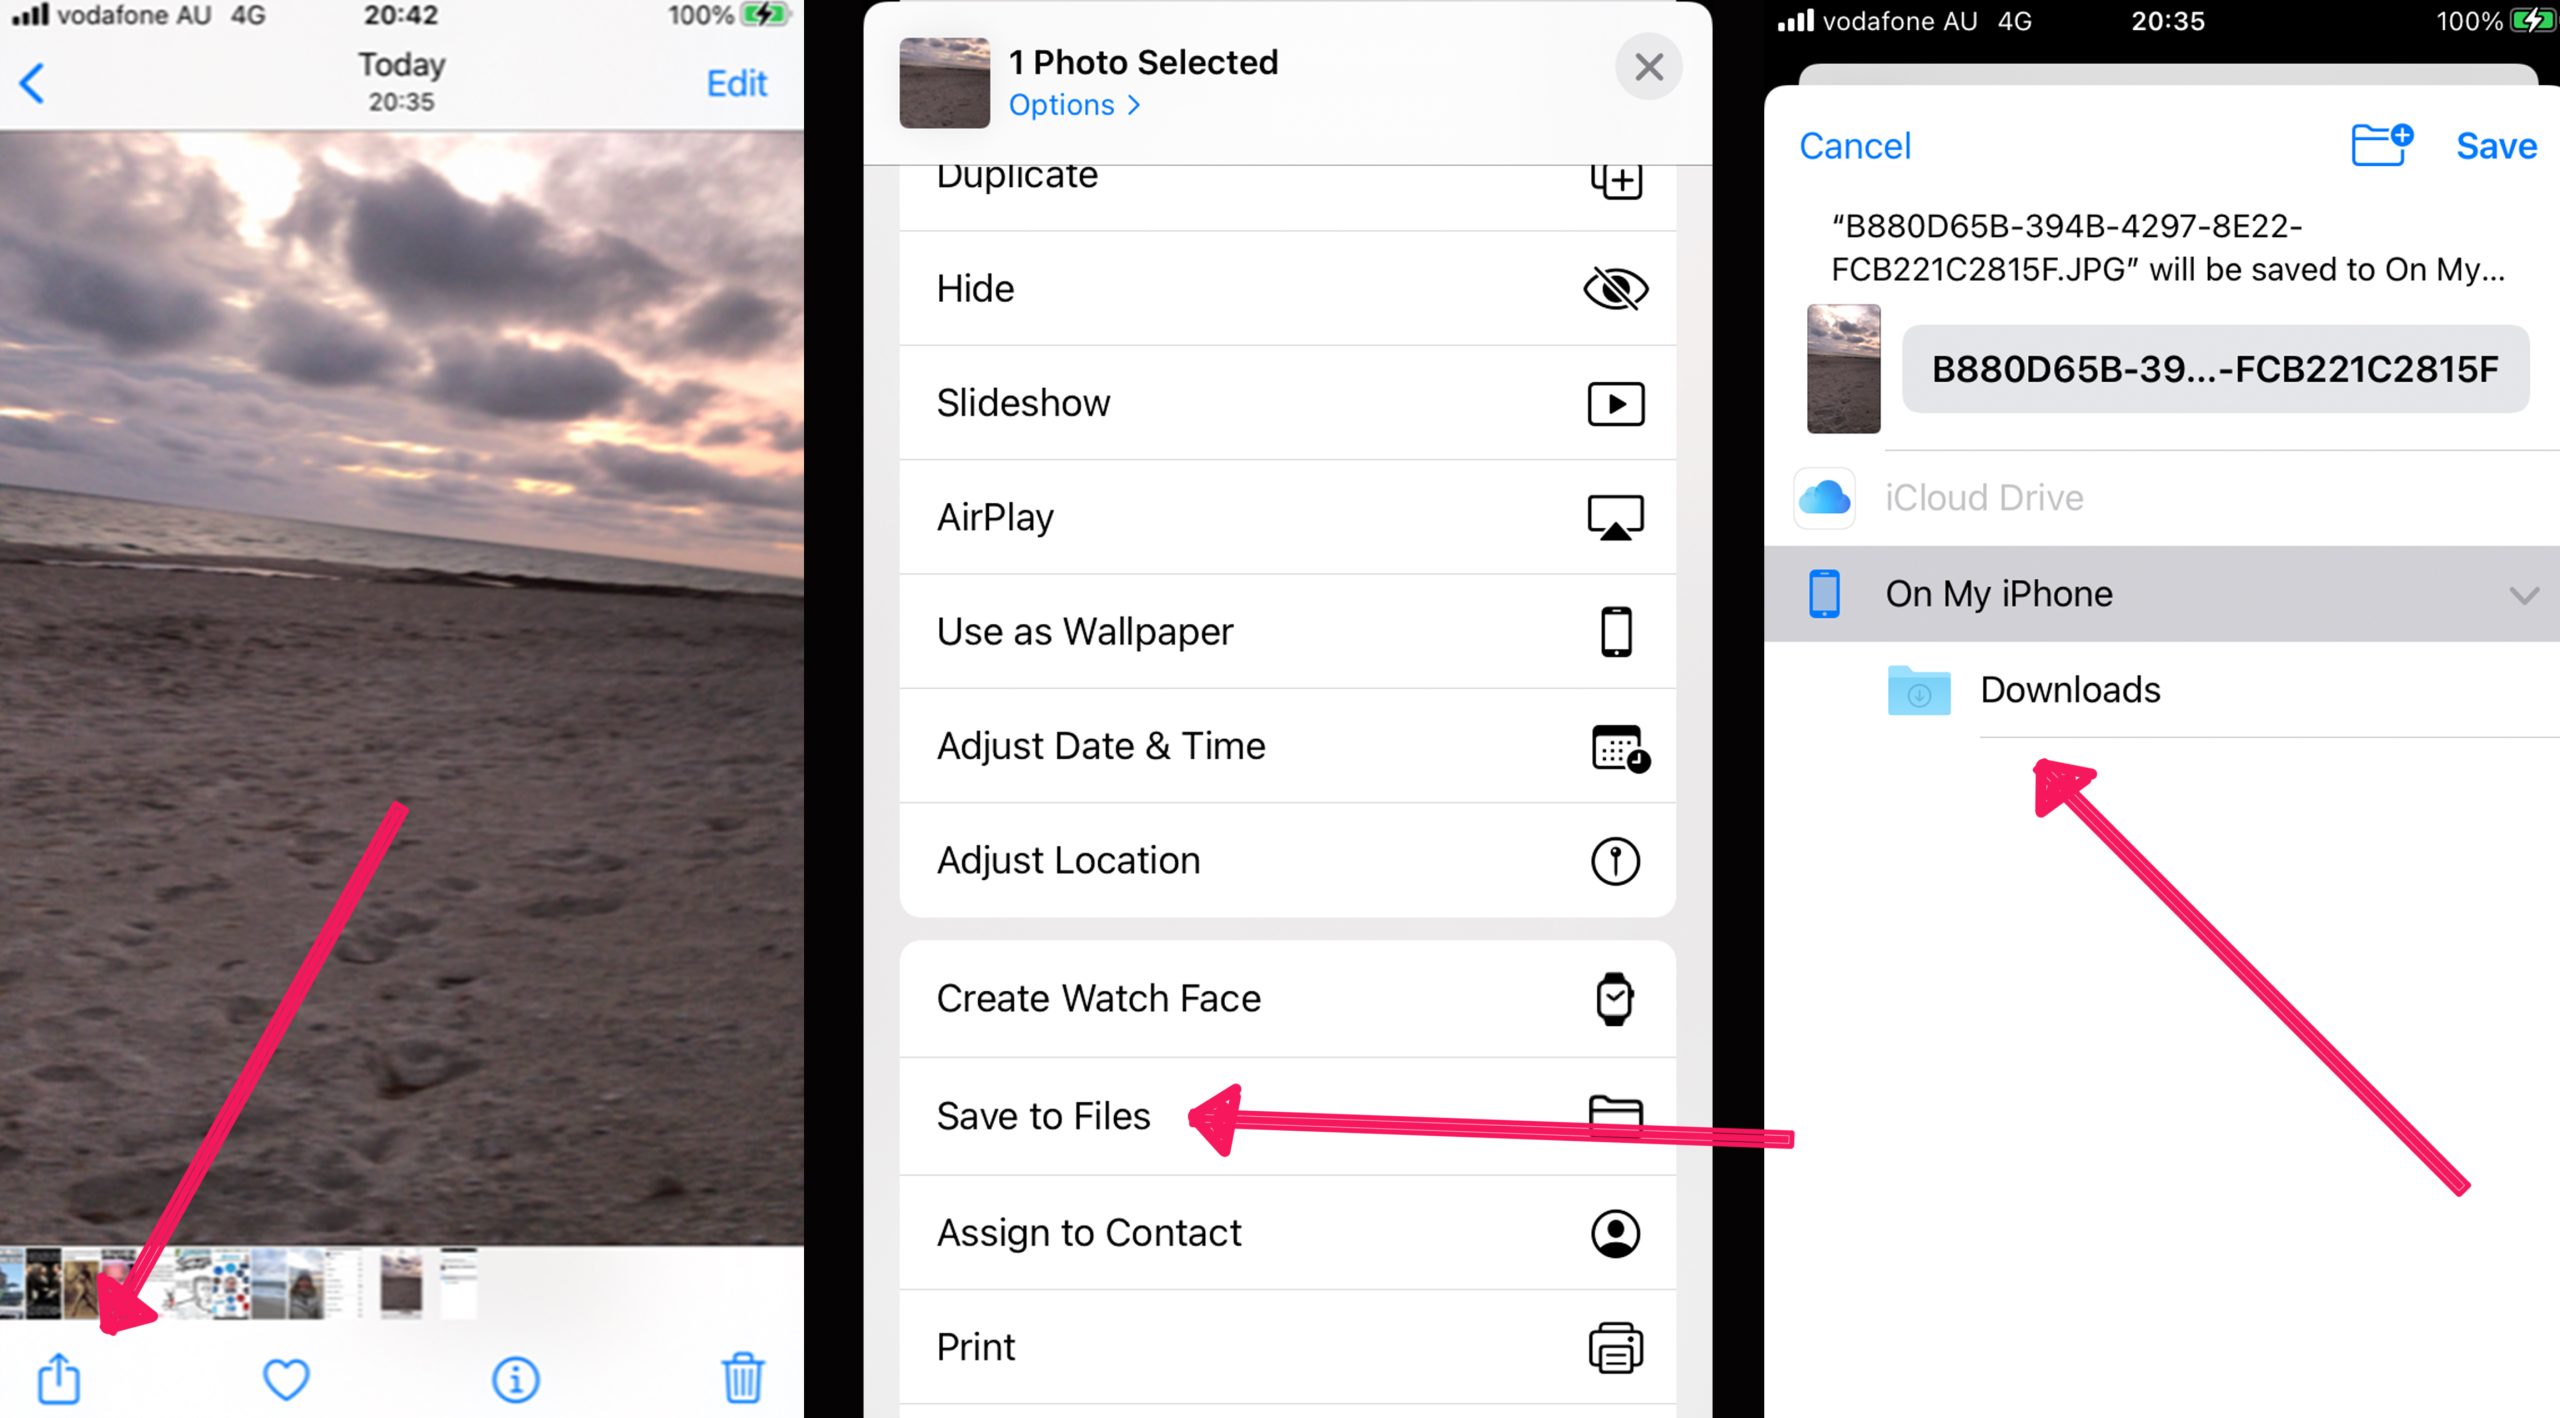
- Open Photos and Select Image:
- Launch the “Photos” application on your Mac.
- Select the HEIC image (or images) you wish to convert from your library.
- Export the Photo:
- Go to the “File” menu in the menu bar.
- Select “Export,” then choose “Export 1 Photo…” (or “Export [Number] Photos…”) from the pop-out menu.
- Choose JPEG as Photo Kind:
- In the export window, find the “Photo Kind” dropdown menu.
- Select “JPEG” as the desired format.
- You can also adjust other settings here, such as “JPEG Quality,” “Size,” and “File Naming” options, providing control over the “Editing Styles” and output.
- Export and Save:
- Click the “Export” button.
- In the subsequent window, choose the location where you want to save your converted JPEG image.
- Click “Export” again to finalize the process.
This method seamlessly integrates with your existing photo library, making it easy to prepare images for broader use or for use in “Visual Design” projects.
Advanced Conversion with GIMP: A Free and Powerful Alternative
When built-in tools aren’t sufficient, or you require more robust “Photo Manipulation” capabilities, the GNU Image Manipulation Program (GIMP) is an excellent free and open-source option. Available for PC, Mac, and Linux, GIMP is a powerful “Digital Art” and “Graphic Design” software that also excels at image conversion, especially for more obscure file types or when you need fine control over the output.
How to use GIMP to convert to JPEG:
- Get GIMP: If you don’t have it already, download and install GIMP from its official website. Tophinhanhdep.com often features guides on powerful free “Image Tools” like GIMP.
- Open the Image:
- Launch GIMP.
- Go to “File” > “Open.”
- Navigate to your image file, select it, and click “Open.”
- Access “Export As” Function:
- Unlike Paint or Preview, GIMP uses an “Export As” function for saving files in different formats.
- Go to “File” > “Export As.” A dialog box will appear.
- Choose JPEG File Type:
- In the “Export Image” dialog box, you can either directly type “.jpg” or “.jpeg” at the end of your filename, or click “Select File Type (By Extension)” at the bottom and choose “JPEG image” from the extensive list.
- Modify JPEG Options:
- After selecting JPEG, click “Export.” A new “Export Image as JPEG” dialog box will appear, offering detailed “Quality” settings.
- Enable “Show preview in image window” to see the impact of your quality adjustments in real-time.
- Adjust the “Quality” slider (typically from 0 to 100). Moving the slider to a higher value will increase image quality but also file size, and vice-versa. Find the sweet spot for your needs, balancing visual integrity for “Beautiful Photography” with efficient file size.
- You can also adjust advanced options like smoothing, chroma subsampling, and more for expert “Image Optimization.”
- Final Export:
- Click “Export” again.
- The dialog box will then ask you to choose a new file name and location. Give it a descriptive name if you wish, ensuring the “.jpg” extension remains intact.
- Select your preferred saving location and click “Save.”
GIMP provides a professional level of control over your JPEG output, making it an invaluable “Image Tool” for serious photographers and designers utilizing Tophinhanhdep.com for “Creative Ideas” and high-quality “Stock Photos.”
The Quick Fix: Changing File Extensions (Use with Caution)
Sometimes, the problem isn’t a different file format, but merely a mistaken file extension. For instance, if you have a JPEG file that was accidentally saved with a “.JGP” or even a “.TXT” extension, you can correct this without a full conversion process. However, this method comes with a significant caveat: it will not actually “convert” a non-JPEG image into a JPEG.
Understanding the limitation: This method is ONLY for fixing incorrect extensions on files that are already JPEGs internally. Attempting to rename a PNG, GIF, or TIFF file to .JPG will likely corrupt the file, making it unusable. Always confirm the actual file type before attempting this. At Tophinhanhdep.com, we emphasize safe “Image Management” practices.
Before you start:
- Backup: Always make a copy of your original image file before attempting this, in case something goes wrong.
- Original Extension: Note down the original file extension so you can revert if necessary.
- Case Sensitivity: File extensions are not case-sensitive (.JPG, .jpg, .JPEG, .jpeg are all recognized as the same format).
How to change a file extension (for actual JPEGs only):
- Find Your File: Locate the file on your desktop or within your file explorer (Finder on Mac, File Explorer on Windows).
- Make Filename Editable:
- On Mac: Click once on the image. Go to “File” > “Get Info.” In the “Name & Extension” section, uncheck “Hide Extension.” Click “Save.” Then, click the image once and press
⏎ Returnto edit the name. - On Windows: Right-click the image and select “Rename.”
- On Mac: Click once on the image. Go to “File” > “Get Info.” In the “Name & Extension” section, uncheck “Hide Extension.” Click “Save.” Then, click the image once and press
- Delete the Current Extension: Erase everything after the final period (
.) in the file name. - Type JPG/JPEG: After the period, type “jpg” or “jpeg” (e.g.,
image.jpg). - Confirm Change: Press
↵ Enteror⏎ Return. Both Mac and PC will display a warning about changing the file extension potentially making the file unusable. Click “Use .jpg” (Mac) or “Yes” (Windows) to confirm.
Your file name will now correctly end in .JPG, making it recognizable as a JPEG. This is a niche “Image Tool” trick for specific scenarios.
Optimizing Your JPEG Images for Web and Print
Converting an image to JPEG is often just the first step. For truly effective “Digital Photography” and “Visual Design,” understanding how to optimize your JPEGs is paramount. Optimization involves striking a balance between maintaining visual quality and reducing file size, ensuring your images load quickly on the web, look sharp in print, and don’t consume excessive storage. This practice is central to the “Image Optimizers” tools and “Creative Ideas” promoted by Tophinhanhdep.com.
Balancing Quality and File Size
As previously discussed, JPEG uses “lossy compression,” meaning some data is permanently discarded during the saving process. The degree of this data loss is controlled by the “quality setting” you choose during conversion or saving.
- High Quality (e.g., 80-100%): Results in minimal data loss, preserving more detail and color fidelity. Ideal for “High Resolution” images, “Beautiful Photography” meant for print, or situations where visual perfection is critical. The trade-off is a larger file size.
- Medium Quality (e.g., 60-80%): Often provides a good compromise for web use. The file size is significantly smaller than high-quality JPEGs, and the visual degradation is usually imperceptible to the average viewer, especially for “Wallpapers” or “Backgrounds.”
- Low Quality (e.g., below 60%): Drastically reduces file size but can introduce noticeable artifacts, blockiness, and color banding. Generally avoided unless file size is the absolute priority and visual quality is secondary (e.g., for very small thumbnails).
When using tools like GIMP, Preview, or many online converters (including those offered by Tophinhanhdep.com), you’ll encounter a quality slider. Experimenting with this slider, especially while using a “preview” option, allows you to visually assess the impact of compression. Our “Image Compressors” on Tophinhanhdep.com are specifically designed to help you achieve this balance efficiently, reducing file size for faster web performance without compromising the aesthetic appeal of your “Aesthetic” or “Nature” photos.
When to Use JPEG vs. Other Formats
Choosing the right image format is a fundamental aspect of “Graphic Design” and “Image Management.” While JPEG is incredibly versatile, it’s not always the best choice. Tophinhanhdep.com emphasizes knowing your “Image Tools” and their applications.
-
Use JPEG for:
- Photographs: Its compression excels with complex images, continuous tones, and smooth color gradients. This makes it the go-to for “Digital Photography,” portraits, landscapes, and “Stock Photos.”
- Web Graphics with many colors: When you need rich imagery that loads relatively quickly online, JPEG is often preferred.
- Emailing Images: Smaller file sizes make JPEGs convenient for sharing via email.
-
Consider PNG for:
- Images with Transparency: PNG supports alpha channels, allowing for transparent backgrounds, which is crucial for logos, icons, and overlays in “Photo Manipulation” and “Digital Art.”
- Images with Sharp Lines or Text: PNG’s lossless compression preserves crisp details and prevents the “fuzzy” edges that JPEG can introduce in high-contrast areas. Ideal for screenshots, graphics with text, or line art.
- Images with Few Colors: For simple graphics with a limited color palette, PNG can often achieve smaller file sizes than JPEG while being lossless.
-
Consider GIF for:
- Animations: GIF is primarily known for its support of animated images.
- Simple Graphics with Limited Colors: For very basic graphics or icons with 256 colors or less, GIF can be efficient.
-
Consider RAW for:
- Professional Photography: RAW files capture all the data directly from the camera sensor, providing maximum flexibility for “Editing Styles” and “Photo Manipulation” without any initial compression. They are not images themselves, but rather unprocessed data, requiring conversion (often to JPEG or TIFF) for sharing or printing. Tophinhanhdep.com offers resources for photographers working with “High Resolution” RAW files.
By thoughtfully selecting the appropriate format for each image, you ensure optimal visual quality, file performance, and compatibility across all your “Visual Design” and “Image Inspiration” projects.
Tophinhanhdep.com: Your Hub for Comprehensive Image Management and Inspiration
Converting an image to JPEG is a foundational skill, but it’s just the beginning of what’s possible in the world of digital imagery. At Tophinhanhdep.com, we strive to be your ultimate resource, offering not only practical “Image Tools” like converters, compressors, and optimizers but also a rich tapestry of content to inspire your “Creative Ideas” and enhance your visual projects.
Our platform extends far beyond basic conversion, providing advanced functionalities that cater to every aspect of digital imaging:
- AI Upscalers: Imagine having an old, low-resolution photograph that you wish to use as a stunning “Wallpaper” or in a “High Resolution” print. Our AI Upscalers leverage artificial intelligence to intelligently increase the resolution of your images, adding detail and sharpness that traditional upscaling methods cannot achieve. This is a game-changer for breathing new life into cherished memories or preparing small web graphics for larger displays.
- Image-to-Text Tools: For professionals dealing with documents, screenshots, or any image containing text, our Image-to-Text feature (Optical Character Recognition, or OCR) can extract editable text, transforming static visuals into dynamic, usable data. This streamlines workflows for “Graphic Design” and information management.
- Image Compressors & Optimizers: Fast-loading websites and efficient storage are crucial. After converting your images to JPEG, our specialized compressors and optimizers fine-tune their file size without compromising the aesthetic quality of your “Beautiful Photography.” This ensures your “Wallpapers” and “Backgrounds” look pristine while delivering optimal performance.
Beyond tools, Tophinhanhdep.com is a vibrant hub for “Image Inspiration & Collections.” Whether you’re a professional photographer seeking “Photo Ideas” for your next “Nature” or “Sad/Emotional” series, or a hobbyist creating “Mood Boards” for “Aesthetic” projects, our curated collections and “Trending Styles” are designed to spark your creativity. Dive into our extensive library of “Stock Photos,” explore diverse “Digital Photography” techniques, or discover “Abstract” art to elevate your “Visual Design” projects. We provide resources for everything from mastering “Editing Styles” to understanding complex “Photo Manipulation” techniques, ensuring that whether you’re converting a single image or embarking on an ambitious “Digital Art” piece, you have the knowledge and tools at your fingertips.
Tophinhanhdep.com is more than just a website; it’s a community and a comprehensive toolkit for anyone passionate about images. We are committed to helping you transform your “Creative Ideas” into stunning realities, equipping you with the best resources to manage, enhance, and be inspired by the power of visuals.
In conclusion, turning an image into a JPEG is an essential skill in the digital age, enabling compatibility and efficiency across various platforms. With the straightforward methods outlined in this guide – whether through online converters, built-in software like Paint and Preview, or powerful editors like GIMP – you are now equipped to handle almost any image conversion challenge. Remember the importance of balancing quality and file size, and choose the method that best suits your device and specific needs.
For all your image needs, from practical conversions to boundless creative inspiration, look no further than Tophinhanhdep.com. Explore our advanced “Image Tools,” discover breathtaking “Images” for every mood and purpose, and unlock your full potential in “Photography” and “Visual Design.” We are here to ensure your digital visual journey is seamless, efficient, and endlessly inspiring.