How to Turn a Picture into a PDF: A Comprehensive Guide for Visual Content Enthusiasts

In the modern digital landscape, images serve as the universal language for conveying ideas, emotions, and information. From breathtaking landscapes and intricate abstract art to professional photography and essential document scans, visual content is paramount. However, the diverse formats and often large file sizes of images can present challenges when it comes to storage, sharing, and consistent presentation. This is where the Portable Document Format (PDF) emerges as an invaluable solution.
PDFs are revered for their cross-platform compatibility, ability to preserve formatting regardless of the viewing device, and inherent security features. Converting images into PDF files allows for easier transmission, more organized archiving, and a polished, professional look, especially when compiling multiple images into a single, cohesive document. Whether you’re a professional photographer curating a portfolio, a graphic designer presenting a mood board, or simply looking to send a collection of vacation photos, understanding how to turn a picture into a PDF is a fundamental digital skill.
At Tophinhanhdep.com, we understand the power of visual content – from stunning wallpapers and aesthetic backgrounds to high-resolution photography and inspiring digital art. Our platform is dedicated to providing tools and resources that enhance your interaction with images, whether it’s through converters, compressors, optimizers, or AI upscalers. This article will guide you through various methods to convert images to PDF across different devices and operating systems, emphasizing how this process integrates seamlessly with managing and showcasing the beautiful, emotional, nature, and abstract imagery you find and create.
The Versatility of PDF: Why Convert Your Images?
The decision to convert an image into a PDF extends beyond mere file format change; it’s about optimizing your visual content for various applications. PDFs offer a distinct advantage over individual image files in several key areas.
Streamlining Sharing and Archiving Visual Content
Imagine you have a series of images from a recent photography session – perhaps a collection of high-resolution nature shots or a thematic collection of abstract art that you’ve diligently curated. Sending these individually via email can be cumbersome, leading to multiple attachments, potential email size limits, and a disorganized inbox for the recipient. By converting these images into a single PDF, you consolidate them into one compact file, making sharing effortless and professional. This is particularly useful for students submitting assignments, professionals sending client proofs, or anyone looking to present a coherent visual narrative.
For users passionate about organizing their “Images (Wallpapers, Backgrounds, Aesthetic, Nature, Abstract, Sad/Emotional, Beautiful Photography)” for personal use or for “Image Inspiration & Collections,” a PDF acts as a digital album or mood board. Instead of scrolling through countless individual files, you can flip through a single PDF document, preserving the intended sequence and context of your visual narrative. This not only simplifies archiving but also makes it easier to revisit and appreciate your “Photo Ideas” and “Trending Styles” over time. The inherent compression capabilities of PDF often result in smaller file sizes compared to a collection of high-resolution images, facilitating quicker uploads and downloads, without significantly compromising visual fidelity for general viewing.
Preserving Image Quality and Professional Presentation
Photographers invest significant effort into capturing “High Resolution” images and applying meticulous “Editing Styles.” When these “Digital Photography” masterpieces are shared, maintaining their quality and presentation is paramount. While some image formats might suffer degradation during compression or cross-platform viewing, PDF is designed to preserve the visual integrity of documents, including embedded images. This ensures that the crisp details of your “Beautiful Photography” or the vibrant colors of your “Digital Art” are displayed exactly as intended, regardless of the viewer’s device or software.
For those involved in “Visual Design,” such as “Graphic Design” or “Photo Manipulation,” compiling project elements into a PDF is standard practice. It provides a static, unalterable representation of the work, crucial for client reviews where consistency is key. Adding password protection to a PDF, a feature available in many conversion tools, offers an extra layer of security for sensitive “Stock Photos” or proprietary “Creative Ideas,” preventing unauthorized access, printing, or copying. This level of control and fidelity makes PDF an indispensable tool for anyone serious about the professional presentation and secure distribution of their visual assets.
Converting Images to PDF on Desktop Operating Systems
Desktop computers, whether running Windows or macOS, offer robust and often built-in capabilities for converting images to PDF. These methods typically provide more control over output settings, such as page order, orientation, and security options, making them ideal for professional and detailed work.
Windows: Leveraging Built-in Print Functionality and Third-Party Tools
Windows users have several convenient ways to transform images into PDF files, ranging from native operating system features to powerful third-party software like Wondershare PDFelement.
Method 1: Using Microsoft Print to PDF
Windows 10 and newer versions include a “Microsoft Print to PDF” feature, which acts as a virtual printer. This allows you to convert virtually any printable content, including images, into a PDF document without needing additional software.
- Organize Your Images: Place all the images you wish to convert into a single folder. To ensure they appear in a specific order within the PDF, rename them sequentially (e.g., Image01.jpg, Image02.jpg). This step is crucial for “Thematic Collections” or “Mood Boards” where sequence matters.
- Select and Print: Select all the images in the folder. Right-click on one of the selected images and choose “Print” from the context menu, or navigate to the “Share” tab in File Explorer and click the “Print” button.
- Choose “Microsoft Print to PDF”: In the “Print Pictures” dialog box that appears, select “Microsoft Print to PDF” from the “Printer” dropdown menu. You can preview your images and adjust layout options such as picture size and fit to frame. For “Beautiful Photography” or “High Resolution” images, ensure the fit is appropriate.
- Adjust Printer Properties (Optional): Click “Options” in the lower-right corner, then “Printer Properties.” Here, you can set the document orientation (Portrait or Landscape) which can be critical for how your “Wallpapers” or “Backgrounds” appear in the PDF.
- Save the PDF: Click “Print” again. A “Save Print Output As” dialog box will appear. Choose a name for your PDF file and select the desired save location. Click “Save,” and your images will be compiled into a single PDF document.
Method 2: Converting Images with Microsoft Word
For those who prefer a more document-centric approach or need to add text alongside their images, Microsoft Word offers a straightforward way to create PDFs. This is particularly useful for “Visual Design” projects that combine text and imagery.
- Create a New Document: Open Microsoft Word and start a new “Blank Document.”
- Insert Images: Go to the “Insert” tab, click “Pictures,” and then choose “This Device” (or other relevant source) to insert your desired images.
- Arrange and Edit: Once inserted, you can freely arrange, resize, and even add captions or other textual elements to your images. This allows for detailed “Digital Art” or “Photo Manipulation” presentations.
- Export to PDF: After arranging your images and text to your satisfaction, go to “File” > “Export” > “Create PDF/XPS Document.”
- Save Your PDF: Click “Create PDF/XPS” and choose a file name and save location. Your Word document, with all its embedded images, will be converted into a PDF.
Method 3: Using Wondershare PDFelement - The Best PDF Creator
For a more comprehensive and powerful solution, Wondershare PDFelement stands out as a leading PDF editor. It’s not just an image converter; it’s a versatile tool that caters to all your PDF needs, perfect for professionals dealing with “High Resolution” images and complex “Visual Design” projects. Tophinhanhdep.com recommends Wondershare PDFelement for its efficiency and robust features.
Features of Wondershare PDFelement:
- Comprehensive Editing: Edit text, images, and links within PDF documents with ease. This is invaluable for refining a “Graphic Design” portfolio.
- Batch Conversion: Convert multiple images or entire folders into PDFs quickly.
- Security Features: Protect your PDFs with password encryption and information redaction, ensuring your “Stock Photos” or “Creative Ideas” remain secure.
- OCR (Image-to-Text): Convert scanned images containing text into editable and searchable PDFs, bridging the gap between “Images” and “Image-to-Text” tools.
- Annotation and Markup: Add comments, highlights, and other annotations, useful for collaborative “Digital Art” projects.
Here’s how to convert an image into a PDF using Wondershare PDFelement:
Option A: Turn a Picture into a PDF from Desktop This method allows for quick conversion directly from your file explorer.
- Select the Picture: Locate the image file (JPG, PNG, TIFF, BMP, etc.) on your desktop or in any folder.
- Create to PDF: Right-click on the image. In the dropdown menu, select “Create to PDF” (this option becomes available after Wondershare PDFelement is installed).
- Save the File: The image will open automatically as a PDF in Wondershare PDFelement. Click the “Save” icon (usually a floppy disk) in the top-left corner of the screen, or go to “File” > “Save,” to save your new PDF to a desired local folder.
Option B: Turn a Picture into a PDF by Opening Wondershare PDFelement This method is ideal if you’re already working within the application or want to import images after launching the software.
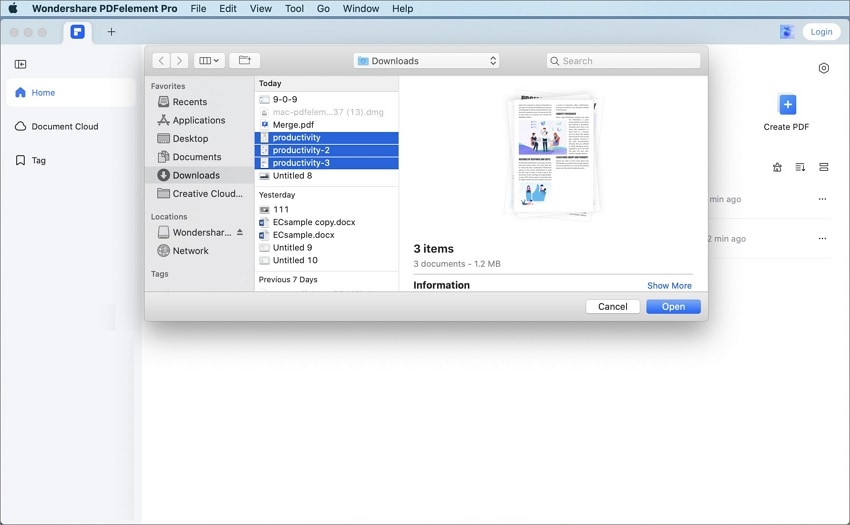
- Open Wondershare PDFelement: Launch the Wondershare PDFelement application.
- Upload the Picture: On the home window, click the “Create PDF” button. An “Open” window will pop up, allowing you to browse your computer and select the image file you want to convert. Click “Open.”
- Save the File: The image will now be displayed as a PDF within Wondershare PDFelement. Go to “File” > “Save” or “Save As,” then choose a folder on your computer to save your newly created PDF.
macOS: Utilizing Preview for Seamless Conversions
macOS users benefit from the powerful and versatile Preview application, which is pre-installed and capable of handling image-to-PDF conversions with surprising efficiency, especially for creating multi-page documents.
How to Convert Several Images into a Single PDF
- Select Images in Finder: Open Finder and navigate to the location of your images. Select all the images you want to include in your PDF. You can do this by dragging a selection box with your mouse or by holding the Command key and clicking each image individually. This method is excellent for compiling a “Thematic Collection” of “Aesthetic” images.
- Open With Preview: Right-click (or Ctrl-click) one of the highlighted image files. From the contextual dropdown menu, select “Open With” and then choose “Preview.” All selected images will open together in a single Preview window, displayed as thumbnails in the sidebar.
- Arrange and Orient Pages: In Preview’s sidebar, you can drag the thumbnail images to rearrange them into the desired order for your PDF. If any images are oriented incorrectly, select them (individually or in a group) and use the “Rotate” button in Preview’s toolbar to adjust their orientation. This ensures your “Digital Photography” looks perfect.
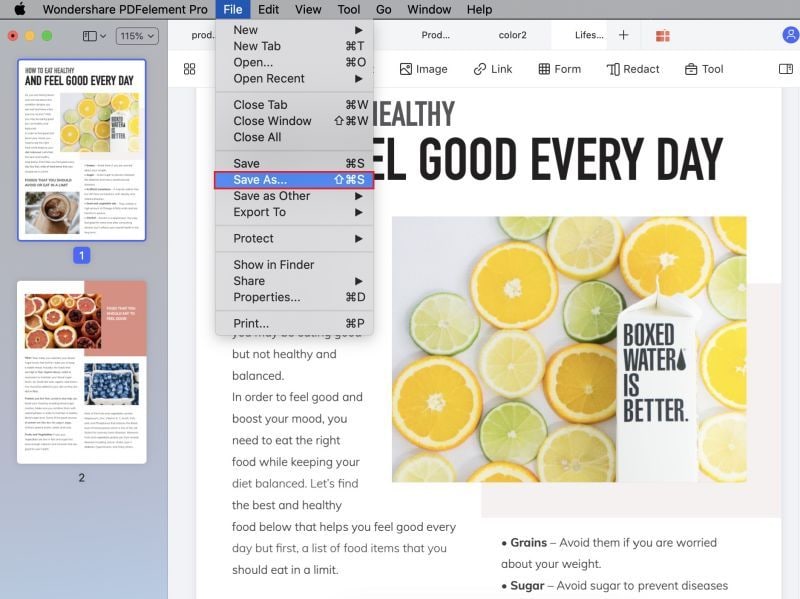
- Access Print Dialog: Go to the “File” menu in the Preview menu bar and select “Print…” (or use the keyboard shortcut Command+P).
- Expand Options and Verify: In the Print dialog box, click “Show Details” to expand the full set of printing options. Make sure the “All” button is selected under “Pages options” to include all your images. You can also double-check the orientation and make final adjustments here.
- Save as PDF: In the lower-left corner of the Print dialog, click the “PDF” dropdown menu. Select “Save as PDF.”
- Name and Save: A “Save” dialog will appear. Give your new PDF a descriptive name, choose where you want to save it, and optionally fill in metadata fields like Title, Author, Subject, and Keywords. For added security, click “Security Options…” to set a password for opening, copying, or printing the document. This is vital for “Stock Photos” or sensitive “Visual Design” drafts.
- Final Save: Click “Save” to complete the conversion.
This “Save as PDF” functionality is not limited to Preview; it’s a system-wide feature in macOS, allowing you to create PDFs from almost any printable document within various applications, from web pages in Safari to documents in Pages.
Transforming Images to PDF on Mobile Devices
The convenience of mobile devices means that image-to-PDF conversion often needs to happen on the go. Fortunately, both iOS and Android offer powerful native features or dedicated applications to achieve this, making it simple to manage your “Images” and “Photography” directly from your phone or tablet.
iPhone and iPad: Native Options for On-the-Go Conversion
iOS devices provide several intuitive, built-in methods to convert photos into PDF documents without the need for third-party apps. These methods leverage core functionalities like the Print menu and integrated apps like Books and Files.
Method 1: Using Print Options (Reverse-Pinch Gesture)
This is a popular and quick method to convert one or multiple photos into a PDF.
- Open the Photos App: Tap the “Photos” app icon (a multicolored flower) on your Home Screen or in your App Library.
- Select Your Photo(s): Tap the photo you wish to convert. If you want to convert multiple photos, tap “Select” in the top-right corner, then tap each photo to include it. This is great for creating a quick “Mood Board” of “Aesthetic” images.
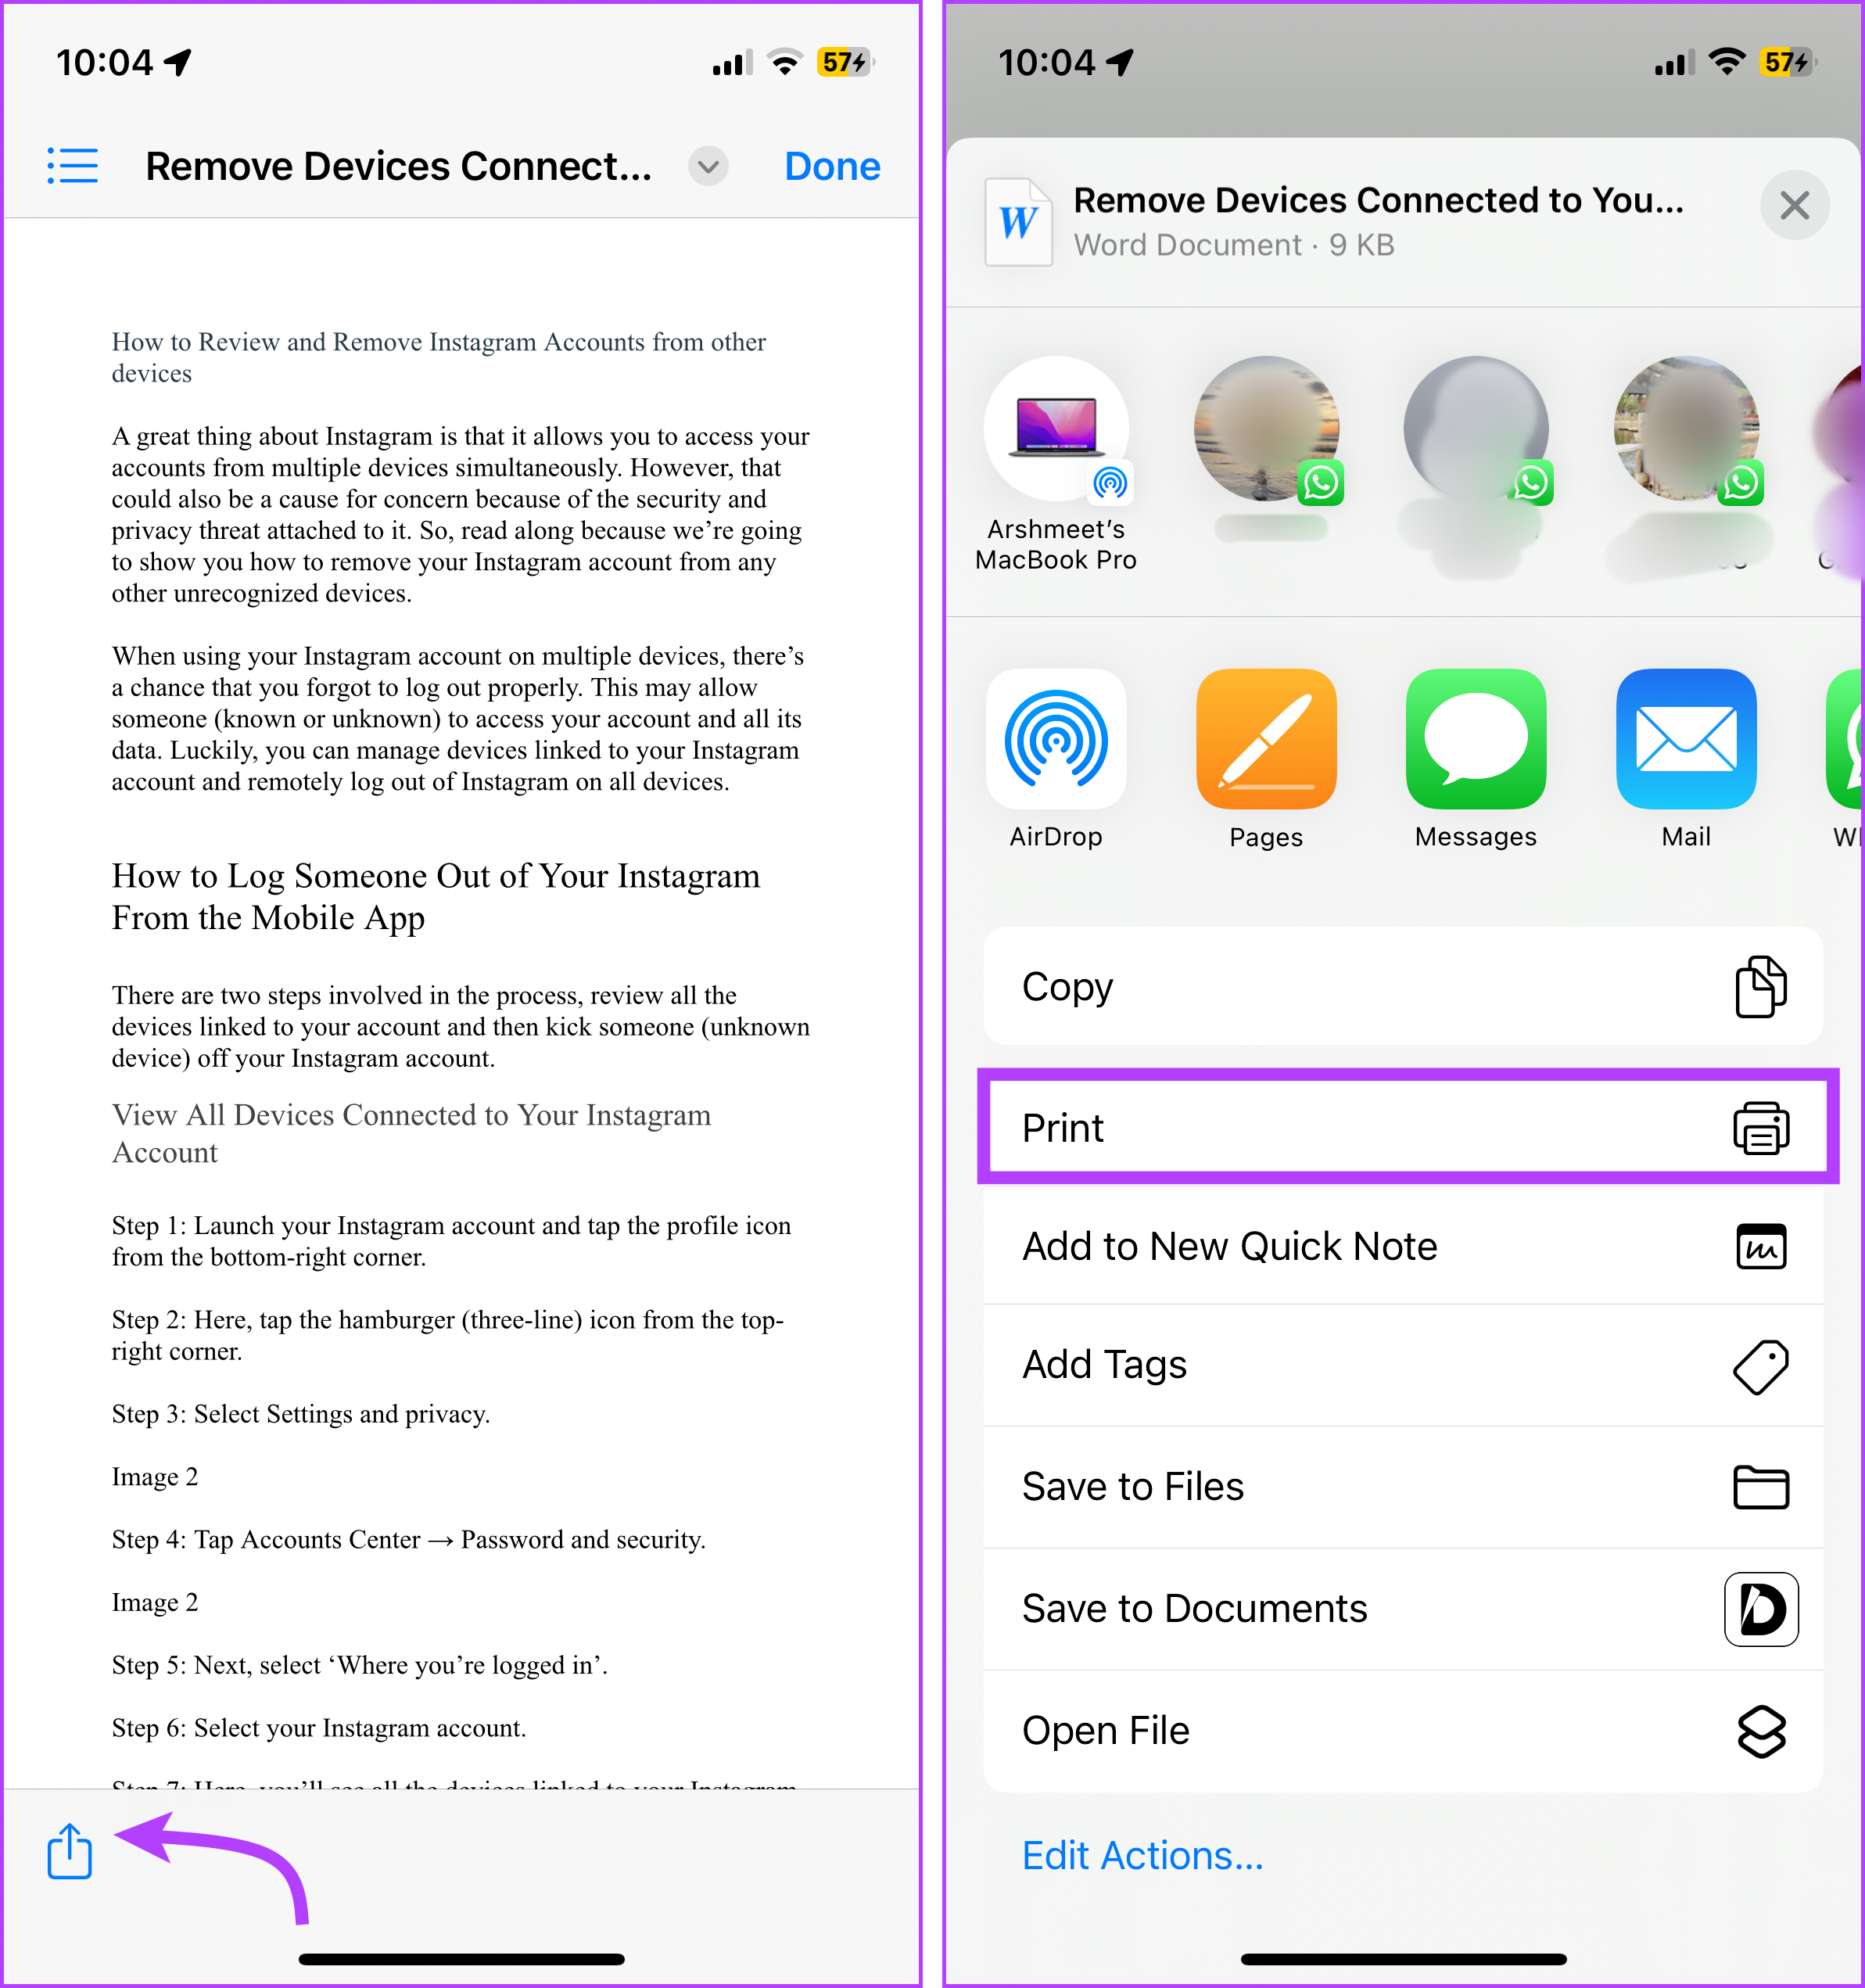
- Tap the Share Icon: In the bottom-left corner of the screen, tap the “Share” icon (a square with an arrow pointing upwards).
- Select “Print”: Scroll down the sharing menu and tap “Print” (it has a printer icon next to it).
- Zoom Out to PDF Preview: On the “Printer Options” screen, you’ll see a preview of your photo(s) at the bottom. Use a “reverse-pinch” gesture (place two fingers on the preview and spread them apart) to zoom out. This action transforms the image preview into a full-screen PDF viewer. You are now essentially viewing your photo(s) as a PDF.
- Tap Share Again (from PDF Viewer): With the PDF preview open, tap the “Share” icon in the top-right corner of the screen.
- Choose “Save to Files”: From the new sharing menu, select “Save to Files” (it has a folder-shaped icon).
- Select Save Location and Save: Choose your desired save location (e.g., iCloud Drive or “On My iPhone”). You can also create a new folder if needed. Tap “Save” in the top-right corner. Your photo(s) are now saved as a PDF in the chosen location, ready for sharing or archiving.
Method 2: Using the Books App
For a simple, direct conversion where the PDF will be stored and readable within the Books app, this method is very efficient.
- Open the Photos App: Launch the “Photos” app on your iPhone or iPad.
- Select Your Photo(s): Tap a photo, or tap “Select” and choose multiple photos. This is ideal for quickly saving “Sad/Emotional” or “Beautiful Photography” in a book-like format.
- Tap the Share Icon: Tap the “Share” icon in the bottom-left corner.
- Tap “Books”: From the sharing options, tap the “Books” icon (an open book on an orange background). The selected photo(s) will automatically convert to PDF and open directly within the “Books” app. You can find this PDF later in the “Books” app itself, and also within the “Books” section in the “Files” app.
Method 3: Using the Files App (for Existing Images in Files)
If your images are already stored in the “Files” app (perhaps synchronized from cloud services or downloaded), you can convert them to PDF directly within the app.
- Open Files: Tap the “Files” app icon (a blue folder) on your Home Screen or in your App Library.
- Locate the Image(s): Navigate to the folder containing the image(s) you wish to convert.
- Select Image(s):
- For a single image: Press and hold the image until a context menu appears.
- For multiple images: Tap the three-dot menu in the top-right corner, then tap “Select.” Tap each image you want to convert. After selecting, tap the three-dot menu icon in the lower-right corner.
- Tap “Create PDF”: From the context menu (or the lower-right three-dot menu if selecting multiple), tap “Create PDF” (it has an icon of a folded piece of paper with “PDF”). Your image(s) will instantly be saved as a new PDF file in the same location. This is a very quick way to convert visual assets received via other apps into a unified PDF.
Android: Exploring Dedicated Image-to-PDF Applications
While some Android devices might offer a “Print to PDF” option similar to Windows, the most reliable and feature-rich method often involves using a dedicated image-to-PDF converter app from the Google Play Store. For purposes of this guide, we’ll refer to a generalized “Image to PDF Converter” app, which you can find by searching for “image to pdf converter” on Tophinhanhdep.com’s recommended app store or through direct links provided on Tophinhanhdep.com.
- Download a Recommended Converter App: Search for “Image to PDF Converter” in the Google Play Store. Many reputable options exist, often identified by icons featuring PDF symbols. Tophinhanhdep.com frequently reviews and recommends effective “Image Tools” for Android. Install one that has good reviews and a clear interface.
- Open the App: After installation, open the “Image to PDF Converter” app.
- Grant Permissions: The first time you use the app, it will likely request permission to access your device’s photos and files. Grant these permissions to proceed.
- Initiate Image Selection: Look for a “+” (plus) button, an “Add Image” button, or a similar prompt, usually located in the bottom-right or center of the screen. Tap it to start selecting images.
- Select Images from Gallery: The app will typically open your device’s image gallery. Tap on the image(s) you wish to convert. Most apps allow you to select multiple images, which will then be compiled into a single multi-page PDF. This is excellent for compiling “Thematic Collections” or “Photo Ideas.”
- Confirm Selection: After choosing all your desired images, look for a “Done,” “Add,” or checkmark icon, usually in the top-right corner. Tap it to confirm your selection.
- Convert to PDF: Within the app, you’ll see your selected images listed. Look for a “Convert to PDF,” “Create PDF,” or a prominent PDF icon (often red or white). Tap this button.
- Configure PDF Details (Optional): Many apps allow you to specify the PDF name, add a password, adjust image compression settings (which ties into Tophinhanhdep.com’s “Compressors” tools), or set page orientation. For “High Resolution” images, you might want to adjust compression to balance file size and quality.
- Save the PDF: Tap “OK,” “Save,” or a similar confirmation button to save the newly created PDF. The app will usually indicate where the file is saved (e.g., in a dedicated “Image2PDF” folder within your internal storage or a cloud service).
Advanced Features and Considerations for Image-to-PDF Conversion
Beyond the basic conversion process, modern image and PDF tools offer advanced functionalities that can significantly enhance your workflow, especially when dealing with high-quality visual content and professional design projects.
Integrating with Tophinhanhdep.com’s Image Tools
Tophinhanhdep.com is your go-to resource for optimizing and transforming images. Our suite of “Image Tools” complements the PDF conversion process, allowing you to refine your images before or after they become part of a PDF document.
- Converters: Our platform provides specialized “Converters” for various image formats (JPG, PNG, TIFF, BMP, GIF, WEBP) to ensure your initial images are in the best possible state before PDF conversion.
- Compressors & Optimizers: Before converting “High Resolution” images into a PDF, you might use Tophinhanhdep.com’s “Compressors” and “Optimizers” to reduce their file size without noticeable loss of quality. This ensures your final PDF is compact and easy to share, crucial for large “Beautiful Photography” collections. Alternatively, you can convert to PDF first, then use our tools to optimize the PDF itself for smaller distribution.
- AI Upscalers: If you’re working with lower-resolution images, perhaps for “Aesthetic” or “Sad/Emotional” contexts where the original quality might not be perfect, Tophinhanhdep.com’s “AI Upscalers” can enhance their detail and resolution before you convert them to PDF. This results in a higher quality visual output within the PDF, making your “Digital Art” pop even more.
- Image-to-Text (OCR): For images containing text, such as scanned documents or photos of notes, our “Image-to-Text” (OCR) functionality can extract the text, allowing you to create a searchable and editable PDF. This transforms static “Images” into dynamic documents, bridging the gap between purely visual and textual content.
By leveraging Tophinhanhdep.com’s comprehensive “Image Tools,” you can ensure that your images are perfectly prepared for PDF conversion, resulting in professional-grade documents every time.
Enhancing Visual Design and Photography Workflows
For professionals in “Photography” and “Visual Design,” PDF conversion is more than a utility; it’s an integral part of their workflow for presenting “Creative Ideas,” “Digital Art,” and client-ready projects.
- Photography Portfolios: Photographers can create stunning “High Resolution” PDF portfolios of their “Nature,” “Abstract,” or “Beautiful Photography” collections. Embedding image metadata within the PDF can also help protect copyright and provide attribution.
- Graphic Design Mock-ups and Proposals: “Graphic Design” and “Photo Manipulation” artists often create multi-page PDFs to present different design concepts, mock-ups, or project proposals to clients. The ability to maintain precise layouts, fonts, and colors within a PDF is crucial for client approvals, ensuring the integrity of their “Creative Ideas.”
- Mood Boards and Inspiration Collections: Curating “Mood Boards” or “Thematic Collections” of “Image Inspiration” becomes seamless with PDFs. Designers can gather images of “Trending Styles,” “Wallpapers,” or “Backgrounds” and compile them into a single, shareable PDF, perfect for collaborative brainstorming sessions.
- Security and Version Control: PDF’s password protection is invaluable for sharing sensitive or proprietary “Stock Photos” and early-stage “Digital Art” designs. Additionally, creating sequential PDF versions (e.g., “Project_v1.pdf,” “Project_v2.pdf”) provides clear version control, an essential aspect of any professional design or photography workflow.
The Future of Visual Content and PDF Conversion
As digital imagery continues to evolve, encompassing everything from immersive “Aesthetic” experiences to nuanced “Sad/Emotional” expressions, the role of PDF conversion will only grow in importance. The demand for flexible, high-quality, and secure ways to share visual content is constant. Tophinhanhdep.com is committed to staying at the forefront of these developments, offering cutting-edge “Image Tools” and insights to help you manage your digital assets.
The integration of AI into image processing, as seen with “AI Upscalers” and advanced “Image-to-Text” capabilities, promises even more sophisticated PDF creation. Imagine effortlessly converting a diverse collection of “Wallpapers” and “Backgrounds” into a curated PDF album, with AI automatically optimizing each image for perfect display and minimal file size, or generating “Thematic Collections” based on “Trending Styles” with just a few clicks.
Ultimately, mastering the art of turning a picture into a PDF is a foundational skill in the digital age. It empowers you to organize, share, and present your visual content – whether personal “Photo Ideas” or professional “High Resolution” artwork – with efficiency, elegance, and peace of mind. Explore Tophinhanhdep.com’s resources and tools to unlock the full potential of your images and embrace a streamlined approach to your digital life.