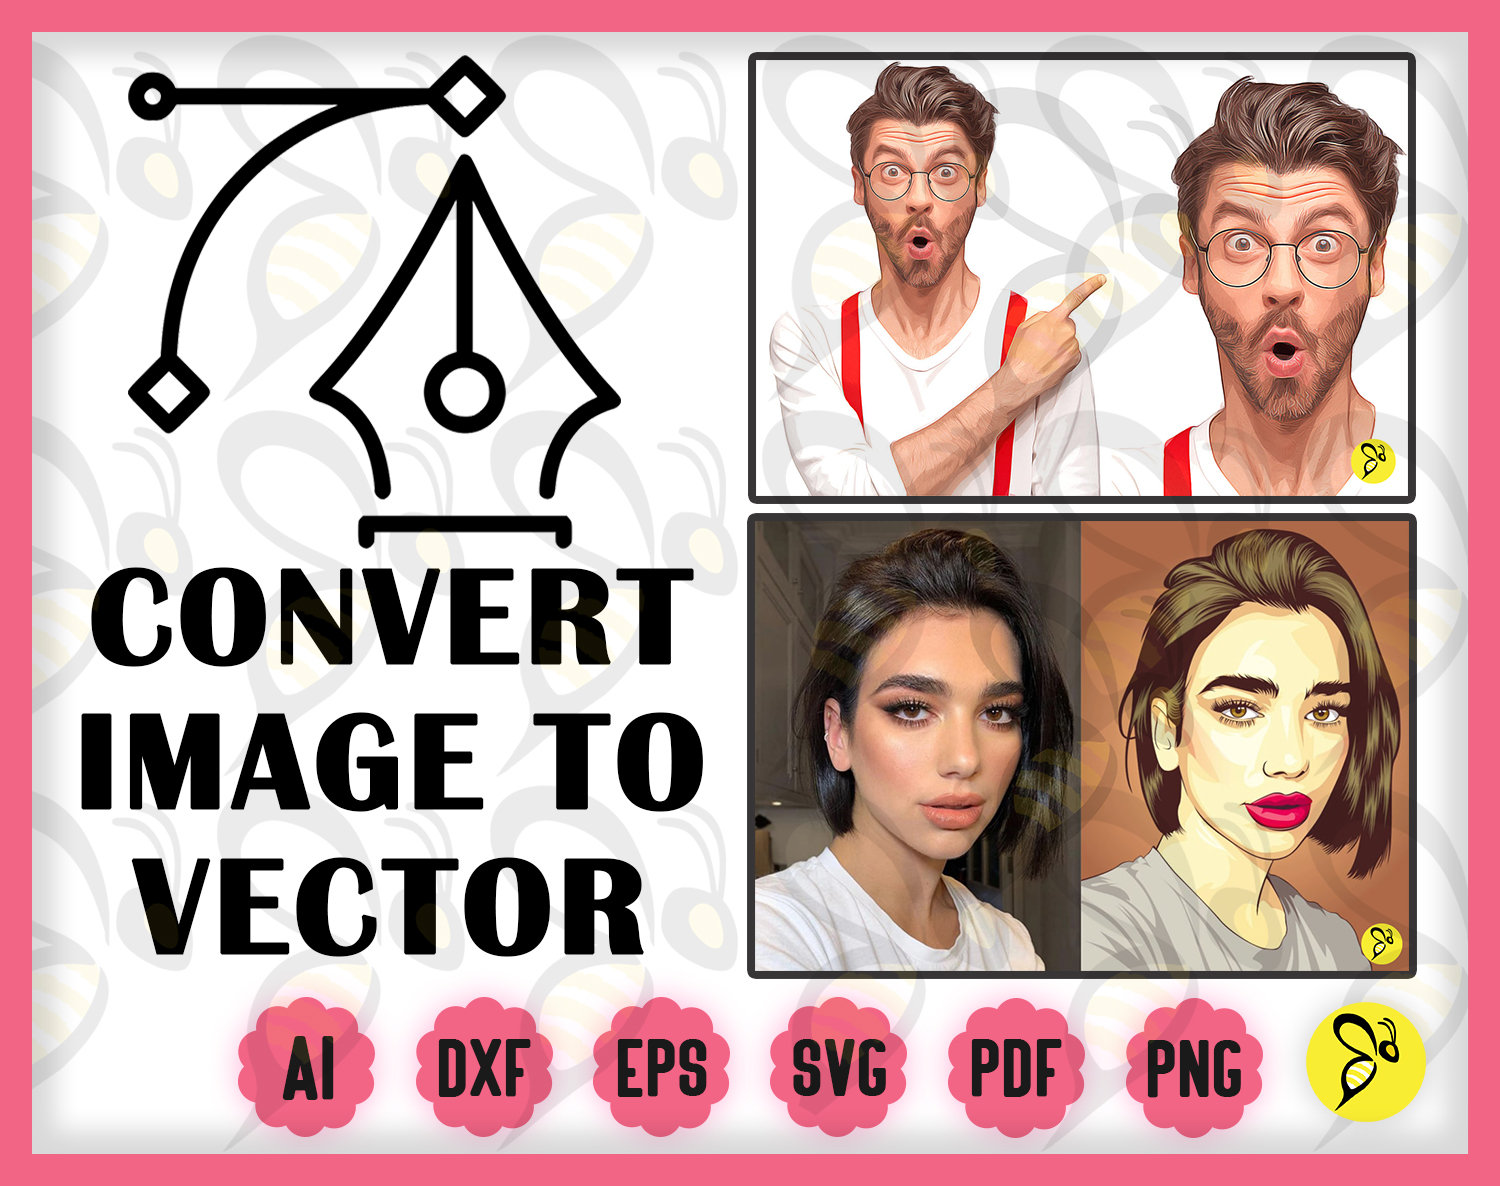
How to Turn an Image into a Vector: A Comprehensive Guide for Stunning Visuals

In the dynamic world of digital imagery, understanding the fundamental differences between image types is crucial for creators, designers, and enthusiasts alike. At Tophinhanhdep.com, we recognize the importance of high-quality visuals, whether you’re looking for breathtaking “Wallpapers,” captivating “Backgrounds,” or exploring intricate “Visual Design” concepts. One of the most powerful transformations you can perform on an image, particularly for scalable applications, is converting it into a vector graphic. This process unlocks a world of possibilities, ensuring your visuals remain crisp, clear, and perfectly adaptable across any medium or size.
This comprehensive guide will delve into the art and science of vectorizing an image. We’ll explore why vector graphics are indispensable, guide you through the step-by-step process using industry-standard software like Adobe Illustrator, and highlight how Tophinhanhdep.com’s suite of “Image Tools” and “Visual Design” resources can further empower your creative journey. Say goodbye to pixelated nightmares and embrace the infinite scalability of vector art!
Understanding the Power of Vector Graphics
Before we dive into the “how-to,” it’s essential to grasp the core distinction between raster and vector images and why this conversion is often a game-changer in “Visual Design” and “Graphic Design.”
Raster vs. Vector: A Fundamental Distinction
Digital images predominantly fall into two categories: raster and vector. Each has its strengths and ideal applications, but they differ significantly in their underlying structure.
Raster Images: These are the most common type of image you encounter daily – think of your “Beautiful Photography” shots, most “Stock Photos,” and the “Aesthetic” images you find online. Raster images are composed of a grid of tiny squares, known as pixels, each assigned a specific color. When viewed at their native resolution, these pixels blend seamlessly to create a continuous image with rich detail and nuanced color gradients. File formats like JPG, PNG, and GIF are prime examples of raster images.

- Pros: Excellent for displaying complex photographic detail, subtle color variations, and realistic textures. Perfect for photographs and highly detailed digital paintings.
- Cons: The main drawback of raster images is their resolution dependency. When you enlarge a raster image beyond its original dimensions, the individual pixels become visible, leading to a blurry, “pixelated” appearance. This limitation makes them unsuitable for applications requiring significant resizing, such as large-format printing or responsive web design where elements need to scale seamlessly. Even with advanced “AI Upscalers” available on Tophinhanhdep.com, while quality can be improved, they remain pixel-based at their core.
Vector Images: In stark contrast, vector graphics are not built from pixels. Instead, they are constructed from mathematical equations that define geometric shapes such as points, lines, curves, and polygons. These mathematical descriptions dictate the position, size, and color of each element in the image. Common vector file formats include SVG (Scalable Vector Graphics), AI (Adobe Illustrator), EPS (Encapsulated PostScript), and sometimes PDF.
- Pros: The paramount advantage of vector graphics is their infinite scalability. Because their definition is mathematical, they can be scaled up or down to any size imaginable—from a tiny icon to a massive billboard—without any loss of quality or introduction of pixelation. Lines remain crisp, and colors stay vibrant. This makes them incredibly versatile for “Graphic Design,” “Digital Art,” and any branding elements like logos. They are also often “lightweight” in terms of file size for simple graphics, making them efficient for web use and aligning with “Image Tools (Optimizers).”
- Cons: Vector images are generally less suited for representing the intricate detail and subtle color transitions found in realistic photographs. While you can convert a photograph into a vector, the result is typically a stylized, illustrative interpretation rather than a perfect replica.
Why Vectorize? Key Applications in Visual Design
The decision to convert an image into a vector is usually driven by specific design requirements where scalability and crispness are paramount. This process is invaluable across many categories featured on Tophinhanhdep.com, from creating engaging “Visual Design” elements to preparing assets for print.
- Logos and Branding: This is arguably the most common application. A company logo needs to look perfect on a business card, a website, a mobile app, and a giant banner. Vectorization ensures that the logo maintains its integrity and sharp appearance at all sizes, reflecting professionalism and quality.
- Icons and User Interface (UI) Elements: For web and app development, icons must be scalable to adapt to different screen resolutions and display densities. Vector icons provide this flexibility, ensuring a consistent and polished user experience.
- Illustrations and Digital Art: Many “Digital Art” styles, especially those with clean lines and flat colors, are ideally created as vector graphics. This includes cartoon characters, infographics, technical drawings, and abstract patterns that might be used for “Abstract” “Wallpapers” or “Backgrounds.” Converting raster sketches or simple artworks into vectors allows for easy color changes, resizing, and manipulation.
- Print Media: Whether it’s a flyer, poster, T-shirt, mug, or vehicle wrap, print requires high-resolution artwork. Vector graphics eliminate concerns about resolution, guaranteeing sharp text and images in physical prints, crucial for “Creative Ideas” brought to life.
- Web Graphics: SVG (Scalable Vector Graphics) is a vector format specifically designed for the web. It’s lightweight, scales perfectly on high-resolution displays (like Retina screens), and can even be animated and styled with CSS. This optimizes site performance and visual fidelity.
- “Photo Manipulation” and Stylization: While photographs are raster, vectorization can transform them into unique artistic interpretations, resembling “Sketched Art,” “Line Art,” or “Posterized” effects. This is a creative way to stylize “Beautiful Photography” or create distinct visuals from “Nature” imagery for artistic projects.
- “Image Tools (Optimizers)” Integration: When creating vector graphics, they often have smaller file sizes for simpler designs compared to high-resolution raster images, which is beneficial for web optimization. After vectorization, you might use other “Image Tools” from Tophinhanhdep.com like “Compressors” or “Optimizers” to ensure your final files are perfectly tailored for their intended use.
In essence, vectorization is a fundamental skill that grants unparalleled flexibility and quality control over your visual assets, making it an indispensable technique for any creative professional or enthusiast.
Preparing Your Image for Vector Conversion
The success of your vector conversion often hinges on the quality and characteristics of your source image. While vectorization can work on various images, selecting the right one and understanding the tools available can significantly streamline the process.
Choosing the Right Source Image
Not all images are created equal when it comes to vectorization. While powerful tools can convert almost anything, some images yield far better results than others.
- Simplicity is Key: The best candidates for vector conversion are images with clear, well-defined lines, distinct shapes, and a limited color palette. Think of logos, simple illustrations, cartoon characters, or black-and-white drawings. Complex “Beautiful Photography” with subtle gradients and intricate details will often result in a highly stylized (sometimes abstract) vector interpretation rather than a perfect, photographic replica. However, if your goal is artistic stylization, these can be excellent starting points for “Digital Art.”
- Contrasting Elements: Images with good contrast between foreground and background elements generally produce cleaner traces. A solid, preferably white or transparent, background can make the tracing process much more efficient, especially if you intend to isolate the main subject.
- Resolution (Initial, for Raster): While the goal is infinite scalability, starting with a reasonably clear (even if small) raster image helps the tracing algorithm identify edges more accurately. Very blurry or low-resolution raster images might produce a muddy or overly simplified vector output.
- File Formats: Common raster formats like JPG, PNG, and GIF are all suitable for input into vector conversion software. Tophinhanhdep.com offers various “Image Tools (Converters)” that can handle these formats if you need to prepare them before vectorization.
Consider an image of a character or a simple graphic you’d like to use in a design. A “Sad/Emotional” image might be vectorized into a poignant silhouette, or a “Nature” scene simplified into a line art illustration for a unique “Aesthetic.” The initial choice of image influences the style and detail of your final vector graphic.
Essential Tools for Vectorization
While there are several ways to convert an image to vector, certain tools stand out for their robust capabilities and ease of use.
- Adobe Illustrator: The Industry Standard: Without a doubt, Adobe Illustrator is the most powerful and widely used software for creating and converting vector graphics. Its “Image Trace” feature (formerly Live Trace) is highly sophisticated, offering a wide array of presets and fine-tuning options to achieve professional-grade results. Many “Graphic Design” and “Digital Art” professionals rely on Illustrator for its precision and comprehensive toolset.
- Inkscape: The Free Alternative: For those seeking a powerful, open-source solution, Inkscape is an excellent choice. This free vector graphics editor offers a “Trace Bitmap” function that provides similar capabilities to Illustrator’s Image Trace, allowing users to convert raster images into vectors. It’s a fantastic option for hobbyists or those on a budget, enabling them to explore “Visual Design” without a subscription.
- Online Vector Converters: Tophinhanhdep.com, under its “Image Tools (Converters)” section, provides access to various online vector conversion utilities. These web-based tools are convenient for quick, straightforward conversions without needing to download or install software. They often use algorithms similar to desktop applications, providing a balance of speed and functionality. They are perfect for users who need to vectorize simple logos or illustrations on the go, making it easy to generate scalable assets for “Creative Ideas.”
For this guide, we will focus on Adobe Illustrator due to its prevalence and comprehensive features, but the underlying principles apply to most vectorization tools.
Step-by-Step Guide: Vectorizing with Adobe Illustrator’s Image Trace
Adobe Illustrator’s Image Trace feature is a powerful tool designed to automatically convert raster images into editable vector graphics. This process is a cornerstone of modern “Visual Design” workflows.
Setting Up Your Workspace and Importing the Image
The journey to a perfect vector begins with a properly set-up document in Illustrator.
Step 1: Open a New Document.
In Adobe Illustrator, begin by selecting File > New to create a new document. The document settings can be adjusted based on your project needs. For general purposes, you might specify a Width and Height (e.g., 470px by 350px, or a standard A4 canvas for print considerations).
Step 2: Define Document Settings.
Crucially, set the Color Mode. For online use, choose RGB (Red, Green, Blue). If your vectorized image is intended for print, select CMYK (Cyan, Magenta, Yellow, Black) to ensure accurate color reproduction. While the Resolution setting (e.g., 300 DPI) is more relevant for raster images, it’s good practice to consider it here for context if your initial raster image was of high quality. Once your settings are chosen, click Create.
Step 3: Place Your Raster Image.
Now, bring your image into the Illustrator artboard. Go to File > Place, navigate to your desired raster image (JPG, PNG, GIF), and click Place. Click on your artboard to position the image. If necessary, you can resize the image using the Free Transform Tool (E). To maintain aspect ratio while resizing, hold down Shift while dragging a corner. This initial image could be a photo you found on Tophinhanhdep.com for “Image Inspiration,” or a “Stock Photo” you plan to stylize into “Digital Art.”
Harnessing the Power of Image Trace Presets
Illustrator’s Image Trace panel is where the magic happens. It offers various presets designed to cater to different types of images and desired vector outputs.
Step 4: Open the Image Trace Panel.
With your placed image selected on the artboard, open the Image Trace panel by going to Window > Image Trace. A panel will appear, usually with a Preset dropdown menu at the top. Alternatively, for quick access, select your image and look for the Image Trace button in the Properties panel (on the right side by default) or in the control bar at the top, depending on your workspace setup.
Step 5: Select an Image Trace Preset.
The Preset menu is your starting point, offering a range of options that automatically configure tracing settings for common scenarios. Each preset aims to achieve a different stylistic outcome, aligning perfectly with various “Visual Design” and “Creative Ideas”:
- High Fidelity Photo / Low Fidelity Photo: These are excellent for converting detailed “Beautiful Photography” or complex “Images” into vectors, preserving a good amount of color and detail. ‘High Fidelity’ aims for maximum detail, while ‘Low Fidelity’ simplifies colors for a more artistic, painterly effect (e.g., 241 colors, as mentioned in the source).
- 3 Colors, 6 Colors, 16 Colors: Ideal for logos, icons, or graphics with flat colors. These presets simplify the image into a specific number of colors, producing clean, graphic vector art. Perfect for converting raster logos into scalable “Graphic Design” assets.
- Shades of Gray: Converts color images into detailed grayscale vectors. Useful for monochromatic “Aesthetic” designs or print layouts.
- Black and White Logo: Creates a simple, stark black and white vector, often used for minimalist logos or silhouettes.
- Sketched Art, Silhouettes, Line Art, Technical Drawing: These presets are tailored for specific artistic styles, often resulting in predominantly black-and-white, line-based drawings. ‘Sketched Art’ might mimic a hand-drawn look, while ‘Line Art’ focuses on clean outlines. These are great for transforming “Creative Ideas” or “Photo Ideas” into unique “Digital Art.”
Select the preset that best suits your image and the desired outcome. For a photo, Low Fidelity Photo or High Fidelity Photo is a good starting point. Observe how your image instantly transforms on the artboard.
Fine-Tuning Your Vector Output
While presets offer a quick solution, the true power of Image Trace lies in its advanced settings, allowing you to meticulously control the vectorization process.
Step 6: Access Advanced Image Trace Settings.
In the Image Trace panel, click the Advanced dropdown arrow to reveal a host of fine-tuning options. These settings allow you to refine the vector quality, detail, and color accuracy, enabling precise “Photo Manipulation” and customization.
- Mode: This dropdown lets you switch between
Color,Grayscale, andBlack and Whiteoutput, overriding the initial preset if needed. - Palette: When
Colormode is selected, you can choose how colors are determined:Automatic(Illustrator chooses),Limited(you specify the number of colors), orDocument Library(uses colors from your current document). TheColorsslider or number input will then let you specify the exact number of colors you want in your vector, which is critical for simplifying complex “Images” or achieving specific “Aesthetic” looks. - Threshold (for Black & White): This slider determines how light or dark pixels are interpreted as black or white. Increasing the
Thresholdvalue makes more pixels appear black, resulting in a darker, bolder vector. - Paths: Controls the accuracy of the vector paths to the original image. A higher value (e.g., 85%) creates more intricate paths, capturing more detail, while a lower value simplifies the paths.
- Corners: Adjusts the fidelity of corner detection. Higher values create sharper, more angular corners, while lower values produce smoother, more rounded ones.
- Noise: This setting controls the minimum area in pixels that can be vectorized. A lower
Noisevalue (e.g., 1px) will trace even tiny details, which can be useful but might also pick up unwanted artifacts. A higherNoisevalue ignores smaller details, leading to a cleaner, more generalized vector. Always aim for a lower value to retain more image details, but experiment to avoid excessive noise. - Method (
AbuttingorOverlapping):Abuttingcreates paths that meet edge-to-edge, whileOverlappingcreates paths that slightly overlap. This affects how shapes interact and can influence the cleanliness of the final vector, particularly for intricate “Digital Art.” - Options:
- Fill: If checked, the traced areas will be filled with color.
- Stroke: If checked, Illustrator will create outlines (strokes) around the traced paths.
- Ignore White: Crucially, checking
Ignore Whitewill make any white areas transparent, leaving only the colored or black vector shapes. This is highly useful for creating logos or elements with transparent backgrounds, ready for integration into “Wallpapers” or “Backgrounds.”
Experiment with these settings. The live preview will update as you make adjustments, allowing you to see the immediate impact of your changes. For example, applying a “Line Art” preset and then adjusting Threshold and Noise can transform a photo into a comic book-style outline.
Step 7: Save Your Custom Presets.
If you discover a combination of settings that yields a particularly desirable effect, click the Manage Presets button in the Image Trace panel and select Save as New Preset. This allows you to quickly apply your custom “Editing Styles” to future images, enhancing your workflow for “Creative Ideas.”
Expanding and Refining Your Vector Art
Once you are satisfied with the trace preview, the next critical step is to convert the temporary trace into actual, editable vector paths.
Step 8: Convert to Editable Paths with “Expand.”
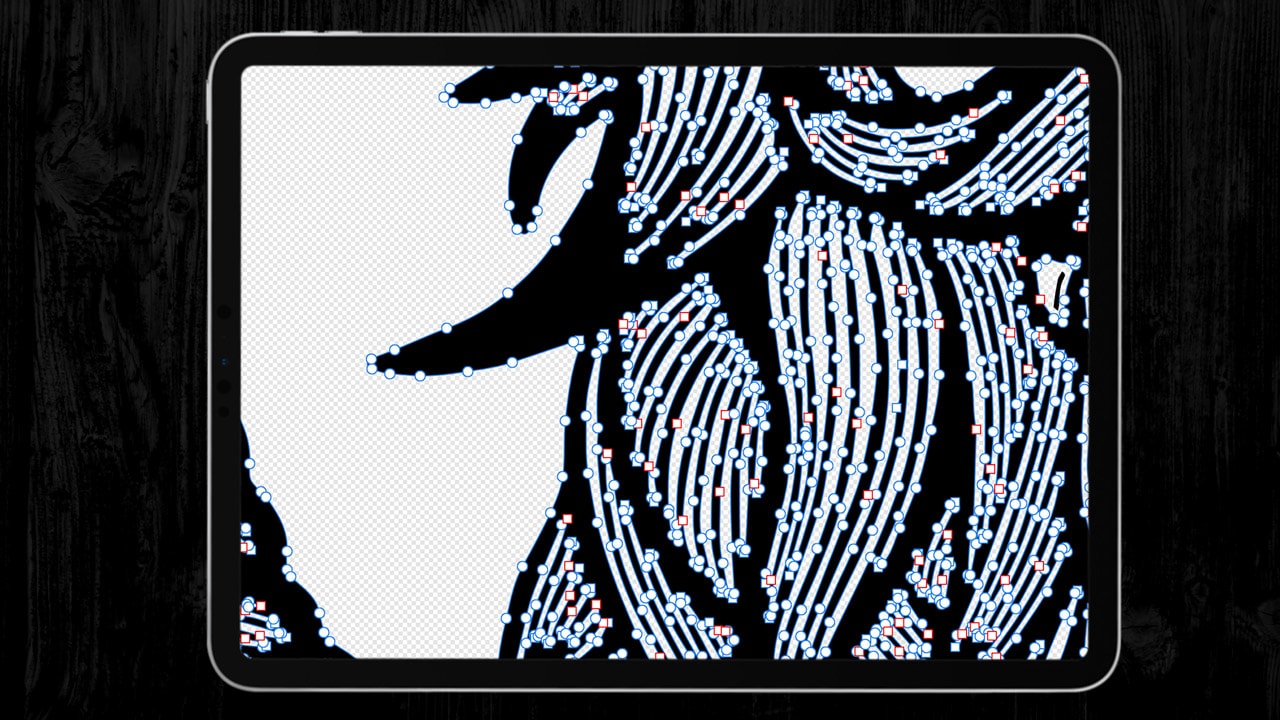
After fine-tuning, the Image Trace result is still a temporary object. To turn it into a fully editable vector graphic, select the traced image and click the Expand button. This button is typically found in the control bar at the top of the Illustrator window or within the Properties panel. Alternatively, you can go to Object > Image Trace > Expand. This action converts the traced lines and shapes into individual vector paths and anchor points, which are the fundamental building blocks of vector graphics.
Step 9: Ungroup Your Vector Shapes.
Upon expanding, your vector image will likely be grouped as a single object. To gain individual control over each color segment or shape, right-click on the expanded image and select Ungroup from the context menu. You may need to Ungroup multiple times until all individual shapes are separated. Now, when you open the Layers panel (Window > Layers), you’ll see a multitude of paths, especially if you used a High Fidelity Photo preset.
Step 10: Edit and Refine Your Vector Image. With your vector shapes ungrouped, you have full control for “Digital Art” and “Photo Manipulation”:
- Select Individual Shapes: Use the
Direct Selection Tool(A) to select and manipulate individual anchor points or segments of paths. You can move, delete, or reshape these points to fine-tune the contours of your vector. - Modify Colors: To change the color of a specific shape, select it with the
Selection Tool(V) orDirect Selection Tool(A), then use theFillandStrokecolor pickers in thePropertiespanel orToolspanel to apply new colors. - Batch Color Changes: A powerful technique for uniform edits: select a shape with a specific color, then go to
Select > Same > Fill Color. This will automatically select all other shapes in your artwork that share that exact fill color. You can then change their color simultaneously or even delete them (e.g., deleting a white background using theBackspacekey ifIgnore Whitewasn’t used during tracing). This feature is particularly useful for refining “Aesthetic” or “Abstract” designs. - Add New Elements: Use Illustrator’s drawing tools like the
Pen Tool(P),Pencil Tool(N), orShape Tools(Rectangle, Ellipse, etc.) to add new vector elements or fill in gaps within your design. - Smooth Paths: If some paths appear jagged, select them and use
Object > Path > Simplify...to reduce the number of anchor points and create smoother curves.
This stage allows for extensive customization, transforming a traced image into a truly unique “Digital Art” piece, ready for “Graphic Design” projects.
Beyond Illustrator: Other Vectorization Approaches and Tophinhanhdep.com’s Role
While Adobe Illustrator is a powerhouse, it’s not the only tool for vectorizing images. Tophinhanhdep.com, as a hub for “Image Tools” and “Visual Design” resources, also supports alternative methods and highlights the broader ecosystem of image manipulation.
Alternative Software: Inkscape and Online Converters
For those who may not have access to Adobe Illustrator or prefer different workflows, several other effective options exist.
- Inkscape: The Open-Source Vector Editor: Inkscape provides a robust alternative for vector creation and conversion. Its “Trace Bitmap” feature (found under
Path > Trace Bitmap) allows users to import raster images (JPG, PNG) and convert them into vectors. Similar to Illustrator, Inkscape offers various tracing methods (e.g., Brightness Cutoff for silhouettes, multiple scans for color images) and parameters to adjust the detail and color output. It’s an excellent choice for learning “Visual Design” and “Graphic Design” principles without financial commitment, offering a comprehensive suite of tools for “Digital Art.” - Online Vector Converters on Tophinhanhdep.com: Our platform, Tophinhanhdep.com, is dedicated to providing comprehensive “Image Tools,” including convenient online vector converters. These tools are ideal for quick, simple conversions without the need for software installation.
- How they work: You typically upload your image (JPG, PNG), and the online tool applies a vectorization algorithm. Many offer basic “Filters” and “Adjustments” such as
Brightness,Contrast,Threshold(for black and white results), andPosterized(to create vector images with a limited number of colors, e.g., 5 colors). You can often choose between different vectorizationMethods, such asContourfor outlines orPosterizedfor multi-color conversions. - Benefits: These tools are incredibly user-friendly and accessible from any web browser, making them perfect for “Image Inspiration” quickly turned into vector assets, or for converting “Stock Photos” into scalable elements for simple “Visual Design” projects. After conversion, you can typically
Downloadthe resulting SVG file, which is a widely supported vector format. - Reinforcing Tophinhanhdep.com’s Offerings: Our platform ensures you have the right tools at your fingertips. Whether you need a simple conversion or a starting point for more complex “Creative Ideas,” Tophinhanhdep.com’s “Image Tools” simplify your workflow.
- How they work: You typically upload your image (JPG, PNG), and the online tool applies a vectorization algorithm. Many offer basic “Filters” and “Adjustments” such as
These alternatives ensure that regardless of your software preference or budget, you have viable options to transform your raster images into versatile vector graphics.
Saving Your Vector Masterpiece
The final step in the vectorization process is saving your work in an appropriate vector format to preserve its infinite scalability and quality.
- Choosing the Right Vector Format:
- SVG (Scalable Vector Graphics): This is an XML-based vector image format for two-dimensional graphics with support for interactivity and animation. SVG is widely supported across web browsers and many design applications, making it an excellent choice for web graphics, icons, and illustrations. It’s the go-to for ensuring your “Wallpapers” or “Backgrounds” with vector elements look crisp on any screen.
- AI (Adobe Illustrator Artwork): Illustrator’s native file format. It’s the best choice for saving your project if you plan to continue editing it in Illustrator, as it preserves all layers, effects, and editable paths.
- EPS (Encapsulated PostScript): A widely used vector format for print. It’s highly compatible with various design and publishing software.
- PDF (Portable Document Format): While often used for documents, PDF can also contain vector data. It’s a good choice for sharing vector files that need to be viewed and printed consistently across different systems.
- Saving Your File: In Adobe Illustrator, go to
File > Export > Export As. In the dialog box, give your file a meaningful name and select your desired vector format (e.g., SVG, AI, EPS, PDF) from theFormatdropdown menu. ClickExportorSave. - The Master Copy Concept: Always save your original, editable vector file as a master copy. From this master, you can export different versions (e.g., smaller PNGs for web, high-res TIFFs for print, or different SVG variations) as needed, without ever compromising the original quality. This practice is vital for maintaining the integrity of your “Graphic Design” and “Digital Art” assets.
Enhancing Your Visuals with Tophinhanhdep.com’s Image Tools and Inspiration
Vectorization is just one powerful tool in your “Visual Design” arsenal. Tophinhanhdep.com is dedicated to providing a holistic experience for all your image needs, integrating seamlessly with your vector creation workflow.
- Beyond Converters: After creating your vector image, you might need to further optimize it. Tophinhanhdep.com offers additional “Image Tools” such as
Compressorsto reduce file sizes for web use, ensuring your vectorized web graphics load quickly. OurOptimizerscan fine-tune your images for various platforms. - AI Upscalers vs. Vectorization: It’s important to differentiate. While vectorization creates scalable, mathematical paths,
AI Upscalers(also available on Tophinhanhdep.com) are designed to enhance the resolution of raster images. An upscaler makes a pixel-based image larger with improved clarity, but it still remains pixel-based. Vectorization fundamentally changes the image’s structure. Both have their uses, and understanding when to apply each tool is key to effective “Digital Photography” and “Editing Styles.” - Image Inspiration & Collections: Tophinhanhdep.com isn’t just about tools; it’s a source of
Image Inspiration & Collections. Once you master vectorization, you can apply these skills to create custom elements forPhoto Ideas, design uniqueMood Boards, or contribute toThematic CollectionsandTrending Stylesby offering scalable, crisp visuals. Imagine taking a “Nature” photo, vectorizing elements from it, and integrating them into a captivating “Aesthetic” wallpaper design. - Creative Possibilities: From creating “Abstract” backgrounds to designing custom icons for your
Sad/Emotionalthemed poetry site, the ability to vectorize opens up endless “Creative Ideas.” Tophinhanhdep.com provides the “Backgrounds,” “Wallpapers,” and visual resources to support these explorations, helping you bring your “Digital Art” to life.
By leveraging vectorization and the diverse “Image Tools” and “Visual Design” resources available on Tophinhanhdep.com, you are equipped to produce high-quality, adaptable, and stunning visual content for any purpose.
In conclusion, the ability to turn a raster image into a vector graphic is a fundamental skill that every designer, photographer, and creative individual should possess. It transcends the limitations of pixelation, offering unparalleled scalability and flexibility crucial for modern “Graphic Design” and “Digital Art.” Whether you choose the comprehensive power of Adobe Illustrator, the open-source versatility of Inkscape, or the convenient online “Image Tools” provided by Tophinhanhdep.com, the journey to pixel-perfect, infinitely scalable visuals is now within your reach. Embrace vectorization, and unlock a new dimension of creative control over your images and “Visual Design” projects. Explore Tophinhanhdep.com today for more inspiration and tools to elevate your visual content.