How to Turn an Image into a Vector in Adobe Illustrator: A Comprehensive Guide

In the vibrant world of digital imagery and visual design, understanding the fundamental differences between image types and how to manipulate them is paramount. Whether you’re a graphic designer, a digital artist, a photographer looking to enhance your portfolio, or simply someone keen on crafting stunning visuals, the ability to convert a raster image into a vector graphic in Adobe Illustrator is an indispensable skill. This guide, brought to you by Tophinhanhdep.com, a leading resource for images, photography, and visual design tools, will walk you through the process step-by-step, empowering you to create scalable, crisp, and professional-grade artwork.
Tophinhanhdep.com is dedicated to providing inspiration and practical tools for all your image needs, from captivating Wallpapers and Backgrounds to High Resolution Stock Photos and advanced Image Tools. Vectorization is a cornerstone of modern Graphic Design and Digital Art, enabling creative ideas to transcend resolution limitations.
Understanding Raster vs. Vector Graphics
Before diving into the “how-to,” it’s crucial to grasp what makes vector graphics distinct from their raster counterparts. This foundational knowledge will illuminate why vectorization is so powerful and when it’s the right choice for your visual projects.

The Core Differences: Pixels vs. Paths
At its heart, the distinction lies in how these image types are constructed.
-
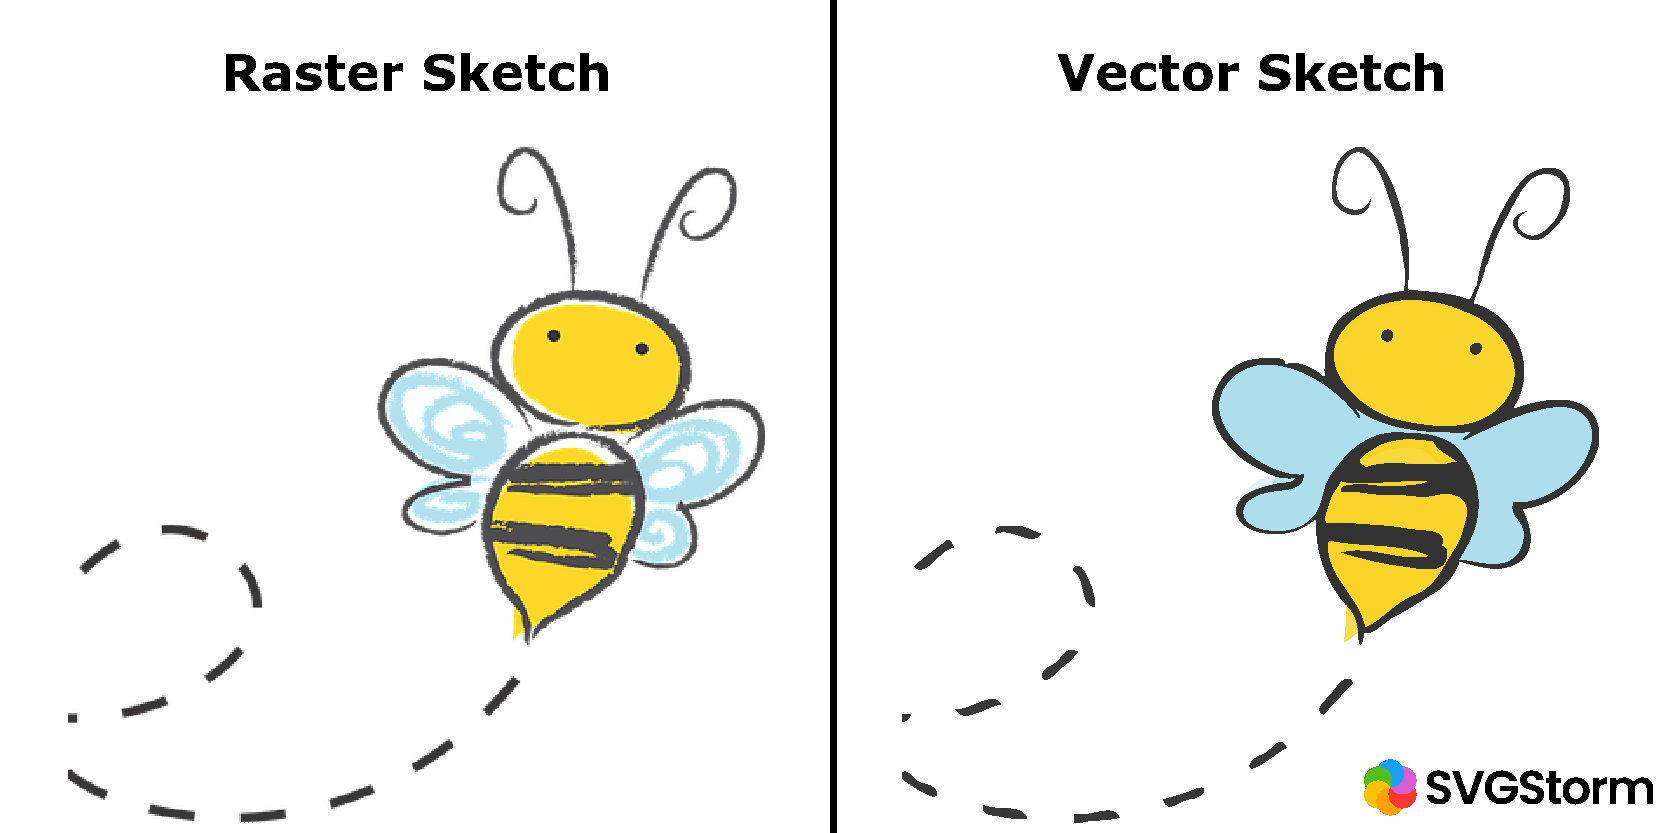
Raster Images: These are the most common type of digital images we encounter daily. Think of JPG, PNG, GIF, and TIFF files. Raster images are made up of a grid of individual colored squares called pixels. Each pixel holds specific color information, and together, millions of these tiny squares form a complete image. This pixel-based structure allows raster images to display intricate details, subtle color gradients, and photographic realism, making them perfect for Beautiful Photography, detailed Nature scenes, or complex Abstract art. However, their resolution is fixed. When you enlarge a raster image beyond its original dimensions, the pixels become visible, leading to a “pixelated” or blurry appearance. This loss of quality is a significant limitation for many design applications.
-
Vector Graphics: In contrast, vector graphics are not composed of pixels. Instead, they are artwork made up of mathematical equations that define points, lines, curves, and shapes. These mathematical descriptions dictate the position, color, and outline of every element in the image. Because they are defined by mathematical formulas rather than a fixed grid of pixels, vector graphics are inherently resolution-independent. This means you can scale a vector image up or down to any size – from a tiny icon to a massive billboard – without any loss of quality, jagged lines, or blurriness. The artwork will always appear crisp and sharp. Common vector file formats include AI (Adobe Illustrator), EPS, SVG (Scalable Vector Graphics), and PDF (which can contain vector data).
Why Vectorize? Quality, Scalability, and Applications
The decision to convert an image into a vector is usually driven by the need for superior quality, infinite scalability, and the specific demands of various Visual Design applications.
-
Infinite Scalability: This is the primary advantage. Logos, icons, and illustrations are prime candidates for vectorization because they often need to be used across diverse mediums and sizes. Imagine a company logo that needs to appear perfectly on a business card, a website, a large banner, or a company vehicle. A raster logo would inevitably pixelate at larger sizes, compromising brand integrity. A vector logo, however, retains its pristine clarity at every scale. This is vital for “Graphic Design” and ensuring consistent branding.
-
Crisp, Clean Lines: Vector graphics produce incredibly sharp and clean lines, which is ideal for line art, technical drawings, and precise illustrations. This precision is invaluable in fields requiring exact representations, enabling stunning “Digital Art” or “Creative Ideas” to be realized without compromise.
-
Smaller File Sizes for Simple Graphics: While complex vector files can be large, simple graphics like logos or icons often have significantly smaller file sizes as vectors compared to high-resolution raster versions. This is beneficial for web performance and storage.
-
Ease of Editing and Customization: Once an image is vectorized, its individual components (paths, shapes, colors) become editable elements within Illustrator. You can easily change colors, reshape paths, add or remove elements, and manipulate the graphic in ways impossible with a flattened raster image. This flexibility makes vectorization an essential step in “Photo Manipulation” and creating truly custom “Aesthetic” designs.
-
Preparation for Print: For any item intended for professional printing – be it t-shirts, brochures, packaging, or signage – vector graphics are often preferred or even required. They ensure a high-quality print without the risk of pixelation that raster images might introduce, contributing to flawless “Beautiful Photography” when adapted to illustrative forms.
At Tophinhanhdep.com, we emphasize the importance of using the right tool for the job. While our platform offers an extensive collection of Images, including “Wallpapers” and “Backgrounds” in raster formats for rich detail, we also understand the critical role of vector graphics in professional output. Our “Image Tools” section, while offering “Compressors” and “Optimizers” for raster files, highlights the broader spectrum of image processing, with vector conversion being a key component.
Preparing Your Image for Vectorization in Illustrator
Successfully converting a raster image to a vector graphic in Adobe Illustrator begins with careful preparation. This involves selecting an appropriate source image and configuring your Illustrator document correctly.
Selecting the Right Image for Optimal Results
While Illustrator’s Image Trace tool is powerful, the quality of your vectorized output heavily depends on the characteristics of your input image.
- Clear Edges and Contrast: Images with well-defined edges and strong contrast between colors or shapes generally yield better tracing results. Blurry or low-contrast images can lead to ambiguous paths and less distinct vector shapes.
- Simplicity for Cleaner Vectors: If your goal is a simple, stylized vector graphic (like an icon or logo), choose an image with fewer details and solid color areas. Overly complex “Beautiful Photography” or highly detailed “Nature” scenes may result in a vector file with an unmanageable number of paths and colors, or a highly stylized (abstracted) version if that’s your intent.
- Single Subject over Complex Scenes: For beginners, working with images that feature a single, clear subject and a relatively clean or transparent background is recommended. This minimizes noise and helps Illustrator focus on the main elements. This applies whether you’re working with “Stock Photos” or your own “Digital Photography.”
- Resolution: While vectors are resolution-independent, starting with a reasonably “High Resolution” raster image can provide more original detail for Illustrator to interpret, especially when using “High Fidelity Photo” trace presets. Tophinhanhdep.com offers numerous “High Resolution” images that serve as excellent starting points for vectorization, allowing for intricate detail to be captured in the conversion.
Consider the desired “Editing Styles.” Are you aiming for a cartoonish outline, a monochromatic logo, or a semi-realistic illustration? Your choice of input image should align with your end goal. For instance, an “Aesthetic” image with soft gradients might not produce a crisp line art vector, but could be beautifully transformed into a multi-color vector illustration.
Setting Up Your Adobe Illustrator Document
Once you have your chosen image, the next step is to prepare your workspace in Adobe Illustrator.
- Create a New Document:
- Open Adobe Illustrator.
- Go to
File > New(orCtrl+N/Cmd+N). - A “New Document” window will appear. Here, you can define your canvas size (e.g., A4, Letter, Web, Print presets). While the final vector is scalable, working on a canvas that approximates your intended primary use size can be helpful for initial visual assessment.
- Resolution: For print-oriented projects, setting the raster effects resolution to
300 ppi (pixels per inch)is a standard best practice, though it primarily affects any raster effects or images within your document, not the vector paths themselves. - Color Mode:
- For digital-only uses (web, screen, social media), select
RGB (Red, Green, Blue). Tophinhanhdep.com’s “Digital Photography” and “Wallpapers” are typically in RGB. - For projects intended for commercial printing, select
CMYK (Cyan, Magenta, Yellow, Black). This is essential for accurate color reproduction in print.
- For digital-only uses (web, screen, social media), select
- Once your settings are configured, click
Create. Your blank artboard will appear.
- Place Your Image:
- With your new document open, go to
File > Place...(orShift+Ctrl+P/Shift+Cmd+P). - Navigate to your image file, select it, and click
Place. - Click on your artboard to place the image. If it’s too large or small, you can resize it. Hold down
Shiftwhile dragging a corner handle to maintain its proportions.
- With your new document open, go to
You’ve now successfully prepared your document and imported your raster image. The stage is set for the transformative power of Image Trace. Tophinhanhdep.com offers a wealth of “Image Inspiration” and “Photo Ideas” that can spark your creativity at this stage, encouraging you to experiment with different images and envision their vectorized potential.
The Core Process: Using Image Trace in Illustrator
Adobe Illustrator’s Image Trace feature is the heart of converting raster images into scalable vector graphics. It intelligently analyzes the pixels of your image and converts them into editable vector paths.
Initial Trace and Accessing the Image Trace Panel
- Select Your Image: Using the
Selection tool(the black arrow,Vkey), click on the raster image you’ve placed on your artboard. - Open the Image Trace Panel: Go to
Window > Image Trace. A dedicated panel will appear, offering a comprehensive set of options.- Alternatively, with the image selected, you might see an
Image Tracebutton directly in thePropertiespanel (on the right side of the screen by default) or in the control bar at the top, depending on your workspace setup. Clicking this button or selectingObject > Image Trace > Makewill perform an initial default trace.
- Alternatively, with the image selected, you might see an
Once the Image Trace panel is open, you’ll see a Preset dropdown menu and other settings. The most straightforward way to begin is to click the Trace button or simply select a preset. Illustrator will immediately process your image, giving you a preview of the vectorized result.
Exploring Image Trace Presets for Diverse Styles
The Preset dropdown menu is a powerful starting point, offering a range of pre-configured settings designed for different types of images and desired “Editing Styles.” Choosing the right preset can dramatically alter your outcome, allowing for a spectrum of “Visual Design” possibilities.
Here are the key presets and their typical applications:
-
High Fidelity Photo / Low Fidelity Photo:
- These are ideal for converting detailed photographs or complex artwork.
High Fidelity Photoaims to preserve as much detail and color as possible, resulting in a vector graphic that closely resembles the original raster image, often with many colors and intricate paths. This is suitable for transforming “Beautiful Photography” or “Digital Photography” into a stylized, but still recognizable, vector form.Low Fidelity Photooffers a slightly more simplified version, reducing the number of colors and details while still maintaining a photographic aesthetic.- Application: Perfect for creating vector portraits, landscape illustrations, or transforming “Aesthetic” images into digital art pieces.
-
3 Colors, 6 Colors, 16 Colors:
- These presets reduce your image to a limited palette of colors, making them perfect for logos, icons, and simplified illustrations.
- The chosen number indicates the maximum colors Illustrator will use in the vector output.
- Application: Excellent for “Graphic Design” projects where a clean, limited color palette is desired for branding or promotional materials. They can turn complex images into vibrant, simplified “Abstract” representations.
-
Shades of Gray:
- Produces a detailed grayscale vector image.
- Application: Useful for converting black and white photos, pencil sketches, or creating monochrome “Digital Art.”
-
Black and White Logo:
- This is a highly simplified preset, creating a vector with just two colors: black and white. It’s often used for solid shapes and silhouettes.
- Application: The go-to for converting basic logos, creating stark “Silhouettes,” or generating clean line art from simple drawings. It’s a core tool for fundamental “Graphic Design” elements.
-
Sketched Art, Silhouettes, Line Art, Technical Drawing:
- These presets are tailored for specific illustrative styles, typically resulting in black-and-white or monochromatic line-based drawings.
Sketched Arttries to preserve the hand-drawn feel.Line Artaims for clean, precise lines.Silhouettescreates solid shapes based on the outline of your subject.Technical Drawingis optimized for blueprints or schematic diagrams.- Application: Ideal for converting scanned drawings, creating vector illustrations from “Creative Ideas,” or extracting outlines from “Nature” images for stylistic graphics.
As you cycle through these presets, observe how the vector output changes. Tophinhanhdep.com encourages experimentation to discover the “Trending Styles” and “Photo Ideas” that resonate with your project.
Fine-Tuning Your Vector Conversion with Advanced Settings
After selecting a preset, you’ll often need to fine-tune the results using the Image Trace Panel’s advanced options. Click the Advanced dropdown arrow within the panel to reveal these controls:
- Mode: Allows you to manually switch between
Color,Grayscale, andBlack and Whiteif you didn’t use a color-specific preset. - Colors/Palette: If
Modeis set toColororGrayscale, this slider (or dropdown) lets you control the number of colors or shades. Dragging it left simplifies the image, while dragging it right adds more detail. This is key for achieving a specific “Aesthetic” or color reduction strategy. - Threshold (for Black & White mode): This slider determines how light or dark a pixel needs to be to turn black. Increasing the threshold makes more pixels black, resulting in a bolder, darker trace. Decreasing it makes the trace lighter.
- Paths: Controls how closely the vector paths conform to the original pixel shapes. Increasing
Pathscreates a more accurate, detailed trace, but can result in a more complex vector with many anchor points. Decreasing it simplifies the paths. - Corners: Adjusts the fidelity of corners. Higher values produce sharper, more angular corners, while lower values result in smoother, more rounded corners. This is crucial for matching the desired “Editing Styles” for elements like logos or illustrations.
- Noise: This setting ignores smaller areas of color (noise) in your original image. Increasing
Noisecleans up small imperfections or specks, simplifying the vector. Decreasing it retains more fine detail, which can be useful for preserving subtle textures but might also pick up unwanted artifacts. - Method:
Abutting: Creates cut-out paths that fit together like a mosaic.Overlapping: Creates stacked paths that can overlap, which can be easier to manage for some designs.
- Snap Curves to Lines: Attempts to convert curved lines into straight lines where appropriate, useful for geometric designs.
- Ignore White: This is a highly useful checkbox, especially for line art or logos. When checked, Illustrator will ignore any white areas in the source image, resulting in a vector graphic with a transparent background. This is a common requirement for clean “Graphic Design” assets.
- Preview: Ensure the
Previewcheckbox is selected so you can see your adjustments in real-time.
By carefully manipulating these settings, you can transform almost any raster image into a vectorized version that perfectly matches your “Creative Ideas” and project requirements. Tophinhanhdep.com understands the need for precision in “Visual Design” and offers resources that complement these advanced techniques, from “AI Upscalers” that can improve source image quality to diverse “Image Collections” for practice.
Refining and Exporting Your Vector Graphic
Once you’re satisfied with the initial trace, the next crucial steps involve converting the traced image into editable vector paths, refining it, and saving it in an appropriate format. This phase truly unlocks the power of vectorization for your “Graphic Design” and “Digital Art” projects.
Expanding and Ungrouping for Editable Paths
The Image Trace result you see on your artboard is still a special kind of object – it’s a “live” trace, meaning the settings can still be adjusted. To convert it into actual, editable vector paths, you need to Expand it.
-
Expand Your Image Trace:
- With your traced image still selected, look for the
Expandbutton in thePropertiespanel or the control bar at the top of the screen. - Alternatively, go to
Object > Image Trace > Expand. - Clicking
Expandconverts the tracing into a group of vector paths, filled with colors, ready for individual manipulation. You’ll typically see blue outlines indicating the newly created paths.
- With your traced image still selected, look for the
-
Ungroup for Individual Control:
- After expanding, your vector graphic will likely be grouped. To edit individual shapes or colors, you need to ungroup it.
- With the expanded vector still selected, right-click on it and choose
Ungroupfrom the context menu (or go toObject > Ungroup, or useShift+Ctrl+G/Shift+Cmd+G). You may need toUngroupmultiple times until all elements are individually selectable.
-
Removing Unwanted Elements (e.g., White Backgrounds):
- A common task is removing a white background that wasn’t eliminated by the
Ignore Whitesetting or to remove any other unwanted color. - Select the
Direct Selection Tool(the white arrow,Akey). - Click on a white (or any unwanted color) shape.
- Go to
Select > Same > Fill Color. This will select all shapes on your artboard that have the exact same fill color. - Press
DeleteorBackspaceon your keyboard. This efficiently removes all instances of that specific color, leaving you with a clean design, often with a transparent background, which is essential for creating versatile “Visual Design” assets.
- A common task is removing a white background that wasn’t eliminated by the
Post-Conversion Editing and Customization
Now that your image is a fully editable vector graphic, the creative possibilities are vast. This is where your “Creative Ideas” truly come to life, transforming a mere trace into a unique piece of “Digital Art” or a polished “Graphic Design” element.
- Changing Colors: Select individual shapes or groups of shapes using the
Direct Selection Tool(A) orGroup Selection Tool(nested under theDirect Selection Tool). Use theFillandStrokecolor pickers in thePropertiespanel orToolspanel to apply new colors. You can experiment with different color palettes to achieve desired “Aesthetic” results, perhaps inspired by “Trending Styles” seen on Tophinhanhdep.com. - Reshaping Paths: Use the
Direct Selection Tool(A) to select and move individual anchor points, or thePen Tool(P) to add/delete points or adjust Bezier curves, giving you granular control over every line and curve. - Combining and Subtracting Shapes: Use the
Pathfinderpanel (Window > Pathfinder) to combine shapes, subtract one shape from another, intersect them, or divide them. This is fundamental for complex “Graphic Design” and “Photo Manipulation” techniques. - Adding New Elements: Use Illustrator’s drawing tools (Pen Tool, Pencil Tool, Shape Tools) to add new vector elements, text, or embellishments to your vectorized image. You can integrate other vector assets from Tophinhanhdep.com’s “Image Collections” or create entirely new components.
- Applying Effects: Explore
Effectmenu options to add stylistic touches like shadows, glows, or artistic filters, further customizing your “Digital Art.” For example, you might apply a “Scribble” effect to match a hand-drawn look, as discussed in some tutorials found on Tophinhanhdep.com.
This stage is a testament to the power of “Visual Design,” allowing you to refine your image beyond its original form, creating new narratives and functionalities from the vectorized content.
Saving Your Vector File for Versatile Use
The final step is to save your masterpiece in the appropriate vector format. Always remember to save your work frequently, and to keep the vector version as your master copy, as it retains the infinite scalability.
-
Saving Your Master File (AI):
- Go to
File > Save As...(orShift+Ctrl+S/Shift+Cmd+S). - Choose
Adobe Illustrator (*.AI)as the format. This is Illustrator’s native file format and preserves all layers, editability, and specific Illustrator features. This should always be your primary save format.
- Go to
-
Exporting for Specific Uses (SVG, EPS, PDF):
- For wider compatibility and web use, you’ll typically export your vector graphic.
- Go to
File > Export > Export As... - In the export dialog box:
- SVG (Scalable Vector Graphics): The preferred format for web graphics, as it’s an XML-based vector image format that supports interactivity and animation. Widely supported across browsers and design programs.
- EPS (Encapsulated PostScript): An older but still widely used vector format, especially in print and prepress workflows. It’s highly compatible with various design software.
- PDF (Portable Document Format): PDFs can contain vector data, making them suitable for sharing vector graphics while maintaining quality, and for certain print production workflows. Ensure “Preserve Illustrator Editing Capabilities” is checked if you intend to reopen and edit it in Illustrator.
- Give your file a descriptive name and choose the desired format from the dropdown menu. Click
Export.
Tophinhanhdep.com recognizes the importance of versatile image formats. While we provide “Image Tools” for converting various file types, understanding native vector formats and their applications is crucial for professionals. After creating your vector, you might also use Tophinhanhdep.com’s “Compressors” or “Optimizers” if you decide to export a raster version of your vector for web use (e.g., a JPG or PNG), ensuring efficient delivery of your “Digital Photography” or “Graphic Design” content.
Beyond Basic Vectorization: Creative Applications and Tophinhanhdep.com Resources
Vectorization in Adobe Illustrator is more than just a technical conversion; it’s a gateway to boundless creative possibilities. Integrating this skill into your broader “Visual Design” workflow can significantly elevate the quality and versatility of your output.
Integrating Vectorization into Visual Design Workflows
The ability to turn an image into a vector graphic unlocks numerous applications across various design disciplines:
- Branding and Logos: Perhaps the most classic application. Any logo designed for a business, whether it’s an “Abstract” emblem or a stylized “Nature” illustration, benefits immensely from being a vector. It ensures brand consistency across all touchpoints, from digital presence to physical merchandise.
- Iconography: Website icons, app interfaces, and infographics rely heavily on scalable vector icons. Vectorization allows designers to create custom icon sets from existing images or sketches, maintaining a cohesive “Aesthetic” throughout a project.
- Illustrations and Digital Art: Artists can vectorize hand-drawn sketches or “Photo Ideas” to create crisp digital illustrations that can be colored, textured, and infinitely scaled without loss of detail. This facilitates the creation of unique “Digital Art” that blends traditional and modern techniques.
- Print Media and Merchandise: For anything printed—from t-shirts and mugs to posters and brochures—vector graphics are indispensable. They guarantee sharp lines and vibrant colors on any material, making sure your “Beautiful Photography” (when stylized) or “Graphic Design” shines through.
- Web Design Assets: SVG (Scalable Vector Graphics) files are increasingly used on the web for their responsiveness and crisp appearance on high-resolution screens. Vectorizing elements for web design ensures a pixel-perfect display across all devices, enhancing user experience.
- Mood Boards and Thematic Collections: Designers often build “Mood Boards” and “Thematic Collections” to define the visual direction of a project. Custom vectorized elements, perhaps derived from “Sad/Emotional” or “Aesthetic” images, can be tailored to fit specific themes, contributing unique assets that embody “Trending Styles.”
By mastering vectorization, you transform images from static pictures into flexible, editable design components, empowering you to tackle complex “Photo Manipulation” and realize ambitious “Creative Ideas.”
Leveraging Tophinhanhdep.com for Image Inspiration and Tools
Tophinhanhdep.com is your ultimate partner in your visual journey, offering a symbiotic relationship with your vectorization efforts. Our extensive platform complements your skills in Adobe Illustrator in multiple ways:
- Vast Image Collections for Inspiration: Whether you’re seeking a specific “Nature” landscape to vectorize into a stylized background, an “Abstract” pattern for a logo, or emotive “Sad/Emotional” or “Beautiful Photography” to transform into compelling digital art, Tophinhanhdep.com offers a rich repository. Our curated “Image Inspiration” and “Photo Ideas” sections are perfect for sparking creativity or finding the ideal source material for your next vector project. Explore our “Trending Styles” to ensure your vectorized creations are always fresh and relevant.
- High Resolution and Stock Photos: Find high-quality raster images within our “Stock Photos” and “High Resolution” collections that are perfect candidates for vectorization. A cleaner, more detailed source image from Tophinhanhdep.com will generally yield a better vector trace, making your work in Illustrator more efficient and rewarding.
- Complementary Image Tools: Beyond vector conversion, Tophinhanhdep.com provides a suite of “Image Tools” that can assist you at various stages of your workflow:
- AI Upscalers: Before you even begin the vectorization process, if you have a low-resolution raster image that you still want to use as a source, our “AI Upscalers” can enhance its quality, providing Illustrator with more data for a more accurate trace.
- Converters: While Illustrator handles vector output, Tophinhanhdep.com’s “Converters” can help you transform your vector files into other raster formats (like JPG or PNG) when you need them for web use or other applications that don’t support vectors.
- Compressors and Optimizers: Once you’ve vectorized an image and potentially created raster derivatives, our “Compressors” and “Optimizers” ensure these files are web-ready, loading quickly and efficiently without compromising visual integrity.
- Image-to-Text: For designers working with typography or extracting textual elements from images, this tool can also be a valuable asset in a broader “Graphic Design” workflow.
By integrating the power of Adobe Illustrator’s vectorization capabilities with the comprehensive resources and tools available on Tophinhanhdep.com, you are equipped to navigate the complexities of modern “Visual Design,” producing stunning, scalable, and versatile imagery for any purpose.
In conclusion, the journey to converting a raster image into a vector in Adobe Illustrator is a skill that opens up a world of professional and creative possibilities. From understanding the core principles of pixels versus paths to mastering the nuances of Image Trace and its advanced settings, you are now empowered to create graphics that are infinitely scalable and impeccably sharp. As you continue to explore “Graphic Design,” “Digital Art,” and “Photo Manipulation,” remember that Tophinhanhdep.com remains your go-to destination for “Image Inspiration,” “High Resolution” assets, and indispensable “Image Tools” that will support every facet of your visual endeavors. Embrace the versatility of vectors, and let your creativity flourish without boundaries.