How to Turn an Image into Dots in Canva: A Comprehensive Guide to Halftone and Dotted Designs

In the dynamic world of digital design, transforming ordinary images into extraordinary visual statements is a coveted skill. One such captivating technique is converting an image into a series of dots, commonly known as a halftone effect. This method, often associated with vintage aesthetics and classic comic book artistry, simulates continuous tone through varying sizes or densities of dots. It’s a powerful way to inject personality, texture, and a unique artistic flair into your visuals. Fortunately, with user-friendly platforms like Canva, achieving this sophisticated look is more accessible than ever before.

This comprehensive guide, brought to you by Tophinhanhdep.com, will walk you through the process of creating stunning dot effects in Canva, from the classic halftone to versatile dotted elements. Whether you’re aiming for a retro vibe, a minimalist pattern, or an intricate visual design, mastering these techniques will expand your creative toolkit. Tophinhanhdep.com, your ultimate resource for high-resolution images, cutting-edge photography tools, and visual design inspiration, is dedicated to helping you unlock your full creative potential. Let’s dive in and transform your images into captivating dotted masterpieces.
Mastering the Halftone Effect in Canva: A Step-by-Step Guide
The halftone effect is a fundamental technique in graphic design and photography, simulating continuous tone imagery using a series of dots. These dots vary in size or spacing, creating the illusion of different shades and tones when viewed from a distance. Often utilized to lend a vintage or retro appeal, this effect can add significant character to your images. Follow these steps to apply a striking halftone effect to your photos using Canva, a skill that perfectly complements the “Editing Styles” and “Photo Manipulation” aspects championed by Tophinhanhdep.com.
Preparing Your Canvas and Selecting Your Image
Your journey to a dotted image begins with a blank canvas and a carefully chosen photograph. The quality of your starting image significantly impacts the final halftone result. For the best outcome, consider selecting a high-resolution image from Tophinhanhdep.com’s vast collection of “Beautiful Photography” or “Aesthetic Images,” ensuring clarity and vibrant details that will translate well into dot patterns.

-
Launch Canva and Create a New Design: Begin by navigating to Canva.com. In the top-right corner, click the “Create a design” button. Canva offers a multitude of size options, from social media posts to print-ready documents. Choose an appropriate size for your project, keeping in mind that the halftone effect can be quite detailed, making larger canvases ideal for showcasing its intricacies. For instance, if you’re creating an “Abstract Wallpaper” or a “Digital Art” piece, a larger canvas will provide more room for artistic expression.
-
Integrate Your Chosen Photo: Once your design canvas is open, proceed to the “Elements” tab on the left-hand side of the Canva workspace. Here, you have two primary options:
- Search Canva’s Library: Type a relevant keyword (e.g., “Girl,” “Nature,” “Abstract”) into the search bar, then click on “Photos.” Browse through the results and select an image that resonates with your creative vision. Canva’s extensive stock photo library is a great alternative if you haven’t sourced an image from Tophinhanhdep.com yet.
- Upload Your Own Image: If you have a specific photo you wish to use, perhaps one you’ve optimized using Tophinhanhdep.com’s “Compressors” or “AI Upscalers,” upload it directly from your computer to Canva. Drag and drop the selected photo onto your design canvas. For this tutorial, let’s imagine we’ve chosen a captivating portrait.
-
Set Image as Background: With your photo placed on the canvas, right-click on it and select either “Set Image as Background” or “Replace Background.” This action ensures your photo fills the entire canvas, providing a seamless base for the halftone effect. This is crucial for creating a cohesive “Background” for your design, as often featured in Tophinhanhdep.com’s “Images” categories.
Applying the Halftone Screen Overlay
The magic of the halftone effect comes to life through the application of a specialized “screen” overlay. This step transforms the continuous tones of your image into discrete dot patterns.
-
Access the Elements Tab for Effects: Return to the “Elements” tab on the left-side panel. This is Canva’s treasure trove of shapes, graphics, and effects.
-
Search for “Screen” Effects: In the “Elements” search bar, type “screen” and press Enter. You’ll be presented with a variety of graphic elements, including various “screen” or “texture” overlays. Look for options that resemble a grid of dots or a textured film. The key here is to find an element that simulates the halftone dot pattern. Experiment with different “screen” graphics to find the one that best suits the aesthetic you’re aiming for – some might have larger dots, others finer, mirroring the diverse “Visual Design” possibilities.
-
Choose Your Preferred Halftone Screen: Click on the “screen” graphic that you find most appealing. It will automatically be added to your canvas, usually overlaying your background image. This element acts as the filter that converts your image into dots.
Fine-Tuning Your Dotted Masterpiece
Once the halftone screen is applied, the next crucial step is to adjust its properties to reveal your underlying image effectively and achieve the desired dotted appearance. This customization is where your “Creative Ideas” truly come to fruition.
-
Adjust the Halftone Amount and Scale: With the “screen” element selected, look for options to adjust its transparency, color, or other effects. While Canva might not have a direct “halftone amount” slider like dedicated photo editors, you can achieve a similar effect by manipulating the transparency and blending modes of the overlay.
- Transparency: Reduce the transparency of the “screen” overlay to allow more of your original photo to show through the dots. This adjustment controls the intensity of the halftone effect. A higher transparency will make the dots more subtle, while a lower transparency will make them more pronounced, creating a stronger dot pattern.
- Color Overlay (Optional): You might also experiment with changing the color of the “screen” overlay to create unique monochromatic or duotone halftone effects, adding a distinct “Aesthetic” to your image.
-
Refine Placement and Size: Ensure the “screen” element perfectly covers your background image. You can resize it by dragging its corners and reposition it to ensure an even distribution of the dot effect across your entire photo.
-
Download Your Design: Congratulations! Your image has now been transformed into a captivating dotted design. To save your work, click the “Share” button (usually in the top-right corner) and then select “Download.” Choose your preferred file format (e.g., PNG for higher quality, JPG for smaller file size) and download your halftone image. You can then use Tophinhanhdep.com’s “Optimizers” or “Compressors” to further prepare your image for web or print, ensuring it maintains its crispness and visual appeal.
This method allows you to harness the power of Canva’s elements to produce a classic halftone effect, adding depth and a timeless feel to your “Digital Photography” projects.
Beyond Halftone: Exploring Other Dotted Design Techniques in Canva
While the halftone effect offers a specific aesthetic, Canva’s versatility extends to creating various other dotted designs. These techniques are perfect for adding subtle textures, visual interest, or structured patterns to your “Visual Design” projects, from “Graphic Design” layouts to custom “Backgrounds.” Tophinhanhdep.com encourages experimentation with these diverse approaches to elevate your creative output.
Crafting Dotted Outlines for Visual Flair
Dotted outlines can be an effective way to frame elements, emphasize certain areas, or add a playful touch to your designs. This technique, which involves creating a dashed or dotted border around an object or image, is particularly useful for adding clear boundaries without harsh lines.
-
Isolate Your Subject: Start by selecting the image or element you wish to outline. For a clean, professional look, it’s often best to remove the background from your primary image. Canva Pro users can do this directly within the platform using the “Background Remover” tool. If you don’t have Canva Pro, Tophinhanhdep.com’s “Image Tools” section offers various online background removal solutions that can assist you in preparing your image.
-
Navigate to Lines and Shapes: Once your subject is prepared, go to the “Elements” section on the left-hand panel of your Canva workspace. Within “Elements,” look for the “Lines and Shapes” category. This section contains a wide array of geometric forms and lines, including dashed and dotted options that are perfect for creating outlines.
-
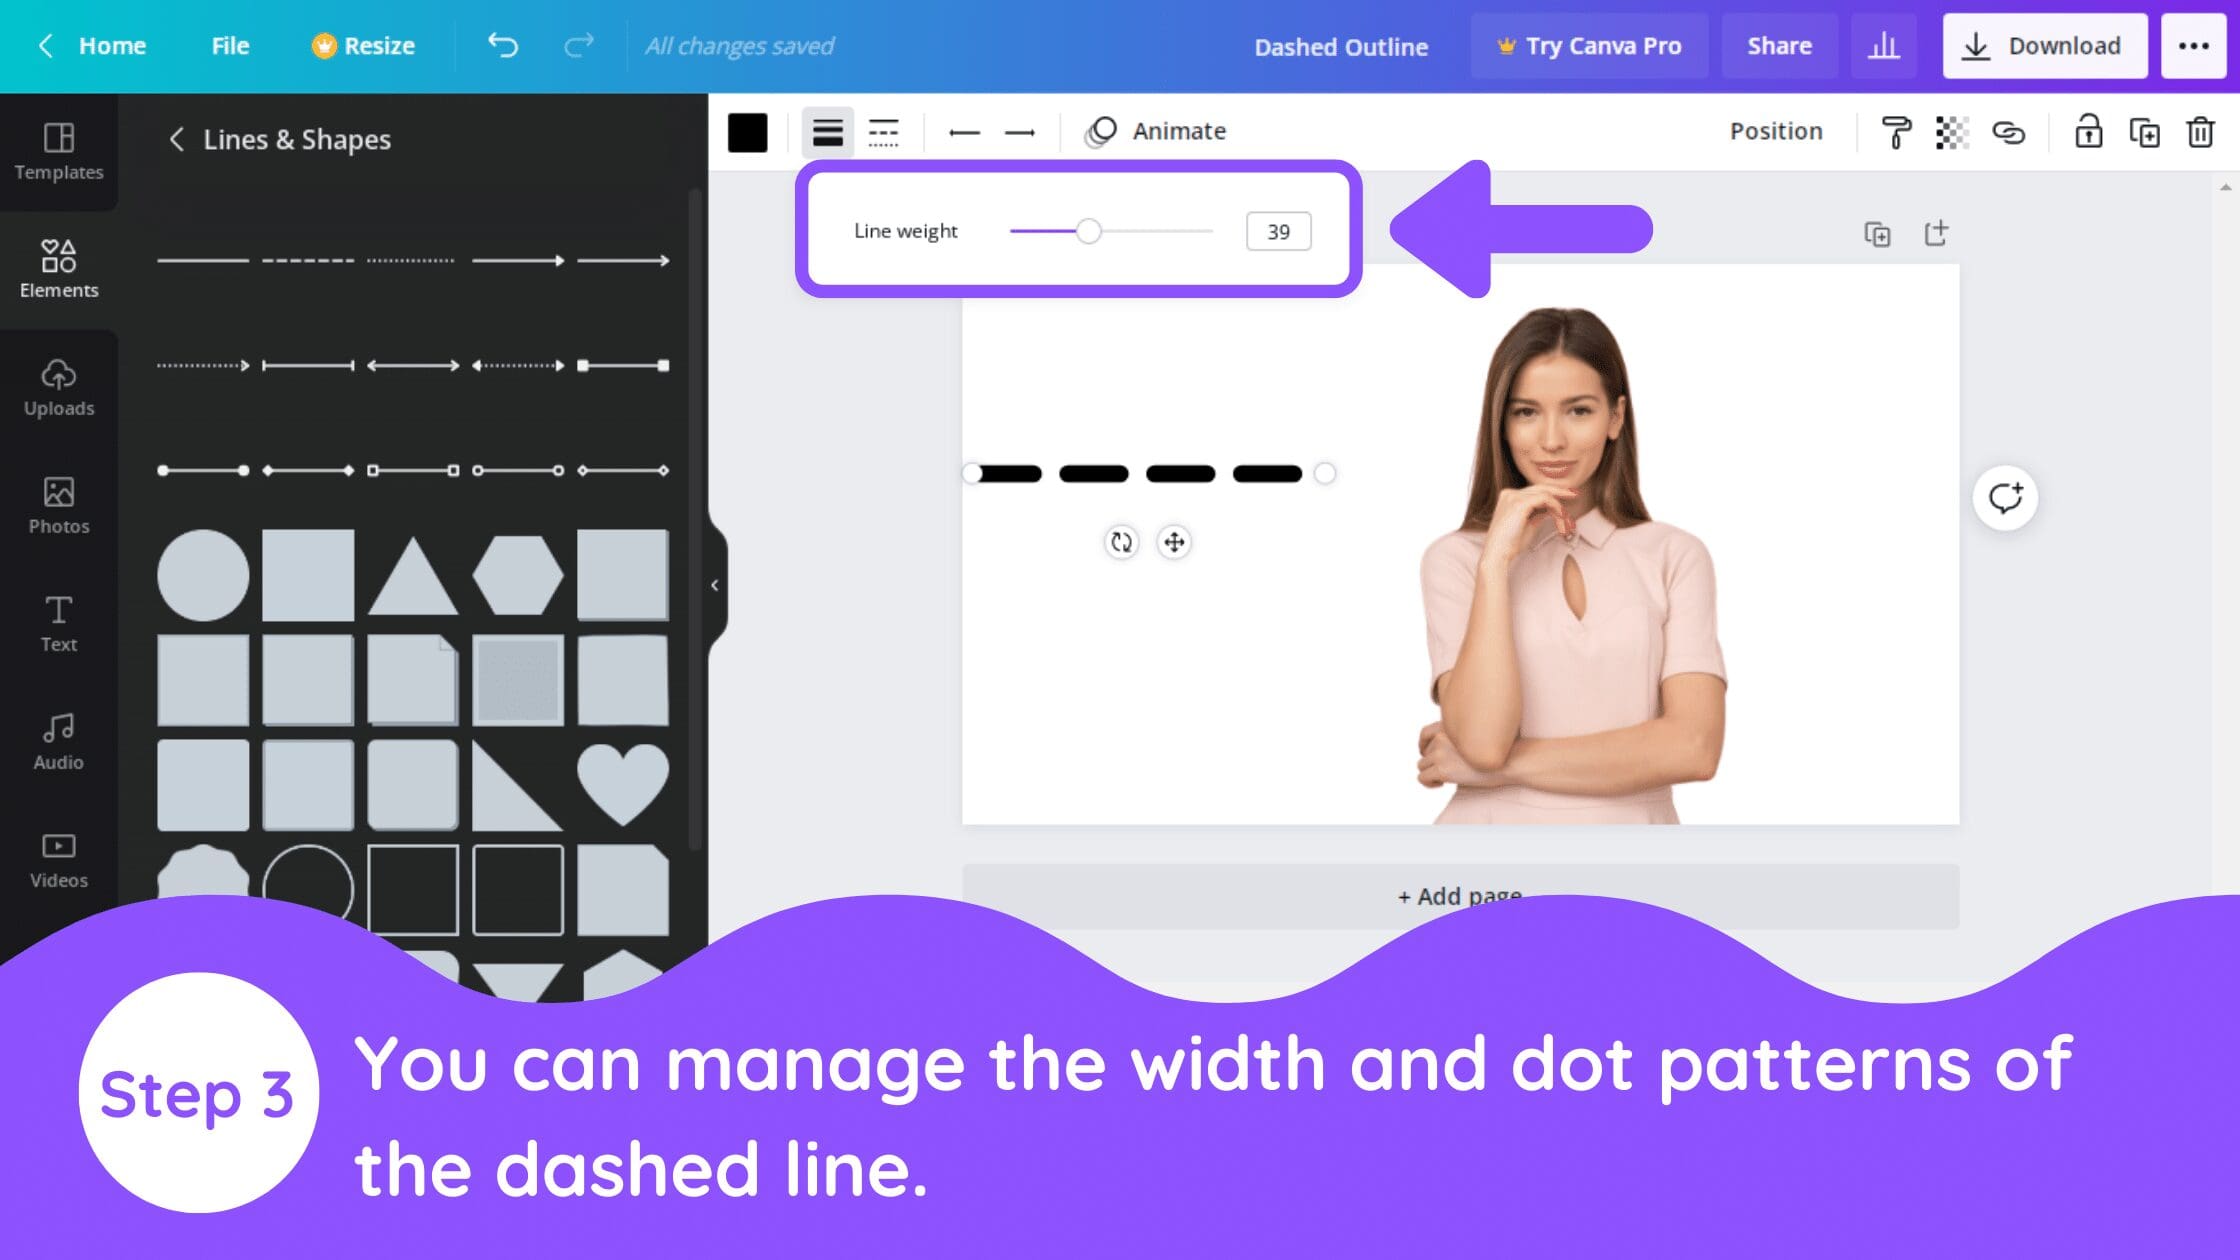
Select and Adjust the Dotted Line: From the “Lines and Shapes” options, choose a dotted or dashed line. Drag it onto your canvas. Now, you can adjust its properties:
- Line Weight: Use the line weight slider to make the dots larger or smaller. For a prominent outline, increase the weight; for a subtle effect, reduce it. The goal is to find a balance where the dots are clearly visible but not overwhelming.
- Dot Spacing: While direct dot spacing adjustment for lines might be limited, you can often find different line styles that offer varying dot densities. Experiment with these options.
- Color: Change the color of your dotted line to complement your design’s color palette.
-
Position and Duplicate for an Outline: Place the adjusted dotted line along the border of your image or element. To create a continuous outline, duplicate this line multiple times. Carefully align each duplicated segment to form a complete border around your subject. This manual process allows for precise control over the outline’s appearance and is a fantastic way to develop “Creative Ideas” for framing. For intricate shapes, you might need to rotate and adjust individual segments to fit perfectly.
Creating Dotted Backgrounds and Journal Pages
Dotted backgrounds are incredibly versatile, serving as subtle textures, guides for journaling, or aesthetic backdrops. Canva offers simple yet effective ways to generate these patterns, adding a touch of minimalist design or functional utility.
-
Method 1: Using Canva’s Line Tool for Uniform Dots This method is ideal for creating structured, uniformly spaced dotted patterns, such as those found in journals or planners.
- Initialize Your Document: Open a new document in Canva, selecting your desired dimensions. For instance, if you’re designing a digital journal for “Creative Ideas,” you might choose standard journal page dimensions.
- Summon a Line: Simply press the letter “L” on your keyboard. This shortcut immediately inserts a straight line onto your canvas.
- Configure the Line: Select the line and adjust its attributes in the toolbar:
- Line Weight: Set the desired thickness for your dots.
- Line Style: Choose the dotted line option (usually represented by a series of small circles).
- Color: Pick a color that suits your background or journaling needs.
- Duplicate and Distribute: Duplicate this single dotted line multiple times (e.g., 20-30 times for a page). Arrange the first and last lines to define the top and bottom margins of your page. Then, select all the lines, go to “Position,” and choose “Vertically” to evenly distribute them across the page. You can also select “Left” or “Center” to align them horizontally. This results in a clean, professional dotted page, perfect for custom “Digital Art” or “Visual Design” projects.
-
Method 2: Using the Period Character for Custom Dot Spacing For greater control over dot size and spacing, using the period character as your dot source offers more flexibility. This is particularly useful for achieving unique “Aesthetic” patterns.
- Insert Text: Press the letter “T” on your keyboard to add a text box. Type a period (.), which will serve as your individual dot.
- Customize Your Dot:
- Font: Experiment with different fonts, as each font’s period character will have a unique shape and size. This allows for diverse dot appearances.
- Font Size: Adjust the font size to control the size of your dots.
- Color: Change the text color to match your design.
- Control Spacing: Duplicate this single dot multiple times to create a horizontal row. Group the dots and then adjust the “Spacing” (letter spacing) to determine the distance between them. This granular control allows for dense or sparse dot arrangements.
- Duplicate Rows and Position: Once you have a perfectly spaced row of dots, duplicate this entire row multiple times to fill your page vertically. As with the line method, align the top and bottom rows, then use the “Position” -> “Vertically” function to distribute the rows evenly. You can also adjust horizontal alignment.
Both methods provide excellent ways to create dotted backgrounds in Canva, offering flexibility for different design needs. These techniques, when combined with Tophinhanhdep.com’s “Image Inspiration & Collections,” can lead to innovative “Photo Ideas” and “Thematic Collections” for your visual projects.
Enhancing Your Dotted Creations with Tophinhanhdep.com’s Resources
Integrating the diverse offerings of Tophinhanhdep.com with your Canva design workflow can significantly elevate the quality and impact of your dotted images and visual projects. Our platform is meticulously curated to provide designers, photographers, and content creators with unparalleled resources.
Sourcing High-Quality Imagery for Your Base
The foundation of any compelling visual effect, including the halftone or dotted aesthetic, is a high-quality source image. Tophinhanhdep.com excels in this area, offering an expansive library that perfectly aligns with your creative needs:
- Images (Wallpapers, Backgrounds, Aesthetic, Nature, Abstract, Sad/Emotional, Beautiful Photography): Before you even open Canva, browse Tophinhanhdep.com for the perfect starting photo. Whether you need a serene “Nature” landscape, a striking “Abstract” composition, or a “Beautiful Photography” portrait, our collections provide the clarity and detail necessary for dot effects to truly shine. High-resolution images ensure that when transformed into dots, they retain discernible form and texture rather than dissolving into an unrecognizable blur. These images can serve as stunning “Wallpapers” or “Backgrounds” that become the canvas for your dotted art.
- Photography (High Resolution, Stock Photos, Digital Photography, Editing Styles): Our “Stock Photos” are not just numerous; they are “High Resolution,” meaning they can withstand significant manipulation without losing quality. This is vital when applying effects like halftones, which inherently simplify the image. Starting with a sharp, well-exposed photograph from Tophinhanhdep.com gives you a significant advantage, allowing for more nuanced “Editing Styles” in Canva.
Optimizing Your Workflow with Image Tools
After creating your initial dot designs in Canva, Tophinhanhdep.com’s suite of “Image Tools” can streamline your workflow and optimize your final output for various uses:
- Converters: If your Canva output isn’t in the desired format for a specific platform or project, our “Converters” can quickly adjust it, ensuring compatibility and ease of use.
- Compressors: Dotted designs, especially intricate ones, can sometimes result in larger file sizes. Use Tophinhanhdep.com’s “Compressors” to reduce file size without compromising visual quality, making your images load faster on websites or social media. This is essential for maintaining optimal web performance for “Graphic Design” assets.
- Optimizers: Our “Optimizers” can further refine your images for web use, ensuring they look sharp and load efficiently across all devices, a crucial aspect for any “Digital Art” piece intended for online display.
- AI Upscalers: Should your dotted image, perhaps a vintage-style halftone, need to be scaled up for a larger print or display without pixelation, Tophinhanhdep.com’s “AI Upscalers” can intelligently increase its resolution, preserving the integrity of the dot pattern. This is particularly useful if you’re taking an older-style effect and adapting it for modern “High Resolution” demands.
- Image-to-Text: While less directly related to dot effects, this tool showcases the breadth of “Image Tools” available, highlighting how Tophinhanhdep.com supports a wide array of image manipulation and utility functions.
Fueling Your Creativity with Visual Design and Inspiration
Tophinhanhdep.com is not just a repository of images and tools; it’s a hub for “Visual Design” and “Image Inspiration.”
- Visual Design (Graphic Design, Digital Art, Photo Manipulation, Creative Ideas): The techniques for turning images into dots in Canva are core “Graphic Design” and “Photo Manipulation” skills. Our platform provides insights and examples of how these techniques are used in professional contexts, offering you “Creative Ideas” for your next project. Explore our galleries to see how designers utilize dotted effects in “Digital Art” and other mediums.
- Image Inspiration & Collections (Photo Ideas, Mood Boards, Thematic Collections, Trending Styles): Struggling for ideas on what image to transform or what kind of dot effect to use? Tophinhanhdep.com’s “Image Inspiration & Collections” provides “Photo Ideas,” “Mood Boards,” and “Thematic Collections” to spark your imagination. See examples of “Trending Styles” that incorporate dot patterns and envision how you can adapt them for your own unique voice. This continuous stream of inspiration ensures your designs remain fresh and relevant.
By synergizing Canva’s intuitive design capabilities with Tophinhanhdep.com’s robust resources, you gain a powerful advantage in creating visually stunning and optimized dotted images, pushing the boundaries of your “Digital Photography” and “Visual Design” endeavors.
Optimizing Your Dotted Designs and Workflow
Creating dotted effects in Canva is just the beginning. To truly master this art, it’s essential to consider factors that optimize your designs for impact and ensure a smooth workflow. This section delves into practical tips, drawing on principles from “Visual Design” and acknowledging the practicalities of “Image Tools” and “Photography” as offered by Tophinhanhdep.com.
The Importance of Cropping Before Effects
Before applying any intricate effects like halftones or creating dotted outlines, a foundational step in effective “Photo Manipulation” is smart cropping. Cropping allows you to focus on the most impactful part of your image, eliminating distractions and improving composition.
Canva provides straightforward cropping tools:
- Select Your Image: Click on the photo or element you wish to crop.
- Access Crop Tool: Click the “Crop” tool in the top menu, or simply double-click the image.
- Adjust Crop Box: Use the white L-shaped handles in the corners to define your desired crop area. You can drag diagonally to maintain proportions or vertically/horizontally to change the aspect ratio.
- Reposition Image: Drag the image within the crop box to center your subject or achieve a balanced composition.
- Confirm Crop: Click “Done” to apply the crop.
Thoughtful cropping, combined with Tophinhanhdep.com’s “High Resolution” source images, ensures that the most compelling elements of your photo are highlighted, making the subsequent dot effect even more striking. For creative cropping, consider using frames in Canva, which allow you to crop images into specific shapes like circles or stars.
Leveraging Canva Pro for Advanced Dot Designs
While the basic techniques discussed are accessible to all Canva users, a Canva Pro subscription unlocks a suite of features that can significantly enhance your dotted designs and overall “Graphic Design” capabilities.
- Background Remover: As mentioned, easily removing the background from your subject is crucial for clean dotted outlines. Canva Pro’s one-click background remover saves immense time and effort.
- Premium Elements: Canva Pro offers an expanded library of premium elements, including more diverse “screen” overlays for halftone effects and a wider variety of dotted lines and shapes, giving you more options for “Creative Ideas.”
- Brand Kit: For consistent branding across multiple designs, Canva Pro’s Brand Kit allows you to save custom color palettes and fonts, ensuring your dotted designs always align with your brand identity.
- Content Planner: If you’re using dotted graphics for social media (e.g., “Aesthetic” post backgrounds), the content planner helps schedule your creations.
Tophinhanhdep.com frequently highlights tools and strategies for professional “Digital Photography” and “Visual Design,” and a Canva Pro subscription is a powerful asset in this regard.
Resolution and Optimization for Diverse Outputs
The final destination of your dotted image dictates important optimization considerations. An image designed for a “Wallpaper” might have different requirements than one for a social media post or a printed “Digital Art” piece.
- Web vs. Print: For web-based outputs (e.g., website “Backgrounds,” social media images), prioritize efficient file sizes using Tophinhanhdep.com’s “Compressors” and “Optimizers” to ensure fast loading times. For print, prioritize higher resolution and ensure color profiles are correct.
- AI Upscalers: If you create a dotted effect on a smaller canvas and then realize you need it larger, Tophinhanhdep.com’s “AI Upscalers” can prevent pixelation and maintain the crispness of your dots, a common challenge in “Digital Photography” when scaling.
- File Formats: Choose appropriate file formats. PNG is excellent for retaining transparency and sharp edges, ideal for intricate dot patterns. JPEG is better for photographs where some compression is acceptable.
By thinking critically about these optimization aspects, you ensure that your dotted designs, whether they are “Abstract Images” or “Beautiful Photography” rendered in dots, achieve their full potential across all platforms. Tophinhanhdep.com stands ready with the “Image Tools” and “Image Inspiration” to guide you through these crucial decisions.
Conclusion
The art of turning an image into dots in Canva is a testament to the platform’s versatility and the enduring appeal of classic “Visual Design” techniques. From the sophisticated “Halftone Photo Effect” that imbues images with a vintage charm to the practical application of dotted outlines and backgrounds, Canva empowers creators of all skill levels to explore intricate aesthetics.
These methods not only offer unique stylistic choices for your “Images” and “Digital Photography” but also foster a deeper understanding of “Graphic Design” principles. As you experiment with dot sizes, spacing, and transparencies, you’ll uncover endless “Creative Ideas” for transforming ordinary visuals into captivating pieces of “Digital Art.”
Remember, Tophinhanhdep.com is your comprehensive partner in this creative journey. Leverage our extensive collections of “High Resolution” and “Aesthetic Images” as your foundation. Utilize our powerful “Image Tools” – from “Compressors” and “Optimizers” to “AI Upscalers” – to perfect and prepare your dotted masterpieces for any output. And never run short on “Image Inspiration” by exploring our “Photo Ideas,” “Mood Boards,” and “Trending Styles” to keep your designs fresh and impactful.
Embrace the dots, experiment fearlessly, and let your creativity flourish with Canva and the boundless resources of Tophinhanhdep.com. Your next stunning design is just a few clicks away!