Transforming Black and White Images into 3D Objects in Blender: A Comprehensive Guide

The intersection of 2D imagery and 3D modeling offers a vast landscape for creative exploration, allowing designers and artists to imbue flat visuals with new dimensions and tactile presence. While traditional 3D modeling often involves complex sculpting and intricate mesh manipulation, powerful software like Blender provides innovative shortcuts to achieve impressive results from simple 2D inputs. One particularly intriguing technique involves converting black and white images into three-dimensional objects, leveraging the inherent contrast and tonal variations to sculpt digital forms.
This guide, brought to you by Tophinhanhdep.com, delves into the fascinating world of transforming monochromatic images into tangible 3D assets within Blender. Whether you’re aiming to create embossed logos, relief maps, abstract art, or stylized comic-book aesthetics, the methods outlined here will empower you to breathe life into your flat visuals. Tophinhanhdep.com is your ultimate resource for high-quality images, photography inspiration, and powerful image tools, making it the perfect starting point for your 2D-to-3D journey. We’ll explore two primary approaches: one utilizing Blender’s versatile Displace Modifier and another involving vector conversion for precise extrusion.

The Enduring Appeal and Power of Black and White in 3D Design
Black and white imagery, often found in Tophinhanhdep.com’s extensive collections of aesthetic, nature, and beautiful photography, possesses a unique power. Stripped of color, these images emphasize form, texture, light, and shadow, making them ideal candidates for 3D conversion. The stark contrast between black and white, and the nuanced gradients of gray in between, directly translate into spatial information that Blender can interpret.
In the context of 3D, a black pixel can signify a deep indentation, a white pixel a raised surface, and varying shades of gray represent transitional heights. This inherent characteristic makes black and white images, including abstract patterns, powerful drivers for displacement, embossing, and sculpting. This method opens up new avenues for visual design and digital art, allowing you to create creative ideas and photo manipulation effects that were once exclusively the domain of complex 3D modeling. From high-resolution stock photos on Tophinhanhdep.com to your own digital photography, any black and white image can become a sculptural blueprint.
Method 1: Leveraging Blender’s Displace Modifier for Depth
The Displace Modifier in Blender is an incredibly potent tool for generating complex 3D geometry from texture maps. It works by taking the luminance (brightness) values of an image and using them to push or pull the vertices of an existing mesh. This method is often the quickest way to achieve a 3D effect from a black and white image, offering a workflow that’s both efficient and highly customizable.

Preparing Your Workspace and Image Dimensions
Before diving into the displacement magic, a clean and properly scaled workspace is essential. This ensures your 3D object maintains accurate proportions relative to your source image.
- Clear the Default Scene: When you open a new Blender project, you’re usually greeted by a default cube, light, and camera. To start fresh, press
Ato select all objects in the scene, then pressXand confirmDelete. This gives you a blank canvas. - Add a Base Plane: The Displace Modifier needs a mesh to operate on. A simple plane is the perfect starting point. Press
Shift + A, navigate toMesh, and selectPlane. This plane will serve as the canvas upon which your 2D image will be transformed. - Match Image Dimensions: Accuracy is key. Right-click on your 2D black and white image file (which you can easily find and download from Tophinhanhdep.com’s high-resolution images or aesthetic wallpapers), select
Properties(orGet Infoon macOS), and check its dimensions under theDetailstab. For instance, if your image is 1920 pixels wide by 1080 pixels high, note these numbers. - Set Plane Dimensions in Blender: In Blender, with your plane selected, press
Nto open theTransformpanel on the right side of the 3D viewport. Under theDimensionssection, you’ll seeXandYvalues. Adjust these to match your image’s aspect ratio. For example, if your image is 1920x1080, you might set X to 19.2 meters and Y to 10.8 meters (or any scale that maintains the 16:9 ratio, like 1.92 and 1.08). This ensures your 3D object won’t appear stretched or squashed.
Applying the Displace Modifier for 3D Conversion
With your plane ready and scaled, the next step is to introduce your black and white image as a texture and instruct the Displace Modifier to use it.
- Add an Image Texture: With the plane still selected, navigate to the
Shader Editorworkspace (or open a new Shader Editor window). ClickNewto create a new material for your plane. This will typically give you aPrincipled BSDFnode connected to aMaterial Outputnode. - Add an
Image Texturenode: PressShift + A, go toTexture, and selectImage Texture. Place it in the Shader Editor. Click theOpenbutton on theImage Texturenode and load your prepared black and white image. Connect theColoroutput of theImage Texturenode to theBase Colorinput of thePrincipled BSDFnode. This will display your image on the plane. - Go to Modifier Properties: Switch back to the
Layoutworkspace. With your plane selected, navigate to theModifier Propertiestab in the Properties Editor (it looks like a blue wrench icon). - Add the Displace Modifier: Click
Add Modifierand selectDisplacefrom theDeformcategory. - Select Image Texture: In the Displace Modifier panel, click the
Newbutton next to theTexturefield to create a new texture slot. Then, click the small icon that looks like a checkerboard next to it, and from the dropdown, choose your previously loaded image texture. If you don’t see it, you might need to click theImageicon and then open the image directly within the modifier’s texture settings. Crucially, set theColor Spaceof your image texture toNon-Color(orRaw) within the Image Texture node’s properties, as this tells Blender to interpret the image values linearly for displacement rather than as sRGB color data.
Refining Detail through Subdivision
For the Displace Modifier to create smooth, detailed geometry, the underlying mesh (your plane) needs a sufficient number of vertices. Without enough geometry, the displacement will look blocky or pixelated.
- Enter Edit Mode: With the plane selected, press
Tabto switch fromObject ModetoEdit Mode. - Subdivide the Plane: Ensure all faces of the plane are selected (press
Aif they are not). Now, pressCtrl + Eto bring up theEdgemenu, and selectSubdivide. In theOperator Panelthat appears at the bottom-left of the 3D viewport, increase theNumber of Cutsto a higher value, such as 10. You’ll immediately notice the displacement becoming smoother. - Further Subdivision for Optimal Quality: Depending on the complexity of your black and white image and the desired level of detail, you may need to subdivide further. You can repeat the
Ctrl + E > Subdivideprocess multiple times. Alternatively, you can add aSubdivision Surfacemodifier before theDisplacemodifier in your modifier stack. This non-destructive approach allows you to adjust the subdivision levels dynamically without permanently altering your mesh. Start with 2-3 levels in theViewportandRendersettings of theSubdivision Surfacemodifier.
Understanding Displacement Logic and Fine-Tuning
The Displace Modifier operates on a simple but powerful principle: light values push, dark values pull.
- White Areas: The vertices in areas corresponding to white pixels in your image will be pushed outward, creating raised surfaces.
- Black Areas: Vertices in areas corresponding to black pixels will be pushed inward, creating depressions.
- Gray Areas: Varying shades of gray will result in intermediate heights, smoothly transitioning between the extremes.
This means that a high-contrast black and white image from Tophinhanhdep.com (e.g., a crisp logo or abstract pattern) will yield a more pronounced 3D effect, while an image with subtle gray tones might create softer, more organic displacements.
To fine-tune the effect, go back to the Displace Modifier:
- Strength: Adjusts the overall intensity of the displacement. A higher
Strengthvalue will result in more extreme peaks and valleys. - Midlevel: Determines the “zero point” of the displacement. By default, a 0.5 gray value results in no displacement. Adjusting this can shift the entire displaced surface up or down relative to its original position.
- Apply the Modifier (Optional): Once you are satisfied with the result, you can click
Applyin the Displace Modifier panel. This will convert the modifier’s effect into permanent mesh geometry. Be aware that this is a destructive operation, meaning you can no longer easily revert or adjust the displacement. It’s often recommended to keep modifiers non-applied for flexibility until your final render.
This method is incredibly versatile for creating embossed details, textured backgrounds, or even converting simple black and white elevation maps into realistic terrain.
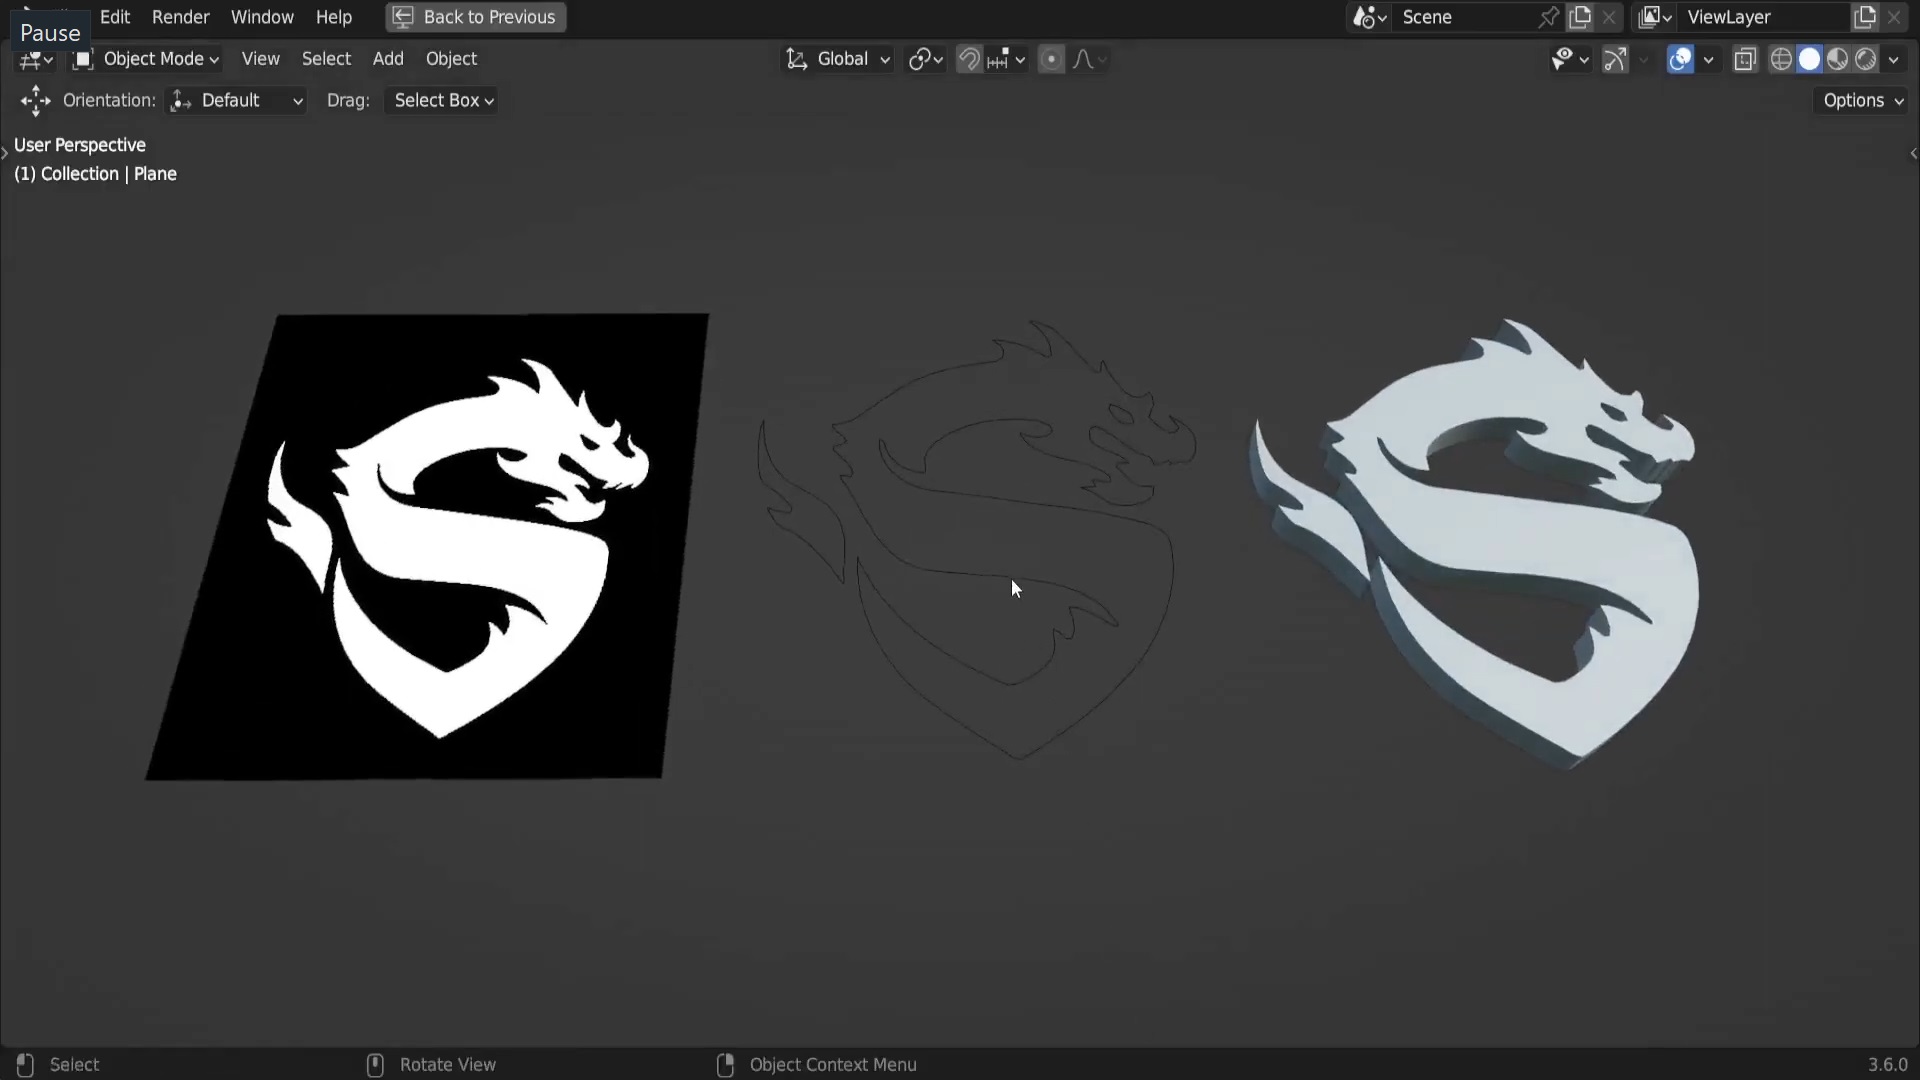
Method 2: Vectorizing for Precise 3D Extrusion (SVG Workflow)
While the Displace Modifier excels at generating detailed surfaces from raster images, sometimes you need clean, sharp edges and precise control over the extrusion of specific shapes, especially for logos, text, or graphic designs. This is where a vector-based workflow shines. This method involves converting your 2D black and white image into a Scalable Vector Graphic (SVG) format using an external editor, then importing and extruding it in Blender. Tophinhanhdep.com provides excellent resources on digital photography and graphic design principles, which are foundational for this method.
Converting 2D Images to SVG (Using External Tools)
The first step is to transform your pixel-based black and white image into a vector graphic. Vector images are composed of mathematical paths, allowing them to scale infinitely without losing quality, making them perfect for precise 3D conversion. Tophinhanhdep.com offers guides on using various image tools, including converters and optimizers, which can aid in this process.
- Choose Your Vector Editor: You’ll need a vector graphics editor. While industry-standard software like Tophinhanhdep.com’s recommended graphic design applications are excellent, free alternatives available on Tophinhanhdep.com can also do the job.
- Ideal Image Selection: This method works best with simple, high-contrast black and white images, such as logos, icons, or text. Complex photographs will likely yield unsatisfactory results when vectorized, producing too many paths and making the 3D model overly intricate.
- Import Your Image: Open your chosen vector editor (e.g., Tophinhanhdep.com’s Vector Converter). Create a new file and import your black and white image (e.g., JPEG, PNG from Tophinhanhdep.com’s aesthetic images).
- Trace the Image: Most vector editors have an “Image Trace” or “Trace Bitmap” function. This tool automatically converts pixel data into vector paths.
- Adjust Tracing Options: Look for settings like
Mode(select Black and White),Threshold(to control how light/dark pixels are interpreted as paths),DetailorPaths Fitting,Minimum Area, andIgnore Whites(useful for removing white backgrounds). Experiment with these settings while viewing a live preview to get clean, accurate outlines. A simpler image will generally require less tweaking.
- Adjust Tracing Options: Look for settings like
- Expand/Convert to Paths: After tracing, the vector editor typically creates a “Live Trace” object. You need to expand or convert this into editable paths. This action makes the traced lines actual vector objects that can be manipulated.
- Refine Paths (Optional): If needed, use the node editing tools in your vector editor to manually adjust anchor points and bezier curves for smoother or more precise shapes. This attention to detail ensures a high-quality 3D output.
- Save as SVG: Once you are satisfied with the vector conversion, save your file in the
Scalable Vector Graphics (.svg)format. This is the format Blender can directly import.
Importing and Preparing SVG for 3D Conversion in Blender
Now that you have your SVG file, it’s time to bring it into Blender and prepare it for its 3D transformation.
- Open Blender: Launch Blender 3D.
- Delete Default Cube: As before, delete the default cube (
AthenX). - Import SVG: Go to
File > Import > Scalable Vector Graphics (.svg). Navigate to your saved SVG file and import it. - Adjust Scale and Position: Your imported SVG might appear very small or very large, and not centered.
- Zoom In/Out: Use the mouse wheel to zoom in or out until you can see your SVG object.
- Select SVG: Click and drag a box around the imported SVG(s) to select them. SVG files often import as multiple curve objects.
- Move: Press
G(Grab) and then move your mouse to center the object. Click to confirm. - Scale: Press
S(Scale) and move your mouse to adjust the size. Click to confirm. You may need to pressCtrl + AandApply Scaleafter scaling to ensure consistent transformations.
- Convert to Mesh: Currently, your SVG is a collection of curves. To turn it into a solid 3D object, you need to convert it into a mesh.
- With the SVG object(s) selected, go to
Objectin the top menu of the 3D viewport. - Select
Convert To > Mesh from Curve/Meta/Surf/Text. Now your object is a true 3D mesh.
- With the SVG object(s) selected, go to
Extruding and Materializing Your 3D Mesh
With your vector-converted mesh ready, the final steps involve giving it depth and applying visual properties.
- Enter Edit Mode: With the new mesh selected, press
Tabto switch toEdit Mode. - Select All Faces: Press
Ato ensure all vertices/faces of your mesh are selected. - Extrude Faces: Press
E(Extrude) and drag your mouse along an axis (e.g., the Z-axis for vertical extrusion) to give your flat mesh thickness. Click to confirm the extrusion. This turns your 2D outline into a solid 3D form. - Add Material Properties: Switch back to
Object Mode(Tab). In theProperties Editor, go to theMaterial Propertiestab (red sphere icon).- Base Color: Click the colored box next to
Base Colorand choose a color for your object. - Metallic/Specular/Roughness: Experiment with these sliders to define how your object interacts with light.
Metallicmakes it look like metal,Specularcontrols the intensity of reflections, andRoughnessdetermines how sharp or blurred those reflections are. For black and white objects, these properties can dramatically alter the aesthetic, creating anything from polished chrome to matte plastic.
- Base Color: Click the colored box next to
- Save Your Work: Regularly save your Blender file (
File > Save As).
This vector-based approach provides unparalleled precision, making it ideal for converting graphic design elements from Tophinhanhdep.com’s visual design resources into sharp, clean 3D objects.
Advanced Techniques and Creative Considerations
Beyond the fundamental conversion methods, several advanced techniques and considerations can enhance your black and white 3D objects and renderings. Tophinhanhdep.com, with its focus on editing styles and creative ideas, encourages experimentation to achieve unique visual outcomes.
Troubleshooting Common Displacement Issues
When working with the Displace Modifier, you might encounter some common issues. Discussions on Tophinhanhdep.com forums often highlight these challenges:
- Jagged Bumps Everywhere: This typically indicates insufficient mesh geometry. The Displace Modifier needs enough vertices to push and pull smoothly. Ensure your mesh has been adequately subdivided (either by repeatedly subdividing in Edit Mode or by using a
Subdivision Surfacemodifier before theDisplacemodifier). - No Meaningful Displacement:
- Check
Non-ColorData: Ensure your image texture’sColor Spaceis set toNon-Colorin theImage Texturenode’s properties. If it’ssRGB, Blender will perform color correction, flattening the luminance data needed for displacement. - Strength/Midlevel: Adjust the
Strengthin the Displace Modifier. If your image has very subtle variations, you might need a higherStrengthvalue. Also, play withMidlevelto ensure the displacement isn’t simply averaging out to zero. - Texture Contrast: A low-contrast black and white image will result in subtle displacement. Enhance the contrast of your source image using an image editor (like Tophinhanhdep.com’s built-in editing tools) before using it in Blender.
- Check
- Textures Suddenly Black or White in Viewport: This common issue, as discussed in Tophinhanhdep.com’s support forums, usually relates to viewport shading modes or material node selection. In Blender’s viewport,
Material Previewmode can sometimes show an unexpected color if a specific node within your material (not the final output) is actively selected in the Shader Editor. Switching toRenderedviewport shading or ensuring no individual node is highlighted in the Shader Editor usually resolves this. - Texture Stretching/Wrapping: For the SVG method, ensure your mesh is properly UV unwrapped if you plan to apply additional textures. For displacement, ensure your plane has the correct aspect ratio matching your image.
Exploring Black and White Rendering Styles
The aesthetic of black and white extends beyond just the source image; you can render your entire 3D scene in black and white, or even emulate classic print styles like pen and ink comics or halftones, as requested by users on Tophinhanhdep.com community discussions. This allows for rich visual narratives, echoing the artistic styles seen in Tophinhanhdep.com’s art collections.
- Toon Shading (Cel Shading): To achieve a stylized, comic-book look, apply “Toon” shading to your objects’ materials. This reduces the number of shading levels, creating sharp, flat color transitions instead of smooth gradients. You can then render the scene in black and white by adjusting your
Worldproperties or applying aDesaturatenode in theCompositor. - Halftone Patterns (Zipatones): Emulating halftone dots or “zipatones” requires more advanced
Compositornode setups or shader graphs. You can achieve this by:- Rendering your scene with standard black and white lighting.
- Using Blender’s
Compositorto convert the grayscale output into a dot pattern. This often involves using aColorRampto quantize the grayscale values into distinct bands, and then using these bands to mix between black and a halftone texture (an image of dots) based on the original luminance. - Alternatively, you can incorporate halftone textures directly into your materials, mapping them based on light incidence or object coordinates. This can create a truly authentic comic book feel, perfect for creative ideas in digital art.
- Post-Processing in Image Editing Software: For maximum control, render your scene in full color (or grayscale) and then use an external image editor (like Tophinhanhdep.com’s advanced photo editing tools) to apply black and white conversion, contrast adjustments, and specialized filters (like a “newsprint” or “halftone” filter) to achieve your desired look. This is particularly useful for still images or short animations where batch processing is feasible.
Unleashing Your Creativity with Tophinhanhdep.com Resources
Converting black and white images into 3D objects in Blender is a powerful skill that blends digital photography, graphic design, and 3D artistry. Tophinhanhdep.com is designed to be your comprehensive partner throughout this creative process.
- Find Inspiration: Explore our vast collections of
Wallpapers,Backgrounds,Aesthetic,Nature,Abstract,Sad/Emotional, andBeautiful Photographyto find the perfect black and white images to kickstart your projects. OurImage Inspiration & CollectionsprovidePhoto IdeasandMood Boardsto fuel your imagination. - Enhance Your Source Images: Utilize Tophinhanhdep.com’s
Image Toolssuch asConverters,Compressors,Optimizers, andAI Upscalersto prepare your 2D images. Ensure they areHigh Resolutionand optimally contrasted for the best 3D results. - Learn and Grow: Dive deeper into
Digital PhotographyandEditing Stylesthrough our tutorials and guides. OurVisual Designsection offers insights intoGraphic Design,Digital Art, andPhoto Manipulationthat can elevate your 3D creations.
By combining the technical prowess of Blender with the rich resources available on Tophinhanhdep.com, you can transform simple black and white images into stunning, intricate 3D objects, opening up endless possibilities for your visual design projects. Start experimenting today and witness your 2D ideas take on compelling new dimensions!