How to Turn an Image into a Vector in Adobe Illustrator: A Comprehensive Guide

In the dynamic world of digital imagery and visual design, understanding the fundamental differences between image formats is crucial for creators, designers, and enthusiasts alike. At Tophinhanhdep.com, we celebrate the artistry of images, from stunning “Beautiful Photography” and captivating “Wallpapers” to thought-provoking “Aesthetic” visuals and intricate “Abstract” designs. Yet, even the most “High Resolution” photographs, when pushed beyond their limits, can lose their crispness, becoming pixelated and unprofessional. This is where the magic of vector graphics comes into play, offering a solution that ensures your visual assets retain impeccable quality, regardless of scale.
Adobe Illustrator, a cornerstone in the “Graphic Design” toolkit, empowers users to transform ordinary pixel-based images—known as raster images—into these infinitely scalable vector masterpieces. Whether you’re a seasoned “Digital Art” professional or just beginning to explore “Creative Ideas” for your projects, mastering the art of vectorization is an invaluable skill. This comprehensive guide will walk you through the process step-by-step, shedding light on the “Image Tools” available and how to leverage them to convert your cherished images into versatile vector art, suitable for everything from intricate logos to expansive “Backgrounds.”

Understanding Raster vs. Vector Graphics: The Foundation of Digital Imagery
Before diving into the mechanics of conversion, it’s essential to grasp the core differences between the two primary types of digital images: raster and vector. This foundational knowledge will not only demystify the process but also help you make informed decisions in your “Visual Design” endeavors and when selecting “Image Converters.”

The Nature of Raster Images
Raster images are the most common type of digital image we encounter daily. Think of your “Digital Photography,” downloaded “Wallpapers,” or screenshots—these are almost certainly raster files. They are composed of a grid of tiny individual colored squares called pixels. Each pixel holds specific color information, and together, millions of these pixels form a complete image.
The strength of raster images lies in their ability to capture vast amounts of detail and subtle color gradients, making them ideal for realistic photographs, complex paintings, and richly detailed “Nature” or “Emotional” images. Common raster file formats include JPG (Joint Photographic Experts Group), PNG (Portable Network Graphics), and GIF (Graphics Interchange Format). Our website’s extensive collection of “High Resolution” images, including “Stock Photos” and “Beautiful Photography,” often starts in raster format because of this inherent detail-capturing capability.
However, raster images come with a significant limitation: they are resolution-dependent. This means their quality is tied to the number of pixels they contain. If you try to enlarge a raster image beyond its original resolution, the individual pixels become visible, leading to a phenomenon known as pixelation or blurriness. Imagine trying to print a small thumbnail image onto a billboard—the result would be a distorted, blocky mess. For “Image Tools” like “Compressors” and “Optimizers,” the goal is often to reduce file size without significant loss of visual quality, a delicate balance when dealing with pixel data. Even “AI Upscalers,” while impressive, are essentially interpolating new pixel data, not creating true resolution independence.
The Power of Vector Graphics
In stark contrast, vector graphics are not made of pixels. Instead, they are constructed from mathematical equations that define points, lines, curves, and shapes. These mathematical descriptions dictate the precise positions, colors, and relationships of all elements within the image. Because the image is defined by mathematical formulas rather than fixed pixels, vector graphics are entirely resolution-independent.
This fundamental difference bestows vector graphics with an extraordinary power: infinite scalability. You can enlarge a vector image to any size—from a tiny icon on a webpage to a massive billboard advertisement—without any loss of quality, sharpness, or detail. The mathematical formulas simply recalculate to render the image perfectly at the new scale. This makes vector formats indispensable for “Graphic Design,” especially for elements like logos, icons, illustrations, and typography, which often need to be used across a multitude of applications and sizes.
Common vector file formats include AI (Adobe Illustrator’s native format), EPS (Encapsulated PostScript), and SVG (Scalable Vector Graphics), which is gaining popularity for web design due to its efficiency and scalability. For designers exploring “Creative Ideas” and executing precise “Photo Manipulation,” the editability and flexibility of vector graphics are unparalleled. They are perfect for crafting clean “Aesthetic” designs and ensuring that elements within “Image Collections” maintain a consistent, professional appearance across all platforms. The clarity offered by vector graphics is paramount for creating truly impactful visual statements.
Preparing Your Image for Vectorization: Optimizing for Best Results
The journey from a pixelated raster image to a crisp vector graphic in Adobe Illustrator begins with careful preparation. While Illustrator’s “Image Tools” are powerful, optimizing your source image and document settings can significantly influence the quality and ease of the conversion process, aligning perfectly with “Editing Styles” in professional “Visual Design.”
Choosing the Right Source Image
Not all images are equally suited for vectorization. While technically any raster image can be converted, the results will vary greatly depending on the complexity and style of the original.
- Simplicity is Key: Images with clear, defined lines, flat colors, and minimal gradients tend to vectorize best. Think of logos, cartoons, technical drawings, or simple “Line Art.” These types of images translate beautifully into the path-based nature of vectors.
- Single Subjects: When working with “Digital Photography” or “Stock Photos,” images featuring a single, distinct subject against a plain or contrasting background will yield better results than complex “Nature” scenes or busy “Abstract” patterns, especially for automatic tracing.
- Desired Outcome: Consider what you want your final vector to look like. If you aim for a simplified, stylized version of a photograph, “Image Trace” can achieve artistic effects. However, if you’re attempting to perfectly replicate a “Beautiful Photography” piece with all its nuanced detail as a vector, you might find the results lacking or the file size prohibitively large, requiring significant manual intervention.
- Quality of Original: While vectors are resolution-independent after conversion, starting with a reasonably clear raster image helps Illustrator’s algorithms better interpret edges and shapes during the “Image Converters” process. A blurry or low-quality original will result in an equally blurry or inaccurate vector trace.
For Tophinhanhdep.com, if you’re looking to create unique “Graphic Design” elements from existing “Image Inspiration & Collections,” selecting images that lend themselves to vectorization will streamline your workflow and enhance your “Creative Ideas.”
Setting Up Your Adobe Illustrator Document
Once you’ve chosen your image, the next step is to set up your workspace in Adobe Illustrator.
-
Create a New Document:
- Open Adobe Illustrator and go to
File > New(orCtrl+N/Cmd+N). - You’ll be presented with various document presets. For most vectorization tasks, a standard print size like A4 or a custom web size will suffice. The exact dimensions aren’t critical for vector output per se, as vectors are scalable, but a comfortable working canvas is helpful.
- Resolution: While vectors themselves don’t have a resolution, the setting for raster effects within Illustrator (e.g., if you apply a blur) is important. For general purposes, set the resolution to
300 ppi (pixels per inch)if you intend to use the vector in print, or72 ppifor web-only uses. - Color Mode: Choose
RGB (Red, Green, Blue)for designs intended for screens (web, digital displays, “Wallpapers”) andCMYK (Cyan, Magenta, Yellow, Key/Black)for designs that will be printed. Selecting the correct color mode from the start is part of good “Editing Styles” and ensures color accuracy for your final “Visual Design” products. - Click
Createto open your new document.
- Open Adobe Illustrator and go to
-
Place Your Image:
- With your new document open, go to
File > Place...(orShift+Ctrl+P/Shift+Cmd+P). - Browse to and select your raster image file.
- Click
Place. Your cursor will turn into a small image icon. Click on your artboard to place the image. - Resize if Needed: If your image is too large or too small for your artboard, select it with the
Selection Tool (V). Hold downShiftwhile dragging a corner handle to resize it proportionally, preventing distortion. This ensures your initial setup is clean and ready for the next phase.
- With your new document open, go to
Now, with your document prepared and your raster image placed, you’re ready to unleash the power of Illustrator’s “Image Trace” feature.
The Image Trace Feature: Automating Your Vector Conversion
Adobe Illustrator’s Image Trace is a powerful and efficient “Image Tool” designed specifically for converting raster images into editable vector paths. It acts as an advanced “Image Converter,” analyzing the pixels in your image and intelligently generating vector shapes and lines based on their color and contrast. This feature is particularly useful for transforming “Digital Photography” into stylized “Digital Art” or extracting clean lines for “Graphic Design” assets.
Introducing Adobe Illustrator’s Image Trace
At its core, Image Trace is an automated tracing engine. Instead of manually drawing every line and curve, Illustrator’s algorithms do the heavy lifting, interpreting the pixel data and converting it into mathematical vector paths. This capability is a game-changer for speeding up workflows and achieving professional results, especially when working with icons, logos, or line art derived from sketches or existing “Image Inspiration & Collections.”
Before Image Trace, converting a raster image to vector was a painstaking manual process, requiring designers to meticulously draw over every detail with the Pen Tool. While manual tracing still has its place for highly precise or artistic applications (as we’ll discuss later), Image Trace provides an excellent starting point and, for many simple designs, a complete solution. It’s an essential tool for creating scalable assets for “Wallpapers,” “Backgrounds,” or any “Visual Design” element that needs to retain quality across various dimensions.
Step-by-Step Auto-Tracing Process
Let’s walk through the practical steps to use Image Trace.
-
Select Your Image: Use the
Selection Tool (V)(the black arrow) to click on the raster image you placed on your artboard. This will activate options related to the image. -
Access Image Trace:
- The quickest way is often through the
Properties panel(usually on the right side of your screen in default workspaces, or accessible viaWindow > Properties). Look for theQuick Actionssection and click theImage Tracebutton. - Alternatively, go to
Window > Image Traceto open the dedicatedImage Trace panel. This panel provides more granular control and is recommended for fine-tuning. - A third way is to go to
Object > Image Trace > Make. This will apply a default trace, and then you can open the Image Trace panel for adjustments.
- The quickest way is often through the
-
Applying a Preset:
- Once the Image Trace panel is open (or after clicking the Quick Action button), you’ll see a
Presetdropdown menu. This is where the initial magic happens. Illustrator offers a range of presets, each optimized for different types of images and desired outcomes:- High Fidelity Photo / Low Fidelity Photo: Ideal for detailed “Digital Photography” or complex artwork where you want to retain as much color and detail as possible. High Fidelity will produce more paths and anchor points, potentially resulting in larger file sizes but greater accuracy.
- 3 Colors / 6 Colors / 16 Colors: Excellent for logos, illustrations, or “Graphic Design” elements with a limited color palette. These presets will reduce the image to the specified number of flat colors, creating clean, simplified vectors.
- Shades of Gray: Converts your image into a grayscale vector, perfect for black and white photos or monotone “Aesthetic” visuals.
- Black and White Logo: A highly simplified preset that creates a basic black and white vector, often used for converting scanned logos or line art into a clean vector outline.
- Sketched Art / Silhouettes / Line Art / Technical Drawing: These presets are tailored for specific artistic styles, often resulting in black-and-white, predominantly line-based drawings. They are fantastic for turning hand-drawn sketches or simple diagrams into scalable “Digital Art.”
- Choose a preset that best matches your image and your desired vector style. For instance, if you’re vectorizing a colorful cartoon character from an “Image Collection,” a “Colors” preset might be appropriate. For a detailed nature photograph that you want to simplify into an artistic rendition, “Low Fidelity Photo” could be a good starting point.
- Make sure the
Previewbox is checked in the Image Trace panel so you can see the changes in real-time as you select presets and adjust settings.
- Once the Image Trace panel is open (or after clicking the Quick Action button), you’ll see a
-
Fine-Tuning with Image Trace Panel (Advanced Settings):
- After applying a preset, you might need to adjust the settings further. Click the
Advanceddropdown arrow in the Image Trace panel to reveal more options. This is where you can truly refine your “Editing Styles.” - Mode: Switch between Color, Grayscale, or Black and White if you change your mind about the output type.
- Palette: For Color mode, choose between Automatic, Document Library, or Limited to control the color selection.
- Colors: For color presets, this slider allows you to increase or decrease the number of colors Illustrator uses, simplifying or adding detail to your vector.
- Threshold (for B&W): Controls the level of detail for black and white tracing. Increasing it makes darker pixels black, while decreasing it makes them white.
- Paths: Controls how closely the vector paths hug the original pixel edges. Higher values create more detailed paths; lower values create smoother, more generalized paths.
- Corners: Determines the sharpness of corners. Higher values result in sharper corners, while lower values make them rounder.
- Noise: Filters out small, unwanted pixel areas (noise). Increasing this can simplify the image by ignoring tiny details, which is often desirable for cleaner vector output, especially for scanned images or those with slight imperfections.
- Ignore White: This is a crucial option, especially for logos or line art. If checked, Illustrator will make all white areas transparent, leaving only the colored or black vector shapes. This is excellent for creating clean assets with transparent “Backgrounds,” ready for any “Visual Design” project.
- Experiment with these sliders while keeping the
Previewchecked. The goal is to achieve a “clear image” that meets your quality expectations. If you find a combination of settings you like, you can save it as a new preset for future use via theManage Presetsbutton.
- After applying a preset, you might need to adjust the settings further. Click the
-
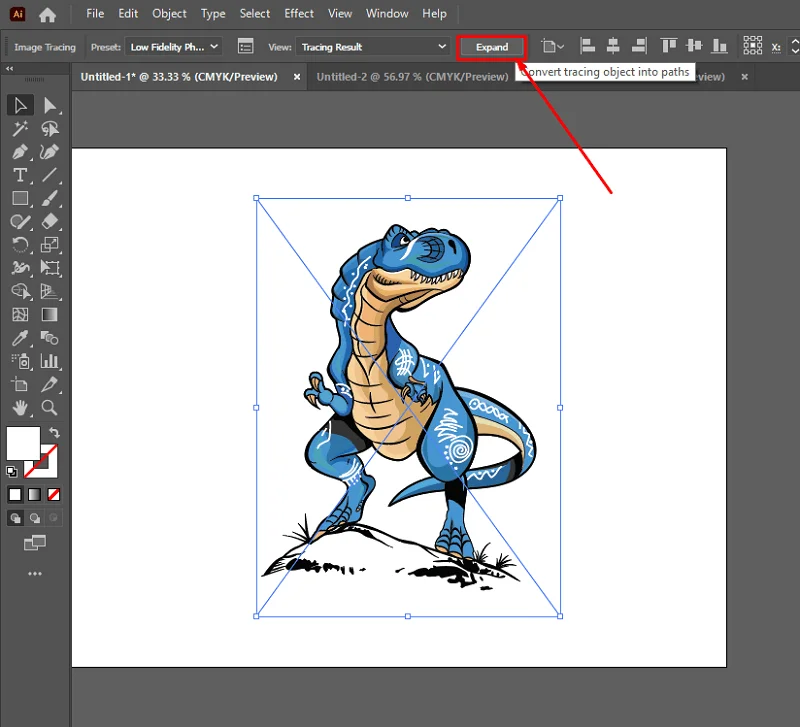
Expanding the Image:
- Once you’re satisfied with your traced image’s appearance in the preview, it’s time to convert the live trace object into actual editable vector paths.
- With the image still selected, click the
Expandbutton in theControl panel(usually at the top, below the menu bar) or in theProperties panel(under Quick Actions). Alternatively, go toObject > Image Trace > Expand. - This step is vital. Before expanding, the traced image is still a “live” object, meaning Illustrator is applying the tracing effect to the raster image. After expanding, the original raster image is gone, replaced entirely by a group of editable vector paths and shapes. This is the moment your image truly becomes a vector!
-
Ungrouping and Editing:
- After expanding, your vector image will likely be grouped as a single object. To manipulate individual shapes and colors, you need to
Ungroupit. - With the expanded vector still selected, right-click (or
Ctrl+clickon Mac) and chooseUngroup. You might need to do this multiple times if there are nested groups (e.g.,Object > Ungrouptwice is a common practice). - Now, using the
Direct Selection Tool (A)(the white arrow), you can select individual paths, anchor points, or entire shapes. - Removing Backgrounds: If you used the
Ignore Whiteoption, your background should already be transparent. If not, and there’s a white or solid background color, select it with theSelection Tool (V)and pressDelete. For more complex backgrounds, you can select areas byFill Colorto quickly remove all instances of a specific color. Go toSelect > Same > Fill Colorto select all shapes with the same fill, then delete them. - Changing Colors: Select a shape or a group of shapes. Use the
FillandStrokecolor pickers in theProperties panelorTools panelto change their appearance. This allows for extensive “Photo Manipulation” and customization of your “Digital Art.” - Voila! You now have a crisp, editable vector graphic.
- After expanding, your vector image will likely be grouped as a single object. To manipulate individual shapes and colors, you need to
Beyond Automatic Tracing: Manual Vectorization and Creative Enhancements
While Adobe Illustrator’s Image Trace feature is remarkably efficient for automated conversion, there are situations where manual vectorization offers superior control, precision, or artistic flair. For those venturing deeper into “Digital Art” and custom “Graphic Design,” these techniques provide limitless possibilities.
When Manual Tracing is Necessary
Automatic tracing, despite its advancements, relies on algorithms to interpret pixel data. This can sometimes lead to:
- Loss of Fine Detail: Very intricate designs, subtle gradients, or nuanced elements from “Beautiful Photography” might be overly simplified or misinterpreted by the auto-trace, especially when using simpler presets.
- Inaccurate Shapes: For designs requiring absolute geometric precision, like technical diagrams or specific brand logos, the auto-trace might introduce slight imperfections or wobbly lines.
- Overly Complex Paths: High-fidelity traces of detailed images can result in thousands of anchor points, making the file large and difficult to edit smoothly.
- Artistic Control: Sometimes, a designer wants to intentionally stylize or interpret an image, not just replicate it. Manual tracing allows for a unique “Editing Style” that automated tools cannot replicate.
In these scenarios, or when your “Creative Ideas” demand a bespoke touch, turning to manual tracing methods allows you to dictate every curve, line, and anchor point. This is where the true craftsmanship of “Visual Design” comes into play, transforming “Image Inspiration & Collections” into highly personalized vector assets.
Techniques for Manual Tracing
Manual tracing, while more time-consuming, grants unparalleled precision and artistic freedom.
-
Preparation is Key: Start by placing your raster image onto the Illustrator artboard, as described in the setup phase. It’s often helpful to reduce the opacity of the placed image (
Window > TransparencyorProperties panel) and lock its layer (Object > Lock > Selectionor via theLayers panel) to prevent accidental movement while you trace over it. -
Utilizing Basic Shapes:
- Before resorting to freeform drawing, analyze your image for geometric primitives: circles, ellipses, rectangles, squares, polygons, and stars.
- Illustrator provides dedicated
Shape Tools(Rectangle Tool, Ellipse Tool, Polygon Tool, Star Tool). Use these to draw perfect geometric shapes over corresponding elements in your raster image. For instance, if you’re vectorizing a logo with a perfect circle, use the Ellipse Tool while holdingShiftto draw a perfect circle, aligning it with the logo’s circular elements. - These tools ensure geometric accuracy that is hard to achieve by hand.
-
The Pen Tool (P) for Precision:
- The
Pen Toolis the workhorse of vector drawing. It allows you to create anchor points and draw both straight lines and precise curves. - It’s ideal for tracing elements with sharp corners, intricate details, or specific paths that require careful control. Mastering the Pen Tool is a fundamental “Editing Style” for any serious “Graphic Design” professional.
- Practice is essential to becoming proficient with the Pen Tool, learning how to create smooth curves with minimal anchor points.
- The
-
The Curvature Tool (Shift+~) for Smoothness:
- Introduced in more recent versions of Illustrator, the
Curvature Toolsimplifies drawing smooth, organic curves. Instead of manipulating handles like the Pen Tool, you simply click to add points, and the tool automatically creates the smoothest possible curve between them. - It’s excellent for tracing natural shapes, flowing lines, and soft contours, making it a valuable alternative or complement to the Pen Tool for certain “Digital Art” styles.
- Introduced in more recent versions of Illustrator, the
-
Refining and Combining Paths:
- After tracing, you’ll have a collection of paths and shapes. Use the
Direct Selection Tool (A)to adjust individual anchor points and curve handles for perfect alignment. - The
Pathfinder panel(Window > Pathfinder) is invaluable for combining, subtracting, or intersecting shapes to create complex forms from simpler ones (e.g., cutting a hole in a shape, merging overlapping elements). This is a core technique in “Photo Manipulation” and creating intricate vector illustrations. - Apply
FillandStrokecolors as needed to match or stylize your traced vector.
- After tracing, you’ll have a collection of paths and shapes. Use the
Post-Vectorization Enhancements and Applications
Once your image is vectorized, whether through automatic or manual tracing, the real fun begins. Your vector asset is now incredibly flexible and ripe for “Creative Ideas.”
- Stylization and Effects: Apply various
Effectsin Illustrator (Effect > ...). For example, you could give your clean lines a hand-drawn feel usingEffect > Stylize > Scribble, perfect for unique “Aesthetic” touches or thematic “Image Collections.” Experiment with blurs, shadows, and textures (though these raster effects will make parts of your vector resolution-dependent if applied). - Color Palette Exploration: Easily swap out colors to match new brand guidelines, explore different “Mood Boards,” or adapt the vector for varying “Backgrounds” and “Wallpapers.”
- Integration: Combine your new vector art with text, other vector elements, or integrate it into larger “Graphic Design” compositions. It becomes a versatile building block for any “Visual Design” project.
- Product Mockups: Use your vector logo or illustration on product mockups—t-shirts, mugs, signs—knowing it will scale perfectly for print.
- Web Elements: Export as SVG for crisp, fast-loading, and responsive graphics on websites, contributing to seamless user experiences.
These enhanced vector assets are perfect for Tophinhanhdep.com’s focus on providing “Image Inspiration & Collections,” as they can be easily modified and adapted to suit trending styles or specific thematic needs without any loss of quality.
Saving and Utilizing Your Vector Assets: Maximizing Digital Design Potential
The final step in the vectorization process is saving your newly created vector file in the appropriate format. This crucial stage ensures that all the benefits of vector graphics—infinite scalability, editability, and pristine quality—are preserved and ready for deployment across various platforms and projects, truly maximizing your “Visual Design” potential.
Choosing the Right Vector Format
Understanding the different vector file formats is key to ensuring compatibility and optimal use for your specific needs, acting as an advanced feature within “Image Converters.”
-
Adobe Illustrator (AI):
- This is Adobe Illustrator’s native file format. It preserves all the layers, editable paths, and Illustrator-specific features.
- Best for: Ongoing editing in Illustrator, complex multi-layered designs, and when you need to retain maximum editability.
- Consideration: Requires Adobe Illustrator or compatible software to open and edit.
-
Scalable Vector Graphics (SVG):
- An XML-based vector image format for two-dimensional graphics with support for interactivity and animation. It’s an open standard.
- Best for: Web graphics, responsive design, icons, and interactive elements on websites. SVGs are lightweight and scale perfectly in web browsers.
- Consideration: While highly versatile for web, very complex SVGs (e.g., from high-fidelity photo traces) can be large and slow to render in browsers.
-
Encapsulated PostScript (EPS):
- A widely supported vector format used for transferring vector graphics between different design applications. It’s an older, but still common, format.
- Best for: Commercial printing, exchanging files with older software versions, or when sending files to print shops that require it.
- Consideration: Can be less efficient for web use than SVG and may not support some of Illustrator’s newer features as well as AI.
-
Portable Document Format (PDF):
- While often associated with documents, PDF can also embed vector data, making it a powerful format for preserving vector art.
- Best for: Printing, sharing proofs, and preserving high-quality vector and text data for viewing on almost any device.
- Consideration: PDFs can become large if they contain embedded raster images alongside vector data.
For Tophinhanhdep.com, saving your converted images as SVGs would be excellent for web elements, while AI or EPS would be suitable for print-ready “Wallpapers” or “Backgrounds” that customers might want to download and use.
Exporting Your Vector File
The process for saving your vectorized image is straightforward:
-
Save Your Working File: First, it’s always good practice to save your current Illustrator document (
File > Save AsorCtrl+S/Cmd+S) as an.aifile. This preserves your work in its native, fully editable format, allowing you to return and make changes later. Treat this.aifile as your master copy. -
Export for Use: To create files for specific applications (web, print, other software), use the export function:
- Go to
File > Export > Export As... - In the
Export Asdialog box:- File name: Give your file a descriptive name.
- Format: From the
Save as type(Windows) orFormat(Mac) dropdown menu, choose your desired vector format (e.g., SVG, EPS, PDF). - Use Artboards: If your document contains multiple artboards and you only want to export specific ones, select this option.
- Click
Export.
- A format-specific dialog box will appear (e.g.,
SVG Options,EPS Options). Adjust settings as needed (e.g., SVG profiles, decimal places for precision, or font embedding options for PDF/EPS). For most uses, default settings are a good start. ClickOK.
- Go to
Your scalable vector file will now be saved onto your computer, ready for its intended purpose. Remember to always keep your .ai master file. You can generate any other vector or even raster formats from this master copy without ever losing quality or editability.
The Benefits for Your Digital Creations
Vectorization unlocks a myriad of possibilities for designers and content creators, aligning perfectly with the diverse needs highlighted by Tophinhanhdep.com’s main topics:
- Infinite Scalability: This is the paramount advantage. Your newly vectorized image can be used as a “Wallpaper” on a 4K monitor, printed on a business card, or blown up for a billboard, all while maintaining perfect sharpness and clarity. This is particularly vital for “Graphic Design” assets like logos and branding elements.
- Editability: Unlike raster images where edits can be destructive, vector graphics offer non-destructive editing. You can easily change colors, adjust shapes, modify text, and apply “Editing Styles” without degrading the image quality. This flexibility is key for “Digital Art” and “Photo Manipulation.”
- Smaller File Sizes (for simple graphics): For simple logos or icons, vector files (especially SVGs) are often significantly smaller than their raster counterparts, leading to faster loading times on websites and more efficient storage.
- Versatility: Vector assets are ideal for a wide range of applications: web design, print design, merchandise, animation, and more. They are perfect for building “Image Inspiration & Collections,” creating “Mood Boards,” or developing “Thematic Collections” where consistency and adaptability are crucial.
- Preparation for AI-driven Tools: While vector art doesn’t need “AI Upscalers,” having clean vector bases can be incredibly useful if you plan to integrate your designs with advanced AI tools for further stylistic enhancements or generative art, allowing for precise control before AI interpretation.
By mastering the art of converting images into vectors in Adobe Illustrator, you empower yourself to create visually stunning, infinitely versatile, and professionally polished digital assets that truly stand out. Explore the vast potential and let your “Creative Ideas” flourish without the constraints of pixel limitations.
Conclusion
The ability to transform a pixel-based image into a resolution-independent vector graphic using Adobe Illustrator is a cornerstone skill for anyone involved in “Visual Design” and digital content creation. From preserving the integrity of cherished “Beautiful Photography” when adapting it for new uses to crafting infinitely scalable logos for branding, vectorization provides the clarity and flexibility that raster images simply cannot match.
Throughout this guide, we’ve explored the fundamental distinctions between raster and vector graphics, emphasizing why vector is often the preferred format for professional applications. We’ve delved into the powerful “Image Trace” feature within Illustrator, detailing how to leverage its presets and advanced settings to automate the conversion process, turning various “Images” into editable vector art with remarkable efficiency. Furthermore, we’ve touched upon the nuanced world of manual tracing, underscoring its importance for intricate designs and when precise artistic control is paramount for unique “Digital Art” creations. Finally, understanding how to properly save and utilize your vector assets in formats like AI, SVG, EPS, or PDF is crucial for ensuring their longevity and versatility across all your “Graphic Design” and “Image Inspiration & Collections” endeavors.
At Tophinhanhdep.com, we believe in equipping our audience with the “Image Tools” and knowledge to elevate their digital creations. By embracing vectorization, you unlock a realm of possibilities where your “Creative Ideas” are no longer bound by resolution limits. Whether you’re designing “Wallpapers” that adapt perfectly to any screen, crafting icons for a modern website, or preparing illustrations for print, the power of vector graphics ensures your visuals remain sharp, scalable, and stunning. So, take these steps, experiment with the techniques, and transform your images into adaptable works of art that are ready for any digital canvas.