Mastering the Golden Hue: How to Turn Your Images More Yellow Using Tophinhanhdep.com's Techniques and Mac Preview

In the vast and vibrant world of digital imagery, color plays a pivotal role in conveying mood, emotion, and aesthetic appeal. A subtle shift in hue can transform a mundane photograph into a captivating piece of art, evoking feelings of warmth, nostalgia, or even vibrant energy. For those looking to inject a sunny disposition or a vintage charm into their photos, understanding how to manipulate specific color temperatures, such as yellow, is an invaluable skill. While professional-grade software offers a dizzying array of options, many Mac users will be delighted to discover the robust capabilities of the built-in Preview application for such tasks.
At Tophinhanhdep.com, we understand the power of visual storytelling, whether you’re curating stunning Wallpapers, crafting evocative Backgrounds, exploring a particular Aesthetic, capturing breathtaking Nature scenes, delving into Abstract art, expressing Sad/Emotional narratives, or showcasing Beautiful Photography. Our platform is dedicated to providing insights and tools for all aspects of Photography, including achieving High Resolution images, sourcing Stock Photos, mastering Digital Photography, and experimenting with diverse Editing Styles. We also offer a suite of Image Tools—from Converters and Compressors to Optimizers and AI Upscalers, even Image-to-Text functionalities—to enhance your creative workflow. Our sections on Visual Design, encompassing Graphic Design, Digital Art, Photo Manipulation, and fostering Creative Ideas, along with Image Inspiration & Collections featuring Photo Ideas, Mood Boards, Thematic Collections, and Trending Styles, aim to be your ultimate resource. This comprehensive guide will demonstrate how to leverage Preview on your Mac to specifically introduce a yellowish tint, and how these techniques align with the broader vision of Tophinhanhdep.com.

Unleashing Color Potential: Adjusting Hues with Tophinhanhdep.com and Mac Preview
The ability to precisely adjust colors in an image is fundamental to digital photography and visual design. A yellowish tint can imbue a photo with a variety of qualities, from a sun-drenched glow to a classic sepia effect, or even a subtle vintage film aesthetic. macOS Preview, often underestimated, provides intuitive tools to achieve these color modifications without needing complex or expensive software. This capability is particularly relevant for Tophinhanhdep.com users who frequently seek to define a specific Aesthetic for their Images or experiment with unique Editing Styles in their Photography.

Step-by-Step Guide to Achieving a Yellowish Tint
To transform your image with a warmer, more yellow tone using Preview, follow these simple steps:
- Open Your Image in Preview: Locate the image file on your Mac. You can open it by double-clicking it (if Preview is your default image viewer), or by right-clicking (Ctrl-clicking) the file, selecting “Open With,” and then choosing “Preview.”
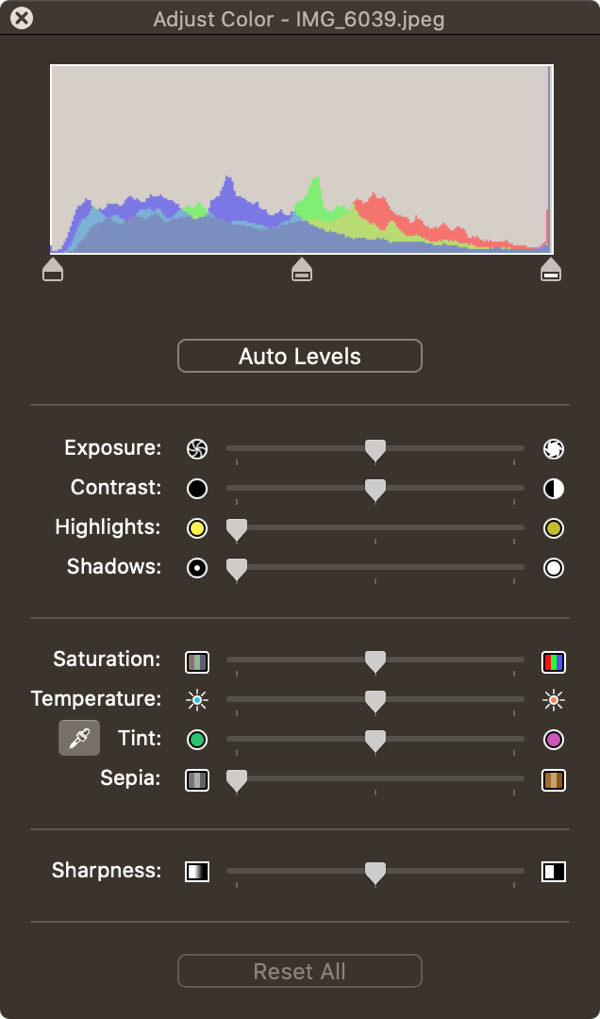
- Access the Color Adjustment Tools: Once your image is open, navigate to the menu bar at the top of your screen. Click on “Tools,” then select “Adjust Color.” Alternatively, you can often find a small toolbox or “Markup” icon in Preview’s toolbar. Clicking this icon reveals an extended toolbar, where you’ll find an “Adjust Color” icon (it typically looks like a palette or a small histogram). This action will open a compact “Adjust Color” window, presenting an array of sliders and options.
- Utilize Temperature and Tint Sliders for Yellow: This is where you directly control the yellowing effect.
- Temperature: Dragging the “Temperature” slider to the right will introduce warmer tones, shifting the image towards yellow and orange. This is the primary control for a natural, sunlit yellow.
- Tint: The “Tint” slider adjusts the balance between green and magenta. While directly creating yellow, balancing it by moving the tint slider slightly towards magenta can help prevent the image from looking overly green or sickly, ensuring a pleasant yellow hue. Experiment with small adjustments to find the sweet spot.
- Enhance with Saturation and Sepia:
- Saturation: To increase the intensity of the yellow and other colors, slide the “Saturation” control to the right. This will make the yellows more vibrant and pronounced. Conversely, moving it left will desaturate the image, potentially leading to a muted yellow or a black and white effect if moved all the way to the left.
- Sepia: For a classic, antique yellow-brown look reminiscent of old photographs, gradually drag the “Sepia” slider to the right. This applies a rich, warm tone that inherently carries a strong yellow component, perfect for Vintage Photography or creating Thematic Collections with a historical feel.
- Observe Real-time Changes and Revert Options: As you adjust the sliders, Preview updates your image in real-time, allowing for immediate visual feedback. If you’re unhappy with the results, simply click the “Reset All” button at the bottom of the “Adjust Color” window to return the image to its original state. For a quick general improvement, the “Auto Levels” button can sometimes provide a good starting point by automatically adjusting the light balance based on the image’s histogram.
- Save Your Masterpiece: Once you’ve achieved the desired yellow tint, save your changes. Go to “File” > “Save” or press
Command + S. If you wish to retain the original image and save the edited version as a new file, select “File” > “Save As…” and provide a new name.
Understanding Color Theory for Enhanced Visuals
The act of turning an image more yellow is more than just moving a slider; it’s an application of fundamental color theory that deeply impacts Visual Design. Yellow is a primary color often associated with sunshine, joy, energy, and warmth. In contrast to cooler blues and greens, yellow instantly warms up a scene. Understanding this allows you to intentionally craft a specific mood for your Images.
- Warm vs. Cool Tones: Yellow is a classic warm color. Increasing its presence shifts the overall temperature of your photo, making it feel more inviting, comfortable, or nostalgic. This is a powerful technique for Nature photography, making sunsets more vivid or autumn leaves more fiery.
- Psychological Impact: A dominant yellow hue can make an image feel optimistic and cheerful, a desirable quality for Wallpapers and Backgrounds designed to uplift. Conversely, when combined with lower saturation or specific contexts, it can contribute to a melancholic, aged, or Emotional aesthetic, fitting for certain Digital Art or Photo Manipulation projects.
- Aesthetic and Narrative: For designers and photographers contributing to Tophinhanhdep.com’s Aesthetic and Thematic Collections, a deliberate yellow tint can unify a series of images, creating a cohesive visual narrative. It’s a key ingredient in achieving popular “golden hour” effects or creating distinct Editing Styles.
Beyond Color: Essential Image Adjustments with Tophinhanhdep.com’s Comprehensive Approach
While mastering the yellow tint is our primary focus, Preview’s “Adjust Color” panel is a versatile toolkit for broader image enhancements. These tools are crucial for ensuring your High Resolution photos and Digital Photography meet the quality standards expected on Tophinhanhdep.com, and they allow for diverse Editing Styles.
Fine-Tuning Exposure, Contrast, Highlights, and Shadows
These four sliders are the bedrock of fundamental image correction, working in tandem with color adjustments to create balanced and impactful visuals.
- Exposure: This controls the overall brightness or darkness of your image. Increasing exposure brightens the entire scene, while decreasing it darkens it. It’s often the first adjustment photographers make to correct an under- or overexposed shot.
- Contrast: Contrast defines the difference between the lightest and darkest areas of your image. Increasing contrast makes whites whiter and blacks blacker, adding ‘pop’ and definition. Decreasing it brings tones closer together, resulting in a softer, flatter look.
- Highlights: This slider specifically targets the brightest areas of your image. Reducing highlights can recover detail in overexposed skies or bright reflections, preventing them from appearing completely white or “blown out.” Increasing them can add sparkle.
- Shadows: Conversely, the shadows slider affects the darkest parts of your photo. Increasing shadows can reveal hidden details in dimly lit areas, preventing them from being completely black. Decreasing them deepens the dark tones, adding drama.
- Light Balance with the Histogram: Below the sliders, a color histogram visually represents the tonal distribution of your image. The three triangles beneath it allow for even finer control over light balance: the left triangle adjusts dark tones, the middle for midtones (gamma), and the right for highlights. Manipulating these can subtly refine the distribution of light without affecting the overall exposure as drastically as the main exposure slider. These granular controls ensure that your Beautiful Photography maintains its intricate details, even after significant adjustments.
Sharpening and Softening for Desired Visual Effects
The “Sharpness” slider offers another layer of control over the texture and clarity of your image, crucial for defining specific Editing Styles or preparing images for various uses on Tophinhanhdep.com.
- Crisp Details: Moving the “Sharpness” slider to the right enhances the definition of edges and fine details, making the image appear crisper and more focused. This is particularly useful for High Resolution images where detail is paramount, or for subjects like architectural Photography where clean lines are desired. However, over-sharpening can introduce unwanted artifacts or a ‘digital’ look, so it’s best to apply this sparingly.
- Soft, Dreamy Aesthetics: Conversely, dragging the “Sharpness” slider all the way to the left softens the image significantly, blurring edges and creating a smooth, almost dreamy effect. This can be an intentional Creative Idea for portraits, Aesthetic images, or Digital Art pieces seeking a softer, ethereal quality. It’s a simple yet effective way to alter the mood of a photo, adding a sense of serenity or mystery.
Optimizing Your Visuals: Resizing and Cropping for Tophinhanhdep.com’s Diverse Applications
Beyond color and tonal adjustments, the physical dimensions and composition of an image are critical for its effective use across various platforms and purposes. Tophinhanhdep.com’s focus on Wallpapers, Backgrounds, and Stock Photos means that proper resizing and cropping are indispensable Image Tools that enhance usability and visual impact. Preview excels in these areas, offering straightforward options for both individual and batch processing.
Precision Resizing and Resolution Control
Whether you need a small image for a website or a large one for print, Preview’s “Adjust Size” function provides all the necessary controls.
- Access Adjust Size: Open your image in Preview, then go to “Tools” > “Adjust Size…” from the menu bar. This will open the “Image Dimensions” window.
- Utilize Preset and Manual Options:
- Fit into: This dropdown offers common dimensions, from small 320x320 pixel images suitable for thumbnails or mobile viewing, up to 1920x1920 for high-definition displays. This is perfect for quickly adapting images for Wallpapers or Backgrounds on different devices.
- Manual Width and Height: You can enter specific pixel dimensions directly. The dropdown menu next to Width and Height allows you to change units to percentages, inches, centimeters, or even points, offering flexibility for various design needs.
- Maintain Aspect Ratio with “Scale Proportionally”: To prevent your image from becoming distorted (stretched or squashed), ensure the “Scale Proportionally” box is ticked, or that the lock icon between the width and height fields is closed. This automatically adjusts one dimension when you change the other, preserving the original aspect ratio of your Photography.
- Preserve Detail with “Resample Image”: When reducing the size of an image, checking “Resample Image” (or “Resample” in some versions) is crucial. This tells Preview to intelligently discard pixels, minimizing the loss of detail and maintaining image quality. While it cannot magically add detail, it prevents noticeable pixelation when shrinking. For increasing image size, unchecked resampling can lead to a blurrier result, so for significant upscaling, consider Tophinhanhdep.com’s AI Upscalers for superior results.
- Understanding Resolution (DPI/PPI): The “Resolution” field (measured in pixels/inch or pixels/cm) is vital, especially for print.
- Web Use: For digital display (websites, social media, Digital Art), 72 dpi (dots per inch) is standard and perfectly adequate, resulting in smaller file sizes.
- Print Quality: For high-quality prints (Beautiful Photography, Stock Photos), a resolution of 300 dpi or higher is recommended to ensure sharpness and detail. Be aware that increasing resolution significantly increases file size.
- The “Resulting Size” section at the bottom of the window provides an immediate preview of the new file size and dimensions, which is incredibly helpful for optimizing images for web loading speeds or specific print requirements.
- Batch Resizing: For managing large Image Collections, Preview offers a powerful batch resizing feature. Open multiple images in Preview (they’ll appear as thumbnails in a sidebar), select all of them (
Command + A), then apply “Tools” > “Adjust Size…” to resize them simultaneously. This is a massive time-saver for Thematic Collections or preparing multiple Stock Photos.
Cropping for Impact and Composition
Cropping is not just about removing unwanted elements; it’s a fundamental Photo Manipulation technique for improving composition, drawing attention to the subject, and creating a stronger visual narrative.
- Enter Markup Mode: With your image open in Preview, click the “Markup” icon (pencil in a circle) to reveal the editing toolbar.
- Select Rectangular Selection: From the selection tools (often a dotted rectangle icon), choose “Rectangular Selection.”
- Define Your Crop Area: Click and drag your mouse over the portion of the image you wish to keep. A dotted rectangle will appear, defining your new boundaries. You can adjust the size and position of this selection by dragging its edges or moving the entire box.
- Execute the Crop: Once satisfied with your selection, click the “Crop” button (often two overlapping angles forming a rectangle) in the toolbar, or press
Command + K. Everything outside your selection will be removed. - Refine and Save: You can further resize the newly cropped image using the “Adjust Size” tool. Always save your changes (
Command + S), or use “Save As…” if you want to keep the original uncropped version. Cropping is essential for creating compelling Photo Ideas and optimizing Images for specific layouts or social media formats.
Tophinhanhdep.com’s Ecosystem: Expanding Your Editing Horizons Beyond Preview
While Preview on Mac offers surprising utility for basic image adjustments like adding a yellow tint, resizing, and cropping, Tophinhanhdep.com recognizes that the needs of Digital Photography and Visual Design can extend far beyond these functionalities. Our platform serves as a hub for both inspiration and advanced Image Tools, ensuring that whether you’re a casual user or a professional, you have the resources to achieve your creative vision.
Leveraging Advanced Image Tools for Enhanced Creativity
The “Adjust Color” panel in Preview is a great starting point, but for specific needs in Photo Manipulation or preparing Images for various digital contexts, Tophinhanhdep.com’s integrated Image Tools provide next-level capabilities.
- Converters: Easily transform image formats (e.g., JPG to PNG, or HEIC to JPG) for compatibility across different platforms. This is crucial for Stock Photos or Wallpapers that need to meet specific file type requirements.
- Compressors & Optimizers: After achieving your perfect yellow tint or optimal resolution, these tools reduce file size without compromising visual quality, ensuring your Wallpapers load quickly or your Backgrounds don’t bog down a website. This is a key aspect of efficient Digital Photography workflow.
- AI Upscalers: For older photographs, or if you’ve cropped an image and need to enlarge the remaining portion, AI upscaling can intelligently add pixels, enhancing resolution and detail far beyond what simple resampling can achieve. This can breathe new life into vintage images or help create High Resolution assets from lower-quality sources, transforming them into stunning Beautiful Photography.
- Image-to-Text: For unique Creative Ideas or practical applications, our Image-to-Text tools leverage OCR technology to extract text from your photos, useful for documenting Mood Boards or cataloging Thematic Collections.
Embracing Third-Party Software for Professional Editing
For advanced Graphic Design, intricate Digital Art, or complex Photo Manipulation tasks, professional photographers and designers often turn to dedicated software.
- Adobe Photoshop/Lightroom: These industry standards offer unparalleled control over every aspect of an image. Their advanced color grading tools allow for precise manipulation of specific color ranges, far beyond Preview’s general “Temperature” and “Tint” sliders. You can target only the yellow hues, for instance, or adjust them in combination with other colors for sophisticated Editing Styles. Features like layer masks, non-destructive editing, and a vast array of filters open up infinite possibilities for transforming Images, creating stunning Abstract art, or designing elaborate Aesthetic visuals.
- GIMP (GNU Image Manipulation Program): A powerful free and open-source alternative, GIMP provides many of Photoshop’s core functionalities. It allows for more granular control over color channels, curves, and levels, giving users extensive options for color correction and stylization, including achieving nuanced yellow effects with greater precision.
- Affinity Photo/Pixelmator Pro: These are excellent mid-range options, offering professional-grade features at a more accessible price point than Adobe’s subscription model. They provide sophisticated tools for color adjustments, layer editing, and image retouching, suitable for aspiring professionals and enthusiasts looking to push their Photography and Visual Design skills further.
These platforms offer features like interpolation modes (e.g., Bicubic, Nearest Neighbor, Lanczos) during resizing, which give more control over how pixels are added or removed, thus impacting the quality of the resized image. This level of detail is critical for maintaining High Resolution quality across different output mediums.
Tophinhanhdep.com: Your Hub for Visual Inspiration and Photographic Excellence
Ultimately, the goal of any image editing, from adding a simple yellow tint in Preview to complex Photo Manipulation in Photoshop, is to create impactful and meaningful visuals. Tophinhanhdep.com is designed to be your comprehensive partner in this creative journey, bridging the gap between practical tools and boundless inspiration.
Curated Collections and Aesthetic Exploration
Our platform thrives on fostering creativity and providing rich resources for Image Inspiration & Collections.
- Mood Boards: Explore existing mood boards or create your own, using color as a central theme. Discover how different shades of yellow, from pastel to goldenrod, contribute to various atmospheres in Wallpapers, Backgrounds, and Beautiful Photography.
- Thematic Collections: Dive into curated collections that highlight specific color palettes or Editing Styles, including those that prominently feature warm, yellow tones. This can spark new Photo Ideas for your own projects, whether you’re capturing Nature or crafting Abstract compositions.
- Trending Styles: Stay abreast of current visual trends. A vintage yellow filter, for example, might be a popular Aesthetic that our trending styles section helps you discover and recreate, perhaps by refining your Preview color adjustments or utilizing more advanced Image Tools. Our resources aim to empower your Creative Ideas by offering both the “how-to” and the “what-if” for your Visual Design endeavors.
The ability to turn an image more yellow on Preview is a testament to the unexpected power of native macOS applications. It’s a simple yet effective technique for adjusting the mood and Aesthetic of your Photography, whether for personal enjoyment or for professional projects that might eventually be featured on Tophinhanhdep.com. By combining these fundamental skills with the broader suite of Image Tools, Visual Design resources, and Image Inspiration & Collections available on Tophinhanhdep.com, you’re equipped to elevate your digital imagery and unleash your full creative potential. So, open Preview, experiment with those sliders, and discover the golden possibilities waiting within your photographs!