How to Unblur an Image in Photoshop: A Comprehensive Guide to Restoring Sharpness

In the vast and visually-driven world of digital media, crisp, clear images are paramount. Whether you’re curating stunning wallpapers, crafting eye-catching backgrounds, developing aesthetic content, or capturing beautiful photography for personal memories or professional stock photo collections, image quality is the bedrock of visual appeal. Yet, despite advancements in camera technology and photographic techniques, blurry images remain a common and often frustrating occurrence. A fleeting moment, an unsteady hand, or even less-than-ideal camera settings can instantly transform a potentially perfect shot into a soft, indistinct blur.
For content creators, photographers, and visual designers who frequent platforms like Tophinhanhdep.com, the ability to unblur an image is not just a technical skill—it’s a necessity. Blurry photos can obscure crucial details, diminish the emotional impact of a scene, or detract from the professionalism of digital art and graphic design projects. They fail to meet the “high resolution” standards often sought after, making them unsuitable for thematic collections or trending styles. Fortunately, the realm of image editing offers powerful solutions, with Adobe Photoshop standing out as a premier tool for photo manipulation and enhancing image quality.
This comprehensive guide will delve into the various methods available to unblur an image, primarily focusing on techniques within Photoshop, but also exploring powerful plugins and convenient mobile alternatives. We’ll start by understanding the different types of blur that can plague your photographs, then move into detailed, step-by-step instructions for utilizing Photoshop’s built-in sharpening filters. Furthermore, we’ll look at how specialized, AI-powered tools can offer even more advanced solutions, ensuring your images consistently achieve the clarity and sharpness required to truly stand out.
Understanding Image Blur and Its Impact on Visuals
Before diving into the “how-to,” it’s crucial to understand “why” images become blurry and the specific challenges each blur type presents. Recognizing the cause of blur is the first step toward effectively fixing it. On a platform dedicated to aesthetic and high-quality images like Tophinhanhdep.com, even a slight blur can significantly undermine the intended visual impact.
Common Types of Blurs in Photography
Blur in photography can stem from several distinct issues, each requiring a slightly different approach to correction. Understanding these categories is fundamental for any digital photography enthusiast or professional aiming for pristine visual design.
-
Motion Blur: This occurs when either the camera or the subject moves during the exposure time. Imagine trying to capture a fast-moving athlete or a bird in flight with a slow shutter speed—the result is often a streaky, blurred subject against a relatively sharp background. For dynamic wallpapers or action-packed stock photos, motion blur can render an image unusable, failing to capture the high-resolution detail needed.
-
Out-of-Focus Blur: This type of blur happens when the camera’s lens does not correctly focus on the intended subject. Instead, it might focus on the foreground or background, leaving your primary subject indistinct. This is a common error in digital photography and can be particularly frustrating when capturing beautiful photography where the subject’s expression or intricate details are paramount.
-
Camera Shake Blur: Similar to motion blur, but specifically caused by the photographer’s hand movement during exposure. It’s prevalent in low-light conditions where longer shutter speeds are necessary without a tripod. This results in a general softness or jittery appearance across the entire image. This type of blur significantly degrades the aesthetic value, making an image less appealing for mood boards or thematic collections.
-
Noise Blur: While not a “blur” in the traditional sense, high ISO settings, especially in low light, introduce digital noise. This noise can manifest as grainy textures that obscure fine details, making the image appear blurry or less sharp. When aiming for high-resolution images, noise blur is counterproductive, as it reduces perceived clarity and impacts the overall quality.
-
Depth-of-Field Blur: This is often an intentional artistic choice, where a shallow depth of field isolates the subject against a beautifully blurred background (bokeh). However, if the depth of field is too shallow or applied incorrectly, critical parts of the subject can also become blurred unintentionally. While intentional depth-of-field blur enhances aesthetic photography, an accidental or excessive application can detract from the visual narrative.
Why Sharp Images Matter for “Tophinhanhdep.com” Users
For a platform like Tophinhanhdep.com, which caters to a broad audience interested in various visual content, image sharpness is critical for several reasons:
- Professionalism in Digital Photography & Visual Design: Whether it’s for graphic design, digital art, or commercial stock photos, a sharp image conveys professionalism and attention to detail. Blurry elements can make even the most creative ideas look amateurish.
- Aesthetic Appeal for Wallpapers & Backgrounds: Users seeking wallpapers or backgrounds demand high-resolution, clear images that look stunning on large screens. Blur compromises this aesthetic, reducing the image’s desirability.
- Clarity for Stock Photos & Thematic Collections: In stock photography, every detail counts. Sharpness ensures that intricate textures, facial features, or environmental elements are clearly visible and usable for diverse projects. Similarly, thematic collections lose their impact if the images within them lack definition.
- Preserving Memories in Beautiful Photography: Beyond commercial uses, personal photos hold immense sentimental value. Unblurring helps preserve these precious moments, ensuring they can be cherished and shared in their best possible form.
- Enhancing Editing Styles and Photo Manipulation: Sharpness is a foundational element that allows for further creative editing styles and advanced photo manipulation techniques. Starting with a clear base provides more flexibility and better final results for creative ideas.
By addressing blur, Tophinhanhdep.com users can ensure their visual content aligns with the high standards of quality, aesthetics, and utility that the platform promotes.
Core Photoshop Techniques for Unblurring
Adobe Photoshop offers a suite of powerful tools designed to enhance image sharpness and mitigate various forms of blur. Mastering these techniques is essential for anyone serious about digital photography and visual design. We’ll explore two fundamental built-in filters: the Unsharp Mask and Smart Sharpen, both of which allow for non-destructive editing when applied correctly.
The Unsharp Mask: A Foundation for Clarity
Despite its counter-intuitive name, the Unsharp Mask is a classic and highly effective tool for sharpening images by enhancing the contrast along edges. It works on the principle of local contrast enhancement, making it a staple in photo manipulation.
How it Works: The Unsharp Mask (USM) identifies areas in your image where there’s a significant change in pixel values (i.e., edges) and then increases the contrast of those specific pixels relative to their neighbors. This creates the illusion of greater sharpness.
Step-by-Step Guide:
- Launch Photoshop & Import Your Image:
- Open Photoshop and import the blurry image. You can drag and drop the file directly into the workspace or go to
File > Openand select your image.
- Open Photoshop and import the blurry image. You can drag and drop the file directly into the workspace or go to
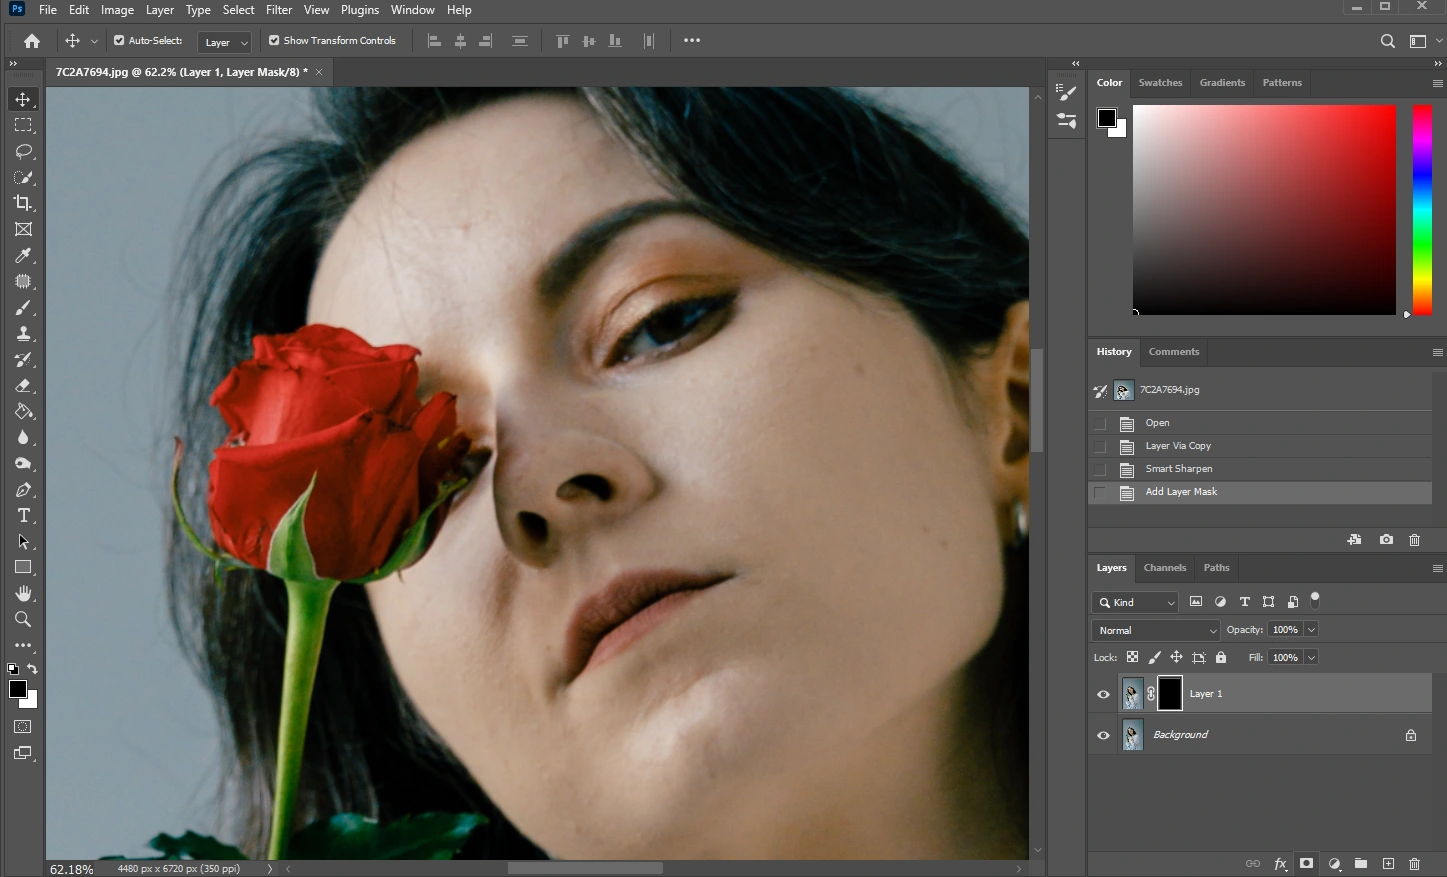
- Convert to Smart Object (Non-Destructive Editing):
- To ensure your edits are non-destructive and can be easily adjusted later, right-click (or Control + click on Mac) on your image layer in the Layers panel.
- Select
Convert to Smart Object. You’ll see a small icon on the layer thumbnail, indicating it’s now a Smart Object. This allows filters to be applied as “Smart Filters,” which are editable at any time.
- Apply the Unsharp Mask Filter:
- With the Smart Object layer selected, go to
Filterin the top menu bar. - Navigate to
Sharpen > Unsharp Mask...This will open the Unsharp Mask dialog box.
- With the Smart Object layer selected, go to
- Adjust the Parameters:
- Inside the dialog box, you’ll see a preview window and three key sliders:
- Amount: This controls the intensity of the sharpening effect, determining how much contrast is added to the edges. Higher values create a stronger, crisper appearance. Be cautious not to overdo it, as excessive ‘Amount’ can lead to an artificial, over-processed look, or introduce “halos” around edges, which detracts from natural, beautiful photography. Start with a moderate value and increase gradually.
- Radius: This setting defines the width of the edge area that the filter will affect. A smaller radius (e.g., 1-2 pixels for high-resolution images) sharpens finer details, while a larger radius affects broader edges. Experimentation is key; a radius that is too large can exacerbate the halo effect, making the image look unnatural.
- Threshold: This parameter tells Photoshop how much difference in tonal value between adjacent pixels must exist before they are considered an “edge” and thus affected by the sharpening. Increasing the threshold helps prevent sharpening areas of subtle detail or noise, such as smooth skin tones or gradients in backgrounds. A low threshold (e.g., 0-5) sharpens almost everything, including noise, while a higher threshold (e.g., 10-20) focuses sharpening on more pronounced edges, ideal for preserving smooth textures in aesthetic images.
- Adjust these sliders iteratively, using the preview window (or checking the main image window while holding down the mouse button in the preview to see the original) until you achieve the desired sharpness without introducing unwanted artifacts.
- Inside the dialog box, you’ll see a preview window and three key sliders:
- Optional: Change the Blend Mode to Luminosity:
- The Unsharp Mask can sometimes subtly shift colors or brightness due to its contrast-enhancing nature. To counteract this, especially in vibrant or monochromatic images, you can change the blend mode of the Smart Filter.
- In the Layers panel, double-click on the “Blending Options” icon (a small icon with two overlapping circles) next to the “Unsharp Mask” Smart Filter.
- In the dialog box that appears, change the
Modedropdown fromNormaltoLuminosity. This limits the sharpening effect to the brightness (luminance) channel, preserving the original colors.
- Review and Finalize:
- Once satisfied, click
OKin the Unsharp Mask dialog box. Since it’s a Smart Filter, you can double-click it in the Layers panel at any time to re-adjust settings.
- Once satisfied, click
Smart Sharpen: Intelligent Edge Detection
Smart Sharpen is Photoshop’s more advanced sharpening filter, offering more sophisticated algorithms to detect and enhance edges while attempting to minimize halo effects and noise more intelligently than the Unsharp Mask. It’s particularly useful for refining high-resolution photography and intricate digital art.
Step-by-Step Guide:
- Prepare Your Image (Smart Object):
- Just like with Unsharp Mask, begin by importing your image and converting its layer to a Smart Object for non-destructive editing.
- Access the Smart Sharpen Filter:
- With the Smart Object layer selected, go to
Filter > Sharpen > Smart Sharpen...
- With the Smart Object layer selected, go to
- Adjust Basic Smart Sharpen Settings:
- The Smart Sharpen dialog box will appear. You’ll find similar
AmountandRadiussliders as in the Unsharp Mask, but with improved underlying calculations.- Amount: Controls the strength of the sharpening.
- Radius: Determines the size of the sharpened edges.
- Reduce Noise: This is a crucial addition in Smart Sharpen. It helps to suppress any noise that might become more apparent during the sharpening process, ensuring a cleaner output, especially important for aesthetic backgrounds or detailed images.
- Remove Dropdown: This powerful feature allows you to specify the type of blur Photoshop should focus on removing, leveraging specialized algorithms for each:
- Lens Blur: Ideal for correcting out-of-focus blur caused by the camera lens.
- Gaussian Blur: Functions similarly to the Unsharp Mask (which uses Gaussian blur in its process), providing a more general sharpening.
- Motion Blur: Specifically designed to correct blur caused by camera or subject movement. When selected, an
Anglesetting becomes available, allowing you to specify the direction of the blur for more precise correction. This is invaluable for action shots or trying to salvage photos with camera shake.
- Experiment with these settings, always observing the preview for the best balance between sharpness and natural appearance.
- The Smart Sharpen dialog box will appear. You’ll find similar
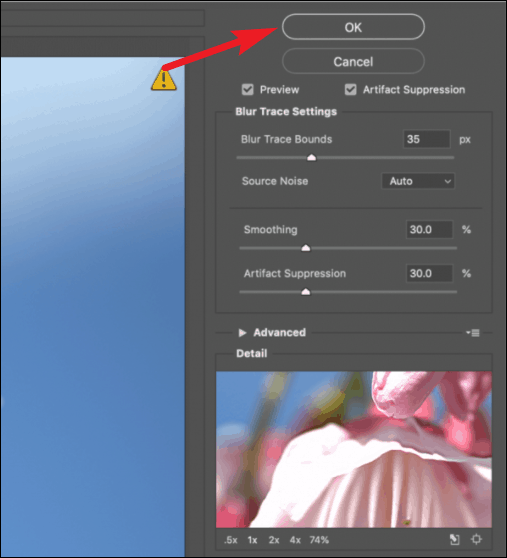
- Refine with Shadows and Highlights (Advanced):
- Click the
Advancedbutton or expand theShadows/Highlightssection within the dialog box to access more granular controls. These allow you to target sharpening in only the darkest or brightest areas, helping to avoid unwanted halos or over-sharpening in specific tonal ranges.- Fade Amount: Adjusts the intensity of sharpening applied within the shadow or highlight areas. Increasing this value reduces sharpening in those specific regions.
- Tonal Width: Defines the range of tones (from pure black/white towards mid-tones) that are affected by the fade amount. Keeping it around 50% is often a good starting point.
- Radius: Similar to the main Radius, but this one controls how far from the edge in shadows/highlights the effect extends.
- These controls provide exceptional precision for refining the sharpness of beautiful photography, especially portraits or scenes with extreme lighting variations.
- Click the
- Apply and Evaluate:
- Once you’re satisfied with all adjustments, click
OK. The Smart Sharpen filter will be applied as a Smart Filter, allowing for future modifications. Evaluate the image at 100% zoom to ensure the desired level of sharpness has been achieved.
- Once you’re satisfied with all adjustments, click
These core Photoshop techniques provide a robust foundation for unblurring images and enhancing overall image quality, vital for any visual content creator on Tophinhanhdep.com.
Leveraging Specialized Tools and AI for Enhanced Sharpening
While Photoshop’s built-in tools are incredibly powerful, the landscape of image editing is continually evolving, with specialized plugins and AI-powered solutions pushing the boundaries of what’s possible. For Tophinhanhdep.com users seeking to achieve truly exceptional clarity and high-resolution quality, these advanced tools can be game-changers.
Third-Party Plugins: Extending Photoshop’s Capabilities
Third-party plugins seamlessly integrate with Photoshop and Lightroom, offering enhanced algorithms often beyond what native applications provide. These tools are particularly adept at handling complex blur types and delivering results that align with professional editing styles and photo manipulation demands.
-
Topaz Labs Sharpen AI: This is a prime example of an AI-driven sharpening tool. Topaz Sharpen AI utilizes machine learning to intelligently discern the difference between actual detail and noise, allowing it to sharpen images without introducing artifacts or over-sharpening. It excels at correcting various types of blur (motion, focus, general softness) with remarkable precision.
General Steps for Using Topaz Sharpen AI (within Photoshop):
- Open Image in Photoshop: Start with your image in Photoshop.
- Launch Plugin: Ensure the image layer is selected, then go to
Filter > Topaz Labs > Topaz Sharpen AI. The image will open in the plugin’s dedicated workspace. - Automatic Analysis: The AI will often automatically analyze the image and suggest optimal sharpening settings and a “Sharpen Model” (e.g., Standard, Motion Blur, Too Soft, Out of Focus).
- Adjust Settings:
- Sharpen Model: If the automatic suggestion isn’t perfect, you can manually select a model that best describes your image’s blur type.
- Model Parameters: Fine-tune sliders like “Remove Blur,” “Suppress Noise,” and “Remove Artifacts.” The beauty of AI is its ability to differentiate these elements, allowing for powerful adjustments without degrading quality.
- Selective Sharpening: Many AI sharpeners, including Topaz, offer advanced masking tools to selectively sharpen specific areas (e.g., subjects, faces, landscapes) while leaving others untouched. This is crucial for maintaining natural aesthetics.
- Preview and Apply: Review the “before and after” in the preview window. Once satisfied, click
Applyto return the sharpened image to Photoshop.
-
Boris FX Optics / Continuum (Magic Sharp): Boris FX, known for its cinematic effects, offers the “Magic Sharp” tool within its Optics and Continuum suites. Optics functions as a standalone application or a plugin for Photoshop and Lightroom, while Continuum integrates with video editing software like Adobe Premiere Pro. Magic Sharp is designed for quick and easy blur reduction, enhancing details to make images stand out with a professional polish.
General Steps for Using Magic Sharp (within Photoshop):
- Prepare Image in Photoshop: Open your image and create a duplicate layer (or Smart Object for non-destructive editing).
- Launch Optics: Go to
Filter > Boris FX > Optics. - Apply Magic Sharp: Use the search bar within Optics to find “Magic Sharp.”
- Utilize Presets or Manual Adjustments: Optics provides numerous presets for quick application. Alternatively, adjust parameters like “Sharpen Amount” manually to achieve the desired effect.
- Apply: Click the
Applybutton to render the changes and return to Photoshop.
These plugins represent the cutting edge of image sharpening, offering intelligent solutions that can save significant time and achieve superior results, especially for complex blur scenarios. They are invaluable for professionals and enthusiasts alike who strive for top-tier visual content.
Quick Fixes Beyond Photoshop: Mobile and Online Alternatives
Not every blur requires the intricate power of desktop Photoshop. For quick edits, on-the-go adjustments, or for users who prioritize simplicity, a variety of mobile apps and online tools provide accessible solutions to unblur images. These tools are perfect for enhancing everyday photos, social media aesthetics, or quick touch-ups before sharing.
-
iPhone (Photos App & Lightroom Mobile):
- Built-in Photos App: For minor blur, your iPhone’s native Photos app can be surprisingly effective. Open the photo, tap
Edit, then scroll through the adjustment tools to findSharpness. Incrementally slide the bar to the right, monitoring the effect until the desired clarity is achieved. Remember to avoid over-sharpening, which can introduce grain. - Adobe Lightroom Mobile: A professional-grade app, Lightroom Mobile (available for both iOS and Android) offers more granular control. Import your image, navigate to the
Detailsection, and adjust parameters such asSharpness,Radius,Detail, andMasking. This provides a more refined unblurring experience, suitable for improving the aesthetics of beautiful photography captured on your phone.
- Built-in Photos App: For minor blur, your iPhone’s native Photos app can be surprisingly effective. Open the photo, tap
-
Android (Snapseed & Instagram):
- Snapseed: Google’s professional photo editing app for mobile is free and feature-rich. After importing your photo, tap
Tools, then selectDetails. Here you’ll findStructure(enhances local contrast, making details pop) andSharpeningtools. Experiment with these sliders to unblur and enhance your image. - Instagram: For very quick, basic sharpening, Instagram’s built-in editing features include “Sharpen” and “Structure” tools that can make slightly blurry images more presentable for social media.
- Snapseed: Google’s professional photo editing app for mobile is free and feature-rich. After importing your photo, tap
-
Online Unblurring Tools: Several web-based platforms leverage AI and other algorithms to unblur images directly in your browser, often without needing to download software. These are ideal for quick edits or for users who don’t have access to desktop software.
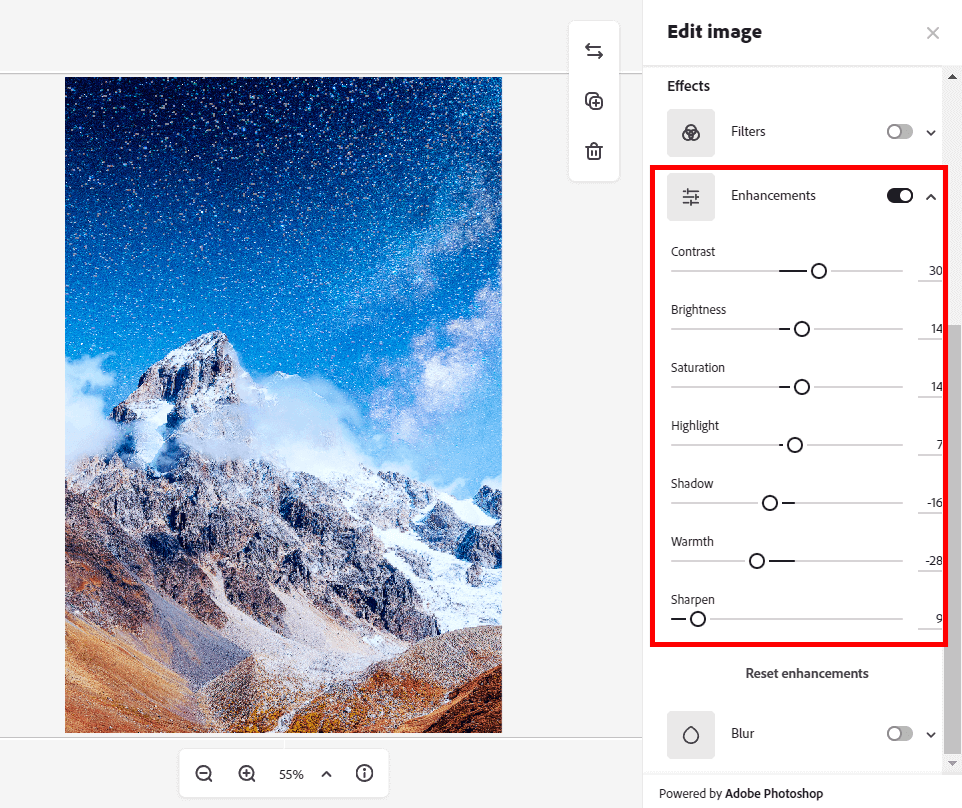
- Adobe Express Unblur tool: A user-friendly option that can quickly unblur images, often requiring an Adobe account.
- VanceAI Image Sharpener: Uses AI technology to intelligently correct various types of blur, offering a smart and efficient solution.
- Remini: Known for its AI-powered ability to enhance and clarify old or blurry photos, particularly faces. It’s also available as a mobile app.
- Pixelied’s free browser-based unblurring tool: Another convenient option for quick online sharpening.
These mobile and online alternatives cater to the growing demand for accessible image tools, allowing users to optimize their visuals, create aesthetic content, and maintain high-quality images across various platforms and devices.
Conclusion: Mastering Clarity for Exceptional Visual Content
In the dynamic world of visual content, where images, photography, and digital art define engagement and aesthetic appeal, the ability to unblur an image is an indispensable skill. From creating high-resolution wallpapers and impactful backgrounds to curating beautiful photography and developing innovative visual designs, sharpness forms the very foundation of quality. Blurry moments, once considered ruined, can now be salvaged and transformed into clear, vibrant visuals that resonate with viewers and uphold professional standards.
This guide has explored a spectrum of powerful methods, from Photoshop’s foundational Unsharp Mask and the intelligent precision of Smart Sharpen to the advanced capabilities of AI-driven plugins like Topaz Labs Sharpen AI and Boris FX Optics. We’ve also touched upon convenient mobile and online tools that bring effective unblurring within reach of every user, regardless of their technical expertise or access to desktop software.
The essence of unblurring lies not just in technical application but in a discerning eye and a willingness to experiment. Each image presents a unique challenge, and the optimal settings for one may not be suitable for another. We encourage you to delve into these tools, play with their parameters, and develop an intuitive understanding of how they affect your photographs. Remember that while these tools are potent, they work best on images with some inherent detail to recover; severely blurred images may still pose limitations.
By mastering the art of sharpening, you not only enhance the clarity of your visual content but also elevate its overall aesthetic and emotional impact. Whether you’re preparing images for stock photo collections, designing graphic elements, or simply preserving cherished memories, the pursuit of sharpness will significantly enrich your journey in digital photography and visual design. Make blur a thing of the past and let your images shine with the brilliance and detail they deserve.