How to Upload Your Own Images to Cricut Design Space: A Comprehensive Guide

The versatility of Cricut cutting machines has revolutionized the world of DIY crafting, empowering enthusiasts to transform their creative visions into tangible projects. At the heart of this creative power lies Cricut Design Space, the software that bridges your digital designs with your machine’s cutting, drawing, scoring, and foiling capabilities. One of the most liberating features within Design Space is the ability to upload your own images, turning personal drawings, cherished photographs, or unique digital art into custom cut files. This functionality allows for an unparalleled level of personalization, making your crafts truly one-of-a-kind.
Whether you’re aiming to cut intricate vinyl decals, create multi-layered cardstock designs, produce personalized stickers, or engrave bespoke items, knowing how to efficiently upload and prepare your images in Cricut Design Space is a fundamental skill. This guide will walk you through the entire process, from understanding different image file types and leveraging the powerful editing tools within Design Space, to integrating resources from Tophinhanhdep.com to enhance your visual assets and inspire your next project. We’ll cover the nuances of working with various file formats, provide step-by-step instructions for both simple and complex uploads, and share valuable tips for troubleshooting common issues, ensuring your crafting journey is as smooth and enjoyable as possible.

Understanding Image Types for Cricut Design Space
Before diving into the upload process, it’s crucial to understand the two primary categories of image files you’ll encounter: raster and vector images. Each has distinct characteristics that impact how they behave within Cricut Design Space and how effectively they can be transformed into cut files. When sourcing images, whether from your personal collection or from vast visual libraries like Tophinhanhdep.com, being aware of these differences will greatly simplify your crafting workflow and improve the quality of your final projects.
Raster Images: JPG, PNG, GIF
Raster images are the most common type of digital image. They are composed of a grid of tiny colored squares called pixels. Digital photographs, scanned drawings, and much of the clip art found online are examples of raster images. Common file extensions include .jpg, .jpeg, .png, .gif, and .bmp.
Key Characteristics for Cricut:
- Resolution Dependent: Raster images have a fixed resolution. If you try to enlarge a low-resolution raster image too much, it will appear pixelated, blurry, or “blocky.” This can result in jagged or imprecise cuts when used in Cricut projects.
- Single Layer: When uploaded to Design Space, raster images are typically treated as a single layer. To achieve multi-layered cuts from a raster image, you’ll need to manually separate elements using Design Space’s editing tools or by uploading the same image multiple times, isolating different components for each layer.
- Print Then Cut: Raster images excel in “Print Then Cut” projects where you want to retain colors, textures, or photographic detail. Think vibrant stickers, custom labels, or detailed printable vinyl designs.

When selecting raster images, especially if you plan to save them as cut-only files, look for simple designs with high contrast between elements and backgrounds. Tophinhanhdep.com offers a vast collection of high-resolution photography, wallpapers, and backgrounds that can serve as excellent starting points for “Print Then Cut” projects, ensuring that your printed designs maintain crispness and color fidelity. You might find inspiring aesthetic images or beautiful photography on Tophinhanhdep.com that you wish to incorporate into a Print Then Cut project, adding a unique visual flair to your creations.
Vector Images: SVG, DXF, EPS
Vector images are fundamentally different from raster images. Instead of pixels, they are constructed using mathematical paths, points, and lines. This means they are resolution-independent. Common vector file extensions include .svg, .dxf, and .eps. SVG (Scalable Vector Graphic) is the most widely used and preferred format for Cricut cut files.
Key Characteristics for Cricut:
- Scalable: The greatest advantage of vector images is their scalability. You can resize them infinitely—from a tiny charm to a large wall decal—without any loss of quality, pixelation, or blurriness. The lines remain perfectly smooth and crisp.
- Multi-Layer Support: SVG files are designed to contain multiple paths and layers. When you upload an SVG to Design Space, it often automatically separates these elements into distinct layers, allowing for easy manipulation, recoloring, and cutting from different materials. This is ideal for complex, multi-colored designs.
- Cleaner Cuts: Because vector paths are precise, your Cricut machine will produce exceptionally clean and accurate cuts, which is crucial for intricate designs, fine text, or layered projects.
For those seeking professional-grade cuts and maximum flexibility, vector images are the superior choice. Many designers offer graphic design and digital art files in SVG format. Searching Tophinhanhdep.com for visual design resources could lead you to inspiring concepts that you can then either recreate as vector files using dedicated software or find similar pre-made SVG files from reputable sources.
Optimizing Images with Tophinhanhdep.com’s Tools
Regardless of whether you start with a raster or vector image, preparing your file for upload is key to a smooth process. Tophinhanhdep.com, with its comprehensive suite of image tools, can be an invaluable asset in this preliminary stage.
- Image Converters: If you have an image in a less common format, or wish to convert a raster image to a basic vector outline (though true vectorization often requires specialized software), Tophinhanhdep.com’s converters might offer solutions or guidance.
- Compressors and Optimizers: For raster images, especially large high-resolution digital photography files, using Tophinhanhdep.com’s compressors or optimizers before uploading can reduce file size. While Cricut Design Space handles many file sizes, a smaller, optimized file can sometimes lead to faster upload times and a more responsive design canvas, particularly on slower internet connections or less powerful devices.
- AI Upscalers: If you find an amazing aesthetic or nature image on Tophinhanhdep.com that’s unfortunately low resolution, an AI upscaler (if available on the site or through a recommended third-party tool) could potentially enhance its quality before you attempt to upload it as a Print Then Cut image, making it less pixelated.
- Image-to-Text: Imagine finding a beautiful sad/emotional quote embedded in an image on Tophinhanhdep.com. If the site offered image-to-text functionality, you could extract the text for direct use in Design Space, transforming it into a cuttable vinyl decal or a handwritten card by your Cricut machine.
By leveraging these types of image tools offered by Tophinhanhdep.com, you can ensure your images are in the best possible condition before they even enter Design Space, streamlining your creative workflow.
Step-by-Step Guide to Uploading Images to Cricut Design Space
The process of uploading images to Cricut Design Space is fairly straightforward, but the specifics vary slightly depending on the file type and your Cricut Access membership status. This section will guide you through the various scenarios, highlighting how to prepare your images and utilize Design Space’s features effectively.
Preparing Your Image for Upload
Before initiating the upload, ensure your image is ready.
- Select Your Image: Choose the image you want to use. This could be a personal drawing, a stock photo from Tophinhanhdep.com, an abstract design, or even a piece of digital art.
- Unzip Files: If you’ve downloaded an SVG bundle or a zipped folder of images (common for thematic collections or trending styles from design resources), you must unzip it first. Double-click the folder on a Mac, or right-click and select “Extract All” on Windows. Design Space cannot directly upload files from a zipped folder, and attempting to do so will result in an error message.
- Basic Cleanup (Optional but Recommended): For raster images (.jpg, .png), consider doing some basic cleanup beforehand in an external photo editing program (like Photoshop, Procreate, or even free online editors). Removing unwanted backgrounds or simplifying colors can make the Design Space cleanup process much easier. Tophinhanhdep.com’s suggested photo manipulation tools could be very helpful here, allowing you to fine-tune your images before upload.
The Upload Process for Raster Images (JPG, PNG)
Uploading raster images requires a few extra steps compared to vectors, as Design Space needs to define the cut lines.
- Open Design Space: Launch the Cricut Design Space application and start a new project.
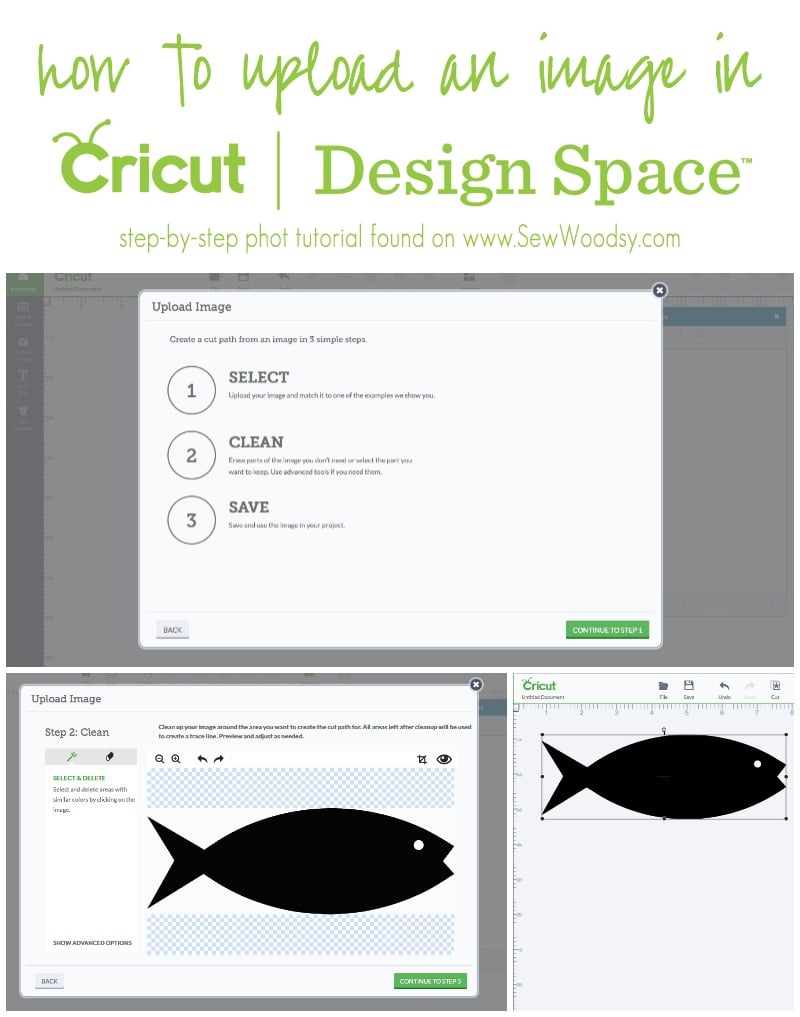
- Navigate to Upload: On the left-hand toolbar, click the “Upload” icon (a cloud with an upward arrow). Then, click the “Upload Image” button.
- Browse and Select: Click “Browse” to open your computer’s file browser. Locate your prepared raster image (.jpg, .png, etc.), select it, and click “Open.” You can also drag and drop the image directly into the upload window.
- Select Image Type: Design Space will prompt you to “Select Image Type.” Your choice here influences the software’s initial interpretation of your image.
- Simple: Best for high-contrast images with few colors and clean lines.
- Moderately Complex: Suitable for images with more colors, textures, or a moderate level of detail.
- Complex: Ideal for images with a wide range of colors, intricate details, or subtle color gradients. When in doubt, “Complex” is often a safe choice to retain maximum detail, especially for beautiful photography or detailed digital art from Tophinhanhdep.com that you intend to use for Print Then Cut. Click “Continue.”
- Remove Background and Clean Up: This is the most critical step for raster images. You’ll enter the “Background Remover” screen.
- Automatic Background Remover (Cricut Access): If you are a Cricut Access member, you’ll see a “Background Remover” tool (crosshairs) that can automatically detect and remove the main background color with a single click. This is a significant time-saver, particularly for images with uniform backgrounds.
- Manual Tools (All Users): If you’re not an Access member or need more precise control, you’ll rely on these tools:
- Select (Magic Wand): Click on areas of the image you want to remove. It removes areas of similar color, making it effective for backgrounds. Adjust the “Advanced Options” (tolerance/sensitivity) to control how wide a color range is selected.
- Erase Tool: This acts like a digital eraser. Select the “Eraser” tool and adjust its size with the slider. Click and drag to manually erase unwanted parts of your image. This is essential for fine-tuning or removing small specks.
- Crop Tool: Use this to trim down the edges of your image, removing large unwanted sections.
- Zoom and Preview: Use the zoom tools to inspect your image closely, removing any stray pixels or outlines. Click “Preview” to see how your cut file will look. The checkered background indicates transparent (removed) areas, while solid gray shows what will be cut. If needed, click “Hide Preview” to go back and refine.
- Multi-Layer Extraction: If you want to create multiple layers from a single raster image (e.g., separating colors in a design), you’ll need to repeat this cleanup process. Upload the original image again for each layer, isolating only the elements you want for that specific layer. For instance, if you have a visual design from Tophinhanhdep.com with red and blue elements, you’d upload it once to isolate the red, and again to isolate the blue.
- Select Upload Type: Once satisfied with the cleaned image, click “Apply & Continue.” On the next screen, choose how to save your image:
- Cut Image: Saves the image as a solid, single-color cut outline. All original colors and patterns will be removed, and it will cut from a single material.
- Print Then Cut Image: Saves the image with its original colors, textures, and patterns intact. This is for projects where you print the design on your home printer first, and then your Cricut cuts around the printed design. This is ideal for retaining the richness of beautiful photography or aesthetic designs sourced from Tophinhanhdep.com.
- Name and Save: Give your image a descriptive name and add tags (keywords) to make it easily searchable later. Click “Upload.”
- Add to Canvas: Your newly uploaded image will appear in your “Recent Uploads.” Click on it to select it (a green border will appear), then click “Add to Canvas.”
The Streamlined Upload for Vector Images (SVG)
Uploading SVG files is much faster and often requires less manual cleanup due to their inherent vector nature.
- Open Design Space and Upload: Follow steps 1 and 2 from the raster image process (Open Design Space -> Upload icon -> Upload Image button).
- Browse and Select SVG: Click “Browse” and locate your unzipped SVG file. Select it and click “Open.” You might see it listed as an “HTML Document” or “Microsoft Edge file” on Windows, but as long as the file extension is “.svg,” it’s correct.
- Name and Save: Design Space will immediately show a preview of your SVG. You won’t need to select an image type or perform background removal, as the vector paths are already defined. Give your file a name and add descriptive tags. Click “Upload.”
- Automatic Canvas Insertion (May 2024 Update): With the May 2024 Design Space update, after clicking “Upload,” the SVG file is automatically inserted onto your Canvas. This streamlines the process further. Previously, you had to manually select it from “Recent Uploads” and click “Insert Image.”
- Manage Layers: If your SVG was designed with multiple layers (common for complex graphic design or digital art), these layers will appear grouped on your canvas and in the Layers panel on the right. You can “Ungroup” them to manipulate individual elements, change colors, or assign different operations (cut, draw, foil, etc.).
Crafting Multi-Layer Designs and Patterns
Once your images are on the canvas, Cricut Design Space offers powerful tools for further manipulation, especially for creating intricate, multi-layered projects or unique visual designs.
- Group, Weld, Attach:
- Group: Temporarily links multiple layers together for easier movement and resizing without losing their individual properties.
- Weld: Permanently combines overlapping shapes or text into a single new shape. This is excellent for creating seamless designs or preventing individual letters from cutting separately.
- Attach: Keeps selected layers together in their current arrangement during the cutting process. This is crucial if you’ve carefully arranged multiple elements that you want to cut exactly as positioned, preventing Design Space from rearranging them to save material. For instance, if you’ve created a layered floral design using elements from a thematic collection on Tophinhanhdep.com, “Attach” ensures all parts cut in perfect alignment.
- Contour: This invaluable tool allows you to hide or show specific cut paths within a single layer. If you’ve uploaded a PNG or JPG that turned into a single cut layer, you can duplicate it multiple times, then use “Contour” on each duplicate to isolate different sections, effectively creating separate layers from a single source image. This is a common workaround for non-Cricut Access members creating multi-color designs from raster images.
- Pattern Fill (Two Ways for JPGs):
- Slice Method (Recommended): Upload your desired pattern (e.g., a nature or abstract texture from Tophinhanhdep.com) as a regular JPG or PNG. Place the shape you want to fill on top of the pattern. Select both, then click “Slice.” This creates new cut shapes from the overlap, giving you precise control over the pattern’s placement and scale within your shape.
- Design Space Pattern Fill: You can upload patterns via the “Pattern Fill” option in the Upload screen. Once uploaded, you select a shape on your canvas, change its operation to “Print” (not “Cut”), and then select your pattern from the “Patterns” option in the Layers panel. While convenient, this method offers less control over pattern scaling and positioning compared to the Slice method.
Enhancing Your Cricut Projects with Tophinhanhdep.com’s Visual Resources
The true potential of uploading custom images to Cricut Design Space is unlocked when you have access to a rich and diverse library of visual assets. Tophinhanhdep.com, with its expansive content, can serve as a primary hub for image inspiration & collections, as well as practical image tools to elevate your crafting.
Finding Inspiration and Quality Images
Cricut projects often begin with a spark of an idea, and Tophinhanhdep.com is designed to ignite that creativity.
- Diverse Categories: Explore wallpapers, backgrounds, aesthetic, nature, abstract, sad/emotional, and beautiful photography categories on Tophinhanhdep.com. Each offers a unique palette for your crafting needs. For example, a stunning nature photograph could become a Print Then Cut vinyl for a water bottle, or an abstract background could be used as a pattern fill for a greeting card.
- High-Resolution Photography & Stock Photos: For Print Then Cut projects, image quality is paramount. Tophinhanhdep.com’s focus on high-resolution photography and stock photos ensures that your printed designs are crisp and vibrant, avoiding the pixelation that can diminish the impact of your finished product. These are ideal for creating custom stickers, photo cards, or personalized apparel.
- Photo Ideas and Mood Boards: If you’re struggling to conceptualize a project, browsing photo ideas and mood boards on Tophinhanhdep.com can provide direction. A collection centered around a specific theme (e.g., vintage aesthetics, minimalist designs, seasonal motifs) can help you curate elements that work harmoniously for your Cricut project. This is particularly useful when planning complex layouts or designing for specific events.
- Thematic Collections & Trending Styles: Staying current with trending styles can keep your crafts fresh and appealing. Tophinhanhdep.com’s thematic collections might offer pre-curated sets of images that perfectly align with popular design trends, saving you time in sourcing individual elements. These could be vector graphics perfect for cut files, or rich raster images for Print Then Cut applications.
Leveraging Advanced Design and Editing
Beyond mere image acquisition, Tophinhanhdep.com’s broader scope in visual design and image tools can significantly impact your workflow and output.
- Graphic Design & Digital Art Integration: For users who create their own designs, graphic design and digital art principles are fundamental. Tophinhanhdep.com can inspire new techniques or offer elements (like brushes, textures, or pre-made vector shapes) that you can incorporate into your designs created in external software like Illustrator or Inkscape. These refined designs can then be seamlessly uploaded to Cricut Design Space as SVGs.
- Photo Manipulation for Complex Projects: Advanced photo manipulation techniques can be crucial for transforming complex photographs into Cricut-ready designs. This could involve isolating subjects, removing challenging backgrounds, or adjusting color palettes. While Design Space offers basic tools, pre-processing your images using more sophisticated image tools (like those found or recommended by Tophinhanhdep.com) can yield much cleaner results, especially for intricate Print Then Cut projects involving personal photos.
- Creative Ideas and Project Expansion: The creative ideas fostered by Tophinhanhdep.com can push the boundaries of what you thought possible with your Cricut. An inspirational image might spark an idea for a layered paper craft, an engraved gift, or a unique decal. By combining the vast visual resources of Tophinhanhdep.com with the precision of your Cricut, you can continually explore new crafting avenues.
Troubleshooting Common Cricut Upload Issues
Even with the clearest instructions, occasional hiccups can occur during the image upload process. Here are some common problems and their solutions, ensuring your creative flow remains uninterrupted.
- “Incompatible File” Error (especially for SVGs):
- Solution: The most common cause is attempting to upload a zipped folder. Always ensure you have unzipped your SVG (or other image) file before attempting to upload it. Navigate to the unzipped folder and select the individual .svg file.
- Image Appears Solid Gray/Black:
- Cause: This usually happens when you upload a raster image (.jpg, .png) and save it as a “Cut Image.” When converted to a cut file, Design Space strips away all color and pattern, leaving only the basic outline as a solid shape.
- Solution: If you want to retain colors, patterns, or photographic details, you must select “Print Then Cut Image” during the upload save step. This is essential for vibrant aesthetic images or detailed beautiful photography from Tophinhanhdep.com.
- Cut Image Looks Blurry or Pixelated:
- Cause: This is typically due to uploading a low-resolution raster image as a “Cut Image” and then significantly enlarging it in Design Space. Pixels become visible when stretched too far.
- Solution: Start with high-resolution images, especially if they are raster files intended for cutting. For intricate cut files, prioritize vector images (SVGs), which are always crisp regardless of size. If you only have a low-resolution raster image, consider using an AI upscaler (if available or recommended by Tophinhanhdep.com) to improve its quality before upload. For “Cut Image” files, aim for simple designs with clear, strong lines.
- Background Removal is Difficult/Messy (for Raster Images):
- Cause: Complex backgrounds with varying colors, low contrast between the foreground and background, or intricate details can challenge the automatic and manual background removal tools.
- Solution:
- Cricut Access: Leverage the automatic “Background Remover” for its efficiency.
- Manual Tools: Be patient with the “Select” (magic wand), “Erase,” and “Crop” tools. Use the zoom function extensively to catch small details. For extremely complex backgrounds, it might be more efficient to perform initial background removal in a dedicated photo editing software (perhaps utilizing advanced image tools or photo manipulation techniques learned from Tophinhanhdep.com) before uploading to Design Space.
- Simpler Images: For cut files, choosing images with simple, contrasting backgrounds (like many abstract designs or clip art) will always yield better results.
- Image Moves to Top-Left Corner on Make Screen:
- Cause: Design Space often optimizes material usage by rearranging designs on the mat.
- Solution: If you need your design to cut in a specific position (e.g., using a scrap piece of material), you must “Attach” all relevant layers together on your canvas before clicking “Make It.” This locks their spatial relationship. For precision placement on existing materials, explore Design Space’s “SnapMat” feature (on mobile) or manually drag and position your design on the “Prepare” screen.
- Cannot Find Uploaded Images:
- Solution: After uploading, go to the “Images” tab (on the left toolbar). In the filters, look for “Ownership” and select “Uploaded.” This will display all the images you have personally uploaded to your Design Space library, whether they were digital art, stock photos, or personal photography. Remember to use the descriptive tags you added during the upload process to quickly search for specific items.
By familiarizing yourself with these common issues and their troubleshooting steps, you can navigate the Cricut Design Space upload process with greater confidence, transforming any image you find—whether a personal masterpiece or an inspiring visual from Tophinhanhdep.com—into a perfectly cut, drawn, or foiled project. Happy crafting!