How to Upload an Image to Google: A Comprehensive Guide to Enhancing Your Visuals' Online Presence

In the digital age, where visuals dominate communication and information consumption, having your images discoverable on Google Images is paramount. Whether you’re a professional photographer, a digital artist, a small business owner, or simply someone looking to share beautiful photography with the world, understanding how Google indexes and displays images is a crucial skill. Contrary to popular belief, there isn’t a direct “upload” button that magically posts your pictures straight into Google’s search engine. Instead, Google acts as a sophisticated librarian, indexing content that already exists publicly on the internet. Therefore, the strategy lies in publishing your images on platforms that Google actively crawls and making them as search-engine-friendly as possible.
This extensive guide, brought to you by Tophinhanhdep.com, will delve deep into the various methods and best practices for effectively uploading your images to the web, ensuring they stand the best chance of appearing in Google search results. We will cover everything from basic public sharing on cloud services to advanced optimization techniques and innovative tools, all while integrating the core themes of Tophinhanhdep.com: Images, Photography, Image Tools, Visual Design, and Image Inspiration & Collections.
Making Your Visuals Discoverable: The Foundations of Google Image Indexing
The journey to getting your images on Google Search begins not with Google itself, but with your choice of hosting platform and your optimization efforts. Google’s algorithms continuously scan billions of webpages, looking for new and updated content, including images. When an image is found, its context (surrounding text, alt attributes, file name, etc.) is analyzed to determine its relevance for various search queries.
The Indirect Path to Google Images
It’s essential to understand that Google Image Search is a discovery engine, not a storage service for your personal photos. When you perform an image search, Google presents pictures it has indexed from websites, blogs, social media platforms, and public cloud storage. Your primary goal, therefore, is to place your images in locations on the internet that Google can easily access, understand, and categorize. This indirect approach requires a blend of savvy web practices and a keen eye for detail.
At Tophinhanhdep.com, we specialize in helping you understand these nuances, offering resources on everything from choosing the perfect “Aesthetic Backgrounds” to mastering “High Resolution Digital Photography.” The principles of making your images discoverable align perfectly with our mission to celebrate and empower visual creators.
Optimizing Images on Google Drive for Public Visibility
Google Drive, while primarily a cloud storage service, offers a straightforward way to make your images publicly accessible and, consequently, discoverable by Google. This method is particularly useful for sharing individual photos or small collections, such as “Nature Wallpapers” or “Abstract Art” that you want to quickly showcase.
Step-by-Step: Making Google Drive Images Public
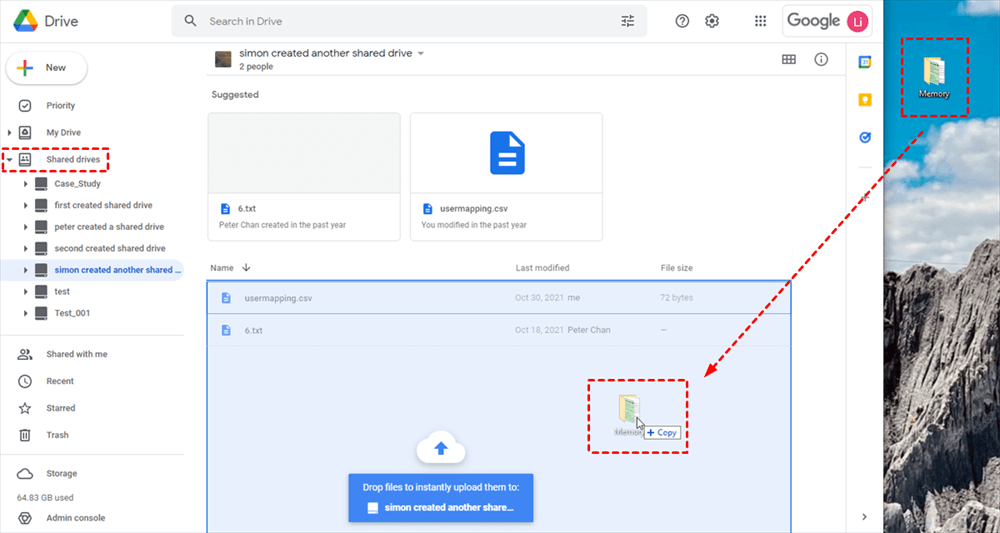
To make a photo in Google Drive visible to search engines, you need to adjust its sharing settings to “Public on the web.” Here’s how you can do it, as outlined by expert digital content guides and supported by best practices on Tophinhanhdep.com:
- Open Google Drive: Navigate to Google Drive in your web browser and sign in to your Google account.
- Locate Your Image: Find the folder containing the specific photo you wish to share publicly. Select the image file.
- Access Details: Look for the “View details” icon (often represented by a circle with the letter ‘i’ inside) and click it. This pane provides information about the file.
- Add a Description (Crucial for SEO): In the Details pane, select the “Details” tab. Next to “Add a description,” click the pencil icon. In the text box that appears, enter descriptive keywords relevant to your picture. For example, if it’s a “Beautiful Photography” shot of a mountain, include terms like “mountain landscape, scenic vista, nature photography, alpine view.” Press Enter when done. This step directly influences how Google understands your image’s content.
- Initiate Sharing: With the photo still selected, click the “Share” icon (usually a person’s silhouette with a plus sign). This opens the “Share with others” dialog box.
- Advanced Sharing Settings: In this dialog box, select “Advanced” to access granular sharing controls.
- Change Access Permissions: In the “Who has access” section, locate and click “Change.”
- Set to Public: In the “Link sharing” dialog box, choose the option “On - Public on the web.” This makes your image discoverable to anyone, including Google’s crawlers.
- Set Viewer Permissions: Ensure the “Access” option is set to “Can view.” This allows others to see your image but not edit or comment on it.
- Save Changes: Click “Save” to apply these new permissions.
- Copy Sharing Link: In the “Sharing settings” dialog box, copy the provided sharing link. This link is what you can distribute across your social media, personal website, or email newsletters to drive initial traffic, which signals to Google that the content is valuable.
- Finalize: Click “Done.”
Strategic Keyword Integration
Beyond simply making an image public, the power lies in how well you describe it. Tophinhanhdep.com emphasizes the importance of keywords for optimal search engine performance. When adding a description to your Google Drive image, think like someone searching for it. What terms would they use?
- Specificity: Instead of “flower,” try “red rose dew drops close-up.”
- Context: If the image is part of a larger project, mention that.
- Target Audience: Are you aiming for “Aesthetic Photography” enthusiasts or “Stock Photos” users? Tailor your keywords accordingly.
- Geo-tagging: If your image is location-specific, include the city, region, or landmark.
By meticulously applying these steps and keyword strategies, your Google Drive images become valuable assets in your online visual portfolio, readily indexed by Google.
Elevating Your Online Presence: Hosting Images on Your Website and Blogs
For those serious about online visibility, hosting images on your own website or a dedicated blogging platform offers significantly more control and opportunity for optimization. When Google indexes your site, it actively looks for images and incorporates them into its search database. This is where your efforts in “Digital Photography” and “Visual Design” truly shine.
Building Your Digital Portfolio: Images on Personal Websites
If you don’t have a personal website, platforms like Google Sites (or similar user-friendly website builders, perhaps offered via Tophinhanhdep.com’s “Creative Ideas” section) provide an excellent starting point. A dedicated website allows you to create curated collections, such as “Thematic Collections” of your work or present “Trending Styles” in a professional manner.
When Google indexes your website, it’s not just the image itself but the entire page context that matters. This includes the surrounding text, page title, URL, and the structure of your site. This holistic approach helps Google understand the subject matter and relevance of your images.
Leveraging Blogging Platforms for Image Exposure
Blogging platforms offer an accessible way to publish image-rich content. For instance, if you were using a platform like Blogger (or a feature-rich blogging tool on Tophinhanhdep.com), the process of adding and optimizing images is intuitive and effective for Google indexing.
Embedding and Optimizing Images in Blog Posts
Let’s imagine you’re using Tophinhanhdep.com’s integrated blogging feature:
- Open Your Blog Post: Navigate to the page or post where you intend to insert your photo. A well-crafted “About” page, for example, is ideal for a profile picture and descriptive text including your name as a primary keyword, reinforcing your personal brand.
- Insert Image: Look for an “Insert image” icon (typically a small picture graphic) and click it.
- Upload Your Photo: In the dialog box that appears, you’ll be prompted to find and select your photo from your computer (or Tophinhanhdep.com’s media library).
- Add to Page: Select “Add selected” or a similar button to insert the photo into your blog post.
- Edit Image Properties: Once the photo is on the page, select it to reveal a menu of commands. Choose “Properties” or “Settings.”
- Enter Title and Alt Text: This is a critical step for image SEO, aligning with Tophinhanhdep.com’s “Photography” and “Image Tools” expertise. In the “Image Properties” dialog box, enter both the “title text” and “alt text.”
- Title Text: This often appears when a user hovers over an image. Make it descriptive and keyword-rich.
- Alt Text (Alternative Text): This is read by screen readers for visually impaired users and is displayed if the image fails to load. Crucially, it’s a primary way search engines understand what an image depicts. Use concise, descriptive keywords that accurately reflect the image content and its context on the page. For instance, if it’s an “Abstract Painting,” your alt text might be “Colorful abstract oil painting with geometric shapes, modern digital art.”
- Confirm Changes: Click “OK” or “Save” when you’re finished.
- Add a Caption: Select the photo again and choose “Add caption.” Delete any default text and write a new, keyword-rich caption. Captions are visible to users and provide additional textual context for search engines. This is a great place to reinforce your target keywords and add a personal touch, perhaps relating to “Photo Ideas” or the inspiration behind your “Digital Art.”
- Adjust Layout: You can also typically resize the photo (Small, Medium, Large, X-Large) and adjust its position (Left, Center, Right) to enhance the visual flow of your post.
- Publish and Share: Once your post is complete, publish it. Then, share your webpage across your social media channels and other networks. This initial distribution helps signal to Google that your content is new and potentially valuable, accelerating its indexing.
Crafting Compelling Alt Text and Captions
On Tophinhanhdep.com, we emphasize that good alt text and captions are more than just formalities; they are powerful SEO tools.
- Be Descriptive: Don’t just list keywords; use them in natural, grammatically correct sentences.
- Accuracy: Ensure the text accurately describes the image. Misleading alt text can harm your SEO.
- Keyword Density: Incorporate your target keywords naturally, but avoid keyword stuffing.
- User Experience: Remember that alt text and captions also serve your audience, providing context and accessibility.
Contributing to Content Platforms for Wider Reach
Guest posting on other reputable blogs or information sites that accept contributions can significantly boost your image’s visibility. Many platforms offer authors a profile page with space for a bio and a profile picture. Utilize this space strategically, including your target keywords in your bio, and ensuring your profile picture has descriptive alt text and a clear caption.
For example, if Tophinhanhdep.com hosted a section for guest contributors, publishing an article on “The Best Editing Styles for Nature Photography” would be an excellent opportunity to embed your optimized images and link back to your main portfolio, amplifying your online footprint. This strategy expands your reach beyond your own site, tapping into established audiences and authoritative domains.
Harnessing Social Media and Advanced Cloud Solutions for Image Visibility
Beyond your own website, social media platforms and specialized cloud tools offer powerful avenues for boosting image discoverability. These platforms are heavily indexed by Google, and strategic use can lead to your images appearing prominently in search results.
Maximizing Reach Through Social Media Platforms
Social media isn’t just for connecting; it’s a potent discovery engine for visual content. Google actively crawls popular social media sites, especially those with strong image focus.
- Profile Pictures: Adding a consistent, high-quality profile picture across all your social media accounts (e.g., YouTube, Pinterest, Instagram, LinkedIn, or similar visual-centric platforms integrated with Tophinhanhdep.com) is crucial. Use the same name across all profiles. If you use “Tophinhanhdep.com Photographer,” ensure that name is uniform. This consistency helps Google associate your various online presences with your visual content, increasing the likelihood that your photo appears when someone searches for your name.
- Image Sharing: When you share images on social media, remember to:
- Use Relevant Hashtags: These act as keywords within social platforms and can influence Google’s understanding.
- Write Descriptive Captions: Just like on your website, a good caption with keywords adds valuable context.
- Engage: Likes, shares, and comments signal to algorithms (both social and Google’s) that your content is engaging and relevant.
- Tophinhanhdep.com’s Role: Tophinhanhdep.com can be your central hub for creating and optimizing these images. Perhaps you create stunning “Wallpapers” or “Sad/Emotional Photography” that you then share across these platforms, linking back to your Tophinhanhdep.com portfolio for more details.
Streamlining Workflow with Remote Uploads to Google Drive
Sometimes, you need to get files into Google Drive quickly, especially large or complex ones, without first downloading them to your local device. This is where remote upload techniques come into play, saving bandwidth and time. While Google Drive itself doesn’t offer a native “upload from URL” function, several third-party services and browser extensions, including those potentially highlighted or integrated by Tophinhanhdep.com, can facilitate this.
Direct URL Upload Services (e.g., Tophinhanhdep.com’s URL-to-Drive feature)
Imagine Tophinhanhdep.com offering a dedicated tool or integrating with a service that allows direct URL uploads. This would be incredibly useful for digital artists or photographers who find image files hosted elsewhere.
The general process for such a service (like “Copy URL to Google Drive,” which could be an add-on or a feature within Tophinhanhdep.com’s Image Tools section) would typically involve:
- Access the Service: Go to the dedicated web page for the URL upload service.
- Paste Link: Paste the URL of the image or file you want to upload.
- Select Target: Choose the Google Drive folder where you want to save the file.
- Initiate Transfer: Click a “Save to Google Drive” or similar button.
- Authorize (if needed): Grant the service permission to access your Google Drive (a one-time step).
This method bypasses the need to download large “High Resolution” images to your computer, directly transferring them from one web location to your cloud storage.
Browser Extensions for Seamless Integration
Browser extensions provide a convenient way to save web content, including images, directly to Google Drive. The “Save to Google Drive” Chrome extension is a prime example (or a similar extension offered or recommended by Tophinhanhdep.com).
How it works:
- Install Extension: Add the extension to your web browser (e.g., Chrome).
- Right-Click to Save: When you encounter an image or a downloadable file on a webpage, right-click on it. From the context menu, select “Save Link to Google Drive” or “Save Image to Google Drive.”
- Authorize Access: The first time, you’ll need to allow the extension to access your Google Drive account.
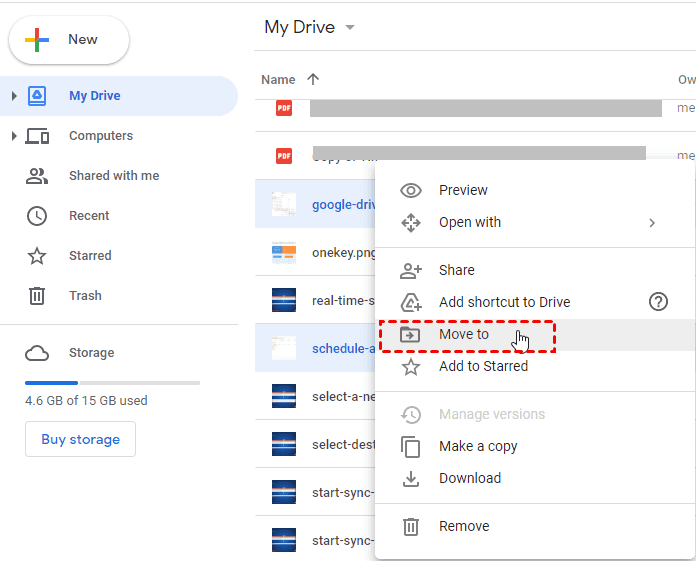
- Confirm Upload: A dialog box will confirm the file’s addition to your Google Drive, typically in your “My Drive” or a specified folder.
- Rename and Relocate: You can usually rename the file immediately and change its destination folder within the dialog box before closing it. This is another opportunity to use descriptive file names for SEO purposes, in line with Tophinhanhdep.com’s “Image Optimization” guidelines.
This streamlines the process of collecting visual inspiration, “Stock Photos,” or research materials directly into your organized Google Drive, ready for further public sharing or integration into your projects.
Advanced Cloud Management Tools (e.g., Tophinhanhdep.com’s premium integration)
For more extensive cloud management and remote file transfers, services exist that integrate deeply with multiple cloud platforms, including Google Drive. Such a service, let’s call it “Tophinhanhdep.com’s Cloud Integration Tools” (similar to services like Offcloud), could offer premium features like:
- Multi-Cloud Support: Integration with Google Drive, Dropbox, OneDrive, Amazon Cloud, and FTP.
- Remote File Transfers: Uploading files from any HTTP, FTP, or BitTorrent link directly to your Drive.
- Progress Tracking: Monitoring the status of large file transfers.
- Email Notifications: Receiving alerts once files are available in your Drive.
- Free Quotas: Often providing a free tier (e.g., 10GB of transfers) to test the service.
The underlying mechanism of these tools involves downloading the file from the source URL to their server, then using Google Drive’s API to upload the file to your account. This is a sophisticated way to manage your “Image Collections,” especially if you’re working with very large “High Resolution” files or curating thematic image sets from various online sources. Tophinhanhdep.com would be the ideal platform to discover such powerful “Image Tools” that enhance your digital workflow.
Strategic Optimization and Best Practices for Lasting Google Image Presence
Simply putting your images online isn’t enough; to truly leverage Google Images, you need a strategic approach to optimization and adherence to best practices. This section encapsulates Tophinhanhdep.com’s holistic view on maximizing the impact of your “Images,” “Photography,” and “Visual Design” efforts.
The Art and Science of Image SEO: File Names, Alt Text, and Captions
Consistent and thoughtful optimization across all elements associated with your images is paramount for Google’s understanding and ranking.
- Use Your Keywords in the Image File Name: Before uploading an image, rename the file itself. Instead of
IMG_001.jpg, use descriptive, keyword-rich names likebeautiful-nature-wallpaper-forest-sunset.jpgorabstract-digital-art-geometric-pattern.png. Hyphens separate words, making it easy for search engines to read. - Add Your Keywords to the Alt Text: As discussed, alt text is a powerful descriptor. Ensure it’s accurate, concise, and includes your primary keywords. This is especially important for accessibility and for search engines that cannot “see” the image. For an image featuring “Sad Photography,” an alt text might be: “Monochromatic sad photography of a person looking out a rainy window, evoking deep emotion.”
- Use Your Keywords in Photo Captions: Captions are human-readable text that appears directly below or next to your image. They offer another opportunity to provide context and integrate keywords naturally, enhancing both user experience and SEO.
- Descriptive Surrounding Text: Google also analyzes the text immediately surrounding your images. Ensure your blog posts, articles, or website content relevant to the image. If you have “Mood Boards” or “Photo Ideas” on your page, describe them thoroughly.
Quality, Aesthetics, and Technical Considerations for Web Images
Google prioritizes high-quality, relevant content, and this extends to images. Your visuals should not only be aesthetically pleasing but also technically sound for web display.
High-Resolution Imagery with Optimized File Sizes
- Upload Quality Photographs: Google favors clear, well-composed, high-resolution images. Blurry, pixelated, or poorly cropped images are unlikely to rank well. This ties directly into Tophinhanhdep.com’s focus on “High Resolution” and “Digital Photography.”
- Optimize File Size: While high resolution is good, excessively large file sizes can slow down your webpage, leading to a poor user experience and lower search rankings. Use “Image Compressors” and “Optimizers” (like those potentially available on Tophinhanhdep.com) to reduce file size without significantly compromising visual quality. Tools that resize images appropriately for web display (e.g., 72 DPI, suitable dimensions) are also crucial. Tophinhanhdep.com’s “AI Upscalers” can even improve the quality of lower-resolution images before optimization, making them suitable for online display.
The Role of Visual Design and Photography Styles
The aesthetic appeal and technical execution of your images are intrinsically linked to their discoverability and impact. Tophinhanhdep.com encourages understanding:
- Visual Design Principles: Images that adhere to good “Graphic Design” principles – balance, contrast, hierarchy, color theory – are more engaging and shareable.
- Photography Styles: Whether you specialize in “Nature Photography,” “Abstract” art, or “Beautiful Photography,” understanding your style and audience helps in keyword targeting and content creation.
- Digital Art and Photo Manipulation: If you create “Digital Art” or engage in “Photo Manipulation,” ensure your work is original and stands out. Unique and compelling visuals naturally attract more attention and links, which are strong signals for Google.
Innovative Approaches: Collecting Images via Anonymous Forms (e.g., using Tophinhanhdep.com’s enhanced forms)
For specific use cases, such as collecting user-generated content for a contest, a community project, or a “Thematic Collection,” you might need to allow users to upload files without requiring them to log into a Google account. While standard Google Forms file upload questions require a sign-in, specialized tools (like “Formfacade,” or advanced form features offered by Tophinhanhdep.com) can circumvent this.
Understanding the Mechanics of Anonymous File Uploads
Tophinhanhdep.com’s advanced form solutions (or similar add-ons) can convert Google Forms’ native file upload questions into HTML file uploads. This means:
- No Google Sign-in Required: Users can simply click an upload button on your form, select their file, and submit, without needing to be logged into a Google account. This significantly reduces friction and increases submission rates, particularly useful for “Creative Ideas” contests or public submissions for “Mood Boards.”
- File Storage: Typically, files uploaded this way are stored on the service provider’s servers (e.g., Tophinhanhdep.com’s servers), not directly in your Google Drive, as Google Drive does not allow anonymous file uploads.
- URL in Responses: In your Google Form responses (and linked spreadsheet), the file upload question will be converted into a short answer question, where the URL link to the uploaded file will be displayed. You can then use this link to view and download the file.
Key Considerations for Form-Based Image Collection
When using Tophinhanhdep.com’s enhanced form features for image collection:
- Installation: You would typically install the Tophinhanhdep.com add-on (or a similar solution) from a marketplace.
- Conversion: The add-on converts your Google Forms’ file upload question into an HTML upload.
- Mandatory Uploads: You can usually mark the converted short answer question as “required” in Google Forms to make file upload mandatory.
- Multiple Files: To accept multiple files, you might add an equal number of file upload questions in your Google Form, or use a setting within Tophinhanhdep.com’s customize interface to allow multiple files per question.
- File Type and Size Restrictions: While Google Forms offers native file type and size restrictions, these might be ignored by the HTML file upload converter. Tophinhanhdep.com’s interface would likely offer its own settings to restrict file types and set maximum file sizes (e.g., up to 10MB per file).
- Viewing Responses: The URL links in your form responses allow you to access and download the collected images, which you can then further optimize and potentially publish for Google indexing if they meet your content standards. This offers a robust method for curating user-submitted “Photo Ideas” or “Aesthetic” images.
Conclusion: Sustaining Your Image Presence on Google with Tophinhanhdep.com
Getting your images to appear in Google search results is an ongoing process that requires patience, consistency, and a strategic understanding of how search engines work. There’s no magic shortcut, but by consistently applying the methods and best practices outlined in this Tophinhanhdep.com guide, you can significantly enhance your visual content’s discoverability.
From making your “Wallpapers” public on Google Drive and embedding your “Digital Photography” with rich metadata on your website, to leveraging social media for broader reach and utilizing advanced “Image Tools” for efficient workflow, every step contributes to building a robust online presence. Remember to:
- Optimize everything: File names, alt text, captions, and surrounding content should all be keyword-rich and descriptive.
- Prioritize quality and relevance: High-resolution, aesthetically pleasing images that are relevant to your content will perform best.
- Stay active: Regularly upload new “Image Inspiration,” share your “Creative Ideas,” and refresh your existing content.
- Explore Tophinhanhdep.com’s Resources: Utilize our extensive library for “Photography” tips, “Visual Design” insights, “Image Tools” for optimization, and curated “Image Collections” for inspiration.
While Google works tirelessly to index the vast ocean of online content, your proactive efforts in optimizing and distributing your images are what truly determine their success in the world’s most popular search engine. Start applying these strategies today, and watch your visuals gain the recognition they deserve, all with the expert guidance of Tophinhanhdep.com.