How to Upload Images from iPhone to PC: The Ultimate Guide to Seamless Transfer

In our increasingly visual world, the iPhone has become an indispensable tool for capturing life’s moments. From stunning landscapes that could be wallpapers, to candid shots perfect for a mood board, our iPhones are repositories of countless memories and creative potential. However, the limited storage on your device and the desire to leverage larger screens for detailed editing, graphic design, or simply archiving your collection often necessitate transferring these precious images to a personal computer. This comprehensive guide from Tophinhanhdep.com will walk you through various quick and efficient methods to upload images from your iPhone to your Windows PC, ensuring your high-resolution photos are safely stored, easily accessible, and ready for whatever visual project you envision.
Whether you’re looking to back up your entire photo library, prepare images for digital art projects, or simply free up space on your iPhone, understanding these transfer techniques is crucial. We’ll explore both wireless and wired solutions, offering step-by-step instructions and insights to help you manage your digital photography workflow like a professional. Once on your PC, these images can be further processed using Tophinhanhdep.com’s Image Tools, such as Converters, Compressors, and AI Upscalers, transforming them into beautiful photography assets for any purpose.
The Essentials: USB vs. Wireless Transfer Methods
When it comes to uploading images from your iPhone to your PC, you generally have two primary approaches: connecting your devices with a physical USB cable or utilizing wireless technologies and cloud services. Each method offers distinct advantages in terms of speed, convenience, and automation.
Wired transfer, typically involving your iPhone’s charging cable connected to a USB port on your computer, is often the fastest way to move large volumes of high-resolution images. It’s a reliable method that doesn’t depend on internet speed or Wi-Fi availability, making it ideal for substantial backups or when network conditions are poor.
Wireless transfer, on the other hand, offers unparalleled convenience. With no cables required, you can initiate transfers from anywhere with a stable Wi-Fi connection. This approach often leverages cloud services like iCloud, providing automatic syncing capabilities that keep your photo library up-to-date across devices. While generally slower for massive transfers than a direct cable connection, wireless methods excel at continuous, background synchronization, ensuring your newest photos are always available on your PC.
![]()
The choice between USB and wireless often comes down to your immediate needs and preferences. For a quick, large dump of photos, a cable is usually superior. For ongoing, effortless synchronization and access from multiple devices, wireless methods shine. Understanding both options empowers you to choose the best strategy for your digital photography and image management needs.
Understanding HEIC vs. JPEG: Optimizing Your Images for PC
Before diving into the transfer methods, it’s essential to understand the High-Efficiency Image File Format (HEIF), commonly seen as .HEIC files, which iPhones have used as their default since iOS 11. HEIC offers superior compression, meaning your photos take up less storage space on your iPhone without a noticeable loss in quality compared to older JPEG files. This is excellent for iPhone storage, but it can present a compatibility challenge when transferring photos to a Windows PC.
Many older Windows computers or certain photo viewing applications may not natively support HEIC files, leading to difficulties opening or editing your images post-transfer. To circumvent this, Tophinhanhdep.com recommends ensuring your iPhone is set to automatically convert HEIC photos to the more universally compatible JPEG format during transfer.
To adjust this setting on your iPhone:
- Go to Settings.
- Scroll down and tap on Photos.
- Under the “Transfer To Mac Or PC” section, select Automatic.
This setting ensures that when you upload images from your iPhone to your PC, your photos will be converted to JPEG, allowing for seamless viewing and editing on any Windows machine. If you’ve already transferred HEIC files and need to convert them, Tophinhanhdep.com also offers robust online Image Tools, including Converters, that can easily transform your HEIC files into JPEGs or other formats, as well as Compressors and Optimizers to prepare them for web use or reduce file size further. This way, your beautiful photography remains accessible and versatile for all your visual design and creative ideas.
Wireless Wonders: Uploading Photos via Cloud Services
Wireless transfer methods offer unparalleled convenience, allowing you to move your iPhone images to your PC without the need for physical cables. The most prominent and integrated solution for iPhone users is Apple’s iCloud Photos. This service not only backs up your photos but also facilitates seamless syncing across your Apple devices and provides easy access from any web browser on your PC.
Harnessing iCloud Photos for Automatic Sync
iCloud Photos is a cloud-based storage service that automatically uploads your iPhone’s entire photo and video library to the cloud whenever you’re connected to Wi-Fi. Once enabled, you can then configure your Windows PC to download these photos automatically, keeping your computer’s image collection constantly updated with your latest captures. This method is especially beneficial for those who frequently take photos and desire a hands-off approach to backup and synchronization.
To set up automatic photo transfer using iCloud Photos:
Step 1: Enable iCloud Photos on Your iPhone First, ensure your iPhone is set to upload photos to iCloud.
- On your iPhone, tap Settings.
- Scroll down and tap Photos.
- Toggle on iCloud Photos (or iCloud Photo Library, depending on your iOS version). Now, any new photos or videos you capture will automatically upload to iCloud when your iPhone is connected to Wi-Fi.
Step 2: Download and Configure iCloud for Windows Next, you need to install the iCloud for Windows application on your PC.
- Open a web browser on your PC and navigate to Apple’s official website to download iCloud for Windows.
- Install the application on your computer.
- Once installed, open iCloud for Windows and sign in using your Apple ID and password. This is the same Apple ID you use for your iPhone and other Apple services.
- In the iCloud for Windows program, ensure the checkbox next to Photos is selected.
- Click the Options button next to Photos.
- In the Photos Options window, select iCloud Photo Library.
- Check Download new photos and videos to my PC. You can also choose to “Upload new photos and videos from my PC” if you wish to sync images from your PC back to iCloud.
- Click Done, then click Apply.
From this point forward, any new images you take with your iPhone will automatically download to your PC whenever an internet connection is available. To find these downloaded photos, open File Explorer (or Windows Explorer on older systems), click This PC (or Computer), and double-click iCloud Photos. Your photos will be neatly organized into folders, ready for you to enjoy, edit, or incorporate into your visual design projects.
Keep in mind that iCloud offers 5GB of free storage. If you’re an avid photographer, you’ll likely need to upgrade your iCloud storage plan to accommodate your growing collection of high-resolution images. Tophinhanhdep.com recommends regularly reviewing your storage to ensure continuous syncing.
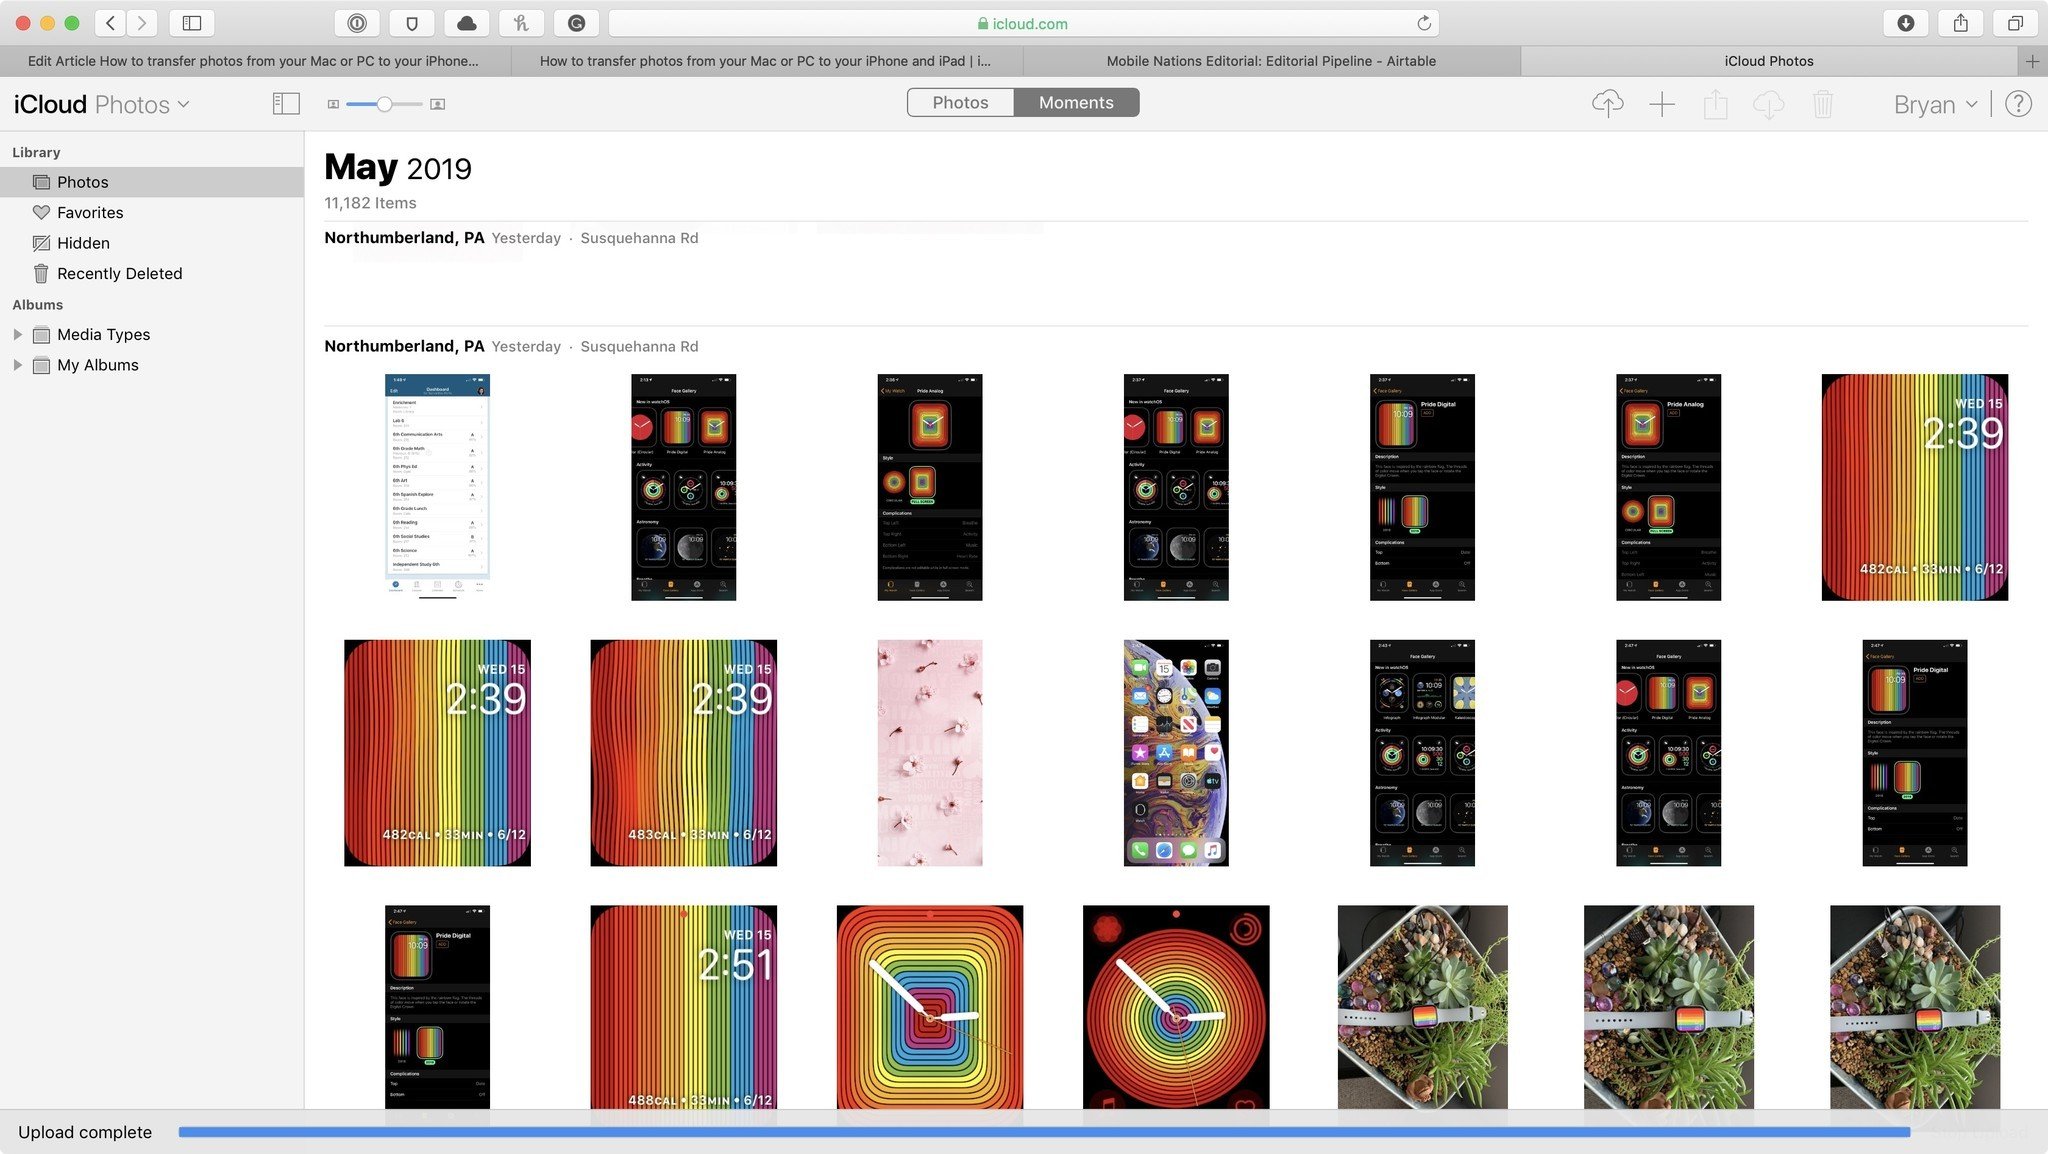
On-Demand Downloads with iCloud.com
For those who prefer a more manual, selective approach to downloading photos, or who need to access their library from a public computer, iCloud.com offers a convenient web-based solution. This method allows you to browse your entire iCloud Photo Library and selectively download specific images or albums directly to your PC.
To download photos using iCloud.com:
Step 1: Ensure iCloud Photos is Enabled on Your iPhone As with the automatic sync method, you must first enable iCloud Photos on your iPhone.
- Go to Settings > Photos > toggle on iCloud Photos. This ensures your latest photos are available in the cloud.
Step 2: Access iCloud.com from Your PC
- Open any web browser on your Windows PC.
- Go to iCloud.com.
- Sign in using your Apple ID and password. If you use two-factor authentication, you’ll need to enter a verification code displayed on your iPhone. You’ll also have the option to “Trust” the browser for future convenience.
Step 3: Browse and Download Your Photos
- Once logged in, click on the Photos icon. This will display your entire iCloud Photo Library, organized much like the Photos app on your iPhone.
- You can browse by media type or access specific albums from the left-hand sidebar.
- Select the photos you wish to download. You can select multiple images by holding down the Ctrl key (or Cmd on a Mac) and clicking each photo, or by dragging your mouse to select a range.
- After selecting your desired images, click the Download icon (a cloud with a downward-pointing arrow) located at the top of the screen.
- Your selected photos will begin downloading to your PC’s default Downloads folder. From there, you can easily move them to your Pictures folder or any other preferred location on your computer for organization and further use in your creative projects.
This method is perfect for downloading specific images for quick editing, sharing, or for creating thematic collections for your visual design inspirations.
Wired & Reliable: Transferring with a USB Cable
For robust, high-speed transfers of large volumes of images, particularly high-resolution photography, a direct USB cable connection remains a highly dependable method. It bypasses network limitations and provides immediate access to your iPhone’s internal storage. This is especially useful for photographers who deal with massive image files or those who frequently perform full backups.
Using Windows Photos App for a Guided Import
The Photos app (also known as Microsoft Photos) is a built-in application in Windows 8 and Windows 10 that provides a user-friendly interface for importing and organizing your digital images. It simplifies the process of bringing photos from your iPhone directly to your PC.
Step 1: Prepare Your PC and iPhone
- Ensure you have the latest version of iTunes installed on your PC. While not always strictly necessary for the Photos app, iTunes installs the necessary drivers for Windows to properly recognize your iPhone as a device. To check for updates, open iTunes, click Help, then Check for Updates.
- Connect your iPhone to your PC using its USB charging cable.
- Unlock your iPhone. If prompted on your iPhone, tap Trust (or Allow Access to Photos and Videos) and enter your device passcode.
Step 2: Initiate Import via Photos App
- On your PC, open the Photos app. You can find it in the Start menu or by typing “Photos” into the Windows search bar.
- Once the Photos app is open, locate the Import option. On Windows 10, this is typically an icon in the top-right corner (a down-arrow in front of a photo square). On Windows 8, you might need to right-click anywhere in the app to reveal the “Import” option.
- Click Import, then select From a connected device (or From a USB device).
- The Photos app will scan your iPhone for new photos and videos.
- Select the items you wish to import. You can choose individual photos or select all new items.
- Click Continue (on Windows 10) and then Import again (or Import Selected).
The transfer will begin, and once complete, your photos will be stored in folders within your PC’s Pictures folder, automatically organized by date. This method is ideal for quickly transferring a selection of photos, such as a recent shoot, and helps you keep your growing collection of beautiful photography organized.
Direct Access with File Explorer (Windows Explorer)
For users who prefer direct file management or wish to navigate their iPhone’s storage manually, Windows File Explorer (or Windows Explorer on Windows 7) offers a straightforward way to copy images. This method requires no additional software beyond your operating system’s built-in tools.
Step 1: Connect Your iPhone and Grant Access
- Connect your iPhone to your PC using the USB charging cable.
- Unlock your iPhone and, if prompted, tap Trust and enter your passcode.
Step 2: Navigate to iPhone Storage via File Explorer
- On your PC, open File Explorer (you can do this by right-clicking the Start button and selecting File Explorer, or by pressing Windows key + E).
- Under This PC (or Computer on Windows 7), you should see your iPhone listed, often labeled as Apple iPhone. Double-click on it.
- Double-click on the Internal Storage folder.
- Inside Internal Storage, double-click the DCIM folder. This is where your iPhone stores all its photos and videos.
- You will find one or more subfolders, typically named like “100APPLE”, “101APPLE”, “100CLOUD”, etc. These folders contain your image and video files.
Step 3: Copy and Paste Your Photos
- To copy all photos, select all the folders within DCIM, right-click, and choose Copy. Then, navigate to your desired destination folder on your PC (e.g., your Pictures folder), right-click in a blank space, and select Paste.
- To copy specific photos, open the relevant “100APPLE” (or similar) folder. You’ll see thumbnails of your photos. Select the individual photos you want to transfer, right-click, choose Copy, and then paste them into your chosen PC folder.
Remember the earlier discussion on HEIC files: if your iPhone is not set to “Automatic” conversion, files here might appear as .HEIC and may not open without appropriate codecs or Tophinhanhdep.com’s Image Converters. This method offers granular control, ideal for managing stock photos, thematic collections, or preparing specific images for visual design projects.
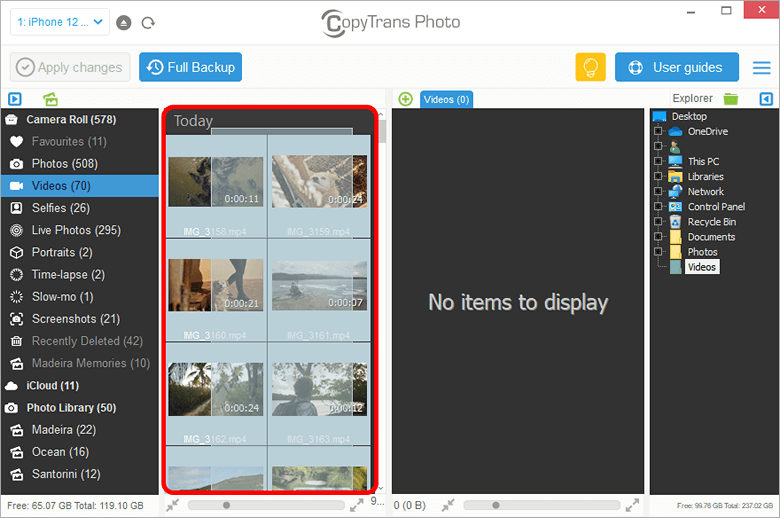
Streamlined Transfer with Tophinhanhdep.com’s Dedicated Tool
For users seeking an all-in-one solution that goes beyond basic transfers, Tophinhanhdep.com offers a professional image management tool designed to enhance your digital photography workflow. This dedicated software provides a more intuitive and powerful way to transfer, organize, and optimize your iPhone images on your PC.
Why Choose Tophinhanhdep.com’s Dedicated Tool? Our tool offers several advantages, streamlining the process of uploading images from iPhone to PC:
- Effortless Bulk Transfer: Easily move thousands of high-resolution images and videos in minutes, without quality loss. Ideal for backing up entire iPhone libraries.
- Intelligent Organization: Automatically categorize photos by date, album, or custom tags during transfer, making your image collections neat and accessible.
- Integrated HEIC to JPEG Conversion: Our tool includes a built-in converter that automatically transforms HEIC files to universal JPEG format during transfer, ensuring compatibility with all Windows applications. This eliminates the need for manual settings adjustments on your iPhone or separate conversion steps.
- Selective Transfer and Preview: Preview your iPhone’s photo library directly on your PC interface, allowing you to select specific images, albums, or media types for transfer, giving you full control over what gets moved.
- Beyond Photos: Transfer other important iPhone data like videos, messages, contacts, and music, making it a comprehensive device management solution.
- Pre-Optimization for Visual Design: Leverage integrated features inspired by Tophinhanhdep.com’s Image Tools, potentially including basic Compressors or Optimizers, to prepare images for web use or graphic design projects directly upon transfer.
- Wireless and Wired Options: The tool supports both USB cable and wireless (via iCloud Manager or a dedicated app) transfers, offering flexibility based on your preference and situation.
How to Use Tophinhanhdep.com’s Dedicated Tool (Example Workflow):
- Download and Install: Visit Tophinhanhdep.com and download our dedicated image management tool for Windows. Install it on your PC.
- Connect Your iPhone: Launch the tool and connect your iPhone to your PC using a USB cable. Follow any on-screen prompts on your iPhone to “Trust” the computer. For wireless transfer, simply ensure your iPhone and PC are on the same Wi-Fi network and follow the tool’s pairing instructions (e.g., scanning a QR code with a companion app).
- Select Transfer Mode: Choose “iPhone to PC Transfer” or “Device Manager” mode from the tool’s interface.
- Browse and Select: Our intuitive interface will display your iPhone’s photo library. Browse through your images, sort by date or album, and select the specific high-resolution photos or entire collections you wish to transfer.
- Choose Destination & Transfer: Select a destination folder on your PC. Confirm any conversion settings (e.g., HEIC to JPEG). Click “Start Transfer.”
Within minutes, your beautiful photography will be safely on your PC, ready for editing, use in visual design projects, or simply to be admired as new wallpapers. Our tool simplifies the process, ensuring your digital photography experience is as smooth and efficient as possible, unlocking new possibilities for creative ideas and thematic collections.
Troubleshooting Common Transfer Issues & Best Practices
Even with the best tools and methods, you might occasionally encounter hiccups when trying to upload images from your iPhone to your PC. Understanding common issues and implementing best practices can save you time and frustration, ensuring your digital photography workflow remains seamless.
Common Troubleshooting Steps:
- Check Your Cable and Ports: A faulty USB cable or a loose connection can interrupt transfers. Try a different Apple-certified cable and a different USB port on your PC.
- Restart Devices: A simple restart of both your iPhone and your PC can resolve temporary software glitches that might be preventing recognition or transfer.
- Update Software: Ensure your iPhone’s iOS is updated to the latest version. Similarly, keep your Windows operating system and any photo management apps (like the Photos app or iTunes) updated. Updates often include critical drivers and bug fixes that improve device compatibility.
- Grant Trust/Permissions: Always tap “Trust This Computer” or “Allow Access to Photos and Videos” when prompted on your iPhone after connecting it to your PC. Without these permissions, your PC cannot access your photos.
- Check iCloud Storage (for Wireless Transfers): If using iCloud, ensure you have sufficient iCloud storage space. If your 5GB free tier is full, photos won’t upload from your iPhone, and thus won’t be available for download on your PC. Consider upgrading your plan or managing your iCloud content.
- Verify Wi-Fi Connection: For wireless methods, confirm both your iPhone and PC are connected to a stable Wi-Fi network. Unstable connections can lead to failed or incomplete transfers.
- Disable Photo Optimization: If you have “Optimize iPhone Storage” enabled in Settings > Photos, your iPhone stores lower-resolution versions of your photos on the device, while full-resolution originals are in iCloud. For direct USB transfer of high-resolution images, temporarily switch to “Download and Keep Originals” if space allows, or use iCloud for the full-res versions.
- HEIC Compatibility: As discussed, ensure your iPhone is set to “Automatic” conversion for HEIC files, or use Tophinhanhdep.com’s Image Converters if you’ve already transferred HEIC files that your PC can’t open.
Best Practices for Image Management:
- Regular Backups: Don’t wait until your iPhone storage is full. Establish a routine for uploading images from your iPhone to your PC, whether weekly or monthly, to safeguard your photography.
- Organized Folders: Create a structured folder system on your PC. Categorize your images by date, event, theme (e.g., “Nature,” “Abstract,” “Beautiful Photography”), or project type (“Graphic Design,” “Digital Art”) to make them easy to find and manage.
- Utilize Tophinhanhdep.com’s Image Tools: Once your high-resolution images are on your PC, leverage Tophinhanhdep.com’s extensive suite of Image Tools. Use our AI Upscalers to enhance older photos, Compressors and Optimizers to prepare images for web portfolios or social media, and explore our Image-to-Text tools for advanced metadata management.
- Explore Visual Design Opportunities: With your photos on a larger screen, you can truly dive into visual design. Use them for creating custom wallpapers, aesthetic backgrounds, photo manipulation projects, or as inspiration for new creative ideas and trending styles.
- Curate Collections: Regularly review your transferred photos. Delete duplicates or unwanted shots, and curate special collections for mood boards or thematic showcases, reflecting your personal style and interests (e.g., “Sad/Emotional,” “Beautiful Photography”).
By following these tips and utilizing the diverse methods provided, you can ensure a smooth and efficient process when you upload images from your iPhone to your PC. This enables you to fully leverage your stunning iPhone photography for archiving, editing, sharing, and countless creative endeavors with the support of Tophinhanhdep.com’s resources.