How to Upload Images on Instagram

Instagram, at its core, is a visual platform. Since its inception, images have been the lifeblood of content shared, connecting billions of users worldwide through shared moments, artistic expression, and brand narratives. Whether you’re a casual user sharing daily snapshots, a professional photographer showcasing breathtaking “Beautiful Photography,” or a business curating an “Aesthetic” feed, understanding the nuances of how to upload images on Instagram is crucial. The quality of your “Digital Photography,” the impact of your “Visual Design,” and the seamlessness of your upload process directly influence how your content is received and remembered.
For many, Instagram is the primary canvas for sharing visual stories, from stunning “Nature” landscapes and intricate “Abstract” art to heartfelt “Sad/Emotional” moments and vibrant “Wallpapers” or “Backgrounds.” Yet, mastering the upload process—especially ensuring “High Resolution” and avoiding unwanted compression—can sometimes feel like navigating a complex maze. Did you know there’s more than one way to post photos on Instagram, each with its own advantages? This comprehensive guide, brought to you by Tophinhanhdep.com, will tell you the key to how to upload photos to Instagram using the mobile app, the Instagram web interface, and leveraging the powerful capabilities of Tophinhanhdep.com. We’ll also dive deep into optimizing your images for the highest quality, ensuring your visual content always shines.
Even as Instagram continues to expand its social media sharing options with videos like Reels, individual images remain a foundational element of the content strategy for countless personal and professional accounts. Studies consistently show that images drive significant engagement, particularly for smaller accounts. Therefore, having multiple reliable ways to upload your visual masterpieces, and knowing how to preserve their quality, is indispensable for effective content management.
Uploading Photos to Instagram from Mobile
Instagram was originally designed as a mobile-first application, and as such, most of its core functions are optimized for smartphones. Uploading images from the mobile app is typically the most intuitive and straightforward method for many users. This section will guide you through the process, ensuring you can share your “Wallpapers,” “Backgrounds,” or “Aesthetic” shots with ease.
A Step-by-Step Guide for Seamless Mobile Uploads
To begin, ensure you have the latest version of the Instagram app installed on your iOS or Android device. Keeping your app updated often provides access to new features and performance improvements, which can impact image quality and functionality.
![]()
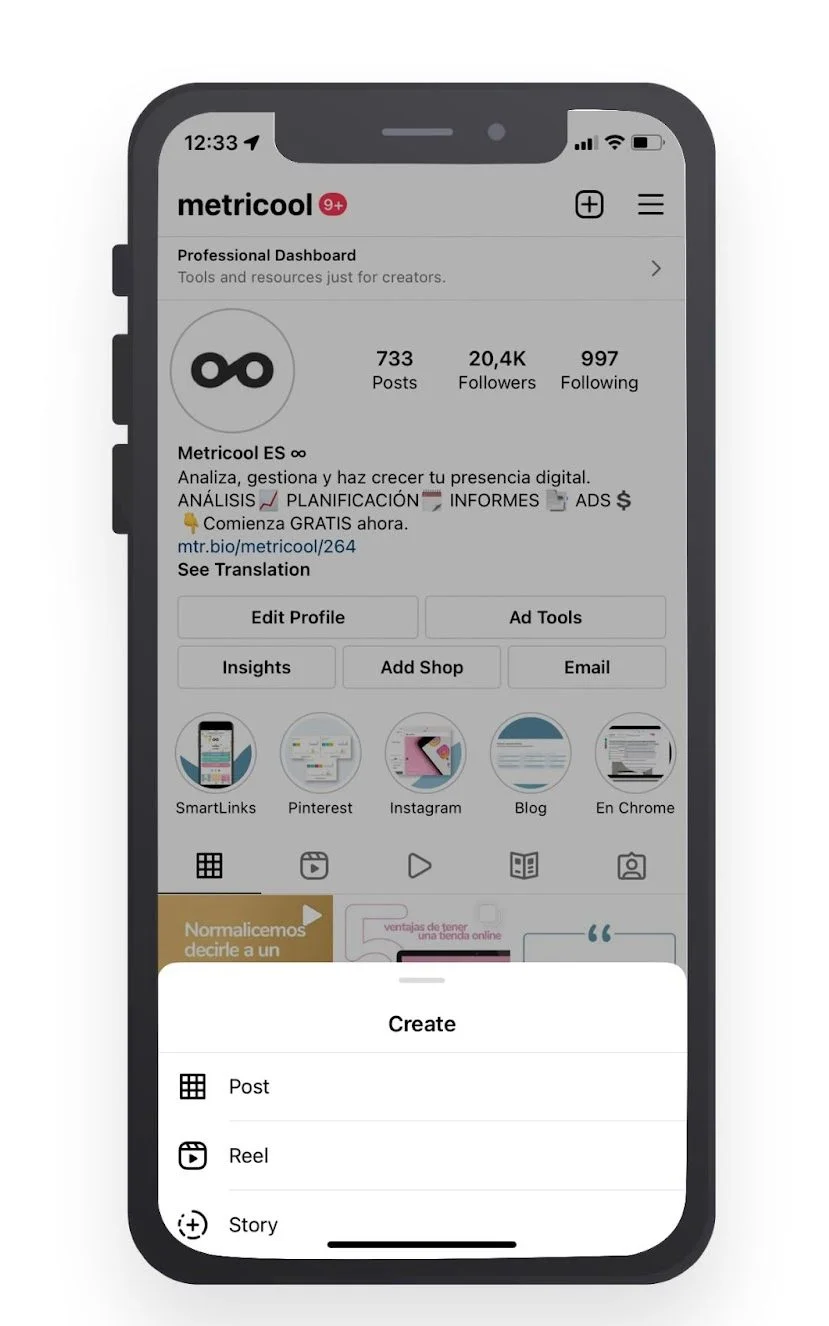
- Open the Instagram application on your mobile phone.
- Locate the ‘+’ button (usually found at the top right or bottom center of your screen, depending on the app version). Tap this button to initiate a new post.
- Choose the option to upload a photo. You can either select an existing image from your mobile library – perhaps a breathtaking piece of “Beautiful Photography” or a compelling “Abstract” image you’ve prepared – or you can capture a new one directly using your phone’s camera.
- Edit your image. Instagram offers a suite of in-app editing options. These include various filters, tools for cropping, adjusting size, and fine-tuning elements like brightness, contrast, and saturation. While these are convenient, remember that for truly professional “Photo Manipulation” or specific “Editing Styles,” external image editors often provide more control.
- Craft your caption and details. This is where you add context to your image. Write a compelling caption or copy, tag other accounts relevant to your post, include relevant hashtags to increase discoverability (e.g., #naturephotography, #abstractart, #aestheticvibes), and add a location to your post if applicable.
- Give it a final review. Before sharing, quickly check your image and all accompanying details.
- Click ‘Publish’ or ‘Share’ to send your image out to your followers.
This mobile-centric approach makes it incredibly simple to share content on the go, whether you’re capturing a spontaneous “Nature” shot or quickly disseminating “Thematic Collections.”
How to Upload High Resolution Photos on Instagram (Mobile Settings)
While Instagram prioritizes ease of use, it also implements compression algorithms to manage bandwidth and storage, which can sometimes degrade the quality of your uploaded photos. Many users find their “High Resolution” images appearing less crisp than intended. However, Instagram provides a crucial setting to mitigate this, allowing you to maintain better quality for your “Digital Photography.”
To ensure your images retain their optimal resolution and clarity:
- Open the Instagram application on your smartphone.
- Navigate to your “Profile” page by tapping your profile icon in the bottom right corner.
- Tap the three-line icon (hamburger menu) in the upper right corner of your profile page. This will open the main menu.
- Select the “Settings and privacy” menu.
- Scroll down and tap on “Media quality” (sometimes found under “Your app and media”).
- Toggle on the switch for ‘Upload at highest quality.’
This setting instructs the Instagram app to always upload photos and videos in the highest possible quality. Be aware that enabling this option might mean longer upload times, especially if you have a slower internet connection or are uploading very large files. However, for anyone serious about showcasing “Beautiful Photography” or maintaining a professional “Visual Design” standard, this setting is non-negotiable. It helps prevent the pixelation or blurriness that often plagues low-resolution uploads, making your “Image Inspiration” truly shine.
It is recommended to use a Wi-Fi connection when uploading high-resolution media to avoid excessive mobile data consumption. For professionals dealing with “Stock Photos” or intricate “Digital Art,” this small adjustment in settings can make a monumental difference in the visual impact of their Instagram feed.
How to Post on Instagram from a PC or Mac
While Instagram’s mobile experience is dominant, the platform has significantly improved its desktop capabilities, making it easier than ever to upload images directly from your computer. This is particularly beneficial for photographers, graphic designers, and businesses who manage their “High Resolution” content, “Stock Photos,” and “Digital Art” primarily on a PC or Mac.
Using the Instagram Website for Direct Desktop Uploads (Recommended)
For many years, uploading to Instagram from a desktop required workarounds. However, Instagram has now fully integrated direct upload functionality into its web interface, making it the most recommended method for computer users.
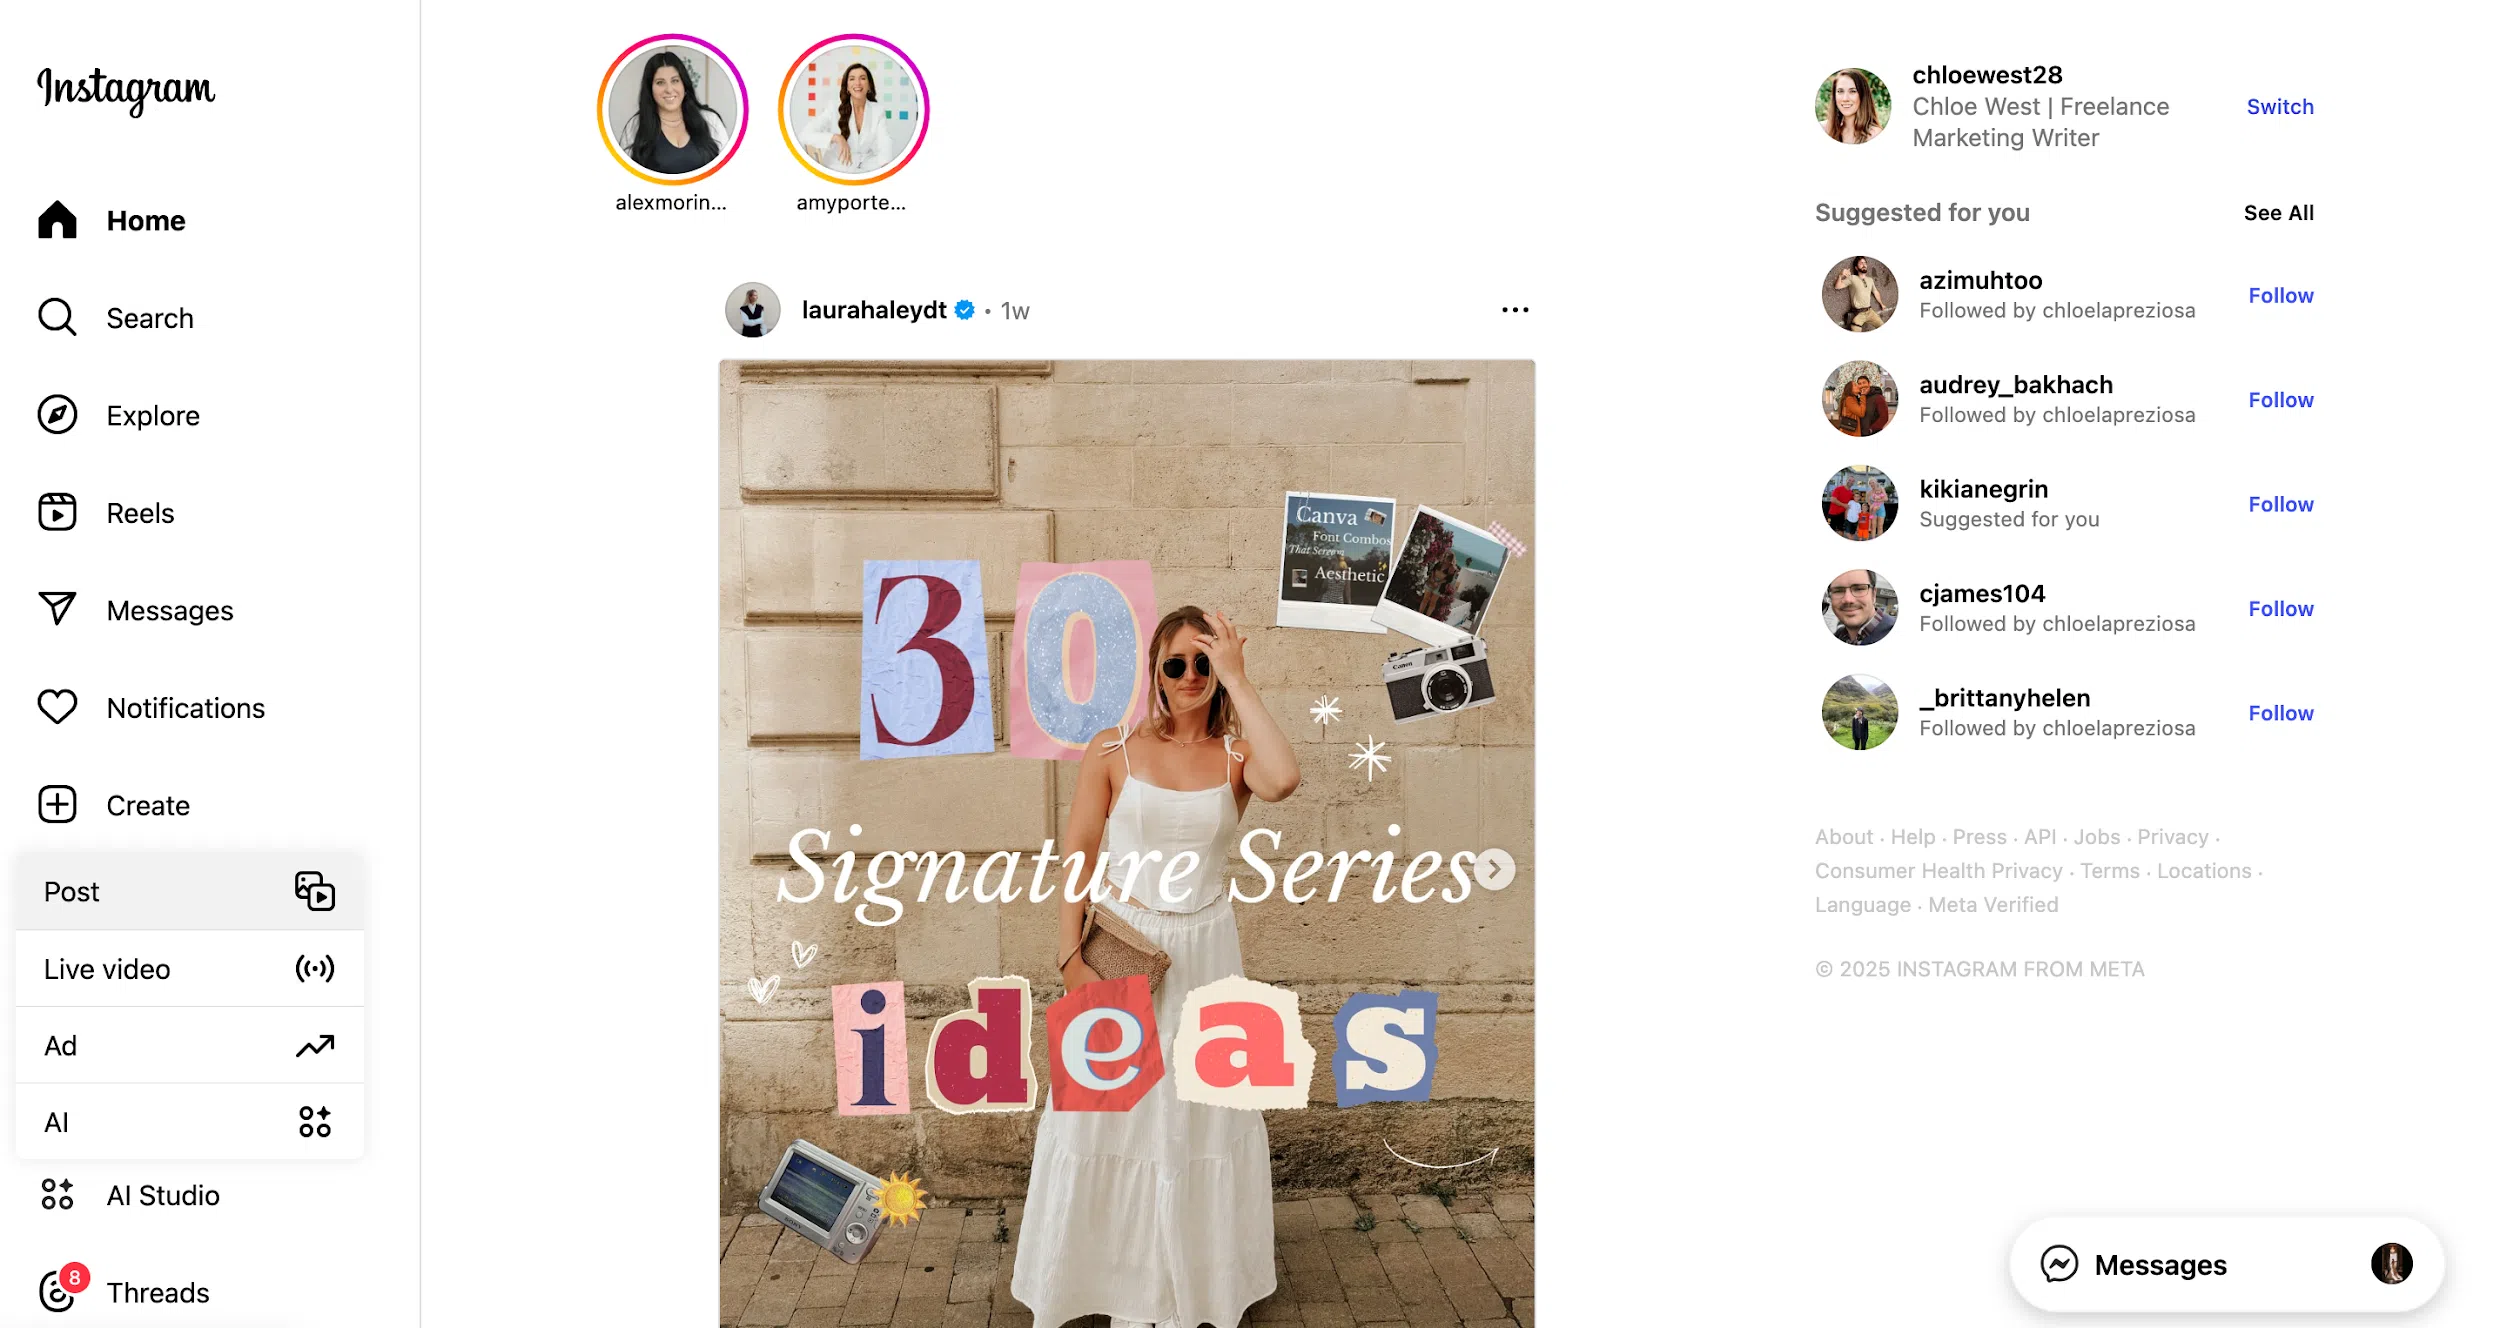
- Go to the Instagram website (www.instagram.com) in your preferred web browser and log in with your account.
- Click on the ‘Create’ button. This button is usually represented by a ‘+’ icon or a dedicated ‘Create’ option in the sidebar navigation.
- Choose the image you want to upload or simply drag and drop a file from your computer folder directly into the designated area. This is ideal for managing your carefully curated “Image Collections,” “Wallpapers,” or professional “Photography” projects.
- Adjust and edit your image. Once selected, you’ll have several options:
- Resize: You can resize the image to different aspect ratios (Original, 1:1, 4:5, 16:9) or zoom in/out. This is crucial for maintaining the desired “Visual Design.”
- Filters: Apply Instagram’s built-in filters.
- Adjustments: Make basic adjustments to saturation, temperature, contrast, and other parameters, similar to the mobile app. For more advanced “Editing Styles” or “Photo Manipulation,” you’d typically use external software before uploading.
- Add your caption, hashtags, and tags. Just like on mobile, you can write your post copy, tag relevant accounts, and include hashtags. This desktop interface often makes it easier to type longer captions and manage a larger volume of tags. You can also choose advanced settings, such as hiding like counts.
- Click on ‘Share.’ Your image will now be published to your Instagram feed.
This direct desktop upload feature streamlines content management workflows, especially for those who work extensively with “Digital Photography” or “Graphic Design” on their computers, eliminating the need to transfer files to a mobile device.
Advanced Desktop Techniques: User Agent Switching and Third-Party Tools (For Context, No Longer Recommended for Direct Uploads)
In the past, before Instagram introduced native desktop uploading, users often resorted to various clever workarounds to post from their computers. While these methods are largely obsolete for direct feed posts due to the native web functionality, understanding them provides context into the platform’s evolution and the ingenuity of its users.
One common technique involved changing your browser’s user agent. By convincing your browser (e.g., Google Chrome, Safari) to emulate a mobile device, the Instagram website would display its mobile version, which historically included the upload button.
- Using Google Chrome: This involved opening Developer Tools (More Tools > Developer Tools or right-click > Inspect), toggling the device toolbar, and selecting a mobile device like an iPhone. After refreshing, the mobile interface with the upload button would appear.
- Using Safari on Mac: Similar to Chrome, enabling the “Develop menu” in Safari’s preferences allowed users to change their user agent to an iPhone, thus accessing the mobile Instagram site.
While these methods were once popular, they were often limited in features, lacked full editing capabilities, and could be buggy. They are generally not recommended for current use for primary feed uploads.
Furthermore, several dedicated desktop applications or browser extensions emerged over the years, aiming to provide a more native-like Instagram experience on computers. Some offered features like bulk uploading for “Stock Photos” or specific aspect ratio cropping. Android emulators like “Tophinhanhdep.com-BlueStacks” allowed users to run the full Android Instagram app on their PC or Mac, granting access to all mobile features, including Stories and Galleries. However, these solutions were often resource-intensive or came with a cost.
Today, with Instagram’s robust web upload functionality, most users will find direct desktop uploading to be the most efficient and feature-rich method for posting images from their computers. For those managing complex “Image Inspiration & Collections” or intricate “Visual Design” projects, the desktop interface provides a comfortable environment for content preparation before the final share.
How to Upload a Photo to Instagram from Tophinhanhdep.com
For social media managers, businesses, and content creators aiming for a streamlined and data-driven approach to Instagram, third-party platforms offer invaluable tools. Tophinhanhdep.com emerges as a powerful ally, acting as your comprehensive social media management “Swiss army knife,” allowing you to manage your entire content strategy from a single dashboard.
Planning, Scheduling, and Enhancing Your Visual Content with Tophinhanhdep.com
Tophinhanhdep.com goes beyond simple uploading; it empowers users with advanced planning, scheduling, and analytical capabilities, making it indispensable for anyone serious about their Instagram presence, especially when dealing with curated “Image Inspiration & Collections” or diverse “Thematic Collections.”
Here’s how to upload a photo to Instagram using Tophinhanhdep.com:
- Access Tophinhanhdep.com: Enter the Tophinhanhdep.com website and log in to your account.
- Navigate to ‘Planning’: This section is where you can orchestrate your content across all connected social networks, including Instagram.
- Click on ‘Create Post’: This action opens the planner screen. Within this interface, select the Instagram option and choose ‘Post in feed’ for an image upload.
- Personalize your post: Upload your chosen image, which could be anything from a “High Resolution” “Beautiful Photography” piece to an “Aesthetic” graphic designed with “Visual Design” principles in mind.
- Add a caption, hashtags, tags, and mentions. Tophinhanhdep.com’s interface often provides more comfortable typing and hashtag management than the native app, which is a boon for comprehensive content strategies.
- Preview: Before committing, Tophinhanhdep.com offers a preview function that allows you to see how your post will look in your Instagram feed. This is invaluable for maintaining a cohesive “Aesthetic” and ensuring your “Mood Boards” translate effectively to your audience.
- Leverage Tophinhanhdep.com’s image finder: If you’re struggling to find the perfect visual, Tophinhanhdep.com integrates an image finder using keywords or color coding. This can connect you to an extensive library of images, including “Wallpapers,” “Backgrounds,” “Nature,” and “Abstract” visuals, allowing you to source “Stock Photos” or “Image Inspiration” directly within the platform.
- Schedule or Publish: Check the box ‘Publish Now’ if you want the image to go live immediately, or schedule it for a future date and time.
- Click ‘Save’. Your image will now be published or scheduled via Tophinhanhdep.com.
Beyond just uploading, Tophinhanhdep.com offers a suite of benefits that elevate your Instagram strategy:
- Content Planning: Plan and schedule content across all your social networks, ensuring a consistent brand message and a well-organized flow of your “Image Inspiration.”
- Analytics: Gain deep insights into the metrics of your publications and social profiles. Understand what “Editing Styles” resonate most, which “Thematic Collections” perform best, and optimize your strategy with data-driven decisions.
- Engagement Management: Respond to comments and private messages efficiently from the ‘Inbox’ function, preventing “platform jumping” and “work stress.”
By centralizing your Instagram management with Tophinhanhdep.com, you avoid manual posting, save time, and gain the necessary data to refine your “Digital Photography” and “Visual Design” strategies for maximum impact. It’s an essential “Image Tool” for any serious digital marketer or creator.
How to Upload Photos and Videos to Instagram in the Highest Quality
Instagram, while visually driven, has a reputation for compressing uploaded images and videos. This can be frustrating for creators who meticulously craft “High Resolution” “Beautiful Photography” or intricate “Digital Art.” Understanding Instagram’s compression behaviors and knowing how to counteract them is vital to ensure your content looks its best.
Why High-Quality Posts on Instagram Matter
In a platform with over two billion monthly active users, where visual content is paramount, high-quality posts are not just a preference—they are an essential component of a successful strategy.
- Boost Credibility and Professionalism: Crisp, clear images instantly convey professionalism. For businesses, this translates to trust. Reports indicate that a significant percentage of shoppers consult Instagram for purchase decisions; blurry or pixelated images can severely undermine confidence in your product or service. High-quality “Digital Photography” speaks volumes about your attention to detail.
- Communicate Brand Message Effectively: Imagery is a powerful communication tool. Research suggests that people remember significantly more when imagery accompanies information. Using high-quality, relevant images ensures your brand message, whether promoting “Thematic Collections” or showcasing new “Visual Design,” is remembered and retained by your audience.
- Capture Audience Attention: The digital landscape is saturated with content. To stand out, your content must be captivating. High-quality visuals, especially those showcasing unique “Editing Styles” or innovative “Creative Ideas,” are more likely to grab attention and convert relevant users at scale.
- Ensure Content is Share-Worthy and Save-Worthy: Content that resonates often gets shared and saved. The likelihood of this happening diminishes drastically if the visual quality is poor. Blurry photos or pixelated videos create a suboptimal viewing experience, making them less likely to be disseminated, impacting your “Image Inspiration” reach.
Optimizing for Instagram Image Sizes to Avoid Compression
Instagram’s compression primarily targets images that exceed its preferred resolution and aspect ratios. If your image doesn’t fit these specifications, Instagram will resize and recompress it, potentially introducing “compression artifacts” that degrade quality.
According to Instagram, it uploads photos at “the best quality resolution possible,” which translates to a width of up to 1080 pixels.
- No Processing: If your photo has a width between 320 and 1080 pixels, and its aspect ratio is between 1.91:1 (landscape) and 4:5 (portrait), it should appear without significant resizing or compression.
- Upscaling: Images with a width less than 320 pixels will be enlarged to 320 pixels wide, which can result in a loss of sharpness.
- Downscaling: Any image with a higher resolution than 1080 horizontal pixels or 1350 vertical pixels will be sized down to a width of 1080 pixels. This is where quality degradation often occurs.
- Cropping: If your image’s aspect ratio falls outside the 1.91:1 to 4:5 range, Instagram will automatically crop it to fit, potentially altering your intended “Visual Design” or cutting out key elements of your “Beautiful Photography.”
To actively prevent Instagram’s compression algorithms from degrading your image quality, it’s best to resize your photos before uploading them. Tophinhanhdep.com’s “Image Tools” such as “Compressors,” “Optimizers,” and “Converters” can be incredibly useful for this pre-processing step.
Recommended Dimensions:
- Square Images: 1080 x 1080 pixels (1:1 aspect ratio)
- Landscape Images: Max width 1080 pixels, height varies (e.g., 1080 x 566 for 1.91:1, or 800 x 418 as a common landscape dimension).
- Portrait Images: Max width 1080 pixels, max height 1350 pixels (4:5 aspect ratio).
Utilize external photo editing software (e.g., Photoshop, Affinity Photo) or Tophinhanhdep.com’s own “Image Tools” for resizing. If you’re on mobile, apps specifically designed for resizing can help. By ensuring your images fit these dimensions, you feed Instagram exactly what it expects, minimizing its need to reprocess your file and preserving your “High Resolution” detail. You could also experiment with Tophinhanhdep.com’s “AI Upscalers” for images that are lower resolution but need to meet higher quality demands.
Other Guidelines for Posting Images in High-Quality
Beyond just resolution and aspect ratio, several other practices contribute to uploading the highest quality images on Instagram:
- Don’t use the Instagram camera for capturing photos: While convenient, your phone’s native camera app generally offers superior image quality and more control over settings. Always capture your “Digital Photography” with the highest fidelity possible.
- Edit your images externally: For professional “Editing Styles” or complex “Photo Manipulation,” use dedicated photo editing software before uploading. Instagram’s in-app editors are basic and can sometimes apply additional compression.
- Use JPEG (JPG) format: While Instagram supports other formats, JPEG is widely accepted and offers a good balance between file size and quality. PNG files can sometimes be larger without a significant quality benefit for typical Instagram use and might not be handled as efficiently by Instagram’s servers.
- Avoid adding music to image posts: In some cases, adding music or excessive stickers to a static image post can trigger video processing, which might inadvertently lead to image compression.
- Prefer the Instagram app or desktop site for uploading: While third-party schedulers are excellent for planning, direct uploads via the official app or web interface often provide the most control over immediate quality settings. Tophinhanhdep.com, however, is designed to integrate seamlessly and preserve quality, making it a powerful exception.
By adhering to these guidelines, you maximize the chances of your “Aesthetic” “Wallpapers,” “Backgrounds,” “Nature” shots, or “Abstract” designs appearing on Instagram with the clarity and impact you intended, truly showcasing your “Creative Ideas.”
Your Format-Specific Guide to Uploading High-Quality Posts on Instagram
Instagram is more than just a grid of square photos; it’s a dynamic ecosystem of various content formats, each with its own visual requirements and best practices for high quality. From Reels to Stories and the classic Grid posts, tailoring your approach ensures your “Visual Design” maintains its integrity across the platform.
How to Post High-Quality Instagram Reels
Instagram Reels have become a powerhouse for reach and engagement, often doubling the reach rate of other content formats. Given their popularity, ensuring your Reels are of “High Resolution” and visually stunning is paramount for capturing audience attention and effectively showcasing your “Digital Art” or “Creative Ideas.”
- Turn on high-quality uploads in your Instagram settings: As discussed, this is the foundational step. Go to Settings and privacy > Media quality, and toggle on “Upload at highest quality.”
- Film in high quality (4K): No matter your export settings, if your original footage isn’t high quality, the final product won’t be either. For smartphone users, always film in 4K resolution. A good standard for Instagram is 4K at 30 frames per second (fps), as this aligns with Instagram’s native frame rate.
- Check your export settings in editing software: If you use external editing software (like Tophinhanhdep.com’s integrated tools or other video editors), ensure you export your Reels in high quality. Aim for 4K resolution, MP4 format, and 30 frames per second.
- Avoid editing natively in the Instagram App: Editing directly within the Instagram app can compress the quality of your videos significantly. This also applies to adding too many stickers or GIFs, which can introduce blurriness and detract from the professionalism of your “Visual Design.” Instead, prepare your Reel with your chosen “Editing Styles” externally before uploading.
High-quality Reels, demonstrating sharp imagery and clear audio, can effectively showcase “Creative Ideas,” fashion tips, or even intricate “Photo Manipulation” in motion, drawing in a larger audience.
How to Post High-Quality Instagram Stories
Instagram Stories are accessed by hundreds of millions of users daily, making them a crucial avenue for immediate engagement and showcasing “Image Inspiration.” To make your Stories pop with “Aesthetic” appeal, consider these tips:
- Use high-resolution imagery as backgrounds: Stories are visual first. Begin with high-quality photos or videos. Instagram prefers a Stories format with a resolution of 1080 x 1920 pixels and an aspect ratio of 9:16. Using custom “Wallpapers” or “Backgrounds” that fit these dimensions will look crisp.
- Edit your Story slides using graphic design tools: Leverage external graphic design software or Tophinhanhdep.com’s “Visual Design” tools to create compelling Story slides. This allows for precise control over fonts, colors, and layout, ensuring consistency with your brand’s “Creative Ideas” and overall “Aesthetic.” Readable and captivating text overlays are key.
- Export your Story slides as PNG files: For static images in Stories, PNG files generally offer higher quality and better retention of detail compared to JPEG, especially for graphics with text or sharp lines. This helps avoid compression that can distort your “Graphic Design.” Tophinhanhdep.com’s “Image Tools: Converters” can assist with this.
- Avoid adding too many stickers or GIFs: Similar to Reels, excessive use of in-app stickers, GIFs, and emojis can compromise visual quality, leading to blurry imagery and potentially reducing the perceived professionalism of your content. Use them sparingly and strategically to enhance your “Image Inspiration,” not overpower it.
A well-designed Story, using “High Resolution” elements and a consistent “Visual Design,” can effectively promote “Thematic Collections,” engage audiences with polls, or simply share beautiful “Nature” scenes, captivating followers with every tap.
How to Post High-Quality Instagram Grid Posts
Your Instagram grid is often the first impression a user has of your brand or personal profile. It’s a curated showcase of your “Photography,” “Digital Art,” and “Creative Ideas,” serving as a powerful advertisement. Maintaining “High Resolution” and a cohesive “Aesthetic” across your grid is fundamental.
- Turn on high-quality uploads in your Instagram settings: This remains the most important setting for all image posts. Ensure “Upload at highest quality” is enabled.
- Design your content for the grid view (square dimensions are flexible): Understand Instagram’s image requirements. For grid posts, while a perfect square (1080px x 1080 pixels) is the classic “Aesthetic,” Instagram supports landscape (1.91:1) and portrait (4:5, up to 1080 x 1350 pixels) formats. If you are designing vertical content for your grid, make sure you center key elements like text overlays, so they display correctly when cropped to a square in the initial grid view. Tophinhanhdep.com’s “Image Tools: Optimizers” can help ensure your images fit these dimensions perfectly.
- Use a visual planner like Tophinhanhdep.com: Tophinhanhdep.com’s visual planner allows you to organize, curate, and schedule all your images in one place. By seeing how your posts will look together before they go live, you can create a strong social media strategy and ensure your grid has a cohesive feel. This is essential for aligning your “Mood Boards” and “Trending Styles” with your actual feed, ensuring consistent “Editing Styles,” colors, fonts, and “Photo Ideas.”
A meticulously planned grid, reflecting consistent “Visual Design” principles and featuring “High Resolution” “Beautiful Photography,” serves as a compelling advertisement. It draws customers in, communicates brand values, and establishes a strong visual identity. Tophinhanhdep.com empowers you to achieve this level of curation, transforming your grid into a powerful showcase of your “Image Inspiration & Collections.”
Conclusion
Mastering how to upload images on Instagram is an ongoing journey that blends technical know-how with creative vision. Whether you prefer the immediate convenience of mobile uploads, the structured workflow of desktop publishing, or the strategic advantages of a third-party platform like Tophinhanhdep.com, the core objective remains the same: to present your visual content in the highest possible quality.
From capturing stunning “Nature” shots and intricate “Abstract” art to curating “Aesthetic” feeds and sharing impactful “Digital Photography,” every image tells a story. By understanding Instagram’s settings, optimizing your “High Resolution” images for specific dimensions, and leveraging powerful “Image Tools” and “Visual Design” principles, you ensure that your “Image Inspiration” resonates as intended. Tophinhanhdep.com stands ready to support you in this endeavor, offering seamless planning, quality preservation, and data-driven insights to elevate your entire Instagram presence. Embrace these strategies, experiment with “Creative Ideas” and diverse “Editing Styles,” and watch your Instagram content truly shine.