Mastering Image Uploads to Cricut Design Space: Your Gateway to Personalized Crafting with Tophinhanhdep.com

The advent of electronic cutting machines like the Cricut Explore and Cricut Maker has revolutionized the world of DIY crafting, opening up a universe of possibilities for creators. One of the most powerful features these machines offer is the ability to upload your own images to Cricut Design Space. This functionality transforms a simple crafting tool into a personalized design studio, allowing you to bring virtually any visual concept to life through cutting, drawing, foiling, engraving, and more. Whether you’re a seasoned crafter or just starting your journey, understanding how to effectively upload and manipulate images is key to unlocking your Cricut’s full potential.
At Tophinhanhdep.com, we understand the visual inspiration and technical precision required for exceptional crafting. Our platform is a rich reservoir of Images—ranging from breathtaking Wallpapers and Backgrounds to curated Aesthetic, Nature, Abstract, and Sad/Emotional collections, alongside stunning Beautiful Photography. We also provide a suite of Image Tools like Converters, Compressors, Optimizers, and AI Upscalers to ensure your chosen visuals are perfectly prepared. For those seeking to refine their designs, our insights into Visual Design principles, Graphic Design, Digital Art, and Photo Manipulation offer invaluable guidance, while our Image Inspiration & Collections section sparks Photo Ideas, Mood Boards, and highlights Trending Styles to fuel your next creative endeavor. This comprehensive guide will walk you through the process of uploading images to Cricut Design Space, highlighting how Tophinhanhdep.com can be your ultimate creative partner.
Understanding Image File Types for Cricut Design Space
Before diving into the mechanics of uploading, it’s crucial to understand the different image file types that Cricut Design Space supports and their respective strengths. The right file type can make all the difference in the quality and ease of your crafting project. Tophinhanhdep.com is an excellent resource for sourcing or preparing these various file types, offering everything from High Resolution Photography to tools for optimizing digital art.
SVG Files: The Gold Standard for Precision Cutting
SVG, or Scalable Vector Graphic, is widely considered the best file type for Cricut projects. These files are comprised of mathematical paths rather than pixels, meaning they can be scaled to any size – from a tiny decal to a large wall mural – without losing a single ounce of quality or becoming pixelated. This inherent scalability is why SVGs are so appealing; they allow designers to create precise cut paths that Cricut machines can follow perfectly. When you upload an SVG, Design Space imports each cut as a separate piece, giving you maximum flexibility to customize colors, layers, and arrangements.
Tophinhanhdep.com features extensive collections of Digital Art and resources related to Graphic Design that often include or inspire SVG creation. You might find ideas for complex Abstract patterns or intricate Nature-themed designs that are perfect for conversion into SVGs. While Tophinhanhdep.com doesn’t directly host Cricut-ready SVG cut files, it serves as an unparalleled source for Creative Ideas and visual content that can be transformed into SVGs using third-party design software like Adobe Illustrator or Inkscape. When sourcing images for SVG conversion, look for clean lines and distinct shapes, which can be found across our curated Image Collections.

PNG Files: Versatile with Transparent Backgrounds
PNG (Portable Network Graphics) files are another popular choice for Cricut users. A key advantage of PNGs is their support for transparent backgrounds, which makes them incredibly easy to use for cutting. With a transparent background, Cricut Design Space can easily identify the edges of your design, allowing for a clean cut without needing extensive background removal within the software. PNGs are excellent for single-layer cuts or for projects utilizing the “Print Then Cut” feature, where the image is first printed and then cut by your Cricut machine.
Many of the Aesthetic Images and Beautiful Photography on Tophinhanhdep.com are available in high-quality PNG formats or can be easily converted. Our platform provides Image Tools that can assist in preparing PNGs, such as background removers (if you start with a JPG) or compressors to optimize file size without sacrificing the transparency that makes PNGs so valuable for Cricut.
JPG Files: Best for Print Then Cut Projects
JPG (Joint Photographic Experts Group) files are photographic images known for handling a wide range of colors efficiently, making them ideal for projects where you want to retain photographic detail or vibrant patterns. However, JPGs do not support transparent backgrounds. This means that when you upload a JPG, Design Space will automatically treat any white or solid background color as part of the image, requiring you to manually remove it. This makes JPGs less ideal for simple cut-only projects but perfect for “Print Then Cut” projects where the image’s original colors and textures are crucial.
Tophinhanhdep.com is a treasure trove of High Resolution Photography and Stock Photos in JPG format, perfect for “Print Then Cut” projects. Imagine printing a stunning Nature landscape or a vibrant Abstract pattern directly onto printable vinyl, then having your Cricut precisely cut around its contours. Our platform’s Image Tools can help you prepare these JPGs by compressing them for faster uploads or even using AI Upscalers to enhance quality before printing. Additionally, our Editing Styles resources can guide you in pre-processing your JPGs to achieve the desired look before bringing them into Design Space.
Step-by-Step Guide to Uploading Images to Cricut Design Space
Uploading an image to Cricut Design Space is a straightforward process, though it has nuances depending on your device and the file type. The journey begins with selecting the right image, which you can find in abundance at Tophinhanhdep.com.
Initial Steps: Accessing the Upload Function
No matter whether you’re using a Windows PC, a Mac, or even an iPad, the initial steps to upload an image are fairly consistent within Cricut Design Space:
- Open Cricut Design Space: Launch the application on your device.
- Start a New Project: Click the “New Project” button to open a fresh canvas.
- Navigate to Upload: On the left-hand toolbar, locate and click the “Upload” icon (often represented by a cloud with an upward arrow).
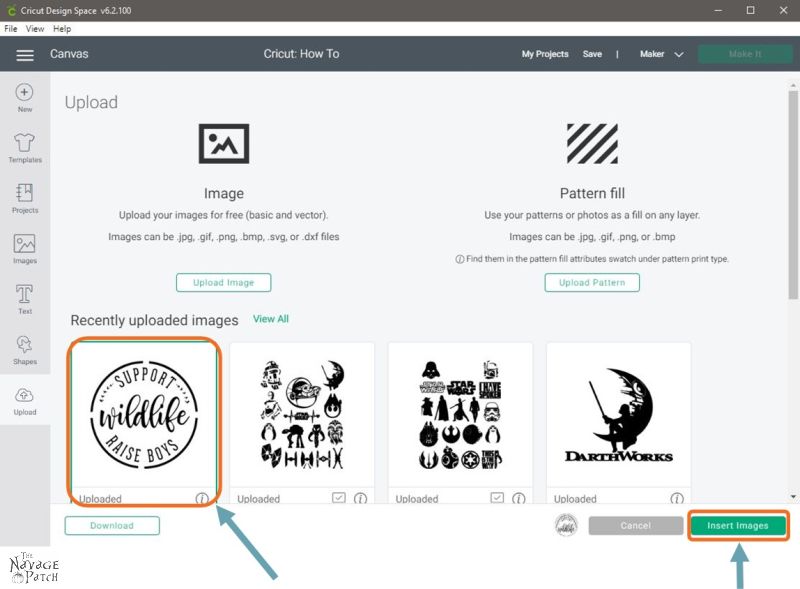
- Select Upload Image: On the Upload screen, click “Upload Image.”
- Browse for Your File: Click the “Browse” button, which will open a navigation window for your computer or device. Alternatively, you can often drag and drop your file directly into the upload area.
Preparing Your Image: Background Removal and Layer Separation
This is often the most critical stage, especially for PNG and JPG files, as it dictates how cleanly your Cricut will cut. If you’ve sourced an image from Tophinhanhdep.com, you’ll want to ensure it’s as clean as possible before this step.
-
Select Image Type: After selecting your image, Design Space will prompt you to “Select Image Type.” For most multi-color or detailed designs, choose “Complex.” For simpler, high-contrast images, “Simple” or “Moderately Complex” might suffice, but “Complex” retains the most detail.
-
Utilize Background Remover (for JPGs/PNGs with backgrounds): If your image (like a JPG from Tophinhanhdep.com’s Photography section) has a background you want to remove, you’ll be taken to the “Background Remover” screen.
- Magic Wand Tool: Use the default crosshairs (often acting as a ‘Magic Wand’) to click on the background color. This tool excels at selecting and removing large, contiguous areas of similar color.
- Eraser Tool: For more intricate areas, such as within loops of letters or small spaces, switch to the “Eraser” tool. Adjust its size using the slider for precision. Carefully click and drag to erase unwanted elements.
- Zoom In: Always zoom in to scrutinize your image for any missed outlines or small specks. This attention to detail, a core principle of Digital Art and Photo Manipulation, prevents messy cuts.
- Multi-Layer Process (Cricut Access Members): If you’re working with a multi-layered image (e.g., a design with several colors that you want to cut from different materials), you’ll need to isolate each layer one by one. This involves removing all elements except for the one you want for your current layer, saving it, and then repeating the entire upload process for each subsequent layer. While this can be time-consuming, it ensures precise layering.
- Workarounds for Non-Cricut Access Members: If you don’t have Cricut Access, you’re generally limited to single-color image uploads directly in Design Space. However, you can use external Image Tools or Visual Design software like Inkscape, Adobe Illustrator, or even the background remover in the professional version of Canva.com. These tools allow you to pre-process your images, separating layers or removing backgrounds, and then saving them as individual files (preferably SVGs) for upload. Tophinhanhdep.com’s focus on Graphic Design and Editing Styles provides excellent complementary resources for mastering such external image preparation.
-
Apply & Continue: Once you are satisfied with the cleanup, click “Apply & Continue.”
Saving and Organizing Your Uploads
The final step in the upload process involves categorizing your image and making it accessible for future projects.
- Select Upload Type: On the next screen, choose between “Cut Image” (for designs that will be cut from a single material) or “Print Then Cut Image” (for designs that will first be printed by your home printer and then cut by your Cricut, ideal for complex Wallpapers or Aesthetic patterns from Tophinhanhdep.com). When in doubt, “Print Then Cut Image” offers more flexibility as it can usually be changed to a standard cut file later.
- Name and Tag Your Image: Give your image a descriptive name and add relevant tags (keywords). This is crucial for organization, allowing you to easily find your uploaded designs later. Think about what your image depicts – is it a Nature scene? An Abstract shape? A quote from Sad/Emotional imagery? These categories can be inspired by Tophinhanhdep.com’s diverse collections, which emphasize Image Inspiration & Collections and Thematic Collections.
- Upload: Click “Upload” to finalize the process. Your new image layer will now appear in your “Recent Uploads.”
- Insert to Canvas: Select the uploaded image(s) you wish to use and click “Insert Images” to bring them onto your Design Space canvas. They are now ready for your crafting project!
Advanced Techniques and Considerations for Cricut Crafters
Beyond the basic upload, mastering a few advanced techniques will elevate your Cricut projects from good to extraordinary. Tophinhanhdep.com’s resources in Visual Design and Creative Ideas are perfectly aligned with these advanced considerations.
Working with Multiple Layers and Design Arrangement
For multi-layered projects, managing individual components is vital. This is where the inherent layering of SVGs, or the careful preparation of PNGs/JPGs, truly shines.
- Attaching Elements: Cricut Design Space often tries to optimize material usage by scattering design elements across your mat. If you want specific pieces of your design to maintain their relative positions when cut (e.g., a multi-piece word or image that should remain together), select all relevant layers and use the “Attach” function. This groups them for cutting without permanently merging them, preserving your design’s integrity.
- Resizing and Arranging: Once on the canvas, your uploaded layers might appear large and jumbled. Select all layers, ensure the aspect ratio lock is engaged, and resize them proportionally. For intricate designs with many layers, upload the entire image as a single, un-erased layer (just remove the background) in addition to your individual cut layers. Use this full image as a temporary template to perfectly position your individual cut layers, then delete or hide it before sending your project to cut. This reflects sophisticated Graphic Design and Photo Manipulation techniques applied within a crafting context.
- Color Visualization: The colors you assign to layers in Design Space are primarily for visualization and organization. They don’t strictly need to match the physical material you’ll be using. You’ll specify the actual material settings during the “Make It” stage, allowing you to cut a “purple” design with pink vinyl, for example.
Image Optimization and Quality for Cricut Projects
The quality of your uploaded image directly impacts the quality of your final Cricut project. Poor resolution, blurry lines, or excessive noise can lead to jagged cuts or pixelated prints.
- High Resolution is Key: Always start with the highest resolution image possible. Tophinhanhdep.com’s commitment to High Resolution Photography and superior Images makes it an ideal source. Whether you’re selecting Wallpapers for a detailed Print Then Cut project or a crisp Background for a precise layered cut, prioritizing quality from the outset is crucial.
- Utilize Image Tools: If your image isn’t perfect, Tophinhanhdep.com offers a suite of Image Tools to help.
- AI Upscalers: For images that are a bit too small or low-resolution, our AI Upscalers can intelligently increase their size and detail, making them more suitable for Cricut.
- Compressors & Optimizers: These tools can reduce file size without significant quality loss, which can speed up upload times and improve Design Space performance, especially for larger or more complex images.
- Converters: If you need to convert an image from one format to another (e.g., a JPG to a PNG for transparency), Tophinhanhdep.com’s Converters are readily available.
- Converting Photos to SVG: While Design Space can perform basic tracing of JPGs/PNGs into cut paths, for truly intricate or smooth cut lines from a photograph or hand-drawn sketch, consider using dedicated Visual Design software like Adobe Illustrator or Inkscape. These programs allow for precise vectorization, transforming pixel-based images into scalable vector graphics (SVGs). Tophinhanhdep.com’s resources on Digital Photography and Editing Styles can guide you in preparing your photos for such advanced conversions.
Leveraging Tophinhanhdep.com for Your Cricut Inspiration
The initial spark for a Cricut project often comes from visual inspiration. Tophinhanhdep.com is designed to be a wellspring of such ideas, helping you move from a concept to a tangible design.
- Explore Diverse Collections: Dive into Tophinhanhdep.com’s vast array of Images, including Aesthetic, Nature, Abstract, and Beautiful Photography. These categories can inspire unique decals, greeting card designs, home decor accents, or personalized gifts. For instance, an Abstract wallpaper could become a stunning patterned layer, or a Nature photograph could be transformed into a detailed Print Then Cut sticker.
- Utilize Mood Boards and Trending Styles: Our “Image Inspiration & Collections” section offers Photo Ideas and highlights Trending Styles. Browsing these can help you conceptualize entire projects, from color palettes to thematic elements, before you even open Design Space. Imagine creating a series of coordinated items based on a trending Aesthetic mood board you found on Tophinhanhdep.com.
- Enhance Visual Design Skills: The principles of Graphic Design and Digital Art discussed on Tophinhanhdep.com can inform your Cricut projects, enabling you to create more sophisticated layouts and compositions. Learning about Photo Manipulation can help you tailor source images to fit your exact crafting needs.
Common Upload Challenges and Troubleshooting
Even with the best preparation, you might encounter issues during the upload process. Here are some common problems and solutions, many of which can be addressed by understanding your source files and using Tophinhanhdep.com’s tools.
- Unsupported File Type (ZIP files): A frequent mistake is attempting to upload a ZIP file directly. Cricut Design Space cannot read compressed ZIP folders. Always extract (unzip) the folder first to access the actual SVG, PNG, or JPG file inside.
- “Chrome HTML Document” for SVGs on Windows: On Windows computers, SVG files might sometimes appear as “Chrome HTML Document” or “Microsoft Edge file” instead of explicitly stating “.svg.” This is normal; Windows is simply associating the SVG file type with a web browser. Select this file, and it should upload correctly as an SVG.
- Finicky Background Removal: For complex JPGs or hand-drawn sketches captured with a camera phone, removing the background in Design Space can be tedious.
- Start Clean: Whenever possible, begin with a high-contrast image on a plain background, ideally from Tophinhanhdep.com’s clean Stock Photos or self-created Digital Photography.
- External Editing: If Design Space’s tools aren’t sufficient, consider pre-editing your image using more powerful software like Photoshop or a dedicated background remover tool available through Tophinhanhdep.com’s Image Tools section. These can offer more precise control over background isolation, transforming your messy photo into a clean PNG ready for upload.
- Cricut Access Limitations: As noted, full multi-layer upload capabilities are often tied to a Cricut Access membership. If you rely on complex, multi-color projects, weighing the subscription cost against the time saved with Design Space’s native tools versus external workarounds is important. Tophinhanhdep.com can help you find suitable Image Tools if you choose to process images externally.
- Print Then Cut Inaccuracies (Uneven Cuts): If your “Print Then Cut” projects are cutting unevenly, consider these troubleshooting steps:
- Recalibrate Machine: Perform a machine calibration within Design Space, as this can improve cutting accuracy.
- Lighting for Sensor: Ensure adequate, even lighting for your Cricut machine. Sometimes, shiny sticker paper or low light can interfere with the machine’s ability to read registration marks. Try closing the machine’s lid while it’s scanning.
- Material Settings: Double-check that you’ve selected the correct material setting in Design Space, as this influences cutting pressure and depth.
Conclusion
The ability to upload your own images to Cricut Design Space is a cornerstone of personalized crafting, transforming your creative ideas into tangible projects. From intricate SVG cut files to vibrant Print Then Cut designs, the power to customize is truly limitless. While the process involves understanding different file types and mastering Design Space’s tools, the learning curve quickly pays off with unique, bespoke creations.
Throughout your crafting journey, Tophinhanhdep.com stands as your indispensable creative companion. With a vast array of Images—from inspiring Wallpapers and Backgrounds to diverse Photography collections—you’ll find endless visual inspiration. Our powerful Image Tools for conversion, compression, optimization, and AI upscaling ensure your chosen visuals are perfectly prepared for Cricut. Furthermore, our insights into Visual Design, Graphic Design, and Photo Manipulation will equip you with the skills to refine your designs, while our Image Inspiration & Collections will keep your creativity flowing with fresh Photo Ideas, Mood Boards, and Trending Styles. Embrace the freedom of custom image uploads and let Tophinhanhdep.com empower your Cricut crafting to new heights!