Mastering Image Upscaling in Photoshop: A Comprehensive Guide to Enlarging Images Without Losing Quality

In the dynamic realm of digital visuals, the desire to transform a small, pixelated image into a large, crystal-clear masterpiece is a common quest. Whether you’re a professional photographer, a graphic designer, or simply an enthusiast looking to print an old family photo poster-sized, the challenge of upscaling without sacrificing quality can feel like navigating a digital minefield. Images that appear perfectly fine on a small screen often turn into a blurry, artifact-ridden mess when enlarged, leading to frustration and wasted effort.
At Tophinhanhdep.com, we understand this challenge intimately. Our mission is to empower creators and visual enthusiasts with the knowledge and tools to achieve stunning image quality across all their projects. We know the pains of blindly cranking up an image’s size, only to be met with a pixelated disaster. Through years of hands-on experience and extensive research into the latest digital photography and visual design techniques, we’ve honed a workflow that actually delivers exceptional results. This guide will walk you through the precise steps to enlarge images in Photoshop, focusing on maintaining clarity and detail, while also introducing you to advanced AI-powered image tools available right here at Tophinhanhdep.com for superior, effortless upscaling.
![]()
This guide is designed for anyone dealing with images – from those creating high-resolution wallpapers and backgrounds to professionals needing sharp stock photos or enhancing their digital photography collections. We’ll explore Photoshop’s built-in capabilities, delve into common challenges, and ultimately reveal how dedicated AI upscalers, found in our Image Tools section, can revolutionize your approach to visual design and photo manipulation. Get ready to turn those tiny, treasured images into magnificent, high-quality visual assets.
The Core Challenge: Why Upscaling Images in Photoshop Can Be Tricky
The act of upscaling an image fundamentally means increasing its pixel dimensions. While shrinking an image is relatively straightforward for software – it simply discards unnecessary pixels – enlarging an image requires the software to create new pixels and intelligently guess what information should fill them. This inherent challenge is why traditional upscaling methods often lead to undesirable outcomes, impacting everything from your carefully curated aesthetic images to critical product photography.
Many users, regardless of their proficiency level, encounter a range of issues when attempting to enlarge images in Photoshop:
- Blurry or Soft Results: This is the most prevalent complaint. Fine edges, intricate details like hair strands, delicate patterns, or crisp text often lose their sharpness, resulting in a generally soft or fuzzy appearance. This is particularly detrimental for professional photography where every detail counts, or for graphic design elements that demand precision.
- Artifacts and Noise Amplification: When you enlarge a low-resolution or heavily compressed image (like many JPEGs found online), traditional upscaling methods don’t just amplify the image; they also amplify existing imperfections. This can lead to visible grain, banding, strange color patterns, or blocky textures that make the image look worse than its original, smaller self. These “artifacts” can ruin the aesthetic appeal of even the most beautiful photography.
- Loss of Fine Details: Old images or tiny web graphics often stay flat and lacking in depth, no matter how much they’re enlarged. Photoshop, without advanced algorithms, struggles to “invent” detail where none existed. Edges become indistinct, and subtle textures crucial for realistic imagery simply disappear. This is a significant hurdle for those working on photo manipulation or trying to rescue valuable image collections.
- Low-Resolution Originals Remain Problematic: If your starting image is extremely pixelated or of inherently poor quality, Photoshop’s built-in upscalers, while powerful, won’t perform miracles. They can improve the situation, but they cannot conjure entirely new visual information from thin air. For such cases, the demand for truly smart upscaling solutions – often leveraging AI – becomes apparent, especially for users striving for high-resolution stock photos or digital art.
These challenges highlight why a discerning approach is crucial. Relying solely on basic resampling methods can lead to endless tweaking with sharpening filters, noise reduction, and layer masks, only to achieve slight improvements. This time-consuming process detracts from creative endeavors and the efficiency needed for visual design projects. Fortunately, advancements in Photoshop, coupled with dedicated AI image tools available through Tophinhanhdep.com, offer pathways to overcome these frustrating obstacles and achieve the high-quality results your images deserve.

Step-by-Step Guide: How to Upscale an Image in Photoshop with Preserve Details 2.0
Photoshop has continually evolved to address the complexities of image upscaling, introducing advanced algorithms that make a significant difference. The “Preserve Details 2.0” feature is a cornerstone of this evolution, offering an intelligent approach to enlarging images while maintaining crucial clarity and detail. This method is invaluable for photographers aiming for larger prints and web designers needing high-resolution assets, aligning perfectly with Tophinhanhdep.com’s commitment to delivering high-quality visual content.
Enabling the Advanced Upscaling Algorithm
Before diving into the upscaling process, it’s essential to ensure that Photoshop’s most advanced upscaling algorithm, “Preserve Details 2.0,” is activated. This feature, introduced in Photoshop CC 2018 and later versions, utilizes sophisticated logic to intelligently retain sharp edges, smooth gradients, and overall clarity, preventing your images from becoming blurry or pixelated after enlargement.
- Open Photoshop: Launch your Adobe Photoshop application.
- Access Preferences:
- On Windows: Go to the top menu bar, click
Edit > Preferences > Technology Previews. - On Mac: Go to the top menu bar, click
Photoshop CC > Settings > Technology Previews. (Note: in older versions, it might bePhotoshop CC > Preferences > Technology Previews).
- On Windows: Go to the top menu bar, click
- Enable Preserve Details 2.0: In the “Technology Previews” dialog box that appears, locate the option labeled
Enable Preserve Details 2.0 Upscale. Ensure that this checkbox is ticked. - Confirm Settings: Click
OKto close the dialog box and apply the changes. With this setting enabled, Photoshop is now primed to use its most intelligent upscaling capabilities.
Adjusting Image Size for Optimal Upscaling
Now that “Preserve Details 2.0” is enabled, you can proceed with enlarging your image with confidence. This process is central to preparing images for high-resolution photography, detailed graphic design, or ensuring your wallpapers and backgrounds look crisp.
- Open Your Image: Start by opening the image you wish to upscale. Go to
File > Openand select your image, or simply drag and drop it into Photoshop. - Access Image Size: Navigate to the top menu bar and click
Image > Image Size. A dialog box will appear. You can click and drag its bottom-right corner to make it larger, allowing for a better preview of your image. - Lock Aspect Ratio: This is a critical step to prevent distortion. In the “Image Size” dialog box, ensure the small
link iconbetween the ‘Width’ and ‘Height’ fields is clicked. This locks the aspect ratio, so when you change one dimension, the other automatically adjusts proportionally. - Input Desired Dimensions:
- Resolution/Dimensions: You’ll see fields for ‘Width’, ‘Height’, and ‘Resolution’.
- Change Unit (Optional but Recommended): While you can input exact pixel dimensions, it’s often easier to switch the unit to
Percentfrom the dropdown menu next to ‘Width’ or ‘Height’. - Specify Upscale Factor: If you want to double the image size, enter
200%. For a 2.5x increase, enter250%, and so on. For example, to enlarge a 500-pixel wide image to 2500 pixels (a 5x increase), you would enter500%. - Tip for Tricky Images: For extremely challenging or very small images, sometimes upscaling in smaller increments (e.g., 100% -> 200% -> 400% rather than a single 400% jump) can help preserve quality. This technique gives Photoshop more intermediate steps to analyze and reconstruct pixels.
- Select Resampling Method: Under the ‘Resample’ dropdown (which might be set to ‘Automatic’ by default), click and select
Preserve Details 2.0. This tells Photoshop to utilize the advanced AI algorithm you enabled in the preferences. While ‘Automatic’ sounds convenient, it doesn’t always choose the best method for significant upscaling. - Adjust Noise Reduction (Optional): Within the ‘Preserve Details 2.0’ option, you’ll find a ‘Noise Reduction’ slider. Enlarging images can sometimes exaggerate existing noise or introduce new graininess. Experiment with this slider, usually between
10-20%, depending on the original image’s graininess. The preview window will help you assess the impact. - Apply Changes: Once satisfied with the preview, click
OKto apply the upscaling. Photoshop will now process your image, creating a larger version with significantly better detail retention than older methods.
By diligently following these steps, you harness Photoshop’s cutting-edge capabilities to create high-resolution images suitable for printing, showcasing in your digital photography portfolio, or integrating into complex visual design projects, all while minimizing the quality loss commonly associated with image enlargement. This positions your images for success, whether for beautiful photography collections or detailed mood boards, fully leveraging the power of modern image tools available at Tophinhanhdep.com.
Advanced Techniques for Sharpening and Enhancing Upscaled Images
Even with Photoshop’s sophisticated “Preserve Details 2.0” algorithm, some images might still feel a bit soft after significant upscaling. This is especially true when working with images for high-resolution displays or large-format prints, where every pixel contributes to the overall visual impact. To combat this and truly bring out the crispness in your upscaled images, Photoshop offers powerful supplementary tools. Furthermore, recent versions of Photoshop introduce AI-driven upscaling features that can drastically simplify the process, aligning with Tophinhanhdep.com’s focus on innovative Image Tools for digital photography and visual design.
Boosting Clarity with the High Pass Filter
The High Pass filter is a non-destructive method widely favored by photographers and designers for enhancing edge definition and sharpening details without introducing harsh artifacts or over-sharpening flat areas. It’s an essential technique for photo manipulation and refining aesthetic images.
- Duplicate the Layer: After upscaling your image, create a duplicate of your main image layer. You can do this by pressing
CMD/CTRL + Jor by right-clicking the layer in the Layers panel and choosingDuplicate Layer. Working on a duplicate layer ensures that your original upscaled image remains untouched, allowing for flexibility and adjustments. - Apply High Pass Filter: With the duplicate layer selected, go to
Filter > Other > High Pass. - Adjust Radius: A grayscale version of your image will appear. Don’t be alarmed; this is normal. The High Pass filter works by highlighting edges and fine details while making flat areas neutral gray. Adjust the
Radiusslider to control the intensity of the sharpening.- A smaller radius (e.g., 0.5 – 2.0 pixels) will target finer details, perfect for subtle enhancements in textures or intricate patterns.
- A larger radius (e.g., 2.0 – 5.0 pixels) will affect more significant edges, providing a broader sharpening effect.
- Experiment to find a setting where you can clearly see the edges and details of your image outlined in white or black against a gray background, but without seeing large halos. Click
OKwhen satisfied.
- Change Blending Mode: In the Layers panel, with the High Pass layer still selected, change its
Blending Modefrom ‘Normal’ toOverlayorSoft Light.Overlaytypically provides a stronger sharpening effect and increases contrast.Soft Lightoffers a more subtle and natural sharpening.- Choose the one that best suits your image, blending the sharpening effect seamlessly without messing with the image’s colors or brightness.
- Refine (Optional): If the sharpening is too intense, you can reduce the
Opacityof the High Pass layer in the Layers panel. You can also add aLayer Maskto selectively apply or remove the sharpening from specific areas of your image (e.g., to avoid sharpening smooth skin tones while enhancing eyes or hair).
Tip: While the High Pass filter is excellent, don’t shy away from experimenting with other sharpening filters like Smart Sharpen (found under Filter > Sharpen > Smart Sharpen) or Unsharp Mask. These tools offer different controls and can sometimes yield superior results depending on the image’s characteristics and your desired editing style.
Leveraging Photoshop’s AI Upscaling Features (Super Resolution & Generative Upscale)
Adobe has been integrating more AI capabilities into Photoshop, providing even more powerful ways to upscale images, particularly for digital photography and high-resolution output, which are cornerstones of Tophinhanhdep.com’s offerings.
-
Photoshop Super Resolution (via Adobe Camera Raw):
- Available in newer versions of Photoshop (and Lightroom/Lightroom Classic), this AI-powered feature can effectively double the resolution (2x upscale) of your images while intelligently preserving and even reconstructing details. It’s particularly useful for RAW files but also works with JPEGs and PNGs.
- How to Use:
- Open in Camera Raw: For RAW images, simply open them in Photoshop, and Camera Raw will open automatically. For JPEGs/PNGs, right-click the image in Adobe Bridge and select
Open in Camera Raw. - Enhance: Right-click on the image within Camera Raw and choose
Enhance. - Select Super Resolution: In the pop-up dialog, check the
Super Resolutionbox. - Apply: Click
Enhance. Photoshop’s AI will then process and upscale your image by 2x, creating a new DNG file with the enhanced resolution.
- Open in Camera Raw: For RAW images, simply open them in Photoshop, and Camera Raw will open automatically. For JPEGs/PNGs, right-click the image in Adobe Bridge and select
- This is a fantastic option for photographers looking to get more out of their original captures for high-resolution stock photos or large prints.
-
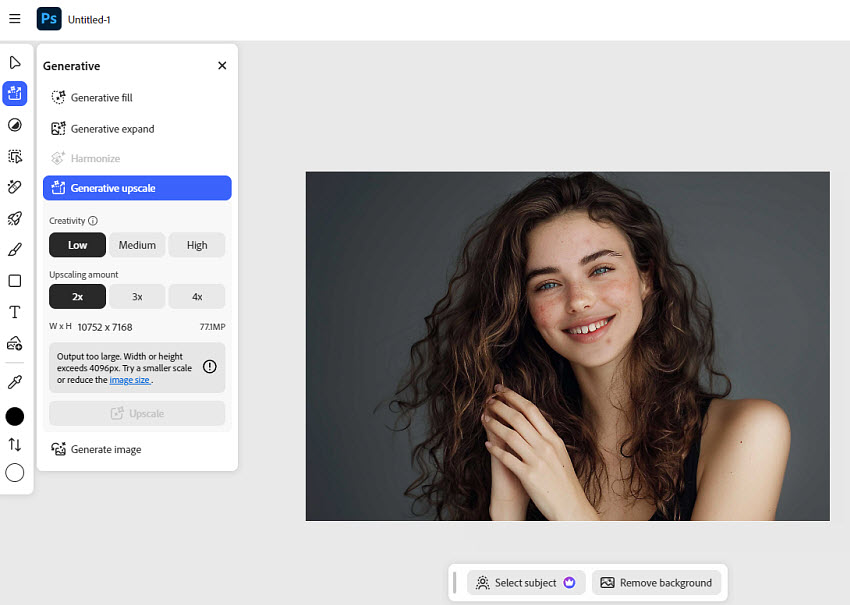
Photoshop Generative Upscale (Beta/Newer Versions):
- This cutting-edge feature, part of Adobe’s Generative AI offerings (like Generative Fill), allows for upscaling images by 2x, 3x, or even 4x, often up to 8 megapixels. It’s available in both the desktop Photoshop application and Photoshop on the web. A unique aspect is the ability to control the “creativity” level (Low, Medium, or High), which dictates how much new, AI-generated detail and texture is added to the upscaled image.
- How to Use:
- Open in Photoshop: Load your source photo into Photoshop (either desktop or web version).
- Access Generative Upscale: On the left-hand panel, you’ll find options for creativity level and scale factor (2x, 3x, 4x).
- Upscale: Choose your desired settings and click
Upscale. Photoshop generates a new high-resolution version in a separate document. - Download/Save: Click
Download(on web) orFile > Save As(desktop) to save the enhanced image.
- Important Consideration: While powerful, it’s crucial to note that Generative Upscale, especially with higher creativity settings, can introduce significant changes. For example, it might “clean up” perceived imperfections, potentially removing original details like freckles or blemishes, altering the image from its authentic state. Users focused on preserving absolute fidelity to the original should use this feature cautiously or opt for lower creativity settings.
By mastering these advanced sharpening techniques and leveraging Photoshop’s AI upscaling tools, you can ensure that your images—whether they are wallpapers, backgrounds, digital art, or beautiful photography—are not just larger, but also sharper, clearer, and more impactful, ready for any visual design project or image collection showcased on Tophinhanhdep.com.
Beyond Photoshop: The Power of Dedicated AI Upscalers from Tophinhanhdep.com
While Photoshop offers robust tools for image upscaling, even its most advanced features like Preserve Details 2.0 and Super Resolution have their limitations. Users often hit a wall when dealing with extremely low-resolution, heavily compressed, or pixelated originals. The manual effort required for fine-tuning, noise reduction, and sharpening can be time-consuming, frustrating, and still may not yield the desired “magical” transformation, especially for those seeking high-resolution images for their vast collections of wallpapers, backgrounds, or stock photos.
This is where dedicated AI upscalers, like those featured in Tophinhanhdep.com’s Image Tools section, become indispensable. Unlike Photoshop, which primarily interpolates existing pixels, our advanced AI upscalers are built from the ground up to intelligently analyze, understand, and reconstruct missing details. They leverage deep learning algorithms trained on massive datasets of images, enabling them to “imagine” and fill in pixels with vivid, natural-looking detail, rather than just stretching or blurring. This makes them a superior choice for overcoming common Photoshop struggles – fighting pixelation, losing details, and ending up with a bigger version of a bad image.
Tophinhanhdep.com offers a powerful AI Image Enhancer that represents the next generation of upscaling technology. It’s not just about making an image bigger; it’s about making it better. Our tool is capable of enlarging photos to astounding resolutions, up to 32K, with virtually no quality loss. During the upscaling process, it simultaneously fixes common low-quality image artifacts like pixelation, blur, and noise. The best part? It’s designed for simplicity – often requiring just one click, eliminating the need for complex manual adjustments and saving countless hours for busy photographers, graphic designers, and digital artists. This ease of use makes it a game-changer for anyone looking to quickly enhance their image inspiration, thematic collections, or simply prepare beautiful photography for any platform.
How to Use Tophinhanhdep.com’s AI Upscaler
Utilizing Tophinhanhdep.com’s AI Image Enhancer is remarkably straightforward, offering a streamlined workflow that bypasses the complexities often associated with traditional image editing software. It’s an ideal solution for achieving professional-grade high-resolution images with minimal effort, perfectly complementing your existing visual design and photography workflows.
- Access the Tool: Visit the Tophinhanhdep.com website and navigate to our dedicated AI Image Enhancer tool in the
Image Toolssection. - Upload Your Image(s): Simply drag and drop your image(s) into the designated area. Our tool supports various formats, including JPG, PNG, and many others, making it versatile for any of your image collections. You can even drop multiple images at once for convenient batch processing, a huge time-saver compared to processing images one by one in Photoshop.
- Select AI Model (Optional): Once your images are loaded, you’ll see a panel, often on the right, displaying various AI models optimized for different image types (e.g., portraits, landscapes, illustrations). While the default often works wonders, choosing a model that best fits your image can further enhance results. This intelligent selection ensures optimal reconstruction for your aesthetic or nature photography.
- Choose Upscale Factor: Next, determine how much larger you want your image to be. Use the ‘Upscale’ dropdown to select a preset resolution like 1K, 2K, 4K, or 8K. Alternatively, for precise control, use ‘Custom Resolution’ to enter specific dimensions, or scale by a factor such as 1x, 2x, 4x, or 8x. The AI will then work its magic and provide you with a real-time preview of the enhanced image.
- Export Your Upscaled Image: If you’re happy with the preview and the upscaled quality, proceed to the Export Settings. Here, you can select your desired output format (e.g., PNG for lossless quality, JPG for smaller file size) and choose the output path on your computer.
- Run and Download: Finally, click
Run(or ‘Start’/‘Enhance’) to initiate the upscaling process. The AI will then swiftly process and generate your high-resolution, quality-enhanced photo. Once complete, download it to your local computer.
This simple, intuitive process makes Tophinhanhdep.com’s AI Upscaler an invaluable asset for anyone working with images. Whether you’re preparing high-resolution stock photos, enhancing beautiful photography for print, creating stunning digital art, or compiling thematic collections, our AI tools deliver exceptional quality with unprecedented ease. It’s a testament to how intelligent Image Tools can transform your Visual Design and Photography workflows, providing the foundation for incredible Image Inspiration & Collections.
Conclusion
Upscaling images in Photoshop, when done correctly, can indeed yield impressive results. Through the detailed steps outlined in this guide, you’ve learned how to leverage Photoshop’s advanced capabilities, particularly the Preserve Details 2.0 algorithm, to enlarge your images while meticulously retaining sharpness and clarity. We’ve also explored supplementary techniques like the High Pass filter for post-upscale sharpening and touched upon Photoshop’s integrated AI features like Super Resolution and Generative Upscale, which offer automated enhancements for various photography and visual design needs.
However, as a hub for comprehensive Image Tools and Visual Design resources, Tophinhanhdep.com recognizes that Photoshop, despite its power, has its inherent limitations. Dealing with extremely low-resolution originals, battling persistent pixelation, or simply needing a quicker, more streamlined workflow can still be a challenging and time-consuming endeavor. This is especially true for those curating extensive Image Collections like wallpapers, backgrounds, or preparing Beautiful Photography for high-end applications where every detail matters.
That’s where dedicated AI Upscalers from Tophinhanhdep.com truly shine. Our AI Image Enhancer provides an incredibly easy-to-use solution that intelligently reconstructs image data, rather than merely stretching pixels. It excels in scenarios where Photoshop might struggle – rescuing blurry product photos, bringing old family pictures back to life, or making tiny web graphics print-ready with astounding detail, all without the steep learning curve or repetitive manual adjustments. For speed, quality, and effortless enhancement, our Image Tools offer a powerful alternative or complement to your Photoshop workflow.
Ultimately, the best approach often involves a combination of tools. For many professionals and enthusiasts, the ideal workflow marries the raw power of Tophinhanhdep.com's AI Image Enhancer for its clean, intelligent upscaling, followed by Photoshop for any final, precise polish and creative adjustments. This hybrid strategy ensures you achieve the highest possible quality for all your Images, Photography projects, and Visual Design endeavors, empowering you to turn every visual idea into a stunning reality.
FAQs about Image Upscaling
1. How do I increase the scale of an image in Photoshop?
You can increase the scale of an image in Photoshop by going to Image > Image Size. In the dialog box, ensure the aspect ratio is locked, then input your desired new dimensions (either in pixels or as a percentage). Crucially, set the Resample method to Preserve Details 2.0 for the best quality without pixelation.
2. Can a low-quality image be converted to high quality in Photoshop?
Photoshop can significantly improve the perceived quality and resolution of a low-quality image, but it cannot create detail that was never present. Techniques like using Preserve Details 2.0 for upscaling, applying Smart Sharpen filters, and utilizing Super Resolution in Camera Raw (for a 2x AI-driven boost) can enhance clarity and detail. However, for genuinely transformative results on very poor originals, a dedicated AI Upscaler from Tophinhanhdep.com is often more effective, as it intelligently reconstructs missing information.
3. How do I make an image higher resolution in Photoshop?
Increasing an image’s resolution in Photoshop is done through the Image Size dialog box (Image > Image Size). Here, you can input a higher resolution value. While increasing resolution primarily impacts print quality (dots per inch), it’s closely tied to upscaling, which changes the pixel dimensions that affect screen display. For optimal results, ensure you’re using Preserve Details 2.0 as your resampling method.
4. Can I truly upscale an image without losing quality in Photoshop?
With modern Photoshop versions (CC 2018 and later), “without losing quality” is a much more attainable goal than it used to be. By consistently using the Preserve Details 2.0 resampling option or leveraging features like Super Resolution and Generative Upscale, Photoshop can enlarge images while maintaining remarkable clarity and detail. However, for extremely drastic enlargements or very poor source images, some perceived softening or introduction of minor artifacts may still occur. For absolute top-tier quality and ease, a specialized AI Upscaler like those found on Tophinhanhdep.com is often recommended.
5. How do I increase image quality in Photoshop beyond just size?
Beyond upscaling, several tools and techniques can increase overall image quality in Photoshop. Super Resolution (via Camera Raw) is excellent for a 2x AI-powered boost. For enhancing sharpness and clarity, explore filters like Smart Sharpen or Unsharp Mask. For noisy or compressed images, the Camera Raw Filter offers fine control over noise reduction, texture, and clarity. Additionally, Tophinhanhdep.com’s Image Tools include AI-powered enhancers that can automatically fix blur, pixelation, and noise with a single click, providing a quick and effective quality boost.