Master the Art of Vectorization: Unleash Image Trace in Adobe Illustrator for Tophinhanhdep.com

In the dynamic world of digital imagery and visual design, the ability to manipulate and optimize graphics is paramount. Whether you’re curating stunning wallpapers, crafting intricate backgrounds, developing aesthetic themes, or producing high-resolution photography for Tophinhanhdep.com, understanding the fundamentals of graphic manipulation can elevate your content. One of the most powerful tools in Adobe® Illustrator’s arsenal for achieving pristine, scalable graphics is the “Image Trace” feature. This indispensable function acts as a bridge, transforming pixel-based (raster) images into crisp, mathematically defined (vector) artwork that can be resized infinitely without any loss of quality.
For creators and designers contributing to platforms like Tophinhanhdep.com, which thrives on high-quality visuals, Image Trace is a game-changer. It enables the conversion of anything from a hand-drawn sketch to a complex stock photo into a versatile vector format. This means your abstract art, nature photography, or even emotional imagery can be integrated into graphic design projects, used for photo manipulation, or become part of thematic collections with unparalleled clarity. This guide will delve deep into how to use Image Trace in Adobe® Illustrator, providing you with the knowledge to vectorize your artwork efficiently and creatively, aligning perfectly with Tophinhanhdep.com’s diverse categories of images, photography, and visual design.
Understanding the Power of Vectorization for Digital Excellence
The foundation of any successful visual project, especially for a platform dedicated to exceptional imagery like Tophinhanhdep.com, lies in understanding the nature of your image files. Different image types serve different purposes, but when scalability and crispness are non-negotiable, vectors reign supreme.
Raster vs. Vector: Why it Matters for High-Quality Visuals
At the heart of Image Trace’s utility is the fundamental distinction between raster and vector images. Most images we encounter daily – photos from digital cameras, downloaded wallpapers, or web backgrounds – are raster images. These are composed of a grid of tiny colored squares known as pixels. While excellent for capturing rich detail and photographic nuances, raster images suffer a critical drawback: scalability. When you zoom in on a raster image or try to enlarge it significantly, the individual pixels become visible, leading to a blurry, “pixelated” appearance. This is why a beautiful high-resolution photograph can look fuzzy if printed on a billboard without proper treatment.
For Tophinhanhdep.com, where image quality is a cornerstone, pixelation is the enemy. Whether you’re offering high-resolution photography, intricate abstract designs, or clean aesthetic backgrounds, maintaining clarity at any size is crucial. This is where vector images step in. Unlike rasters, vectors are built from mathematical equations that define points, lines, curves, and shapes. This means they are resolution-independent. You can scale a vector image from a tiny icon to a massive banner without any degradation in quality; the lines remain perfectly smooth and sharp. This makes vectorization a vital process for graphic design, digital art, and any form of photo manipulation where flexibility and precision are required. Image Trace in Illustrator provides an efficient way to make this critical conversion, transforming your raster assets into infinitely scalable vectors suitable for any visual design challenge on Tophinhanhdep.com.

Preparing Your Artwork for Image Trace: A Seamless Workflow
The journey from a pixelated image to a pristine vector begins with proper preparation. The effectiveness of the Image Trace tool in Illustrator hinges on the quality and type of your source material, and how you bring it into your workspace. For Tophinhanhdep.com’s diverse range of images, from nature photography to abstract backgrounds, starting with a clean input is key to achieving optimal vectorized results.
Importing and Initial Setup
The first step in using Image Trace is to get your artwork into Illustrator. This could be a scanned drawing, a logo you created, a photograph, or any other raster image you wish to vectorize.
- Open a New Document: Begin by launching Adobe® Illustrator and opening a new document (File > New). The size of your document doesn’t critically matter at this stage, as vector art is scalable, but a reasonably sized canvas is good for visibility.
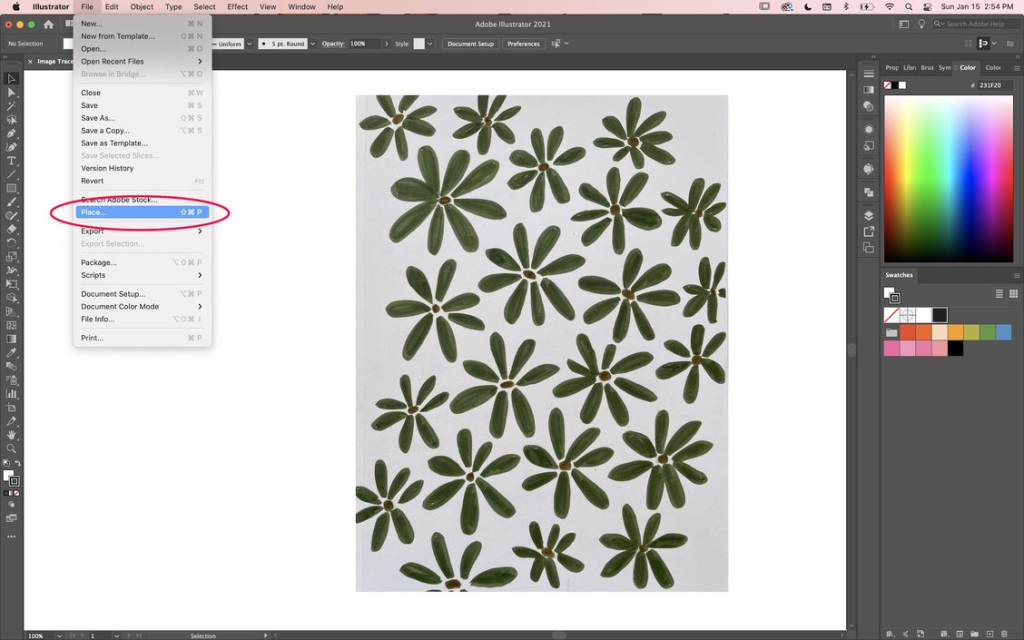
- Place Your Image: Go to File > Place. Navigate to where your raster image is saved, select it, and click “Place.” Then, click on your artboard to place the image.
- Activate Image Trace Panel: Once your image is on the canvas, ensure it’s selected using the Selection tool (the black arrow). You’ll notice a bounding box around it. If your Image Trace panel isn’t already visible on your workspace (it often looks like a circle with three points or a mountain icon in a square), you can open it by going to Window > Image Trace. If the image isn’t selected, the options in this panel will be greyed out, indicating that Illustrator needs a target image to work on.
As you zoom in on your newly placed image, you’ll likely observe that its lines become blurry and pixelated. This visual cue serves as a powerful reminder of why vectorization is so crucial for maintaining the high-resolution standards expected on Tophinhanhdep.com. File types such as .jpg, .png, .psd, and .pdf are common raster formats that benefit immensely from this conversion process.
Optimizing Your Image Source
The success of the Image Trace operation is significantly influenced by the quality and characteristics of your original raster image. For images curated for Tophinhanhdep.com, whether they are aesthetic wallpapers, digital photography, or visual design elements, a thoughtful approach to the source image can save considerable time and effort in the vectorization and post-editing phases.
- Clarity and Contrast: Image Trace works best with images that have a clear subject standing out from the background, or well-defined lines. High-contrast images, especially for black-and-white tracing (like converting a signature or a line drawing into a vector logo), yield cleaner results. For color images, vibrant and distinct colors will trace more accurately than subtle gradients or blurry areas. This is especially true when vectorizing abstract or nature-themed images where details are important.
- Resolution of Source Image: While the goal is a scalable vector, starting with a reasonably high-resolution raster image provides more detail for Illustrator to interpret, leading to a richer and more accurate trace. For example, a high-resolution stock photo will offer more fidelity to the tracing engine than a low-resolution thumbnail.
- Clean Backgrounds: If your objective is to extract a foreground object (e.g., a flower from a nature photograph to use as a graphic design element), ensure the background is as simple and uniform as possible. An “Ignore White” option within Image Trace (which we’ll explore shortly) is incredibly effective for solid white backgrounds, allowing you to create transparent vector assets for seamless integration into other visual compositions or mood boards on Tophinhanhdep.com. Pre-processing your images in a tool like Photoshop to clean up backgrounds or enhance contrast can drastically improve Image Trace outcomes, ensuring your visual design projects begin with the best possible foundation.
Mastering the Image Trace Panel: Presets and Advanced Controls
Once your image is placed and selected, the Image Trace panel becomes your command center for transforming pixels into paths. This powerful panel offers both quick, pre-defined solutions and granular control, allowing you to tailor the vectorization process to the specific needs of your Tophinhanhdep.com projects, whether it’s for intricate digital art or simple graphic design elements.
Exploring Default Presets for Quick Vectorization
Illustrator’s Image Trace panel comes equipped with a variety of presets designed to tackle common vectorization scenarios. These presets offer an excellent starting point and can often deliver satisfactory results with a single click, especially for images with specific characteristics like high contrast or a limited color palette.
To access these presets, make sure your raster image is selected on the artboard, and the Image Trace panel (Window > Image Trace) is open. You’ll see a “Preset” dropdown menu at the top of the panel, offering options such as:
- Default: A general-purpose trace, often resulting in a black and white outline.
- Sketched Art / Line Art / Technical Drawing: Ideal for converting drawings, scans of pen-and-ink illustrations, or schematics into vector lines. These are perfect for turning creative ideas or hand-drawn motifs into scalable digital art for Tophinhanhdep.com.
- Black and White Logo / Silhouette: Best for simple, high-contrast images, ensuring clean, sharp edges, suitable for logos or icons. For example, a crisp silhouette from a nature photo can be quickly vectorized.
- Grayscale: Converts a color image into shades of grey vectors.
- 3 Colors / 6 Colors / 16 Colors: These presets attempt to recreate your image using a limited palette of colors. They are fantastic for achieving a graphic, illustrative look, effectively simplifying complex color photography into a more abstract style. This can be particularly useful for aesthetic collections or digital art on Tophinhanhdep.com.
- High Fidelity Photo / Low Fidelity Photo: These aim to reproduce the photographic detail of your original image as closely as possible, with “High Fidelity” preserving more detail and color, resulting in more complex vector art. These are great for transforming stock photos or beautiful photography into vector representations, allowing for some level of photo manipulation while retaining scalability.
As you select different presets, pay close attention to the “Preview” checkbox (usually at the bottom-left of the panel). Keeping this checked will show you the real-time results of your chosen preset on your artwork, allowing for immediate visual feedback and helping you determine which preset best suits your image and your desired visual design outcome. Experimenting with these presets is an essential step in understanding the versatility of Image Trace for Tophinhanhdep.com’s diverse image offerings.
Fine-Tuning with Advanced Options: Threshold, Paths, Corners, and Noise
While presets provide a solid foundation, the true power of Image Trace lies in its “Advanced” settings. By adjusting these sliders, you gain precise control over the vectorization process, allowing you to refine details, smooth lines, and achieve a result that perfectly mimics your original vision or creates a desired stylistic effect for your visual design projects on Tophinhanhdep.com. Click the “Advanced” dropdown arrow in the Image Trace panel to reveal these critical controls:
-
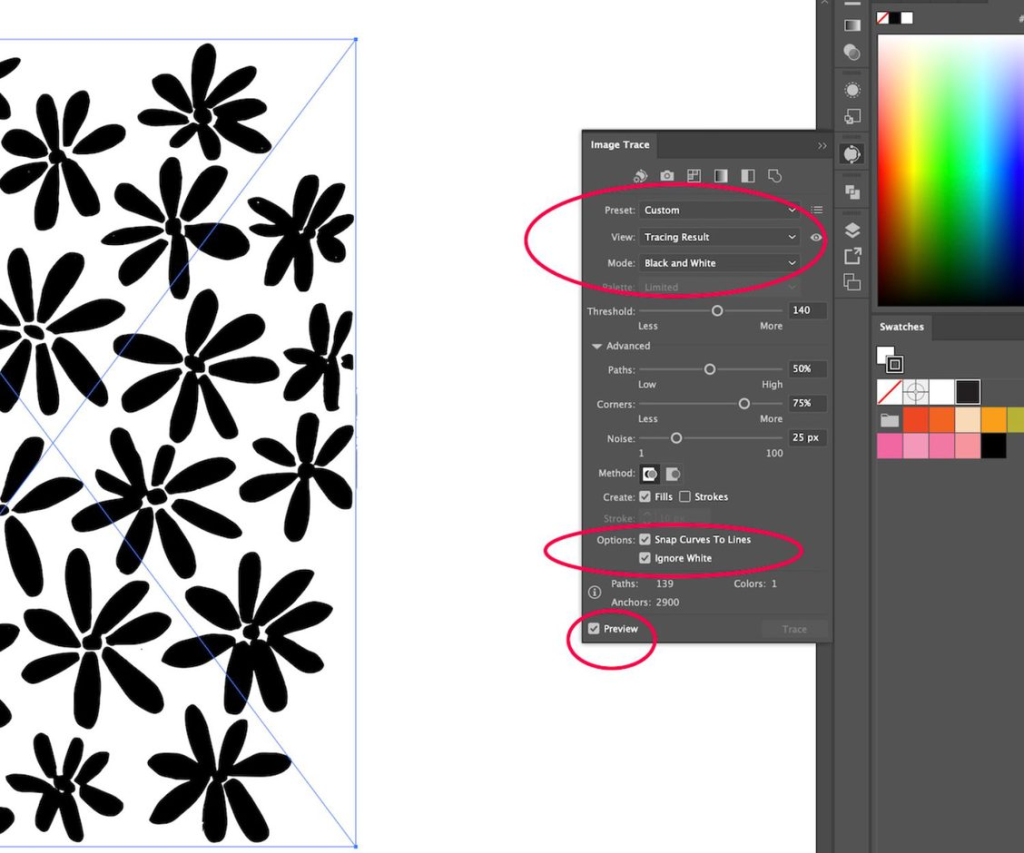
Threshold: This slider is paramount for black and white (or grayscale) tracing modes. It dictates the pixel luminosity cutoff point. Moving the slider to the right increases the threshold, making lighter pixels darker and producing thicker lines or filling in more areas. Moving it to the left decreases the threshold, making darker pixels lighter and resulting in thinner lines or more negative space. For example, if you’re vectorizing a scanned sketch for a digital art project, adjusting the threshold can bring out faint lines or clean up smudges. For strong, bold graphic design elements, a higher threshold might be preferred.
-
Paths: This setting controls the fidelity of the vector paths to the original image. A higher “Paths” percentage generates more anchor points and paths, resulting in a more accurate and detailed trace that closely follows the curves and nuances of the original. A lower percentage creates fewer paths, simplifying the artwork and potentially making lines straighter or more angular. This is crucial when aiming for either a smooth, flowing digital art piece or a more stylized, minimalist graphic.
-
Corners: As the name suggests, this slider affects the sharpness of corners in your vectorized image. A higher “Corners” percentage produces sharper, more defined corners, which is ideal for geometric designs or crisp typography often seen in creative ideas for logos. A lower percentage rounds off corners, leading to a softer, more organic aesthetic, suitable for certain artistic styles or photo manipulation effects.
-
Noise: The “Noise” setting determines the minimum number of pixels that can form a traced area. By increasing the noise value, Illustrator ignores smaller, isolated pixels or specks of detail, effectively cleaning up your trace. This is incredibly useful for removing unwanted artifacts from scanned images or grainy photography. Conversely, lowering the noise value allows Illustrator to pick up finer details, which can be essential for preserving intricate textures or small elements in complex digital art. However, too low a noise setting can lead to a cluttered vector with excessive anchor points. A common setting is 1 pixel to retain all desired detail while eliminating minimal noise.
-
Ignore White: This crucial checkbox, often found at the bottom of the advanced settings, tells Illustrator to treat any white areas in the original raster image as transparent. When checked, the white background of your traced image disappears, leaving only the colored or black vector shapes. This is indispensable for creating graphic design elements that need to be layered seamlessly onto other backgrounds or used for web elements, ensuring that your vectorized content from Tophinhanhdep.com can be easily incorporated into diverse visual compositions.
-
Method (Abutting vs. Overlapping): In the advanced section, you’ll also find two methods for how paths are created:
- Abutting: This method creates paths that butt up against each other, sharing edges. It’s generally preferred for most situations as it results in a cleaner file with no overlapping shapes.
- Overlapping: This method creates paths that slightly overlap, similar to how separate pieces of paper might lie on top of each other. While it can sometimes preserve more visual integrity, it often leads to a more complex file with redundant shapes.
After fine-tuning these settings, if you achieve a desired look that you plan to reuse for future image collections or visual design projects, you can save your customized settings as a new preset. Simply click the “Manage Presets” button and select “Save as New Preset,” giving it a descriptive name (e.g., “Hand Drawn Line Art” or “Tophinhanhdep.com Aesthetic”). This streamlines your workflow for consistent results across multiple images and creative ideas, making your experience with Tophinhanhdep.com even more productive.
Finalizing Your Vector Artwork: Expansion and Refinement
The Image Trace panel allows you to preview your vectorized image, but it’s important to remember that at this stage, the image is still a “live trace object.” This means the vector paths are not yet fully editable. To unlock the full potential of your newly vectorized artwork for graphic design, digital art, or extensive photo manipulation for Tophinhanhdep.com, you must take the crucial steps of expansion and refinement.
Expanding Your Trace to Editable Vector Paths
The “Expand” command is the pivotal moment when your live trace object officially transforms into a collection of editable vector paths. Until you perform this step, what you see is merely a preview of the tracing result.
- Locate the Expand Button: With your traced image still selected on the artboard, look at the top of your Illustrator workspace, usually in the Control panel, or in the Properties panel (Window > Properties) under “Quick Actions.” You will see an “Expand” button.
- Click Expand: Click the “Expand” button. Instantly, the bounding box around your image will disappear, replaced by numerous anchor points and paths that define every shape and line of your vectorized artwork. These anchor points are the building blocks of vector graphics, allowing for precise manipulation.
- Understanding the Transformation: Now, your image is no longer a raster image being interpreted; it is a true vector image made up of geometric components. You can zoom in indefinitely, and the lines will remain perfectly crisp, never pixelating. This scalability is fundamental for producing high-resolution photography assets, backgrounds, or creative ideas for Tophinhanhdep.com that maintain quality across all sizes and platforms.
Post-Trace Editing: Ungrouping and Manual Adjustments
After expanding, your vectorized image will typically be grouped as a single object. While this is convenient for moving the entire artwork, it restricts individual element manipulation. To fully leverage your vector creation for detailed graphic design, digital art, or photo manipulation, you’ll need to “Ungroup” and then refine.
- Ungroup the Artwork: With the expanded vector artwork still selected, right-click on it and choose “Ungroup.” Alternatively, you can go to Object > Ungroup, or use the keyboard shortcut (Ctrl+Shift+G on Windows, Cmd+Shift+G on Mac). After ungrouping, you’ll be able to select and manipulate individual shapes and paths independently. If the artwork has multiple layers of groups (which can happen with complex traces), you may need to ungroup multiple times.
- Refine with Direct Selection Tool: Now that your artwork is ungrouped, the Direct Selection tool (the white arrow in the toolbar) becomes your best friend. This tool allows you to select individual anchor points, lines, and shapes.
- Remove Unwanted Elements: Often, Image Trace will pick up stray pixels or background elements you don’t need. Use the Direct Selection tool to click on these unwanted shapes (e.g., a residual white background, small specks) and press “Delete” on your keyboard. This is incredibly useful for isolating subjects from stock photos or cleaning up digital art elements.
- Adjust Shapes and Lines: You can click and drag individual anchor points to reshape curves, sharpen corners, or smooth out jagged edges. For example, if you’re refining a vectorized logo for Tophinhanhdep.com, you might want to ensure perfect symmetry or consistent line weight.
- Use the Smooth Tool: For areas that are too rough or have too many unnecessary anchor points, the “Smooth Tool” (nested under the Pencil Tool in the toolbar) can be invaluable. Simply select the paths you wish to smooth and drag the Smooth Tool along them. Illustrator will intelligently reduce anchor points and make the lines more fluid. This is perfect for creating more organic and aesthetic lines in your digital art.
- Change Colors: Since each shape is now a separate vector object, you can easily select individual components and change their fill or stroke color using the Color or Swatches panel. This opens up endless possibilities for photo manipulation, creating new visual designs, or developing thematic collections with specific color palettes for Tophinhanhdep.com.
- Regroup for Convenience (Optional): Once you’ve finished editing individual elements, you can select multiple shapes and regroup them (Object > Group or Ctrl+G / Cmd+G) to manage them more easily as a single unit again.
Manual Tracing: Precision for Detailed Digital Art
While the Image Trace tool is incredibly powerful for automatic vectorization, there are instances, especially for highly precise graphic design, intricate digital art, or when a very specific artistic style is desired, where manual tracing offers superior control. This method, while more time-consuming, yields immaculate results.
- The Pen Tool: The Pen tool is the cornerstone of manual vector drawing in Illustrator. It allows you to create precise paths and curves by placing anchor points and manipulating Bezier handles. For complex logo designs, highly refined illustrations, or when tracing delicate details from a beautiful photograph for Tophinhanhdep.com, the Pen tool offers unmatched accuracy. You can place your raster image on a locked layer, then create a new layer above it to meticulously trace over the desired elements.
- Pencil Tool and Blob Brush Tool: For artists who prefer a more organic, hand-drawn feel, the Pencil tool and Blob Brush tool (often used with a graphics tablet) provide a natural drawing experience. The Pencil tool creates single paths that can be smoothed automatically, while the Blob Brush tool creates filled shapes, mimicking a traditional brush stroke. These are fantastic for turning creative ideas into unique digital art, adding personal touches to graphic design, or for expressive photo manipulation styles that might be featured in Tophinhanhdep.com’s aesthetic collections.
By mastering both automatic Image Trace and manual tracing techniques, you gain a versatile toolkit to transform any visual input into scalable, editable vector graphics. This comprehensive approach ensures that all your creative endeavors, from wallpapers and backgrounds to high-resolution photography and abstract art for Tophinhanhdep.com, are presented with the highest possible quality and design flexibility.
Conclusion
The Image Trace feature in Adobe® Illustrator is an indispensable tool for anyone involved in digital imaging and visual design, particularly for contributing to a rich visual platform like Tophinhanhdep.com. By effectively converting raster images into scalable vector graphics, you unlock a realm of creative possibilities, ensuring your artwork remains crisp and adaptable across all applications – from small web graphics to large-format prints.
We’ve covered the crucial distinction between raster and vector images, highlighting why vectorization is essential for maintaining the high-resolution quality demanded by Tophinhanhdep.com’s diverse collections of wallpapers, backgrounds, and photography. You’ve learned how to prepare your artwork, whether it’s a piece of nature photography, an abstract concept, or a hand-drawn sketch, for optimal tracing results. Mastering the Image Trace panel, from its quick presets to the detailed control offered by advanced settings like Threshold, Paths, Corners, and Noise, empowers you to fine-tune the vectorization process to achieve your precise visual design goals. Finally, understanding the critical steps of expanding and ungrouping your trace, followed by manual refinement, equips you to fully edit and integrate your vectorized elements into any graphic design or digital art project.
Whether your passion lies in creating aesthetic backgrounds, designing unique digital art, or performing intricate photo manipulation, Image Trace stands as a cornerstone of modern visual design. It allows your creative ideas and thematic collections on Tophinhanhdep.com to achieve a level of professionalism and scalability that truly sets them apart. Embrace this powerful tool, experiment with its settings, and watch your visual content transform, ready for any creative challenge.