How to Cut Out an Image in Photoshop: Your Comprehensive Guide

In the dynamic world of digital imagery, the ability to precisely isolate a subject from its background is not just a technical skill—it’s a foundational art form. Whether you’re crafting stunning graphic designs, perfecting digital photography, or developing compelling visual art, knowing how to expertly cut out an image in Photoshop is indispensable. This comprehensive guide will delve into various powerful methods Photoshop offers, ensuring you can achieve professional-grade results for any project. At Tophinhanhdep.com, we understand the pursuit of visual excellence, and mastering image cutouts is a crucial step in creating the breathtaking wallpapers, aesthetic compositions, and high-resolution stock photos that define our collections.
The Foundation of Image Manipulation: Why Cutouts Matter

Cutting out an image, often referred to as background removal or subject isolation, unlocks a universe of creative possibilities. For digital artists and photographers, it’s the gateway to:
- Photo Manipulation and Creative Ideas: By isolating elements, you can seamlessly integrate them into new scenes, combine multiple images into a captivating photo collage, or transform ordinary photographs into extraordinary digital art. This is central to generating fresh Image Inspiration and developing unique Mood Boards.
- Custom Wallpapers, Backgrounds, and Aesthetic Compositions: Imagine taking a beautiful subject and placing it against an abstract background, a serene nature scene, or a custom aesthetic design. Cutouts make this effortless, allowing you to tailor visuals to trending styles or personal preference.
- High-Resolution Stock Photos and Thematic Collections: For contributors to stock photo platforms, clean cutouts are essential. They provide versatility for clients and elevate the professional appeal of your High Resolution and thematic collections. Tophinhanhdep.com values such precision in its vast array of images, from beautiful photography to evocative sad/emotional themes.
- Visual Design and Graphic Design Excellence: From product mockups to intricate poster designs, isolating elements is a core graphic design task. It allows designers to maintain crisp edges and control composition, leading to visually striking and impactful results.
The journey to impeccable image cutouts begins with understanding Photoshop’s versatile toolset. While some tasks can be accelerated with Tophinhanhdep.com’s online Image Tools like AI Upscalers or Compressors, the precision offered by Photoshop remains paramount for complex, high-quality work.
Mastering Core Selection Techniques in Photoshop
Photoshop offers a diverse array of tools and techniques for isolating subjects. The “best” method often depends on the complexity of the image, the nature of the edges (hard, soft, fuzzy), and your desired level of precision. Many experienced users, like those who’ve been with Photoshop since its early versions like 2.0 or 4.0, appreciate the evolution of these tools, knowing that a combination often yields the finest results.
Method 1: Precision with the Pen Tool
When absolute precision and crisp, vector-like edges are paramount, especially for objects with defined, smooth curves or straight lines, the Pen Tool is the professional’s choice. It’s a favorite for product photography and graphic design elements where cleanliness is non-negotiable. Many users have found that while it can be more time-consuming, the results are unmatched.
Step-by-Step Guide:
- Activate the Pen Tool: Select the Pen Tool (P) from the toolbar. Ensure “Path” is selected in the Options bar, not “Shape.”
- Outline Your Subject: Begin clicking around the edge of your subject. For straight lines, simply click to create anchor points. For curves, click and drag to create Bezier handles, which allow you to control the arc of the curve.
- Tip: Zoom in closely (Ctrl/Cmd + +) to place anchor points accurately.
- Refine the Path: If your initial path isn’t perfect, use the Direct Selection Tool (A) to adjust individual anchor points and their Bezier handles. This is where you can meticulously sculpt the outline to match your subject’s contours. For very tight areas, you may need to add additional anchor points (Pen Tool with a ‘+’ sign) to achieve greater control.
- Close the Path: Click on your starting anchor point to close the path, creating a complete outline around your subject.
- Convert Path to Selection: Open the Paths panel (Window > Paths). You’ll see your “Work Path.” Ctrl/Cmd-click on the Work Path thumbnail to convert it into a marching ants selection.
- Create a Layer Mask: With the selection active, click the “Add Layer Mask” icon (a rectangle with a circle inside) at the bottom of the Layers panel. This non-destructively hides the background, leaving your perfectly cut-out subject. To invert the mask (if you selected the background instead of the subject), press Ctrl/Cmd + I with the mask selected.

The Pen Tool method, while demanding a steady hand and patience, provides the sharpest, most scalable cutouts, making it invaluable for professional Photo Manipulation and Visual Design projects that demand meticulous detail.
Method 2: Rapid Selection with Quick Selection & Subject Selection
For subjects that contrast well with their background, or as a starting point for more complex selections, Photoshop’s intelligent selection tools can save a significant amount of time. These methods are excellent for quickly preparing images for aesthetic backgrounds or initial photo composites.
Quick Selection Tool
The Quick Selection Tool acts like a smart brush, automatically detecting edges as you paint over your desired area.
Step-by-Step Guide:
- Open Your Image: Load your image into Photoshop.
- Select the Quick Selection Tool: Find it in the toolbar (it often shares a spot with the Object Selection Tool, shortcut W).
- Paint Your Selection: Adjust your brush size as needed. Click and drag the tool over the subject you want to select. Photoshop will intelligently expand the selection to encompass similar pixels and edges.
- Fine-Tune: If the selection goes too far, hold down the Alt/Option key (which changes the cursor to a minus sign) and paint over the areas you want to deselect. Zoom in for precision.
- Refine Edges (Optional, but Recommended): Once you have a decent initial selection, click the “Select and Mask” button in the Options bar (or go to Select > Select and Mask). This takes you to a dedicated workspace for advanced refinement (discussed in Method 3).
- Cut Out: From the “Select and Mask” workspace, choose “New Layer with Layer Mask” as your output option, then click OK. Alternatively, if you didn’t use “Select and Mask” and your selection is good, simply click the “Add Layer Mask” icon in the Layers panel.
Subject Selection (AI-Powered)
Photoshop’s “Select Subject” command leverages Adobe’s AI (Adobe Sensei) to automatically identify and select the main subject in your photograph with remarkable accuracy. This is a powerful starting point for many quick aesthetic changes.
Step-by-Step Guide:
- Open Your Image: Open the photo in Photoshop.
- Activate Select Subject: Go to Select > Subject. Photoshop will analyze the image and generate an initial selection around the main subject. In newer CC versions, you might also find a “Select Subject” button in the Properties panel when certain selection tools are active.
- Refine (Crucial): While “Select Subject” is impressive, it’s rarely perfect for intricate areas like hair or complex edges. Use the Quick Selection Tool (holding Alt/Option to subtract), Lasso Tool, or enter the “Select and Mask” workspace to fine-tune the selection.
- Cut Out: Once refined, apply a Layer Mask to non-destructively hide the background.
These quick selection methods are invaluable for streamlining your workflow, especially when dealing with large batches of images for photo ideas or preliminary mood boards.
Method 3: Advanced Refinement with Select and Mask (formerly Refine Edge)
For the most challenging subjects—think wispy hair, intricate fur, smoke, or tree branches—the “Select and Mask” workspace (formerly “Refine Edge”) is your ultimate tool. This dedicated environment allows for granular control over selection edges, crucial for high-resolution images and realistic photo manipulation. Many long-time Photoshop users appreciate how this feature has evolved to tackle these difficult edge cases effectively.
Step-by-Step Guide:
- Start with an Initial Selection: Begin with any selection tool (e.g., Quick Selection, Lasso, or even “Select Subject”). Get as close as you can to your desired outline.
- Enter Select and Mask: Click the “Select and Mask” button in the Options bar (when a selection tool is active) or go to Select > Select and Mask.
- Choose a View Mode: In the Properties panel on the right, experiment with different “View Modes” (e.g., “On Layers,” “On Black,” “Overlay”) to find the one that best highlights the edges you need to refine. Adjust the “Transparency” slider as well.
- Use the Refine Edge Brush Tool: On the left toolbar within the workspace, select the Refine Edge Brush Tool. Paint along the complex edges (like hair or fur) where the background is still visible or the selection is rough. Photoshop’s algorithm will try to distinguish foreground from background and intelligently refine the edge.
- Tip: Zoom in closely and use a small brush for detailed areas.
- Adjust Global Refinements: Use the sliders in the Properties panel:
- Radius: Increases or decreases the area Photoshop searches for edge details. “Smart Radius” can help.
- Smooth: Reduces jaggy lines.
- Feather: Softens the edge for a more natural blend.
- Contrast: Creates a harder edge.
- Shift Edge: Moves the selection boundary inward or outward.
- Decontaminate Colors: For subjects with fine details (like hair) against a strongly colored background, some of the background color might “fringe” onto the subject. Check the “Decontaminate Colors” box and adjust the “Amount” slider to remove these color fringes, making the cutout blend more seamlessly.
- Output Your Result: In the Output Settings section, choose “New Layer with Layer Mask” and click OK. This preserves your original image and provides a flexible, editable mask.
This method is essential for achieving professional-level results in digital photography and editing styles where a flawless separation from the background is critical for the final aesthetic or creative idea.
Cutting Images with Specific Criteria: Color, Shape, and Erasure
Beyond intricate edge refinement, Photoshop offers specialized tools for unique cutting scenarios. Whether you’re working with solid color backgrounds, needing to conform images to custom shapes, or performing simple rectangular cuts, these methods provide tailored solutions.
Method 4: Color-Based Selection with Color Range
When your subject has a distinctive color that stands out from its background, or you need to select multiple disconnected areas of a similar hue, the Color Range command is incredibly efficient. It’s particularly useful for abstract or nature images where specific color palettes need to be isolated.
Step-by-Step Guide:
- Open Your Image: Launch your image in Photoshop.
- Access Color Range: Go to Select > Color Range. A dialog box will appear.
- Sample Colors:
- Ensure “Sampled Colors” is chosen from the “Select” dropdown.
- Use the first eyedropper tool to click on the color you want to select in your image (usually a dominant background color).
- Use the “+” eyedropper to click on other shades or areas of the same color that weren’t initially selected.
- Use the “-” eyedropper to deselect any unwanted colors.
- Adjust Fuzziness: The “Fuzziness” slider controls the range of similar colors included in the selection. Drag it slowly to the right to expand the selection to include more variations of your sampled colors. Observe the preview window (or change the “Selection Preview” to “Grayscale” or “Black Matte” for clarity) to ensure only the desired areas are turning white (selected).
- Refine and Mask: Once satisfied with the color selection, click OK. You’ll see the marching ants selection. Now, click the “Add Layer Mask” icon in the Layers panel. If the background is selected, holding Alt/Option while clicking the mask icon will create an inverted mask, isolating your subject.
This method excels in situations where a uniform background color needs to be quickly removed, allowing for the creation of unique abstract backgrounds or focused thematic collections for Tophinhanhdep.com.
Method 5: Shaping Your Vision with Clipping Masks and Marquee Tools
Sometimes, the goal isn’t just to remove a background, but to cut an image into a specific, non-rectangular shape, or to perform simple geometric extractions. Clipping masks and marquee tools offer distinct advantages here.
Clipping Masks (Cutting into Custom Shapes)
Clipping masks allow you to use the transparency of one layer (the ‘mask’) to define the visibility of another layer (the ‘clipped’ layer). This is perfect for creating unique visual designs, digital art, or incorporating images into creative layouts.
Step-by-Step Guide:
- Prepare Your Image Layer: Open your image. Go to Layer > New > Layer from Background to convert your background into a regular layer (give it a name).
- Create Your Shape Layer: Select the Custom Shape Tool (U) or any shape tool (e.g., Rectangle Tool) from the toolbar. In the Options bar, ensure “Shape” is selected. Choose your desired custom shape (e.g., a heart, star, or speech bubble) or draw a rectangle/ellipse. Draw the shape over the area of your image you want to keep.
- Arrange Layers: In the Layers panel, drag your newly created shape layer below your image layer.
- Create Clipping Mask: Right-click on your image layer (the one above the shape layer) in the Layers panel and select “Create Clipping Mask.” Your image will now be “clipped” to the boundaries of the shape layer below it.
- Flexibility: Both layers remain independent. You can move and resize the image within the shape, or move and resize the shape itself, and the clipping will adjust.
- Add Graduated Transparency (Optional):
- Right-click the shape layer and select “Rasterize Layer” (Photoshop CC) or “Simplify Layer” (Elements).
- Go to Filter > Blur > Gaussian Blur. Set a high Radius (e.g., 30 pixels) and click OK. The edges of your clipped image will now have a soft, fading effect, perfect for aesthetic compositions.
- Add Layer Effects (Optional):
- Select the shape layer. Go to Layer > Layer Style and add effects like a “Drop Shadow” or “Stroke” to enhance the cutout. In Photoshop Elements, use Layer > Layer Style > Style Settings.
This method is a staple for graphic designers looking to integrate images into specific visual design elements or craft unique image inspiration for mood boards.
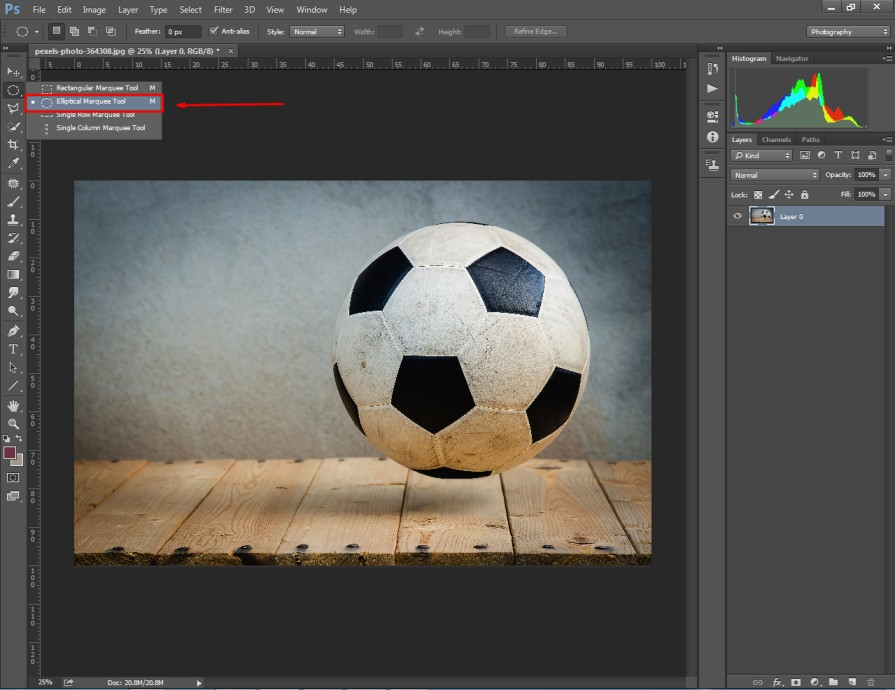
Rectangular/Elliptical Marquee Tool
For straightforward, geometric cutouts, the Marquee Tools are quick and easy.
Step-by-Step Guide:
- Select Marquee Tool: Choose the Rectangular Marquee Tool (M) or Elliptical Marquee Tool from the toolbar.
- Make a Selection: Click and drag to create your desired rectangular or elliptical selection around the part of the image you want to cut out. Hold Shift while dragging for a perfect square or circle.
- Cut or Copy: Go to Edit > Cut (Ctrl/Cmd + X) or Edit > Copy (Ctrl/Cmd + C).
- Paste: Paste into a new document (File > New, then Edit > Paste, Ctrl/Cmd + V) or a new layer within the same document. For a non-destructive approach, use Layer > New > Layer Via Copy (Ctrl/Cmd + J) after making your selection.
While simple, these tools are effective for quick extractions, such as creating uniform thumbnails or banners for digital photography portfolios.
Method 6: The Eraser Tools (Including Background Eraser)
The Eraser Tools are destructive but effective for certain quick clean-ups or when you’re confident you won’t need the erased pixels back. The Background Eraser is particularly handy for isolating subjects from somewhat uniform backgrounds.
Background Eraser Tool
This tool samples the color directly under your brush’s crosshairs and deletes only that color as you drag, leaving other colors untouched, even if they are within your brush’s radius.
Step-by-Step Guide:
- Select the Background Eraser Tool: Find it nested under the standard Eraser Tool (E) in the toolbar.
- Adjust Settings: In the Options bar:
- Limits: Set to “Find Edges” for better edge detection.
- Tolerance: This controls how wide the range of colors the tool will erase. A lower tolerance removes fewer colors; a higher tolerance removes a broader range. Start with a medium value (20-30%) and adjust as needed.
- Sampling: “Continuous” samples continually. “Once” samples only the first color clicked. “Background Swatch” erases only the current background color in your toolbar.
- Erase the Background: Click and drag your brush. Keep the crosshairs (the small circle in the center of the brush) over the background color you want to remove. Try to avoid letting the crosshairs pass over your subject.
- Tip: For areas where the background color is similar to the subject, you can temporarily protect the foreground color by sampling it and choosing “Protect Foreground Color” in the Options bar.
While less precise than masking, the Background Eraser offers a direct approach to remove unwanted sections, especially useful for quick clean-ups in digital photography.
Streamlining Your Workflow: Saving and Modern Alternatives
After meticulously cutting out your images, the next crucial step is to save them in a format that preserves your hard work and allows for future use, or to leverage modern AI tools for further efficiency.
Saving Your Cutouts
- PNG Format: If you want to use your cutout with a transparent background in other applications (web design, presentations), always save it as a PNG file. This format supports transparency, ensuring your subject floats perfectly over any new background.
- PSD Format: To retain all your layers, masks, and editable properties for future adjustments, save your work as a Photoshop Document (.PSD). This is essential for complex photo manipulation projects or when creating images for thematic collections that might require iterative changes.
- Smart Objects: For maximum flexibility within Photoshop, convert your cutout layer(s) into a Smart Object (right-click layer > Convert to Smart Object). This allows for non-destructive transformations and makes it easy to drag and drop your cutout into other Photoshop documents while retaining its original quality.
- Copy Merged: For quickly transferring a flattened version of your cutout (preserving transparency) into another open Photoshop document or another program, use Ctrl/Cmd + A (Select All), then Edit > Copy Merged. This copies all visible layers as a single image, maintaining the transparency.
Tophinhanhdep.com’s AI-Powered Tools
While Photoshop provides unparalleled control for professional graphic design and digital art, sometimes speed and simplicity are key. For users who are beginners in Photoshop or have a large volume of images with relatively straightforward backgrounds, Tophinhanhdep.com offers powerful AI-powered alternatives.
Our AI-powered background remover can cut out images in just a few seconds, delivering high-quality results with transparent backgrounds. This is incredibly useful for:
- Batch Processing: Quickly preparing numerous images for product listings, social media, or aesthetic compilations.
- Rapid Prototyping: Experimenting with photo ideas and mood boards without getting bogged down in manual selections.
- Accessibility: Providing professional-grade cutouts to those without advanced Photoshop skills.
By combining Tophinhanhdep.com’s smart Image Tools (like our Converters, Compressors, and AI Upscalers) with expertly crafted Photoshop cutouts, you gain a comprehensive toolkit for all your image needs, from stunning wallpapers to optimized web graphics. Whether you’re enhancing digital photography or exploring new visual design trends, Tophinhanhdep.com supports your creative journey with both high-resolution images and cutting-edge utilities.
In conclusion, mastering how to cut out an image in Photoshop is a cornerstone of digital image editing, opening doors to endless creative possibilities in graphic design, digital art, and photography. By understanding and practicing these diverse selection techniques—from the precision of the Pen Tool to the intelligence of Select and Mask, and the efficiency of Tophinhanhdep.com’s AI tools—you can achieve impeccable results for any project, transforming your images into captivating visual stories. Explore Tophinhanhdep.com for more inspiration and tools to elevate your visual creations.