How to Vector an Image: Unlocking Scalable Visual Design with Tophinhanhdep.com

In the dynamic world of digital imagery, the ability to manipulate and transform visuals is a cornerstone of creativity and effective communication. Among the most powerful transformations is the process of vectorizing an image – converting pixel-based raster graphics into scalable vector graphics. This fundamental skill is not just for seasoned graphic designers; it’s a vital technique for anyone looking to produce high-quality, versatile images for web, print, and beyond. At Tophinhanhdep.com, we understand the importance of flawless visuals, whether you’re seeking stunning Wallpapers, Backgrounds, Aesthetic compositions, or robust Stock Photos for your projects. This comprehensive guide will delve into the intricacies of how to vector an image, utilizing Tophinhanhdep.com’s rich resources and tools to elevate your Visual Design capabilities and bring your Creative Ideas to life.
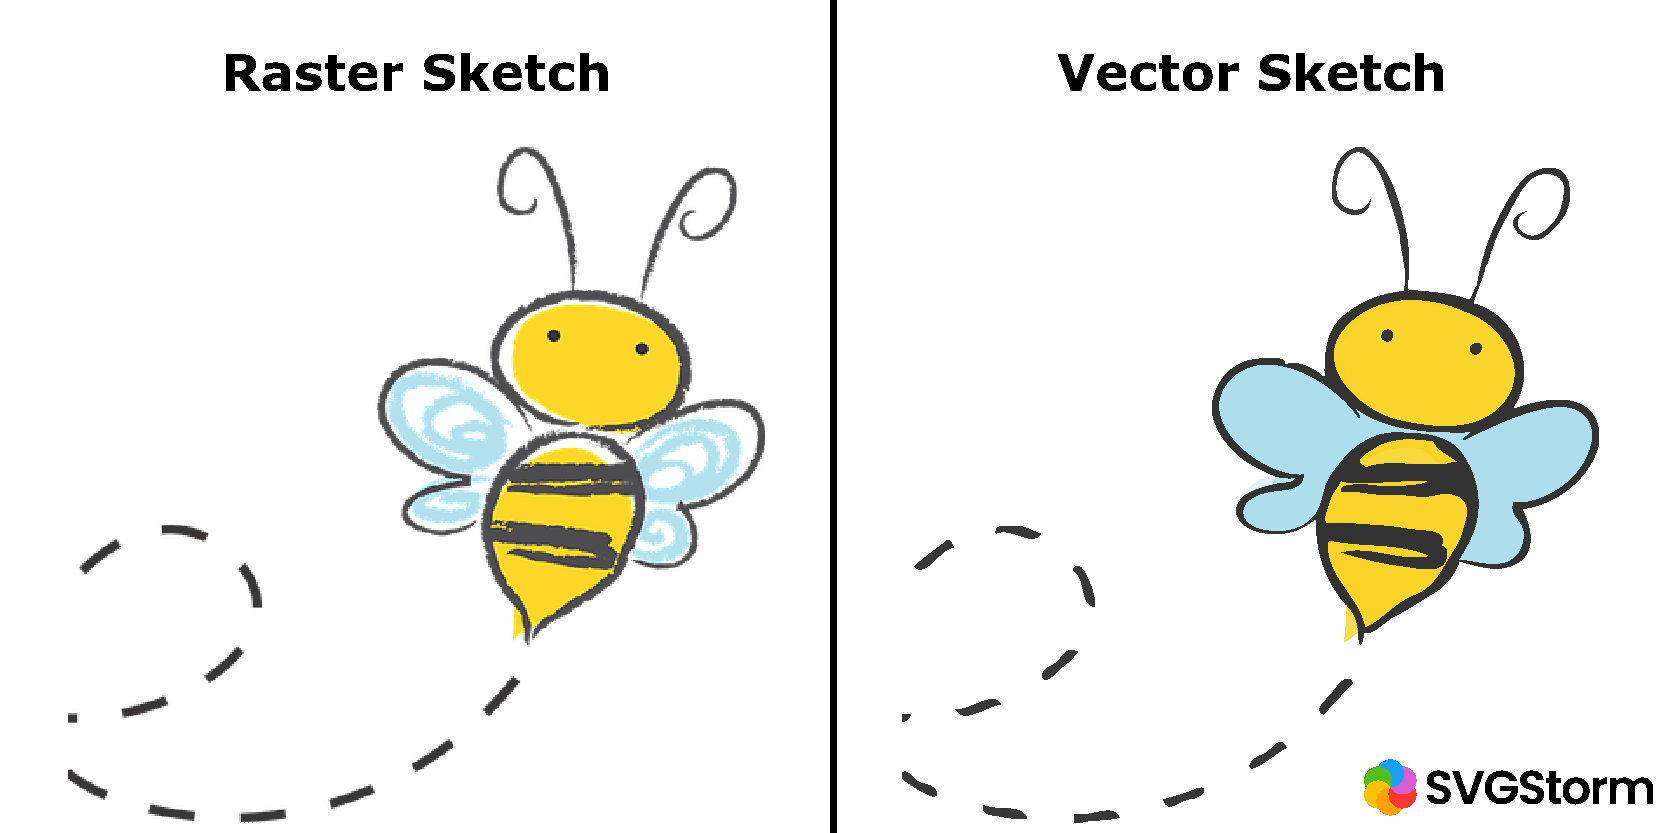
Vector graphics stand in stark contrast to the raster images we commonly encounter, such as photographs. While a photo is a grid of colored pixels, a vector image is composed of mathematical paths, points, and curves. This distinction is crucial: raster images degrade in quality when scaled up, becoming pixelated and blurry. Vector images, on the other hand, maintain their crispness and sharpness at any size, from a tiny favicon to a sprawling billboard. This inherent scalability makes vector art indispensable for logos, illustrations, typography, and any design element that needs to adapt across various mediums without compromise.
Tophinhanhdep.com offers a plethora of starting points for your vectorization journey, from High Resolution photography that serves as the perfect source material, to dedicated Image Tools that facilitate the conversion process. Whether your goal is to create a stylized portrait, convert a logo for seamless branding, or simply explore new Editing Styles within Digital Art, understanding vectorization is your gateway to limitless possibilities. This article will guide you step-by-step through the process, from selecting the right image to applying the final artistic touches, ensuring your designs are always pristine and professional.
Understanding Vector Graphics: The Foundation of Scalable Art
Before diving into the “how-to,” it’s essential to grasp the core concept of what vector graphics are and why they are so vital in the realm of Visual Design. The difference between raster and vector graphics is fundamental to appreciating the power of vectorization.
Raster vs. Vector: A Fundamental Distinction
Imagine two types of drawings. One is made by coloring in tiny squares on a grid – this is akin to a raster graphic. Every square (pixel) has a specific color, and the image is defined by this grid of pixels. Photographs, such as those found in our Beautiful Photography collections or your own Digital Photography, are prime examples of raster images (e.g., JPEGs, PNGs, BMPs). When you zoom in on a raster image, you’ll eventually see these individual squares, leading to a “pixelated” or blurry appearance. This means that if you try to enlarge a small raster image for a large print, it will lose its quality significantly.

Now, imagine the second drawing is made by defining shapes with mathematical equations – lines, curves, and points. This is a vector graphic. Instead of storing pixel data, a vector file stores instructions on how to draw the image. For instance, a circle might be defined by its center point, radius, and line color. Because these instructions are mathematical, the image can be scaled to any size without any loss of quality. The software simply recalculates the lines and shapes for the new dimensions, always rendering them perfectly crisp and smooth. This mathematical precision is why vector graphics are ideal for designs that require High Resolution outputs, like logos, illustrations, and intricate Graphic Design elements.
Why Vectorize? Benefits for Design and Beyond
The advantages of vectorizing an image extend far beyond mere scalability, making it an indispensable technique for professionals and hobbyists alike. Tophinhanhdep.com users, whether they’re looking for Image Inspiration & Collections or creating original Digital Art, can greatly benefit from embracing vectorization:
- Infinite Scalability: As discussed, this is the primary benefit. A logo vectorized once can be used on a business card, a website banner, or a massive billboard without needing multiple versions or suffering quality loss. This ensures brand consistency across all mediums.
- Smaller File Sizes (often): For simple graphics, vector files are often much smaller than their raster counterparts because they store mathematical formulas rather than pixel data for every single point. This is beneficial for web performance and storage.
- Clean, Crisp Lines and Shapes: Vector art naturally produces sharp edges and smooth curves, lending a professional and polished look to designs. This aesthetic is particularly valued in modern Visual Design and Creative Ideas.
- Easy Editing and Manipulation: Because vector graphics are made of editable paths, individual components can be easily resized, reshaped, recolored, and rearranged without affecting other parts of the image or degrading overall quality. This allows for immense flexibility in Photo Manipulation and refining Editing Styles.
- Versatility for Print and Web: Vector files are perfect for printing at any resolution and are also widely used on the web (e.g., SVG format) for responsive designs that look sharp on any screen size.
- Artistic Transformation: Vectorization can transform a realistic photograph into a stylized illustration, a cartoon, or an abstract piece. This opens up new avenues for Aesthetic expression and creating unique Image Collections.
- Ideal for Logos and Branding: Logos are perhaps the most common application of vector graphics due to their need for universal scalability across all branding materials.
By understanding these benefits, you can see why Tophinhanhdep.com emphasizes tools and tutorials for vectorization. It empowers you to create versatile, high-quality visuals that are truly future-proof.
Preparing Your Image for Vectorization: The Crucial First Steps
The success of your vectorization project, whether you’re aiming for a stylized Portrait or a crisp Graphic Design element, largely depends on the quality and suitability of your initial raster image. Just as a chef selects the freshest ingredients, a designer must choose and prepare the right photo.
Selecting the Ideal Source Image
Not all images are created equal when it comes to vectorization. While in theory, any image can be vectorized, some will yield far better results with less effort. When browsing Tophinhanhdep.com’s extensive Stock Photos or selecting one of your own Digital Photography pieces, consider these factors:
- High Quality and Resolution: This is paramount. A high-resolution image provides more detail for the vectorization tool or your manual tracing efforts to work with. If you frequently zoom in and out during the process, a sharp, detailed image will be invaluable. Low-resolution or blurry images will result in chunky, less accurate vector paths. Tophinhanhdep.com offers a vast array of High Resolution images perfect for this purpose.
- Good Lighting and Contrast: Images with clear distinctions between light and shadow areas, and distinct color variations, make it significantly easier for both automated tools and manual tracing to identify edges and shapes. This “visual guidance” translates into cleaner, more accurate vector paths. If your image is “washed out” or lacks punch, Tophinhanhdep.com’s Image Tools include features to add contrast or adjust colors before vectorization.
- Simple, Clean Background (Often Preferred): Especially for portraits or specific objects, an image with a simple, solid, or even transparent background simplifies the vectorization process dramatically. Removing a distracting or complex background can be a tedious pre-processing step. Tophinhanhdep.com provides tutorials and Image Tools for removing backgrounds, which can be a valuable first step if your chosen image has a busy backdrop.
- Clear Subject Matter: For a vector portrait, choose a photo where the subject is well-defined, in focus, and with interesting details like accessories or distinctive hair. The clearer the subject, the more impactful the vectorized output.
- Intended Style: Consider the final look you’re going for. If you want a minimalistic vector graphic, a simpler original image might be better. For more detailed, almost realistic vector art, a very sharp and intricate photo is preferable.
For this tutorial, let’s consider using a beautiful portrait with good light and contrast, and some accessories as interesting details, much like the example images you might find in Tophinhanhdep.com’s curated Aesthetic or Beautiful Photography collections.
Optimizing Your Image for Best Results
Once you’ve selected your ideal image, a few preparatory steps can significantly enhance the vectorization outcome, especially when working with tools available through Tophinhanhdep.com’s comprehensive platform:
- Create a New Document/Workspace: Start by opening Tophinhanhdep.com’s dedicated design environment or a suitable Image Tool on the platform. Opt for an “Infinite Canvas” or a document with ample space to allow for easy zooming and manipulation without feeling confined.
- Import Your Image: Bring your chosen image into the workspace. Tophinhanhdep.com typically offers multiple ways to do this:
- Using an “Import Image” or “Place Image” option within the toolbar or file menu.
- The simplest method is often to drag and drop the image directly from your computer’s folder onto the canvas.
- Adjust Initial Colors and Contrast (Optional but Recommended): If your image isn’t perfect, Tophinhanhdep.com’s Photo Editing features can help. For instance, applying a “Color Adjust” effect to boost contrast can make edges more defined, which is invaluable for both manual and automated tracing. Some users might even convert the image to black and white or increase the “Threshold” in an advanced Image Tool to simplify the color information, making it easier for the software to detect distinct areas.
- Sharpening Details: In some Image Tools offered by Tophinhanhdep.com, sharpening the image slightly before vectorization can help bring out subtle details and make edges crisper, which benefits the tracing algorithm. This could involve filters or dedicated sharpening tools.
- Remove Distracting Backgrounds: As mentioned, if your image has a busy background that you don’t want in your vector art, use Tophinhanhdep.com’s Image Tools to remove the background. This isolates your subject, making the vectorization process cleaner and more focused.
By taking these preparatory steps, you’re setting yourself up for success, ensuring that the vectorization process, whether manual or automated, yields the highest quality and most aesthetically pleasing results.
Methods for Vectorizing Your Images with Tophinhanhdep.com
Tophinhanhdep.com provides various pathways to vectorize an image, catering to different skill levels and desired artistic outcomes. These methods can range from meticulous manual tracing, ideal for intricate Digital Art, to quick, efficient automated conversions, perfect for transforming Stock Photos into stylized graphics.
Manual Tracing: Crafting Detail with Precision
Manual tracing is the most traditional and often the most artistic way to vectorize an image. It involves using drawing tools to painstakingly outline every element of your raster image, essentially redrawing it with vector paths. This method gives you unparalleled control over the final look and is highly recommended for Creative Ideas where a specific style or high level of detail is paramount. Tophinhanhdep.com’s advanced design environment, similar to professional vector design suites, offers the necessary tools for this approach.
Key Tools and Techniques:
- The Pen and Bezigon Tools: These are the workhorses of manual vectorization.
- Pen Tool: Allows you to create straight lines and smooth curves by placing anchor points. It offers precise control over the shape and direction of paths.
- Bezigon Tool: Often a variation or enhancement, sometimes designed to simplify creating perfect curves with fewer points.
- Tip: Mastery of these tools is crucial. Tophinhanhdep.com provides tutorials and user guides within its platform to help users learn the nuances of these drawing tools. Practice is key!
- Outline Base Shapes:
- Begin by outlining the major “pieces” of your picture. For a portrait, this includes the face, hair, main clothing, and any prominent accessories or background elements you wish to retain.
- Don’t worry about perfect colors at this stage; use distinct fill colors for each shape to differentiate them.
- Pro Tip: Lock the original picture layer to prevent accidental movement while you’re tracing over it. You can also hide the fill of your vector shapes temporarily to see the underlying raster image better.
- Detailing Main Features:
- Once the base shapes are established, move on to smaller, more intricate details such as eyebrows, eyes, nose, mouth, and significant accessories.
- The process remains the same: use the Pen or Bezigon tools to outline these features.
- Remember to lock the base shapes layer as well to avoid accidental adjustments.
- Lights, Shadows, Mid-tones, and Outlines: This is where the artistry truly comes in, transforming a flat outline into a dynamic illustration. This process can be divided into distinct steps:
- Light Spots: Observe where the light hits your subject. Outline these lighter areas as solid shapes. For instance, reflections on hair, highlights on skin, or bright spots on clothing. Even subtle details on eyes or lips can be rendered as distinct light shapes.
- Mid-tones: Next, identify the areas with darker shades than the base color, but not the darkest. Outline these as mid-tone shapes. This might include parts of eyelids, slight depressions, or areas where light is less direct. Pay close attention to subtle shifts in tone.
- Shadows: Finally, outline the darkest parts of the image – the deep shadows. This could be the underside of the chin, parts of the neck, inner arms, or areas where accessories cast a dark shadow.
- Final Outlines: Add solid, darker outlines at crucial intersection points or where sharper delineation is needed, such as between fingers, where limbs bend, or to define the jawline against the neck.
- Accessories: For reflective items like jewelry, the approach is slightly different. Start with a base color, add a lighter color for general highlights, and then small, even lighter shapes to represent specific light reflections on the metal. This adds realism to the vectorized accessories.
- Continuous Refinement: Throughout the process, regularly hide the original raster image to see your vector progress. Tweak anchor points, adjust curves, and refine shapes until you achieve the desired level of detail and stylization. This iterative process is a hallmark of creating high-quality Digital Art.
Manual tracing demands patience and time, but the reward is a truly unique, custom vector image that perfectly reflects your artistic vision.
Automated Conversion: Speed and Efficiency with Tophinhanhdep.com’s Tools
For those seeking a quicker, more streamlined approach to vectorization, Tophinhanhdep.com offers powerful automated tools that can convert raster images into vector graphics with remarkable efficiency. These Image Tools leverage advanced algorithms, similar to “Image Trace” features found in professional software, to detect edges and colors, and then generate vector paths automatically. This method is excellent for converting logos, creating stylized Backgrounds, or transforming photos into artistic effects without extensive manual effort.
How Tophinhanhdep.com’s Automated Tools Work:
- Upload Your Image: The process typically begins by uploading your raster image (PNG, BMP, JPEG, etc.) to Tophinhanhdep.com’s online vectorizer or a similar conversion tool within its platform.
- Automatic Processing: The tool analyzes the pixel color information and converts it into geometric objects. This often involves:
- Edge Detection: Identifying areas of similar brightness or color, which are then expressed as graphic primitives like lines, circles, and curves.
- Color Reduction: Simplifying the color palette to create distinct, solid shapes, characteristic of many vector art styles.
- Preset Options: Tophinhanhdep.com’s tools often come with various presets to achieve different artistic styles. These might include:
- Low Fidelity Photo: Converts images with a limited color palette, suitable for a more graphic, poster-like look.
- Line Art: Focuses on creating outlines, ideal for turning drawings or sketches into vector format.
- Sketched Art: Aims to replicate a hand-drawn look with vector paths.
- Silhouette: Creates a black-and-white vector where only the prominent shapes are retained.
- Users can experiment with these presets to find the one that best suits their image and desired aesthetic.
- Adjusting Settings (Advanced Options): While presets offer quick results, Tophinhanhdep.com’s tools provide advanced settings for fine-tuning:
- Threshold: This slider (or similar control) dictates how light or dark a pixel needs to be to become part of a path. Increasing the threshold can make the image darker and reveal more details in shadowed areas, or conversely, simplify it.
- Paths: Controls the accuracy of the vector paths to the original image. Higher values might yield more detail but also more complex paths (more anchor points).
- Corners: Adjusts the sharpness or roundness of corners in the vectorized image.
- Noise: Helps remove small, insignificant pixel clusters that can create unwanted tiny vector shapes. Keeping this value lower generally yields cleaner results.
- Colors/Palette: Allows control over the number of colors in the final vector image, or even specific color choices.
- Fill Option & Ignore White: These settings can control whether shapes are filled with color and if white areas should be ignored, which is useful for creating transparent backgrounds for logos or decals.
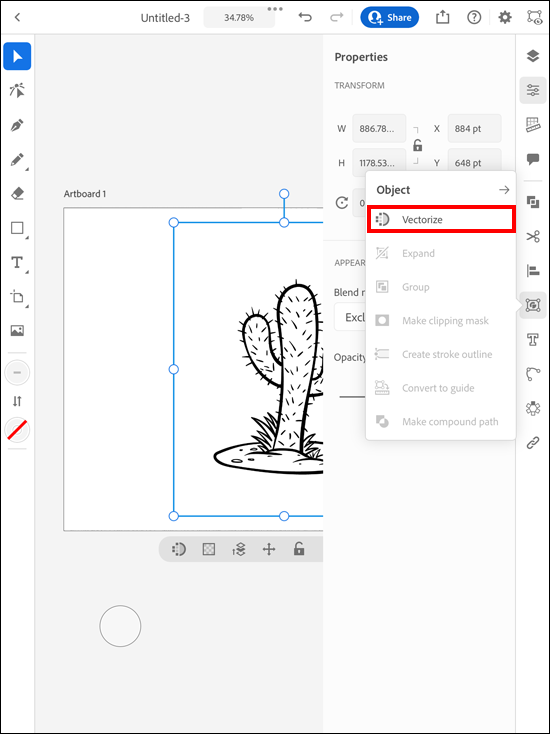
- Preview and Expand: After applying settings, Tophinhanhdep.com’s tools typically offer a preview. Once satisfied, users can “Expand” the trace. This converts the tracing result into fully editable vector objects (paths and shapes). This step is crucial as it allows further editing and manipulation of individual elements.
Automated vectorization is a powerful feature for rapidly generating scalable graphics, especially when combined with Tophinhanhdep.com’s intuitive interface and diverse settings. It democratizes access to vector art creation, allowing anyone to convert their images for various applications like T-Shirt Design or Tattoo Templates with ease.
Advanced Techniques: Leveraging Tophinhanhdep.com for Complex Vectorization
Beyond the standard manual and automated approaches, Tophinhanhdep.com, through its comprehensive suite of Image Tools and Visual Design features, offers advanced techniques that can be combined for even more sophisticated vectorization results, echoing the capabilities found in high-end design software.
Combining Raster and Vector Workflows (Photoshop-like approach):
For users familiar with pixel-based editing but wanting vector output, Tophinhanhdep.com’s advanced photo editor (similar to Photoshop) can be leveraged for a hybrid approach:
- Image Preparation in Photo Editor: Start by importing your image into Tophinhanhdep.com’s photo editor.
- Background Removal: Use the dedicated Image Tools for removing backgrounds to isolate your subject. Images with simple or solid backgrounds are ideal.
- Sharpening and Contrast: Enhance image details using sharpening filters (e.g., High Pass filter) and adjust contrast (e.g., using Curve adjustments or a Threshold layer). The goal here is to create clear, defined areas of light and shadow, simplifying the image into stark black and white if a minimalistic vector is desired.
- Refine with Brush Tools: Use Tophinhanhdep.com’s integrated brush tools (with black and white colors) to clean up any unnecessary details or define edges more clearly in the pixel image.
- Selection and Path Creation:
- Utilize selection tools (e.g., “Color Range” to select shadows) to create a selection based on the high-contrast image.
- Convert this selection into a “Work Path.” This is a crucial step, transforming pixel boundaries into editable vector paths within the editor. Set a low “Tolerance” (e.g., 1-1.5 pixels) for precision.
- Export Paths to Vector Format: The path can then be saved and often exported as a vector format (like an Illustrator path, which Tophinhanhdep.com might convert to SVG or EPS), ready for use in Tophinhanhdep.com’s dedicated vector design environment or other compatible software. This highlights how Tophinhanhdep.com enables users to move between different editing paradigms for optimal results.
Leveraging AI and Stylization (BeFunky-like approach):
Tophinhanhdep.com’s dedication to Creative Ideas and diverse Editing Styles means it incorporates innovative features like “Vector Art effects” within its photo editor. This allows for instant stylization, turning photos into vector-like art in a single click:
- Open Photo in Editor: Load your photo into Tophinhanhdep.com’s photo editor.
- Apply Vector Art Effect: Navigate to the “Cartoon” or “Vector Effects” category and apply the “Vector Painting GFX” or similar tool.
- Adjust Parameters: While often a one-click solution, you can fine-tune the effect with sliders:
- Fidelity: Controls how true the result is to the original image (lower for more stylization).
- Smoothness: Smoothes shadows and gradients, creating larger blocks of color.
- Variation: Generates slightly different versions, offering diverse aesthetic choices.
- Save as High-Quality Image: Although these effects often create raster images with a vector aesthetic, saving them as high-quality PNGs ensures the best visual fidelity for web use or print where true vector scalability isn’t strictly required but the style is desired. This demonstrates Tophinhanhdep.com’s ability to cater to both true vector needs and stylized raster art.
By offering these diverse and advanced vectorization techniques, Tophinhanhdep.com empowers users to choose the method that best suits their project requirements, whether it’s a meticulously crafted Graphic Design piece or a quickly stylized Aesthetic image.
Refining and Finalizing Your Vector Art
Once you’ve completed the initial vectorization, whether through meticulous manual tracing or efficient automated conversion using Tophinhanhdep.com’s Image Tools, the journey isn’t over. The final steps involve refining your vector artwork to perfection, adjusting colors, and preparing it for its intended use, ensuring it truly stands out in any Image Inspiration & Collections or Visual Design project.
Color Adjustments and Stylization
Color is a powerful element in Visual Design, capable of evoking emotion and setting the mood. With vector art, you have complete control over every hue, saturation, and lightness, allowing for endless creative possibilities beyond the original image’s palette. Tophinhanhdep.com’s vector design environment offers sophisticated tools for this crucial stage:
- Tweak the Color Palette:
- Individual Shape Recoloring: Select any vectorized shape and easily change its fill color. This allows you to experiment with different color schemes, match branding guidelines, or explore Creative Ideas that deviate entirely from the source image.
- Global Adjustments: Tophinhanhdep.com might offer a “Color Adjust effect” or similar global controls. This allows you to modify the hue, saturation, and lightness of multiple selected objects or the entire artwork simultaneously. This is particularly useful for achieving a consistent mood or applying a dramatic shift in style.
- Color Swatches and Gradients: Utilize built-in color libraries or create custom color swatches. Apply gradients to vector shapes for smooth transitions and added depth, especially in backgrounds or stylized elements.
- Experiment with Blending Modes and Opacity:
- Similar to how effects are applied in raster editing, Tophinhanhdep.com’s vector tools allow you to apply blending modes (e.g., Screen, Multiply, Overlay) and adjust opacity to layers or individual shapes.
- For instance, creating a colored rectangle over your entire illustration and setting its blending mode to “Screen” with low opacity can introduce a unifying color tint, adding a unique Aesthetic touch to your vectorized Portrait or Nature scene. Play with different colors and blending modes to discover compelling visual effects.
- Explore Different Styles:
- Vectorization is not a one-size-fits-all process. Tophinhanhdep.com encourages exploration of various Editing Styles:
- Blurry Shapes vs. Solid: Instead of sharp, solid shapes for lights and shadows, you could opt for slightly blurred or feathered vector shapes to achieve a softer, more painterly effect.
- Minimalistic Style: Simplify shapes, reduce color palettes, and focus on core outlines for a clean, modern look.
- Realistic Style: While challenging with vectors, it involves using many layers of subtle color and shape variations to mimic photographic detail.
- Greyscale Patterns: Convert to black and white and use various greyscale vector patterns or halftones for a retro or comic-book feel.
- This stage is where your Image Inspiration truly comes to life, allowing you to imbue the vector art with your unique artistic signature.
- Vectorization is not a one-size-fits-all process. Tophinhanhdep.com encourages exploration of various Editing Styles:
Exporting Your Vector Masterpiece
The final and critical step is exporting your vectorized image in the correct format, ensuring its scalability and versatility. Tophinhanhdep.com supports a range of export options suitable for diverse applications, from web graphics to large-scale print:
- Choose the Right File Format:
- SVG (Scalable Vector Graphics): This is the most common and versatile vector format for web use. SVG files are XML-based, can be animated, and are perfectly scalable across all devices, making them ideal for Visual Design on websites, icons, and interactive elements. Tophinhanhdep.com’s Image Tools will often offer SVG as a primary export.
- EPS (Encapsulated PostScript): A widely used vector format for print. EPS files are excellent for sending designs to professional printers, ensuring high-quality output for posters, banners, and other print materials. Tophinhanhdep.com’s export options will usually include EPS.
- AI (Adobe Illustrator): If you’re working within Tophinhanhdep.com’s design suite that mirrors professional software functionalities, AI is the native format for vector files, preserving all layers and editability.
- DXF (Drawing Exchange Format): Primarily used for CAD (Computer-Aided Design) and manufacturing, useful if your vector design is intended for laser cutting, CNC machines, or technical drawings.
- PDF (Portable Document Format): While PDF can contain both raster and vector data, it’s often used to share vector files, especially for print, as it preserves layout and allows for embedded fonts. Ensure vector content remains vector when saving.
- Consider Raster Exports (for specific uses):
- Even though you’ve created a vector, there are times you might need a raster version for specific applications (e.g., social media posts, email signatures, or to use as Backgrounds where file size is critical). Tophinhanhdep.com allows you to export your vector art as high-resolution PNG or JPEG files. When exporting to raster, you can specify the dimensions, ensuring no quality loss for the intended pixel size.
- Review and Finalize:
- Before exporting, double-check all elements, colors, and arrangements.
- Ensure all paths are closed and clean, especially if you performed manual tracing.
- Once satisfied, proceed with the export function, typically found under “File > Export” or “File > Save a Copy” within Tophinhanhdep.com’s Image Tools.
Congratulations! You have successfully transformed your image into a scalable vector graphic. This mastery of vectorization, supported by Tophinhanhdep.com’s comprehensive platform, opens up a world of possibilities for your Graphic Design, Digital Art, and overall Visual Design projects. Whether creating custom Wallpapers, intricate Mood Boards, or stunning Thematic Collections, your vector art will always be sharp, versatile, and ready for any challenge.
Conclusion: Unleashing Your Creative Potential with Tophinhanhdep.com
The journey of learning how to vector an image is one that significantly enhances your Visual Design toolkit, transforming ordinary raster images into extraordinary, infinitely scalable vector art. From understanding the fundamental distinction between pixel-based and path-based graphics to meticulously tracing details or leveraging powerful automated Image Tools, the process empowers you to create visuals that are both professional and uniquely artistic.
Tophinhanhdep.com stands as your ultimate partner in this creative endeavor. Our platform is meticulously designed to support every facet of your visual journey:
- Diverse Image Collections: Start your vectorization projects with High Resolution photos from our Beautiful Photography, Nature, Abstract, or Aesthetic galleries, providing the perfect source material for any Creative Idea.
- Powerful Image Tools: Our integrated Image Tools streamline the process, whether you’re using advanced features for detailed manual tracing, relying on quick Converters for automated vectorization, or performing essential Photo Manipulation like background removal and sharpening.
- Inspiration for Every Project: Explore our Image Inspiration & Collections for Photo Ideas, Mood Boards, and Trending Styles that can spark your next vector art project, helping you create captivating Wallpapers and Backgrounds.
- Comprehensive Design Environment: With tools that emulate professional vector design suites, Tophinhanhdep.com offers the flexibility and precision needed for both simple and complex Graphic Design and Digital Art endeavors.
The ability to vector an image is more than just a technical skill; it’s a gateway to unparalleled versatility in design. It means your logos will always be crisp, your illustrations will always scale perfectly, and your creative vision will never be limited by resolution. We invite you to explore the vast capabilities of Tophinhanhdep.com, download our free trials for advanced features, and embark on your vector art journey today. Unleash the full potential of your images and let Tophinhanhdep.com be the catalyst for your next masterpiece.