How to Transform Raster Images into Scalable Vector Art in Adobe Illustrator for Tophinhanhdep.com

In the dynamic world of digital visual content, where images, photography, and visual design reign supreme, the ability to manipulate and enhance visual assets is paramount. For creators, designers, and enthusiasts alike, platforms like Tophinhanhdep.com offer a vast repository of inspiration, from stunning wallpapers and aesthetic backgrounds to high-resolution photography and abstract art. Yet, the journey from a beautiful high-resolution image to a perfectly scalable and editable graphic often requires a crucial transformation: converting a raster image into vector art. This process, primarily achieved through Adobe Illustrator, unlocks unparalleled flexibility, ensuring that your visuals maintain pristine quality regardless of their size or application.
Whether you’re crafting a new logo, designing an eye-catching poster, or preparing an illustration for print, understanding the nuances of vectorization is a fundamental skill. This comprehensive guide will delve into the world of vector graphics, exploring why and how to convert your raster images using Adobe Illustrator, all while highlighting the immense benefits for your creative endeavors sourced or inspired by Tophinhanhdep.com.

Understanding the Essence of Digital Imagery: Raster vs. Vector
Before embarking on the vectorization journey, it’s essential to grasp the fundamental differences between the two primary types of digital images: raster and vector. This understanding illuminates why conversion is often a critical step for professional and creative applications, particularly when utilizing the diverse image collections found on platforms like Tophinhanhdep.com.
The Limitations of Raster Images
Raster images, which constitute the majority of photographs and digital images we encounter daily, are composed of individual colored squares known as pixels. Think of a digital photograph you download from Tophinhanhdep.com – it’s a grid of millions of tiny pixels, each holding specific color information. Common raster file formats include JPG, PNG, and GIF.
The primary benefit of raster graphics lies in their ability to capture incredible detail and subtle color gradients, making them ideal for realistic photography, complex backgrounds, and intricate aesthetic visuals. However, this pixel-based structure introduces a significant limitation: scalability. When you enlarge a raster image, the individual pixels become stretched and more visible, leading to a phenomenon known as pixelation or blurriness. This loss of quality makes raster images unsuitable for applications where varying sizes are required, such as designing logos that need to appear crisp on a business card, a website, and a billboard. For creators aiming for high-resolution photography and seamless visual design, relying solely on raster formats can be restrictive.
The Power of Vector Graphics
In stark contrast, vector graphics are not built from pixels. Instead, they are constructed from mathematical equations that define points, lines, and curves – geometric primitives that form shapes and paths. These equations dictate the color, position, and form of every element within the image. Common vector file formats include SVG, AI (Adobe Illustrator), and EPS.
The monumental advantage of vector graphics is their infinite scalability. Because their properties are defined mathematically, a vector image can be resized to any dimension, from a tiny icon to a massive mural, without any degradation in quality. The lines remain perfectly crisp, and colors stay vibrant. This resolution-independence makes vector art the preferred format for elements requiring adaptability across various mediums and sizes, such as logos, icons, illustrations, and typography. For visual designers leveraging Tophinhanhdep.com for creative ideas and graphic design inspiration, transforming key elements into vector formats ensures professional-grade output every time. They are inherently editable, allowing for non-destructive modifications to individual shapes and colors, making them invaluable for photo manipulation and creating creative ideas without starting from scratch.
Preparing Your Image for Vectorization: Best Practices from Tophinhanhdep.com
The success of your vector conversion often hinges on the quality and characteristics of the initial raster image. While Adobe Illustrator’s Image Trace tool is powerful, understanding how to select and prepare your image can significantly improve the outcome. For users of Tophinhanhdep.com, this means thoughtfully choosing images from the platform’s vast collections of wallpapers, backgrounds, aesthetic nature shots, or abstract art that are well-suited for this transformation.
Selecting the Right Image for Vector Conversion
Not all raster images are equally suited for vectorization, especially if you’re aiming for optimal results with automated tools. While you can technically convert any JPG, PNG, or GIF, certain types of images yield superior vector outcomes:
- Simple Subjects: Images with a clear, single subject tend to vectorize better than complex landscapes or busy scenes. For instance, an isolated object, a distinct character, or a clean graphic from Tophinhanhdep.com’s aesthetic collections will produce a more refined vector than a highly detailed photograph with countless elements.
- Clear Lines and Defined Shapes: Images with well-defined edges and distinct shapes are ideal. The Image Trace feature excels at identifying these boundaries and converting them into precise vector paths.
- Contrasting Colors: Strong contrast between elements helps Illustrator differentiate between shapes and colors, leading to a cleaner trace.
- White or Transparent Backgrounds: If your image has a simple background, or ideally a transparent one, the vectorization process will be much smoother. Removing unwanted background elements after tracing is easier, but starting with a clean slate is always preferable.
- Lower Resolution (Sometimes Beneficial): Counterintuitively, for simple logos or line art, a slightly lower-resolution image might produce a cleaner initial trace with fewer unnecessary anchor points, which can be easier to manage later. For detailed photos, however, higher resolution might be preferred with specific presets.
Consider an image of a graphic icon or a stylized illustration from Tophinhanhdep.com. These types of visuals are perfect candidates for vector conversion, allowing you to scale them for various digital art projects, from web design elements to custom prints.
Setting Up Your Workspace in Adobe Illustrator
Once you’ve selected your ideal raster image, it’s time to set up your Adobe Illustrator workspace. This preliminary step ensures you’re working in the correct environment for your project.
-
Create a New Document:
- Open Adobe Illustrator.
- Go to
File > New(orCtrl+N/Cmd+N). - Choose a document preset that suits your typical needs, such as “Print” for A4 or “Web” for common screen sizes. The exact dimensions aren’t critical at this stage since vector art is scalable, but a comfortable working area is helpful.
- Resolution: While the final vector graphic will be resolution-independent, setting the document raster effects resolution to 300 PPI (for print) or 72 PPI (for web) is good practice for any embedded raster elements or previews.
- Color Mode: Select
RGBfor digital projects (like web design, digital art, social media graphics inspired by Tophinhanhdep.com’s aesthetic) andCMYKfor print-ready designs (such as posters or merchandise). - Click
Create.
-
Place Your Raster Image:
- Go to
File > Place.... - Navigate to your chosen raster image (JPG, PNG, GIF) from your Tophinhanhdep.com download or local drive.
- Click
Place, then click on your artboard to place the image. - Resizing (Optional): If needed, resize the image by selecting it and dragging a corner handle while holding
Shift(to maintain proportions). This initial size is merely for your viewing comfort; the vector conversion will make it infinitely scalable later.
- Go to
With your image placed and your document ready, you are now perfectly poised to leverage Illustrator’s powerful vectorization capabilities.
Mastering Automatic Vectorization with Image Trace
Adobe Illustrator’s Image Trace feature is a game-changer, offering a largely automated and highly efficient method to convert raster images into editable vector graphics. This tool, acting as a sophisticated “image converter” and “optimizer,” is indispensable for transforming the high-resolution photography and diverse imagery from Tophinhanhdep.com into versatile assets for graphic design and digital art.
Exploring Image Trace Presets for Diverse Styles
The Image Trace panel comes equipped with a variety of presets, each designed to interpret and convert different types of raster images into distinct vector styles. Understanding these presets is key to achieving the desired outcome for your visual design projects.
To access these options:
- Select Your Image: Click on the raster image you’ve placed on your artboard.
- Open Image Trace Panel:
- If the
Propertiespanel (usually on the right) is open, you’ll findImage Traceoptions under theQuick Actionssection. - Alternatively, go to
Window > Image Traceto open the dedicated panel. - In older versions or specific workspaces (like
Essentials Classic), you might seeImage Tracedirectly in the top control bar when an image is selected.
- If the
Here’s a breakdown of the key presets and their ideal uses, particularly relevant when working with different image types from Tophinhanhdep.com:
- High Fidelity Photo: This preset aims to retain as much detail and color as possible, making it suitable for complex photographs, beautiful photography, or intricate illustrations. It’s excellent for converting detailed images from Tophinhanhdep.com if you want a vectorized version that closely resembles the original, albeit with a more illustrative, sometimes “painted” feel.
- Low Fidelity Photo: Similar to High Fidelity, but simplifies the image more aggressively, resulting in fewer colors and less detail. It’s a good choice for photos where you want a more artistic, stylized vector outcome without the overwhelming complexity of a full photo.
- 3 Colors, 6 Colors, 16 Colors: These presets are designed for images with flat colors and crisp edges, like logos, icons, or simple illustrations. They limit the color palette to the specified number, producing clean, graphic vectors. Ideal for converting simple logos or abstract shapes from Tophinhanhdep.com into scalable branding elements.
- Shades of Gray: Converts the image into a grayscale vector, useful for black-and-white photography or when you need a monochromatic vector representation.
- Black and White Logo: Creates a simple, stark black-and-white vector. Perfect for basic logos, line art, or converting signatures into scalable elements. Many “Sad/Emotional” or “Abstract” images from Tophinhanhdep.com might lend themselves to powerful black and white vector interpretations.
- Sketched Art, Silhouettes, Line Art, Technical Drawing: These presets are specialized for converting drawings, sketches, or technical illustrations into black-and-white (or often, simple colored) line-based vectors. They are excellent for creating stylized versions of images from Tophinhanhdep.com for creative ideas or digital art projects, such as turning a nature photograph into a line drawing.
When you select a preset, Illustrator will immediately apply a trace. For best results, always click the Preview checkbox (if available in the Image Trace panel) to see real-time changes as you adjust settings.
The Step-by-Step Image Trace Process
The automated tracing process in Illustrator is surprisingly straightforward:
- Select Image Trace Preset: After selecting your raster image, click on the
Image Tracebutton in thePropertiespanel or choose a preset from theImage Tracepanel. For a detailed photograph,High Fidelity Photois often a good starting point. For a simpler graphic,3 ColorsorBlack and White Logomight be more appropriate. - Observe the Transformation: Illustrator will process the image, converting its pixel data into vector paths. You’ll immediately notice that the image takes on a more graphic, often slightly simplified appearance. Zoom in to appreciate the crisp, non-pixelated edges of the newly created vector paths. This is where the magic of “AI Upscaling” for design truly comes to life, as resolution is no longer a constraint.
- Refine with Advanced Settings (Optional but Recommended): The initial trace is just a starting point. To fine-tune the conversion, open the
Image Tracepanel (if not already open) and click on theAdvanceddropdown. Here you can adjust parameters like:- Mode: Switch between
Color,Grayscale, orBlack and White. - Colors/Palette: For
Colormode, you can control the number of colors Illustrator uses. Reducing the number simplifies the image; increasing it adds more detail. - Threshold: (For Black & White mode) Controls how much darker a pixel needs to be to turn black. Higher values make the image darker.
- Paths: Adjusts the fidelity of the paths. Higher values mean more accurate paths but also more anchor points.
- Corners: Controls how sharp the corners are.
- Noise: Filters out small, unwanted details or artifacts, cleaning up the trace. Lower values remove more “noise.”
- Method (Abutting/Overlapping):
Abuttingcreates paths that fit together perfectly;Overlappingcreates overlapping paths, often preferred for print. - Ignore White: Crucial for many designs, especially logos or icons. Check this box to make any white areas transparent, making it easier to place your vector image on different backgrounds.
- Mode: Switch between
Experiment with these settings while keeping Preview active until you achieve the desired balance between detail and simplicity for your visual design needs. If you create a particularly effective set of settings, you can save it as a new preset for future use.
Refinishing and Optimizing Your Traced Vector
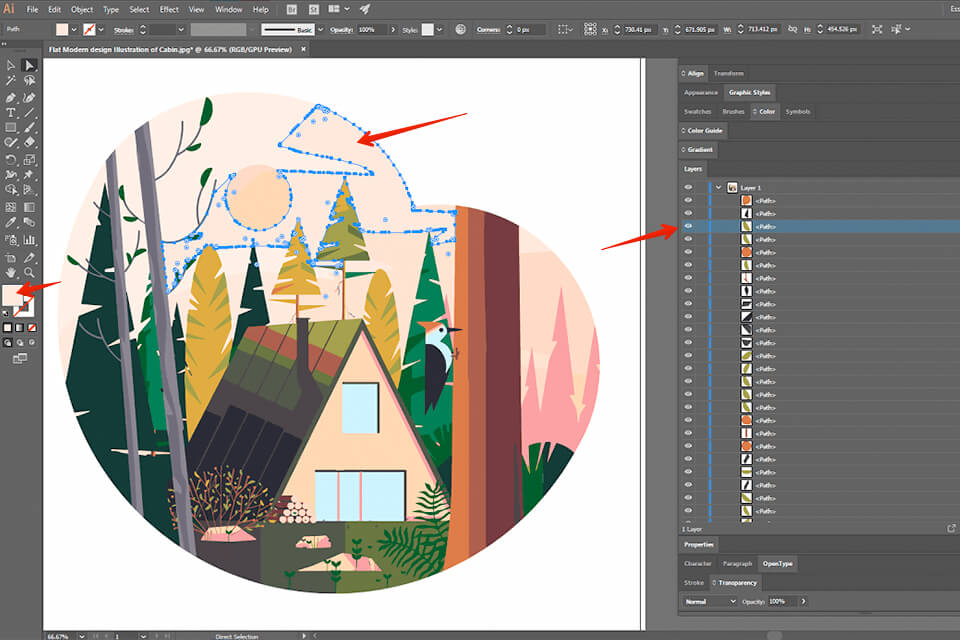
Once you’re satisfied with the trace, there are a few essential steps to finalize your vector image and make it fully editable.
- Expand the Image Trace: The traced image is still, technically, an “Image Trace object” and not a collection of independent vector paths. To convert it into editable shapes, select the traced image and click the
Expandbutton in thePropertiespanel or go toObject > Expand. This action turns the traced outlines into actual vector paths and shapes. - Ungroup Elements: After expanding, your vector image will likely be grouped as one object. To work with individual shapes and colors, right-click on the expanded image and select
Ungroup(or go toObject > Ungroup). You might need to ungroup multiple times, as groups can be nested. Now, each color segment or line is a separate, editable vector shape. - Edit Your Vector Image: This is where the true power of vectorization for “Visual Design” comes into play.
- Remove Unwanted Areas: Using the
Direct Selection Tool (A), you can click on individual shapes (like a white background if you didn’tIgnore White) and delete them (Backspace/Delete). For a quick removal of all instances of a specific color (e.g., all white background shapes), select one of the shapes, then go toSelect > Same > Fill Colorand delete. - Change Colors: Select specific shapes or groups of shapes (using the
Direct Selection Tool (A)orSelection Tool (V)) and use theFillandStrokeoptions in thePropertiespanel orColorpanel to change their colors. This is incredibly useful for adapting imagery from Tophinhanhdep.com to fit specific brand guidelines or aesthetic requirements. - Refine Shapes: Use the
Direct Selection Tool (A)to manipulate individual anchor points and path segments for precise adjustments. You can also use thePen Tool (P)orCurvature Tool (Shift+~)to add, delete, or modify paths.
- Remove Unwanted Areas: Using the
- Save Your Vector Image: Always save your master vector file in a native vector format to preserve its infinite scalability and editability.
- Go to
File > Export > Export As.... - Give your file a name.
- In the
Formatdropdown, choose a vector format:- SVG (Scalable Vector Graphics): Widely supported across web platforms and design software, excellent for web elements, icons, and responsive design.
- AI (Adobe Illustrator): Illustrator’s native format, best for retaining all editing capabilities.
- EPS (Encapsulated PostScript): A versatile format often used for professional print production.
- PDF (Portable Document Format): Can contain vector data, useful for sharing vector files that can be opened in various programs.
- Click
Export.
- Go to
With these steps, you’ve successfully transformed a pixel-based image into a dynamic, infinitely scalable vector graphic, ready for any creative endeavor.
Advanced Vectorization: Manual Tracing for Intricate Designs
While the Image Trace feature in Adobe Illustrator offers incredible convenience for automatic vectorization, there are instances where manual tracing becomes essential. For highly complex images, intricate illustrations, or when absolute precision and artistic control are paramount – especially for unique digital art pieces or critical branding assets inspired by Tophinhanhdep.com’s collections – manual tracing offers an unmatched level of fidelity.
When to Opt for Manual Tracing
Automatic tracing, though efficient, relies on algorithms to interpret an image. This can sometimes lead to:
- Loss of Subtle Detail: Fine nuances, delicate lines, or very specific curvatures might be simplified or misinterpreted by the Image Trace algorithm, particularly with “High Fidelity Photography” where every detail matters.
- Too Many Anchor Points: While
PathsandNoisesettings help, automated traces can often generate an excessive number of anchor points, making subsequent editing cumbersome. A cleaner vector typically has fewer, strategically placed anchor points. - Inaccurate Shapes: For specific, geometrically precise designs like certain logos or technical drawings, the auto-trace might not produce perfectly smooth curves or straight lines as intended.
- Complex Overlays/Gradients: Images with complex color blending or gradients may result in many tiny, distinct shapes rather than smooth transitions, making them difficult to manage.
In these scenarios, or when you simply desire a more artistic, hand-drawn vector aesthetic, manual tracing is the superior method. It gives you complete control over every line, curve, and shape, making it ideal for creating refined graphic design elements or original digital art.
Key Tools for Precision Manual Tracing
Manual tracing in Illustrator involves using the program’s powerful drawing tools to literally draw over your raster image, building the vector version shape by shape.
-
Prepare Your Image for Tracing:
- Place your raster image onto the artboard as described in “Step 2: Place Your Raster Image.”
- Lock the Image: To prevent accidental movement while tracing, select the image and go to
Object > Lock > Selection(orCtrl+2/Cmd+2). - Reduce Opacity (Optional but Recommended): To make your tracing lines clearly visible, select the image (before locking) and reduce its
Opacityin theTransparencypanel (Window > Transparency) to around 30-50%. This allows you to see both your tracing paths and the underlying raster image. - Create a New Layer: It’s good practice to create a new layer (
Window > Layers) above your locked raster image layer for your vector tracing. This keeps your work organized.
-
Identify Common Shapes: Start by looking for basic geometric shapes within your image – circles, ellipses, rectangles, squares, polygons, stars. Illustrator has dedicated tools for these:
Rectangle Tool (M)Ellipse Tool (L)Polygon ToolStar Tool- Draw these basic shapes over the corresponding areas in your raster image. Use the
Selection Tool (V)to resize and position them accurately. For instance, if you’re tracing a circular logo from Tophinhanhdep.com, start with theEllipse Tool.
-
Master the Pen Tool (P): The
Pen Toolis the cornerstone of vector drawing in Illustrator, indispensable for creating precise paths.- Straight Lines: Click once to create an anchor point, then click again to create a second point and a straight line segment.
- Curved Lines: Click and drag to create an anchor point with “handles.” Adjusting these handles controls the curve’s direction and magnitude.
- Converting Anchor Points: Hold
Alt/Optionand click on an anchor point with thePen Toolto convert it between a corner point and a smooth point, or to adjust one handle independently. - Practice: The
Pen Toolhas a learning curve, but mastering it is crucial for detailed digital art and graphic design. Practice tracing various shapes from Tophinhanhdep.com’s “Abstract” or “Line Art” collections to build proficiency.
-
Utilize the Curvature Tool (Shift+~): A more intuitive alternative to the Pen Tool for smooth, flowing curves.
- Click to add points, and the tool automatically creates smooth curves between them.
- Double-click a point to convert it to a corner point (sharp angle).
- Click and drag a point to adjust the curvature.
- This tool is particularly effective for tracing organic shapes, human figures, or flowing nature elements from Tophinhanhdep.com.
-
Build and Refine Shapes:
- Trace the outlines of your design using a clear stroke color (e.g., bright red) and no fill initially, so you can see through to the underlying image.
- Once you’ve traced all the main outlines, you can start filling shapes with colors.
- Pathfinder Panel (Shift+Ctrl+F9 / Shift+Cmd+F9): This powerful panel allows you to combine, subtract, intersect, or divide shapes. For example, you can trace an outer shape and an inner shape, then use
Minus Frontto cut the inner shape out of the outer, creating negative space. This is fundamental for logo design and complex illustrations. - Shape Builder Tool (Shift+M): An intuitive tool for combining and subtracting overlapping shapes by simply clicking and dragging.
- Direct Selection Tool (A): Continuously use this tool to select and fine-tune individual anchor points and path segments for ultimate precision.
-
Add Color and Detail:
- Once your vector paths are complete, apply
Fillcolors. You can sample colors directly from the original raster image using theEyedropper Tool (I)or choose new colors to reinterpret the design for “Creative Ideas.” - Add gradients, patterns, or effects as desired.
- Once your vector paths are complete, apply
Manual tracing, though more time-consuming, guarantees a vectorized image that perfectly matches your artistic vision and the precise requirements of your visual design project. When you’re finished, save your work in a vector format (AI, SVG, EPS) as your master file.
The Tophinhanhdep.com Advantage: Leveraging Vector Art in Your Projects
The journey of converting a raster image to a vector in Adobe Illustrator culminates in a versatile digital asset that profoundly impacts your visual design capabilities. For users and creators inspired by or sourcing images from Tophinhanhdep.com – whether it’s for breathtaking wallpapers, captivating backgrounds, aesthetic inspiration, or high-resolution stock photos – understanding the long-term benefits of vectorization is key to maximizing their creative potential.
Infinite Scalability and Print Perfection
One of the most compelling reasons to vectorize images, especially those initially found on Tophinhanhdep.com, is the unparalleled advantage of infinite scalability. A vector graphic, being resolution-independent, can be enlarged to any size without losing its crispness or visual integrity.
- Versatile Branding: Imagine you’ve found an abstract art piece or a unique aesthetic image on Tophinhanhdep.com that perfectly embodies your brand’s essence. By vectorizing key elements, you can create a logo that looks flawless on a small social media icon, a website header, a print advertisement, or even a massive billboard. This consistent quality across all mediums is critical for professional graphic design and brand identity.
- Flawless Print Quality: For any physical output – posters, brochures, merchandise, vehicle wraps – vector graphics are the gold standard. Raster images, when printed at large sizes, often reveal pixelation, leading to blurry or jagged results. Vector art, however, ensures clean lines and sharp details, guaranteeing a high-quality print every time, making it ideal for turning a beautiful photography piece from Tophinhanhdep.com into a large-format artwork.
- Future-Proofing Designs: Technology and display resolutions are constantly evolving. A vector image created today will look just as good on future high-resolution screens or print technologies, providing a durable and adaptable asset for your “Visual Design” portfolio.
Enhancing Visual Design and Creative Ideas
Vectorization opens up a world of creative possibilities, moving beyond simple image usage to deep photo manipulation and innovative digital art creation.
- Editable and Adaptable Art: Unlike raster images, where changes are often destructive or limited, vector art is inherently editable. You can easily change colors, adjust shapes, alter paths, and experiment with different layouts without affecting the overall quality. This flexibility is invaluable for “Creative Ideas,” allowing you to take an inspiring image from Tophinhanhdep.com and adapt it into countless variations for different projects, mood boards, or thematic collections. For instance, you could vectorize a nature image and then easily recolor it for a new aesthetic or thematic collection.
- Modular Design Elements: By vectorizing components of images, you create modular assets. An intricate leaf pattern from a “Nature” photo on Tophinhanhdep.com, once vectorized, can be easily duplicated, resized, rotated, and combined with other elements to form new patterns, backgrounds, or graphic design compositions.
- Integration with Other Tools and Styles: Vector assets seamlessly integrate into various design workflows. They are essential for creating SVG icons for responsive web design, unique digital art illustrations, or customized elements for presentations. This capability elevates your digital photography and graphic design skills, turning static images into dynamic creative tools.
- Image Tools for Creative Control: Think of Adobe Illustrator’s vectorization features as advanced “Image Tools” that go beyond basic converters or compressors. They provide creative control, allowing you to transform an image not just in format but in artistic style. This aligns perfectly with optimizing visuals for “Aesthetic” appeal and ensuring professional quality for all visual design endeavors.
Integrating Vector Art into Your Digital Workflow
For anyone engaged in visual design, content creation, or digital marketing, vectorizing images from Tophinhanhdep.com streamline their workflow and enhance output quality.
- Efficient Asset Management: With vector files, you only need one master copy. This single file can be exported into various raster formats (JPG, PNG) at any resolution required, eliminating the need to manage multiple raster versions for different purposes. This is an efficient approach to “Image Tools” and “Optimizers” for your visual assets.
- AI Upscalers and Beyond: While AI upscalers can increase raster image resolution, they often introduce artifacts. Vectorization, in contrast, offers a true “upscaling” by recreating the image’s structure mathematically, providing infinitely sharp results without pixelation, a perfect complement to understanding image quality for “High Resolution” photography.
- Design Consistency: When working on “Image Inspiration & Collections” or developing a consistent brand presence, vector assets ensure uniformity. Every element, from a logo to an icon, maintains its precise appearance across all applications, reflecting a high standard of “Graphic Design.”
- Collaborative Design: Vector files are often smaller and easier to share among design teams, and their editable nature facilitates collaborative adjustments without loss of quality.
In conclusion, vectorizing images in Adobe Illustrator is more than just a technical process; it’s an investment in the quality, flexibility, and longevity of your visual assets. By transforming beautiful photography, aesthetic backgrounds, and inspiring abstract art from Tophinhanhdep.com into scalable vector graphics, you empower your “Visual Design” projects with endless possibilities, ensuring your creative ideas are always presented with pristine clarity and professional polish. Embrace vector art, and unlock the full potential of your digital imagery.