How to Vectorize an Image: Unlocking Scalability and Quality for Your Visual Assets

In the dynamic world of digital visuals, the ability to transform and optimize images is paramount. Whether you’re a professional graphic designer, a budding digital artist, or simply looking to enhance your personal collection of wallpapers and backgrounds, understanding image vectorization is a powerful skill. At Tophinhanhdep.com, we pride ourselves on being a comprehensive resource for all things visual, offering everything from stunning nature photography to cutting-edge AI upscalers. Vectorizing an image is a fundamental process that bridges the gap between static, resolution-limited photographs and infinitely scalable, versatile graphics, directly impacting the quality and utility of your visual content across various applications.
This comprehensive guide will delve into the intricacies of image vectorization, exploring what it is, why it’s indispensable, and how you can achieve professional results using a range of tools and techniques. We’ll cover both automated and manual methods, highlighting the strengths of popular software like Adobe Illustrator and Photopea, and even touch upon preparatory steps in Adobe Photoshop. By the end of this article, you’ll possess the knowledge to confidently convert your raster images into sharp, scalable vector graphics, ensuring your designs and visuals always look their best, no matter the size or medium.
Understanding Vector vs. Raster Images: The Foundation of Digital Visuals
Before we embark on the journey of vectorizing images, it’s crucial to grasp the fundamental differences between the two primary types of digital images: raster and vector. This distinction lies at the heart of why vectorization is necessary and how it revolutionizes the way we interact with and utilize visual content.
What are Raster Images?
Raster images, also commonly known as bitmap images, are the most prevalent type of digital image we encounter daily. They are composed of a grid of individual colored squares, or pixels (picture elements). Each pixel holds specific color information, and when these tiny squares are arranged together, they form a complete image. Common raster file formats include JPG (or JPEG), PNG, GIF, and BMP. Most photographs you take with a camera, screenshots, or images downloaded from the internet are raster files.
The defining characteristic of raster images is their resolution dependency. This means they are created at a specific resolution (e.g., 1920x1080 pixels for a wallpaper). While they can display rich detail and photographic realism, scaling them up beyond their original resolution causes a significant loss in quality. When you zoom in on a raster image, or attempt to enlarge it for a large print, you will eventually see the individual pixels, resulting in a blurry, pixelated, or “blocky” appearance. This limitation makes raster images unsuitable for applications requiring frequent resizing or very large-scale outputs without compromising visual integrity. For example, if you found a beautiful high-resolution image on Tophinhanhdep.com and wanted to print it on a billboard, a raster image would likely pixelate unless it was captured at an exceptionally high resolution for that specific purpose.
What are Vector Images?
In stark contrast to raster images, vector images are not composed of pixels. Instead, they are built from mathematical equations that define geometric primitives like points, lines, curves, and shapes. Each path in a vector graphic has a starting and ending point, along with other specific points, curves, and angles that define its direction and properties (like color, stroke, and fill). This mathematical foundation makes vector graphics resolution-independent.
The primary advantage of vector images is their infinite scalability. You can enlarge or shrink a vector image to any size imaginable—from a tiny icon on a website to a massive billboard advertisement—without any loss of quality. The lines and shapes will remain perfectly crisp, smooth, and sharp, regardless of the magnification. This makes vector graphics ideal for logos, illustrations, technical drawings, typography, and any design element that needs to maintain clarity and precision across various mediums and sizes. Popular vector file formats include SVG (Scalable Vector Graphics), EPS (Encapsulated PostScript), AI (Adobe Illustrator Artwork), PDF (Portable Document Format, which can contain vector elements), CDR (CorelDRAW), and DXF (Drawing Exchange Format, primarily for CAD).
At Tophinhanhdep.com, while we offer a vast array of raster images like stunning photography and aesthetic backgrounds, understanding vectorization allows our users to transform these visuals, or elements derived from them, into assets suitable for professional visual design, graphic design, and digital art projects that demand ultimate flexibility and quality.
Why Vectorize? Unlocking Quality and Versatility for Your Designs
The decision to vectorize an image often stems from practical necessity, artistic ambition, or a combination of both. Transforming a pixel-based image into a mathematically defined vector graphic unlocks a spectrum of possibilities, making your visual assets more adaptable, professional, and impactful.
Scalability Without Quality Loss
This is arguably the most compelling reason to vectorize an image. Imagine you have a company logo that looks great on your business card but becomes fuzzy when printed on a large banner or embroidered on merchandise. This is a classic raster image limitation. A vectorized logo, on the other hand, can be scaled up or down infinitely, always retaining its sharp edges, vibrant colors, and overall crispness. For any element that needs to appear consistently clear across various sizes and platforms – from a small website favicon to an expansive outdoor advertisement – vectorization is essential. This capability is crucial for brands and businesses, ensuring their visual identity remains impeccable regardless of the application. For users of Tophinhanhdep.com creating visual design projects, vectorization means the beautiful elements they find can be adapted for any scale without degradation.
Ease of Editing and Manipulation
Vector images offer unparalleled flexibility in editing. Because they are composed of distinct mathematical paths and shapes, you can easily select, modify, and manipulate individual components without affecting the rest of the image. Want to change a specific color in your vectorized illustration? No problem – just select the shape and apply a new fill. Need to adjust the curvature of a line or reshape an element? The control points are readily accessible for precise adjustments. This granular control is invaluable for graphic design, digital art, and photo manipulation, allowing for rapid iterations and creative modifications that would be tedious or impossible with a raster image. This ease of manipulation streamlines workflows, enabling designers to refine their creative ideas efficiently.
Diverse Practical Applications
The utility of vectorized images extends far beyond simple scaling and editing. Their mathematical precision makes them the preferred format for numerous specialized applications:
- Manufacturing and Fabrication: Vector graphics are the standard for machines that rely on precise lines and shapes, such as CNC routers, laser cutters, plasma cutters, and vinyl cutters. These machines interpret vector paths as instructions for cutting, engraving, or routing materials, making vectorization indispensable for product design and custom fabrication.
- Textile and Apparel: For embroidery digitizing, screen printing (serigraphy), and digital transfers on fabrics, vector files ensure that designs are reproduced with sharp detail and accurate color separation. This is vital for creating high-quality merchandise and custom apparel.
- Web Design and UI/UX: SVG (Scalable Vector Graphics) is a powerful format for web-based graphics. SVGs are lightweight, load quickly, and scale perfectly on responsive websites, adapting to different screen sizes without losing clarity. They are excellent for icons, logos, and interactive elements.
- Professional Printing: Whether for commercial printing, signage, or promotional materials, vector files guarantee that text and graphics will print with maximum sharpness, preventing the fuzzy edges often seen with scaled-up raster images.
By transforming your images into vectors, you future-proof your designs, making them adaptable for virtually any purpose. This capability empowers Tophinhanhdep.com users to not only enjoy high-quality images but also to leverage them as foundational assets for their own professional or personal visual design projects, including graphic design, digital art, and creative marketing materials.
Step-by-Step Guide to Vectorizing Your Images
Vectorizing an image can be approached in several ways, depending on the complexity of the original image, the desired outcome, and the tools at your disposal. This section will walk you through the most common and effective methods, ranging from automated tracing to precise manual recreation.
Automated Vectorization with Image Tracing Tools
Automated vectorization, often referred to as bitmap tracing or image tracing, is a process where software analyzes the pixel data of a raster image and automatically converts it into vector paths. This method is generally quicker and more suitable for images with clear lines, distinct color areas, or simpler compositions.
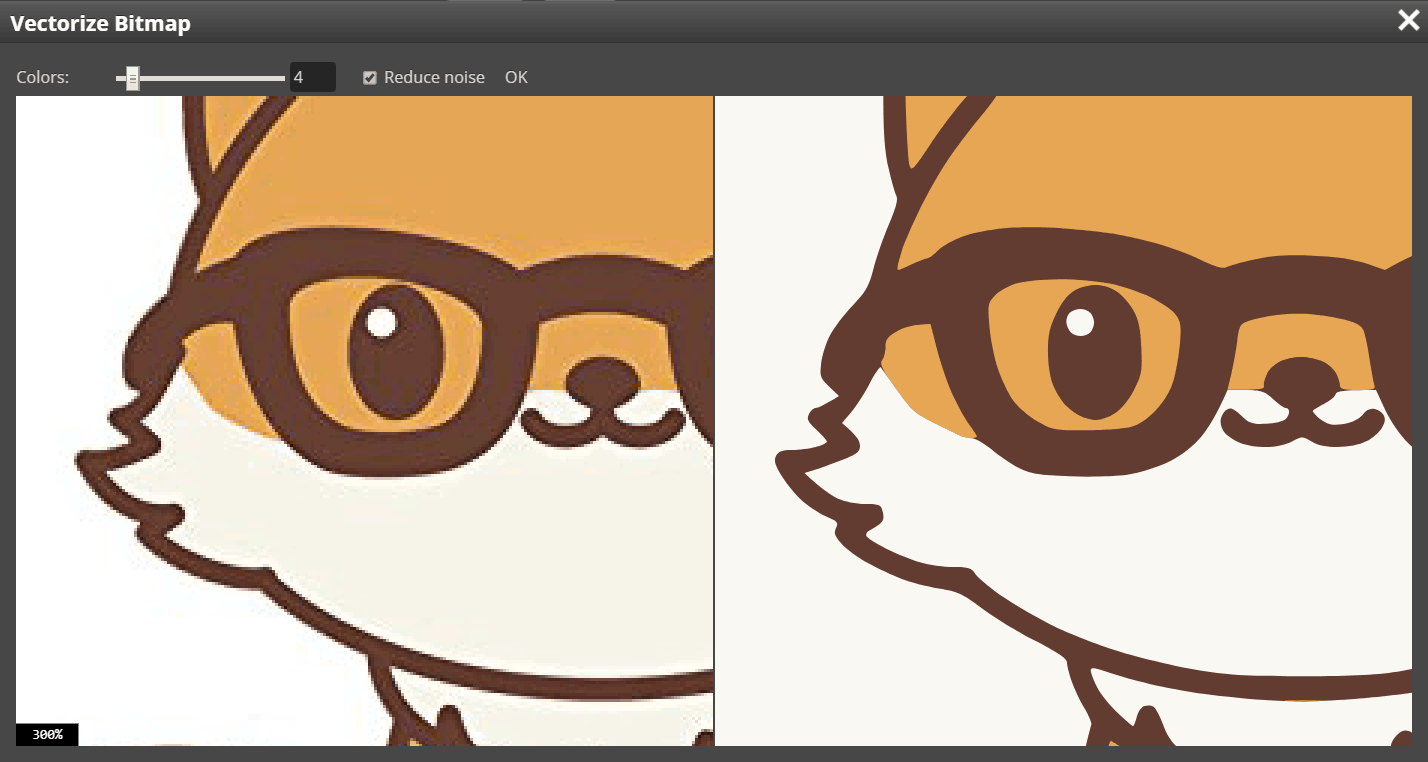
Using Photopea’s Vectorize Bitmap Feature
Photopea is a powerful online image editor that offers a straightforward approach to bitmap vectorization. It’s an excellent tool for quick conversions, especially for users who might not have access to desktop software.
- Open Your Image: Begin by opening your raster image (JPG, PNG, etc.) in Photopea. If you have a layered image, ensure the correct raster layer is selected.
- Access the Vectorizer: Navigate to the menu bar and click
Image>Vectorize Bitmap. This will open a dedicated Vectorizer window. - Review and Adjust: In the Vectorizer window, you’ll see your original image on the left and the vectorized preview on the right. You can zoom in/out and pan both images to inspect the conversion. Photopea offers two key parameters:
- Number of colors: This allows you to specify how many distinct colors the vector output should contain. Reducing the number of colors can simplify the image and is useful for logos or illustrations with flat color areas.
- Noise reduction: Photopea often auto-detects the optimal noise reduction setting for each image. It’s generally recommended not to change this setting unless you observe significant issues.
- Finalize Conversion: Once you are satisfied with the vector output in the preview, click
OK. Photopea will replace your original raster layer with corresponding vector layers, ready for further vector editing or export in vector formats like SVG or PDF. This is a prime example of an “Image Tool” that simplifies complex tasks.
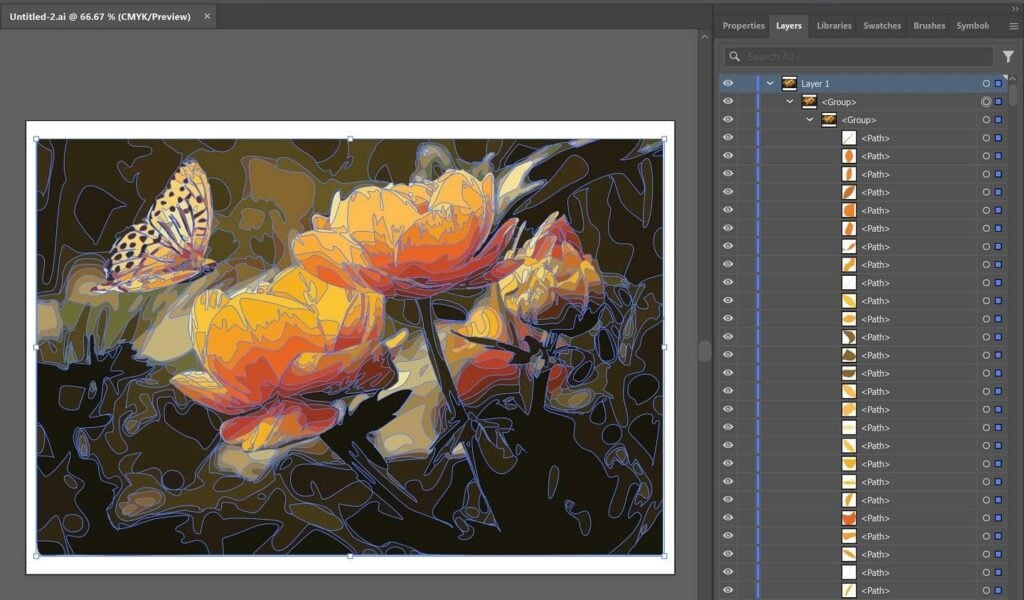
Adobe Illustrator’s Image Trace: A Powerful Automated Solution
Adobe Illustrator is the industry standard for vector graphics, and its Image Trace feature is a highly sophisticated tool for automated vectorization. It offers a wide array of presets and controls for fine-tuning the conversion process.
- Prepare Your Image: Open your raster image in Adobe Illustrator. For best results, especially with intricate images or those with busy backgrounds, consider preparing the image first. Cropping the image to focus on the desired subject can improve tracing accuracy. Embed the image if it’s linked.
- Select the Image and Initiate Image Trace: Select the image on your artboard. In the
Propertiespanel (usually on the right), underQuick Actions, you’ll find theImage Traceoption. Click on it. - Choose a Preset: Illustrator provides various presets designed for different types of images. Choosing the right preset is crucial for achieving the desired outcome:
- High Fidelity Photo: Attempts to create a vector image that closely resembles the original photograph, capturing many details and color gradients. This is ideal if you want a vectorized version that looks as close to the original as possible.
- Low Fidelity Photo: Simplifies the image, giving it a more stylized, “cartoony” appearance with fewer colors and details.
- 3 / 6 / 16 Colors: Generates vector images with a limited number of colors. These are excellent for logos, flat-color artwork, or designs requiring a specific color palette.
- Grayscale / Black and White / Silhouette / Line Art / Sketched Art / Technical Drawing: These presets are tailored for monochromatic images, line drawings, or creating simplified outlines.
- Refine the Trace in the Image Trace Panel: After applying a preset, the image will be traced, but you can further refine it. To access more controls, click the
Image Trace Panelicon next to the preset dropdown (or go toWindow>Image Trace).- Mode: Switch between Color, Grayscale, or Black and White.
- Colors Slider: (For color/grayscale modes) Drag left to simplify colors, drag right to add more elements and detail.
- Advanced Settings: Expand this section for granular control over Paths, Corners, Noise, and other parameters.
- Ignore White: This is a very useful option for logos or images with a solid white background. It removes all white areas, making the background transparent. Caution: If your design contains white elements (like the white play button in a YouTube logo), this option will remove them too. You might need to ungroup and delete the background manually later.
- Expand and Ungroup: Once you’re satisfied with the trace, click the
Expandbutton in thePropertiespanel (orObject>Image Trace>Expand). This converts the tracing result into editable vector paths.- Next, right-click on the expanded image and select
Ungroup. This separates the various color groups and shapes, allowing you to select and modify individual elements.
- Next, right-click on the expanded image and select
- Post-Tracing Editing: With the image ungrouped, you can now:
- Remove Backgrounds: Select unwanted background shapes (if not removed by
Ignore White) and delete them. You might need to holdShiftto select multiple parts of the background. - Adjust Colors: Select specific shapes and change their fill or stroke colors.
- Refine Shapes: Use the
Direct Selection Tool(A) to adjust anchor points and paths for smoother lines or more accurate shapes.
- Remove Backgrounds: Select unwanted background shapes (if not removed by
Image Trace in Illustrator is a powerful “Visual Design” tool that can quickly turn raster images into versatile vector assets, perfect for Tophinhanhdep.com users looking to create graphic design elements or digital art from existing visuals.
Manual Vectorization with the Pen Tool for Precision and Customization
While automated tracing is fast, it sometimes struggles with complex details, intricate textures, or subtle gradients. For ultimate precision, artistic control, or when creating a stylized vector graphic from a raster reference, manual vectorization using the Pen Tool is the superior method. This approach treats the raster image as a guide, allowing you to painstakingly recreate its forms with vector paths.
- Prepare Your Raster Image in Illustrator:
- Open your raster image in Adobe Illustrator.
- Select the image and reduce its
Opacity(e.g., to 70%) in theTransparencypanel (Window>Transparency). This makes it easier to see your vector paths as you draw over the image. - Lock the image layer (
Window>Layers, click the empty square next to the layer name to show a lock icon). This prevents you from accidentally moving the raster image while you’re drawing.
- Create a New Layer for Vector Paths: Always work on a new layer above your locked raster image. This keeps your vector work separate and organized.
- Trace with the Pen Tool (P):
- Select the
Pen Toolfrom the toolbar. - Set the
FilltoNoneand choose a bright, contrastingStroke Color(e.g., magenta or cyan) that stands out against your image. This allows you to clearly see the paths you’re drawing. - Begin tracing the outlines of the different elements or color areas within your image. For complex images, it’s advisable to trace distinct sections or color groups on separate paths or even separate sub-layers.
- Tips for Pen Tool Mastery:
- Click to create straight corner points.
- Click and drag to create smooth curve points with handles.
- Hold
Alt/Optionwhile dragging a handle to create a cusp (sharp change in direction on a curve). - Close paths by clicking on the initial anchor point to form complete shapes.
- Lock each path (
Command/Ctrl + 2) as you finish it to avoid accidental selection or modification.
- Select the
- Coloring and Detailing Your Vector Image:
- Once you have traced all the necessary shapes, unlock all your vector paths (
Object>Unlock All). - Select a closed path. Use the
Eyedropper Tool(I) to sample a color directly from the corresponding area of your original raster image. The sampled color will be applied as the fill for your vector shape. Repeat this process for all major color areas. - Arranging Layers: If some colored areas are obscuring others, use
Object>Arrange(or right-click) to send layers backward or bring them forward, ensuring the correct stacking order. - Adding Details: Use the Pen Tool,
Brush Tool(B), orPencil Tool(N) to add finer details, textures, or subtle variations. You can also create gradients for more nuanced color transitions.
- Once you have traced all the necessary shapes, unlock all your vector paths (
- Refinement and Finalization:
- Use the
Direct Selection Tool(A) to select individual anchor points and handles, allowing for precise adjustments to the curves and lines. - The
Eraser Tool(Shift + E) can be used to clean up overlapping areas or refine edges. - Consider grouping related vector elements (
Object>Group) for easier management. - Save your work in a vector format (AI, EPS, SVG, PDF) to preserve its scalability and editability.
- Use the
This method offers complete creative freedom, making it ideal for converting photos to sketches, vectorizing handwriting, or creating unique digital art and graphic design pieces from scratch, perfect for Tophinhanhdep.com users with a vision for custom visual assets.
Preparing for Vectorization in Adobe Photoshop
While Photoshop is primarily a raster-based image editor, it can serve as a crucial preparatory tool for vectorization. Its strengths lie in image manipulation, background removal, and enhancing details, which can significantly improve the accuracy of subsequent vector tracing, especially when working with complex “Beautiful Photography” or “Stock Photos.” Photoshop can also create vector paths, though it’s typically best to export these paths to a dedicated vector editor like Illustrator for final vector graphic creation.
- Import and Initial Assessment:
- Open the image you wish to vectorize in Photoshop.
- Evaluate the image: Does it have a complex background? Are the edges of your subject well-defined? Images with simple backgrounds (solid color or transparent) and clear subject outlines are ideal for cleaner vectorization.
- Background Removal (If Necessary):
- If your image has a busy background that would interfere with tracing, use Photoshop’s powerful selection tools to remove it. Tools like the
Quick Selection Tool(W),Magic Wand Tool(W),Pen Tool(P), or theRemove Backgroundfeature inPropertiespanel are effective. - A clean, isolated subject will yield much better vector results.
- If your image has a busy background that would interfere with tracing, use Photoshop’s powerful selection tools to remove it. Tools like the
- Enhance Details and Contrast:
- Vectorization relies on identifying distinct edges and color changes. Enhancing these can improve the tracing accuracy.
- Sharpening: Apply a
High Passfilter (Filter>Other>High Pass) to bring out edges. Set the blending mode toOverlayorSoft Lightand adjust opacity. - Contrast Adjustment: Use
Curves(Image>Adjustments>Curves) orLevels(Image>Adjustments>Levels) to increase the contrast between different areas of your subject. - Threshold Adjustment: Create a
Threshold Adjustment Layer(Layer>New Adjustment Layer>Threshold). This converts your image to pure black and white pixels based on a luminance threshold. Adjust the slider to highlight the key details you want to vectorize. This step is particularly useful for converting photos to high-contrast line art or silhouettes.
- Merge Layers (If using adjustment layers): Once satisfied with the threshold result, merge the visible layers (
Layer>Merge VisibleorShift + Ctrl + Alt + E/Shift + Cmd + Option + E) to create a single black and white layer. - Create Work Paths from Selection:
- Select Color Range: Go to
Select>Color Range. ChooseShadows(orHighlightsdepending on your image) from theSelectdropdown. AdjustFuzzinessandRangeto accurately select the black (or white) areas of your processed image. ClickOK. This will create a selection indicated by marching ants. - Make Work Path: With the selection active, choose any selection tool (e.g.,
Rectangular Marquee Tool- M). Right-click on the canvas and selectMake Work Path. In the dialog box, setToleranceto a low value (1 to 1.5 pixels) for greater precision. This converts the selection into a vector path.
- Select Color Range: Go to
- Export Paths to Illustrator:
- In the
Pathspanel (Window>Paths), double-click on your newly createdWork Pathto name and save it. - Go to
File>Export>Paths to Illustrator. This will save a.aifile containing only the vector paths, which can then be opened in Adobe Illustrator for further editing, coloring, and final vector graphic creation.
- In the
- Saving as EPS (Limited Vector Output from Photoshop): While Photoshop can save as an EPS, this typically embeds a raster image within the EPS container or relies on vector paths created as above. For true, editable vector files, exporting paths to Illustrator is usually preferred. If you must save a partially vectorized image directly from Photoshop, use
File>Save a Copyand selectPhotoshop EPSformat. However, be aware that this is a hybrid format, and full vector editing is best done in Illustrator.
Using Photoshop in this way makes it an excellent “Image Tool” for preparing complex “Digital Photography” or “Abstract” images for conversion into scalable vector assets, integrating perfectly with “Visual Design” workflows on Tophinhanhdep.com.
Essential Vector File Formats and Their Applications
Understanding the different vector file formats is crucial for effective visual design and ensuring your vectorized images are used appropriately. Each format has its strengths and ideal applications.
- AI (Adobe Illustrator Artwork): This is the native file format for Adobe Illustrator. AI files retain all editing capabilities and layers, making them the preferred format for designers working within the Adobe ecosystem. If you’re creating a logo or illustration from scratch or doing extensive vector editing, AI is your go-to.
- EPS (Encapsulated PostScript): A widely used, older vector format compatible with most graphic design software. EPS files are excellent for sending vector graphics to print shops as they preserve vector data and can also include raster elements. However, they lack the modern features of formats like AI and SVG.
- SVG (Scalable Vector Graphics): An XML-based vector image format for two-dimensional graphics with support for interactivity and animation. SVG is the standard for web graphics, offering excellent scalability, small file sizes, and responsive design capabilities. All modern web browsers support SVG.
- PDF (Portable Document Format): While PDF is primarily known for document sharing, it can contain both raster and vector data. PDFs that originated as vector files (e.g., from Illustrator) will retain their vector properties, making them suitable for high-quality printing and sharing editable designs, provided they are saved correctly.
- CDR (CorelDRAW): The native file format for CorelDRAW, another popular vector graphics editor. CDR files are similar to AI files in their ability to retain editing information within the CorelDRAW environment.
- DXF (Drawing Exchange Format): Developed by Autodesk, DXF is a CAD (Computer-Aided Design) data file format. It’s widely used for exchanging two-dimensional drawing data between CAD programs and is essential for applications like laser cutting, CNC machining, and architectural drawings.
Choosing the correct vector file format ensures compatibility, preserves quality, and optimizes your “Visual Design” and “Graphic Design” projects for their intended output, whether for web, print, or fabrication. This knowledge is an invaluable addition to the “Image Tools” available through Tophinhanhdep.com.
Tophinhanhdep.com: Your Hub for Image Inspiration, Tools, and Visual Excellence
At Tophinhanhdep.com, we understand that exceptional visuals are the cornerstone of impactful communication and creative expression. Our platform is meticulously curated to be a comprehensive resource, blending inspiration with practical tools to elevate your visual projects. Vectorizing an image isn’t just a technical process; it’s a bridge that connects the aesthetic appeal of our “Images” and “Photography” collections with the functional demands of “Visual Design” and “Image Tools.”
Here’s how vectorization enhances and integrates with Tophinhanhdep.com’s core offerings:
- Images (Wallpapers, Backgrounds, Aesthetic, Nature, Abstract, Sad/Emotional, Beautiful Photography): Imagine finding a stunning piece of nature photography or an abstract background on Tophinhanhdep.com. By vectorizing key elements or creating a stylized interpretation, you can transform these beautiful raster images into unique logos, illustrations, or graphic design components. A vectorized abstract pattern, for instance, could become a scalable branding asset, maintaining its aesthetic appeal across all marketing materials.
- Photography (High Resolution, Stock Photos, Digital Photography, Editing Styles): Our commitment to providing high-resolution stock photos means you start with the best possible raster source for vectorization. Whether you’re extracting a product for a catalog, converting a photo of a person into an artistic silhouette, or preparing digital photography for a large-format display, vectorization ensures that the core elements retain their quality at any scale. This capability allows designers to leverage our extensive photo library as a foundation for professional-grade visual assets.
- Image Tools (Converters, Compressors, Optimizers, AI Upscalers, Image-to-Text): Vectorization acts as a sophisticated “converter” within the suite of tools we advocate. While AI Upscalers enhance raster image resolution, vectorization offers a fundamentally different solution – true resolution independence. For those moments when you need to convert JPG to vector, PNG to vector, or even a GIF or BMP to a scalable format, understanding vectorization complements these tools, providing a pathway to creating highly optimized and versatile visual content.
- Visual Design (Graphic Design, Digital Art, Photo Manipulation, Creative Ideas): This category is where vectorization truly shines. Graphic designers depend on vector graphics for logo creation, branding guidelines, packaging design, and print materials, all of which demand pristine scalability. Digital artists can use vectorization to achieve clean lines and flat color styles, moving beyond pixel-based limitations. Photo manipulation techniques can often incorporate vectorized elements for composite images that maintain sharpness. Tophinhanhdep.com provides the inspiration and the knowledge to execute these creative ideas with precision.
- Image Inspiration & Collections (Photo Ideas, Mood Boards, Thematic Collections, Trending Styles): Vectorization extends the lifespan and utility of the images found in our inspiration galleries. A trending aesthetic might involve bold, clean lines or abstract shapes – elements perfectly suited for vector transformation. When compiling mood boards or thematic collections, vectorized assets ensure consistency and quality, allowing designers to experiment with various layouts and scales without compromising visual integrity.
In essence, Tophinhanhdep.com empowers you not just to find stunning visuals, but to understand how to manipulate and optimize them for any purpose. From beautiful photography to abstract art, the journey of vectorization ensures that your digital assets are always of the highest quality, infinitely adaptable, and ready to meet the demands of any creative project, ultimately enriching your “Visual Design” and “Digital Photography” endeavors.
Vectorizing an image is more than just a technical trick; it’s a strategic move that fundamentally enhances the versatility and longevity of your visual assets. By transforming pixel-based images into mathematical paths, you unlock infinite scalability, pristine clarity, and unparalleled editing flexibility. Whether you opt for the efficiency of automated tracing tools like Photopea or Adobe Illustrator’s Image Trace, or prefer the precision of manual recreation with the Pen Tool, the outcome is a graphic that stands the test of resolution and size.
This journey from raster to vector is essential for a myriad of applications, from crisp corporate logos and intricate embroidery designs to responsive web graphics and precise laser-cut patterns. It ensures that your visual message remains consistent and impactful, regardless of where or how it’s displayed.
At Tophinhanhdep.com, we are committed to equipping you with the knowledge and resources to excel in the digital visual landscape. By embracing image vectorization, you’re not just converting a file; you’re transforming your creative potential, ensuring that your beautiful photography, aesthetic backgrounds, and all your visual design endeavors are always sharp, professional, and ready for any challenge. Explore our collections, harness these powerful techniques, and elevate your visual content to new heights of excellence.