How to Vectorize an Image in Illustrator: A Comprehensive Guide for Scalable Design

In the vast landscape of digital imagery, the ability to manipulate and optimize graphics for various applications is paramount. Whether you’re working on stunning wallpapers for high-resolution screens, intricate graphic design projects, or simply seeking to enhance your digital art, understanding the difference between raster and vector images, and mastering the conversion process, is a game-changer. This guide delves deep into the art of vectorization using Adobe Illustrator, a skill that empowers designers and photographers alike to achieve unparalleled scalability and quality in their visual assets. We’ll explore the ‘why’ and ‘how’ of converting raster images into editable vector graphics, a crucial technique that ensures your visuals remain crisp and flawless, regardless of their size or application.
Understanding Raster vs. Vector Images: The Foundation of Digital Art
Before we dive into the practical steps of vectorization, it’s essential to grasp the fundamental distinction between raster and vector images. This understanding forms the bedrock of effective digital image manipulation and helps you decide when vectorization is truly necessary.
Raster images, often referred to as bitmaps, are the most common type of digital image. They are composed of a grid of tiny individual squares, called pixels, each assigned a specific color. Think of a photograph you take with your camera or a scenic wallpaper you download from Tophinhanhdep.com – these are typically raster images. Their strength lies in their ability to capture intricate details, subtle color gradations, and photographic realism, making them ideal for high-resolution photography, aesthetic backgrounds, and detailed image collections. Common raster file formats include JPEG, PNG, GIF, and TIFF.
The primary limitation of raster images, however, is their inherent resolution dependency. When you enlarge a raster image beyond its original dimensions, the individual pixels become visible, leading to a pixelated, blurry, and unprofessional appearance. This loss of quality makes them unsuitable for applications requiring frequent resizing, such as logos, illustrations for branding, or large-format prints.
What Makes Vector Graphics Superior for Scalability?
Vector graphics, in stark contrast, are not made of pixels. Instead, they are constructed using mathematical equations that define points, lines, curves, and shapes. These geometric objects are represented by paths, which contain information about their color, stroke, and position. Because vectors are defined by mathematical formulas rather than a fixed grid of pixels, they are inherently resolution-independent.

This means you can scale a vector image to any size – from a tiny icon to a billboard-sized advertisement – without any loss of quality. The lines remain sharp, and the colors stay true, making vector graphics the preferred choice for logos, illustrations, technical drawings, digital art, and elements within graphic design where crispness and scalability are paramount. Common vector file formats include SVG, AI (Adobe Illustrator), EPS, and PDF (which can contain vector data).
The advantages of vector graphics extend beyond scalability. They are often smaller in file size for simpler designs, easier to edit (as you manipulate paths and points directly), and can be used to create clean, minimalist aesthetics often sought after in modern design. For artists and designers exploring creative ideas or developing thematic collections, starting with vector assets, or converting existing ones, opens up a world of possibilities for versatile application across various platforms.
When to Vectorize Your Images?
Understanding when to convert a raster image to a vector is key to optimizing your workflow and achieving the best visual outcomes. You should consider vectorization in the following scenarios:
- Logo Design: This is perhaps the most common application. A logo needs to look perfect on a business card, a website, a large sign, or merchandise. Vectorizing ensures this consistency.
- Illustrations and Digital Art: If you have hand-drawn sketches or simple digital artworks that you want to scale and edit with precision, converting them to vectors allows for easy manipulation of individual shapes and lines.
- Print Media: For anything going to print, especially at larger sizes (posters, banners, apparel), vector graphics eliminate pixelation and ensure sharp output. This is vital for maintaining the quality of high-resolution stock photos that might need graphic elements overlaid or extracted.
- Web Graphics (SVG): Scalable Vector Graphics (SVG) are excellent for web use. They load quickly, scale perfectly on different screen sizes and resolutions (from mobile phones to 4K monitors), and can be animated. This is particularly useful for aesthetic backgrounds and abstract designs that need to perform well online.
- Product Mock-ups and Branding: When applying designs to different products or creating branding guidelines, having vector versions of your graphics ensures consistency and adaptability.
- Simplifying Complex Images: Sometimes, vectorization is used as an editing style to reduce a complex photo to a more artistic, simplified illustration, ideal for digital art or stylized backgrounds.
In essence, if your image needs to be scaled, retain crisp edges, or be easily editable at a foundational shape level, vectorization is the answer. This tool is a cornerstone for visual design and photo manipulation, transforming ordinary images into versatile graphic assets.
The Adobe Illustrator Approach: Mastering Image Trace
Adobe Illustrator is the industry standard for vector graphic creation and manipulation. Its powerful “Image Trace” feature makes the process of converting raster images into vectors largely automated and highly customizable. This section will walk you through the steps to effectively use this tool.
Step-by-Step Guide to Vectorizing with Image Trace
The process in Illustrator is streamlined, allowing both beginners and experienced designers to achieve impressive results.
Step 1: Prepare and Import Your Image
Before you begin, select the right image for vectorization. While Illustrator can trace any raster image, simpler images with clear lines, strong contrasts, and fewer colors tend to yield better results and require less fine-tuning. Images like logos, cartoons, or line art are excellent candidates. Even a complex photograph can be stylized, but it will involve more detailed settings.
- Launch Adobe Illustrator: Open the application on your computer.
- Create a New Document: Go to
File > New(orCtrl+N/Cmd+N). You can choose any standard canvas size, like A4, and ensure the resolution is set to 300 PPI for potential print uses, selecting RGB for digital and CMYK for print. - Place Your Raster Image: Go to
File > Place...(Shift+Ctrl+P/Shift+Cmd+P), navigate to your image file (e.g., JPEG, PNG), select it, and click “Place.” Click on your artboard to position the image. If needed, resize the image by clicking and dragging its bounding box handles while holdingShiftto maintain proportions.
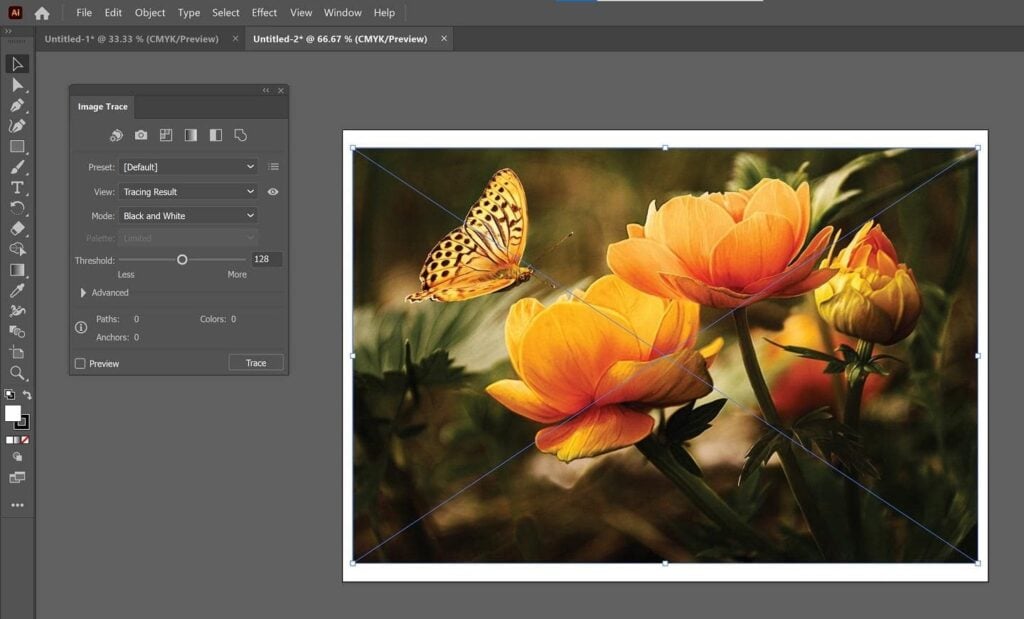
Step 2: Activate Image Trace and Choose a Preset
Once your image is placed and selected, the Image Trace feature becomes accessible.
-
Open the Image Trace Panel: With the image still selected, go to
Window > Image Trace. A panel will appear, offering various options. -
Enable Preview: In the Image Trace panel, check the “Preview” box. This allows you to see the real-time effect of your tracing settings, making it much easier to fine-tune. Initially, it might not look perfect, but don’t worry – we’ll adjust it.
-
Select a Preset: Illustrator provides a range of presets designed for different types of images. Choosing the right preset is crucial as it automatically applies a set of optimized tracing parameters.
- High Fidelity Photo / Low Fidelity Photo: Best for detailed images or photographs, offering varying levels of detail.
- 3 Colors / 6 Colors / 16 Colors: Ideal for designs with a limited color palette, such as logos or illustrations.
- Grayscale: Converts the image to shades of gray.
- Black and White Logo: Perfect for simple, two-color logos.
- Sketched Art / Silhouettes / Line Art / Technical Drawing: Tailored for specific types of line-based or simplified artwork.
Click on the “Preset” dropdown menu in the Image Trace panel and select the option that best suits your source image. For example, if you’re vectorizing a complex image that needs to retain many colors, “High Fidelity Photo” is a good starting point. For a cleaner, more graphic look from a photo, try one of the “Color” presets.
Step 3: Fine-Tuning Your Vectorization Settings
After applying a preset, you’ll likely need to adjust the settings to achieve your desired outcome. The Image Trace panel offers extensive control.
- Choose the Mode: Depending on your selected preset, you can refine the “Mode” (Color, Grayscale, or Black and White).
- Color Mode: Offers a “Colors” slider to control the number of colors in your vector. Lower values simplify the image; higher values add more detail but increase complexity.
- Grayscale Mode: Provides a “Grays” slider to adjust the range of gray tones.
- Black and White Mode: Features a “Threshold” slider, where higher values make dark areas more prominent and expand them, while lower values reduce them. This is particularly useful for text or line art.
- Access Advanced Options: Click the “Advanced” arrow to reveal more granular controls, which are essential for precise vectorization.
- Paths: Controls how closely the vector paths hug the original image’s edges. Higher values create more precise, detailed paths; lower values result in smoother, simpler shapes.
- Corners: Determines the sharpness of corners. Higher values produce sharper corners; lower values lead to rounder corners.
- Noise: Specifies the minimum number of pixels that can be traced as a single object. Increasing this value ignores smaller, isolated pixels (noise), leading to a cleaner trace and simplifying your image, which is great for removing unwanted artifacts.
- Method: Choose between “Abutting” (creates paths that touch each other, preserving all detail) or “Overlapping” (creates paths that overlap, which can be easier for editing individual components later).
- Ignore White: This crucial option, often found under the advanced settings or directly in the Image Trace panel, allows you to automatically make white areas transparent. This is incredibly useful for vectorizing logos or objects with a white background, making them instantly usable on any background color.
- Fill/Stroke: Decide whether Illustrator should trace fills, strokes, or both. For most purposes, “Fill” is active.
Experiment with these sliders and options while keeping the “Preview” box checked. You’ll see the changes instantly, allowing you to find the perfect balance between detail, color accuracy, and simplicity for your vector image. If you find a combination of settings you love, you can save it as a new preset for future use by clicking the “Manage Presets” button.
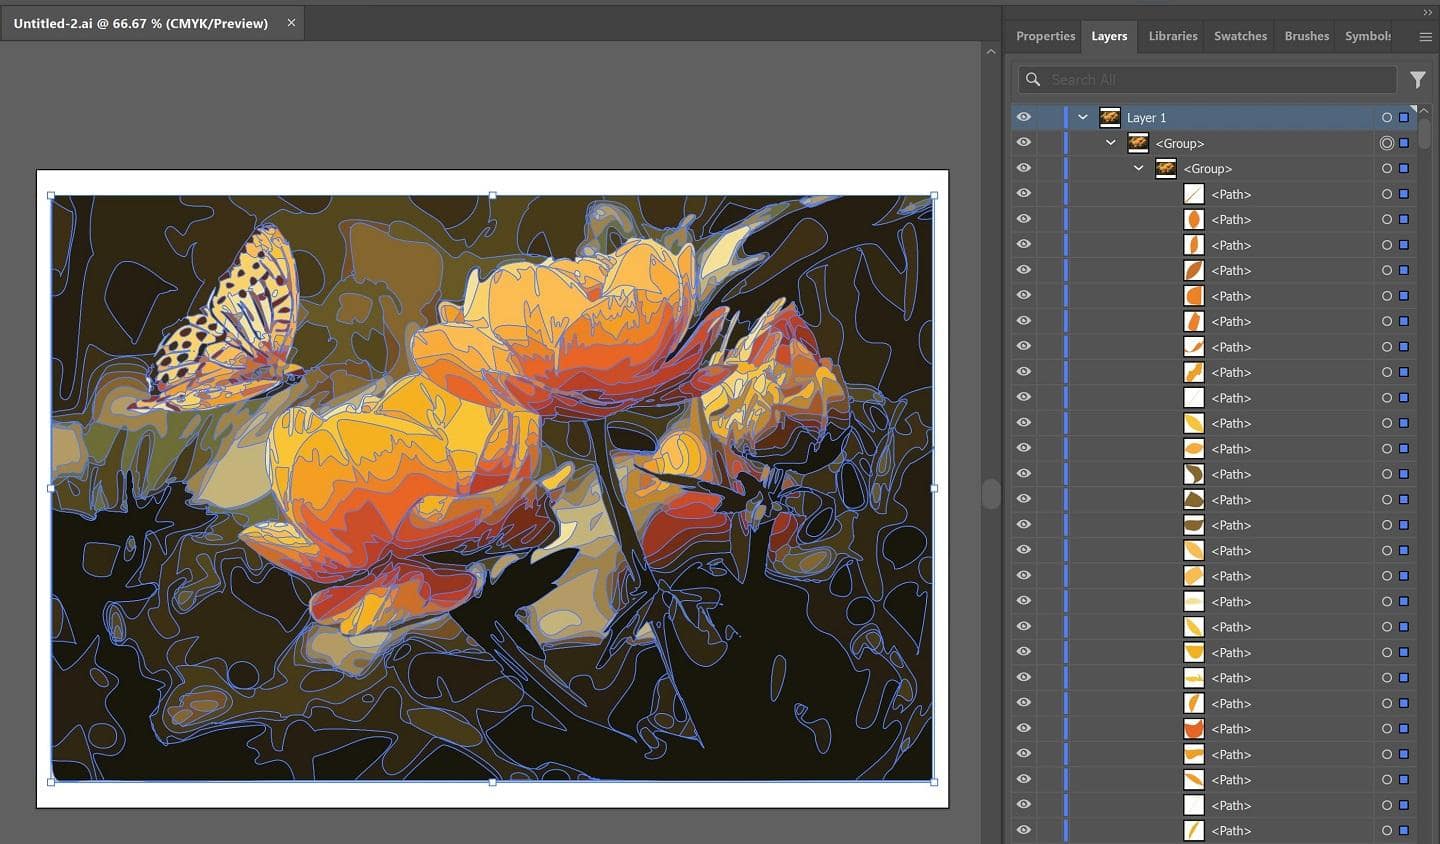
Step 4: Expand and Ungroup for Full Editability
Once you are satisfied with the real-time preview of your vectorized image, it’s time to finalize the conversion into editable vector paths.
- Expand the Trace: With the image still selected, click the “Expand” button in the Control panel at the top of Illustrator (or in the Properties panel). This action converts the traced outline into actual vector paths and shapes. You will see numerous blue outlines indicating the individual vector objects that now make up your image.
- Ungroup Color Shapes: After expanding, the entire image will still be grouped as a single object. To edit individual color areas or shapes, you need to ungroup them. Right-click on the expanded image and select “Ungroup” from the context menu, or go to
Object > Ungroup(Shift+Ctrl+G/Shift+Cmd+G). You may need to ungroup multiple times if there are nested groups.
Now, your image is fully vectorized and ready for intricate editing, similar to how graphic designers work on custom digital art.
Step 5: Refine and Save Your Vector Masterpiece
With your image converted into editable vector shapes, you have complete control over its appearance.
- Edit Individual Shapes and Colors:
- Remove Unwanted Elements: Use the
Direct Selection Tool (A)(the white arrow) to select and delete individual paths or shapes, such as residual background elements. - Change Colors: Select an individual shape with the
Direct Selection Tool (A). To select all shapes of the same color, go toSelect > Same > Fill Color. Then, use theFillbox in thePropertiespanel orToolspanel to choose a new color. This is excellent for updating branding colors or experimenting with new aesthetics. - Modify Paths: Use the
Pen Tool (P)to add, delete, or adjust anchor points on paths, allowing for precise control over curves and lines. TheSmooth Toolcan help refine jagged edges.
- Remove Unwanted Elements: Use the
- Optimize the Image: For cleaner vector graphics, especially for simpler illustrations or logos, you might want to simplify paths. Go to
Object > Path > Simplify...to reduce the number of anchor points without significantly altering the shape. This can reduce file size and make editing easier. - Save Your Vector Image: Once you’ve perfected your vector graphic, it’s time to save it in a vector-friendly format to preserve its scalability.
- Go to
File > Save As.... - Choose a suitable vector format:
- Adobe Illustrator (.ai): Illustrator’s native format, retaining all layers and editability.
- Scalable Vector Graphics (.svg): Excellent for web use, compatible with many design programs.
- Encapsulated PostScript (.eps): A widely supported format for print and professional applications.
- PDF (.pdf): Can embed vector data, making it versatile for both viewing and editing.
- For most general purposes,
.aior.svgare excellent choices. - Always keep the vector file as your master copy, as you can always export raster versions (like JPEG or PNG) from it without quality loss.
- Go to
You’ve now successfully converted a raster image into a fully editable, scalable vector graphic using Adobe Illustrator. This skill is invaluable for any visual designer, photographer, or digital artist looking to elevate their creative ideas and ensure their images look pristine at any size.
Expanding Your Horizons: Beyond Illustrator for Vectorization
While Adobe Illustrator is a powerhouse for vectorization, it’s not the only tool available. Various software and online platforms offer similar capabilities, each with its own workflow and advantages. Exploring these alternatives can provide flexibility, especially if you’re working within different ecosystems or need a simpler, quicker solution for specific tasks.
Alternative Tools for Vector Conversion
- Linearity Curve (formerly Vectornator): This increasingly popular design software, available on Mac and iPad, offers an intuitive “Auto Trace” feature. It leverages AI to quickly convert raster images to vectors in just a few clicks. Curve provides different modes (Sketch, Photography, Illustration, Basic Shapes) optimized for various image types, along with sliders for detail, color precision, and gradient smoothness. Its ease of use and mobile-first approach make it a strong contender for digital artists on the go.
- Adobe Photoshop: Primarily a raster editing software, Photoshop does possess some vector capabilities through its Pen Tool. You can manually trace over raster images to create vector paths and shapes. However, this is a meticulous and time-consuming process, making it less ideal for automatic conversion compared to Illustrator’s Image Trace. For tasks like outlining text or creating simple vector masks, Photoshop can suffice, but it’s not its primary strength for full image vectorization.
- Figma: Geared towards UI/UX design, Figma also includes a Pen Tool that allows for manual vector tracing. Designers can create vector layers and meticulously trace over raster images. While powerful for its collaborative features and interface design, its vectorization process is manual and, like Photoshop, not designed for automatic image tracing.
- Free Online Tools (e.g., AutoTracer, Vectorization.org): A handful of web-based tools offer free raster-to-vector conversion. These are generally good for simple graphics, logos, or line art, providing quick results without software installation. However, they often lack the advanced customization and precision found in professional desktop applications like Illustrator or Linearity Curve. For complex images or fine-tuning, their capabilities can be limited. For quick, no-frills conversions, they can be a convenient option.
- Inkscape: As a free and open-source vector graphics editor, Inkscape is a robust alternative to Illustrator. It offers a “Trace Bitmap” feature that functions similarly to Illustrator’s Image Trace, allowing users to convert raster images into vectors with various settings and parameters. It’s an excellent choice for those seeking powerful vectorization capabilities without the subscription cost.
When evaluating these tools, consider the complexity of your image, the desired level of detail, your workflow, and your budget. For the most professional and flexible results, Adobe Illustrator remains a top choice, but alternatives like Linearity Curve offer compelling, efficient workflows, especially for those involved in digital art and creative ideas on multiple devices.
Leveraging Vectorization in Visual Design and Photography
The ability to vectorize images fundamentally transforms how visual designers and photographers approach their craft, aligning perfectly with the diverse content offerings on Tophinhanhdep.com.
For Visual Design, vectorization is an indispensable technique. Graphic designers use it to convert client-provided raster logos into scalable vector formats for consistent branding across all mediums. Digital artists can take their hand-drawn sketches or traditional artwork, vectorize them, and then manipulate them with vector tools to create stunning, scalable digital art pieces. This process is key to creating clean, sharp graphics for everything from websites and mobile apps to print brochures and packaging. The precision of vector graphics allows for perfect alignment, clean typography, and intricate patterns, all of which contribute to high-quality visual design.
In Photography, while raw images are inherently raster, vectorization opens avenues for creative photo manipulation and stylization. Imagine taking a beautiful photograph of nature or a portrait and transforming it into an artistic, painterly vector illustration. This process can distil the essence of a photograph into a graphic form, suitable for aesthetic backgrounds, abstract designs, or as elements within a larger graphic composition. High-resolution stock photos, after vectorization, can be broken down into their core shapes and colors, offering new creative ideas for promotional materials or unique art pieces. This technique bridges the gap between realistic photography and stylized graphic elements, offering immense flexibility for image editing styles and creative expression.
Moreover, vectorized images contribute significantly to Image Tools categories. They act as “converters” by transforming raster data into vector data. Once vectorized, these images can be “optimized” for web use (e.g., as SVGs), contributing to faster load times and improved user experience for platforms showcasing wallpapers and backgrounds. For “image inspiration & collections,” vectorized art can populate mood boards and thematic collections with visually cohesive, scalable elements that maintain their quality regardless of how they are displayed or printed.
The versatility of vector graphics enables designers to explore creative ideas, refine digital art, and even redefine how photographic elements are incorporated into visual projects. It’s a critical skill for anyone aiming to produce professional, adaptable, and high-quality visual content.
Best Practices and Creative Applications of Vectorization
Mastering vectorization extends beyond knowing the steps; it involves strategic thinking about when and how to apply this powerful technique to maximize its benefits across various creative endeavors, from generating aesthetic backgrounds to refining graphic design elements.
Choosing the Right Images for Vector Conversion
Not all raster images are created equal when it comes to vectorization. Understanding which types of images yield the best results can save you time and produce superior outcomes.
- Simple Graphics Excel: Images with clear, defined lines, solid blocks of color, and minimal gradients are ideal candidates. Think logos, cartoons, clip art, or single-subject illustrations. The Image Trace feature will interpret these elements cleanly, resulting in crisp vector shapes.
- High Contrast is Your Friend: Images with strong contrast between colors or between foreground and background elements will trace more accurately. Illustrator’s algorithms find edges based on color differences, so clear distinctions lead to better path definition.
- Low Resolution is Okay (Sometimes): While generally, you want the best possible source image, vectorization’s magic lies in making images scalable. For very detailed photos, a higher resolution source might capture more nuances for a “High Fidelity” trace. However, for a stylized, simplified vector, even a lower resolution source can work, as the goal is to interpret its basic shapes rather than replicate every pixel.
- Avoid Overly Complex Photographs for Simplification: While you can vectorize a photograph, trying to get a perfect, photorealistic vector from a complex image (like a landscape with thousands of subtle color variations) can result in an extremely large file with an overwhelming number of paths and anchor points, making it difficult to edit. For photographic realism, raster images remain superior. Vectorization of photos is best suited for artistic stylization or creating painting-like effects, as often seen in digital art and creative ideas for image transformation.
- Clean Backgrounds Help: Images with transparent or solid white backgrounds are easier to vectorize, especially when using the “Ignore White” feature. This helps isolate the main subject cleanly, reducing the need for extensive post-conversion cleanup.
By selecting appropriate source images, you streamline the vectorization process, allowing you to focus on the creative possibilities rather than tedious cleanup.
Vector Graphics in Tophinhanhdep.com’s Ecosystem
For a platform like Tophinhanhdep.com, which thrives on delivering diverse and high-quality visual content—from wallpapers and backgrounds to aesthetic and nature photography, abstract art, and beautiful photography—vectorization plays a crucial, though sometimes behind-the-scenes, role.
- Versatile Wallpapers and Backgrounds: Vector graphics ensure that abstract patterns, geometric designs, or stylized scenic elements offered as wallpapers or backgrounds on Tophinhanhdep.com can be downloaded and used across devices of any resolution (from smartphones to large desktop monitors) without pixelation. This guarantees a premium visual experience for users, no matter their screen size.
- Enhancing Aesthetic and Digital Art: Artists contributing to Tophinhanhdep.com can leverage vectorization to transform their sketches into scalable digital art, allowing for seamless integration into various design projects or print formats. This capability expands the range of creative ideas that can be showcased, blending traditional art forms with digital precision.
- Optimizing Image Tools: As an essential “Image Tool,” vectorization itself enables the creation of assets that can then be processed by other tools. For instance, a vectorized logo can be easily “compressed” as an SVG for web, or “upscaled” to any print dimension without relying on AI upscalers for pixel-based images. It’s a fundamental conversion that improves the overall utility and quality of digital assets.
- Driving Visual Design and Creative Ideas: Graphic designers accessing Tophinhanhdep.com for inspiration can find and adapt vectorized elements for their projects, knowing these assets will perform flawlessly across different scales. Whether it’s for creating a new brand identity, developing marketing materials, or crafting unique photo manipulations, the inherent scalability of vectors fuels endless creative possibilities.
- Future-Proofing Content: By offering or creating content in vector formats, Tophinhanhdep.com ensures that its visual assets are future-proof. As display technologies advance and resolutions increase, vector graphics will always adapt, maintaining their pristine quality without requiring new renders or versions. This long-term value is critical for maintaining a leading edge in digital content delivery.
In conclusion, vectorizing images in Illustrator is more than just a technical process; it’s a strategic move that unlocks unparalleled flexibility and quality for your visual assets. By understanding the nuances of raster and vector, mastering the Image Trace tool, and applying best practices, you empower yourself to create stunning, scalable graphics suitable for any application, from personal digital art to professional graphic design. Embrace vectorization, and let your creative ideas flourish with limitless possibilities on platforms like Tophinhanhdep.com.