Mastering Image Vectorization: Unlock Scalability and Professional Quality with Tophinhanhdep.com

In today’s visually-driven world, images are the cornerstone of communication, design, and personal expression. From stunning wallpapers and aesthetic backgrounds to high-resolution photography and intricate graphic designs, the quality and adaptability of your visuals are paramount. But what happens when you need to resize a beautiful image for a billboard, embroider a logo onto a t-shirt, or ensure your digital art looks crisp on any screen? This is where understanding how to vectorize an image becomes indispensable. At Tophinhanhdep.com, we understand the nuances of image manipulation and empower you with the knowledge and tools to transform your raster images into versatile vector graphics, ensuring your visuals always shine with professional-grade quality.
Understanding the Core Difference: Raster vs. Vector Images
Before diving into the “how-to,” it’s crucial to grasp the fundamental distinction between the two primary types of digital images: raster and vector. This knowledge is the bedrock of making informed decisions about your visual assets and appreciating the transformative power of vectorization.
What are Raster Images?
Raster images are the most common type of image format you encounter daily. Think of your digital photographs, scanned documents, and images downloaded from the internet (e.g., JPG, PNG, GIF, BMP). These images are fundamentally composed of a grid of tiny individual squares, known as pixels. Each pixel holds specific color information, and together, millions of these pixels create the complete image.
The defining characteristic of raster images is their resolution dependence. They are created at a fixed resolution, meaning they have a set number of pixels per inch (PPI) or dots per inch (DPI). While this pixel-based structure allows for incredible detail, subtle color gradients, and photographic realism, it comes with a significant limitation: scalability. When you enlarge a raster image beyond its original resolution, the individual pixels become visible, resulting in a blurry, “pixelated” appearance. This loss of quality can severely compromise the professionalism of your designs, making them unsuitable for large-scale printing or high-definition displays.
What are Vector Images?
In stark contrast, vector images are not built from pixels. Instead, they are composed of mathematical descriptions of geometric shapes—points, lines, curves, and polygons—all defined by mathematical equations. These “paths” can be filled with colors, gradients, or patterns, creating an image that is entirely resolution-independent.
This mathematical foundation grants vector graphics extraordinary flexibility. Because the image is defined by instructions rather than a fixed grid of pixels, it can be scaled up or down to any size without any loss of quality. A vector logo designed for a small business card will look perfectly sharp and clear when blown up for a billboard, a vehicle wrap, or a large poster. The lines remain crisp, the colors stay true, and the details never blur, making vector graphics the gold standard for professional design applications.
Why Vectorize Your Images?
The benefits of converting a raster image to a vector format are extensive and touch upon various aspects of image tools, visual design, and practical applications:
- Infinite Scalability: This is the primary advantage. Vector images can be resized indefinitely without pixelation, making them perfect for everything from small icons to massive banners.
- Crispness and Clarity: Edges remain sharp and clean, and colors are consistently solid, regardless of the output size or resolution. This is vital for professional graphic design, logos, and high-resolution visuals.
- Easier Editing and Manipulation: Vector graphics are much simpler to edit. You can easily change colors, adjust shapes, modify line weights, and manipulate individual elements without affecting overall quality. This streamlines processes in graphic design and photo manipulation.
- Smaller File Sizes (often): While complex vector files can be larger, for designs with flat colors and distinct shapes (like logos), vector files are often much smaller than high-resolution raster equivalents, making them efficient for web use and storage.
- Versatile Applications: Vectorized images are indispensable for various industries and creative endeavors, including laser cutting, CNC machining, embroidery, screen printing, vinyl cutting, and digital transfers. These machines rely on precise geometric paths, which only vector files can provide.
- Future-Proofing: Having a vector version of your artwork, especially logos and branding elements, ensures that you can adapt it to any future need or technology without having to recreate it from scratch.
At Tophinhanhdep.com, we recognize these critical advantages and provide comprehensive resources, tools, and insights to help you harness the power of vectorization for all your image and visual design projects.
Essential Tools and Techniques for Image Vectorization
The process of vectorizing an image can range from quick automated conversions to meticulous manual tracing, depending on the complexity of the original image and the desired outcome. Tophinhanhdep.com offers insights into both approaches, catering to a wide spectrum of user needs, from quick fixes for simple logos to intricate digital art projects.
Automated Vectorization with Tophinhanhdep.com’s Online Tools
For many common scenarios, especially when dealing with images that have clear lines, distinct shapes, and a limited color palette (like logos, simple illustrations, or clip art), automated vectorization tools are a game-changer. These tools use sophisticated algorithms to detect edges, identify areas of similar color, and convert them into vector paths.
Tophinhanhdep.com provides access to powerful online image tools designed for efficiency and ease of use. When you have a raster image (JPG, PNG, BMP, GIF) that you suspect originated as a vector or simply needs to be vectorized quickly, you can leverage our dedicated ‘Vectorize Bitmap’ function.
How it Works (Simplified Process):
- Upload Your Image: Begin by opening your raster image on Tophinhanhdep.com’s platform or selecting the appropriate layer if you’re working with a layered image.
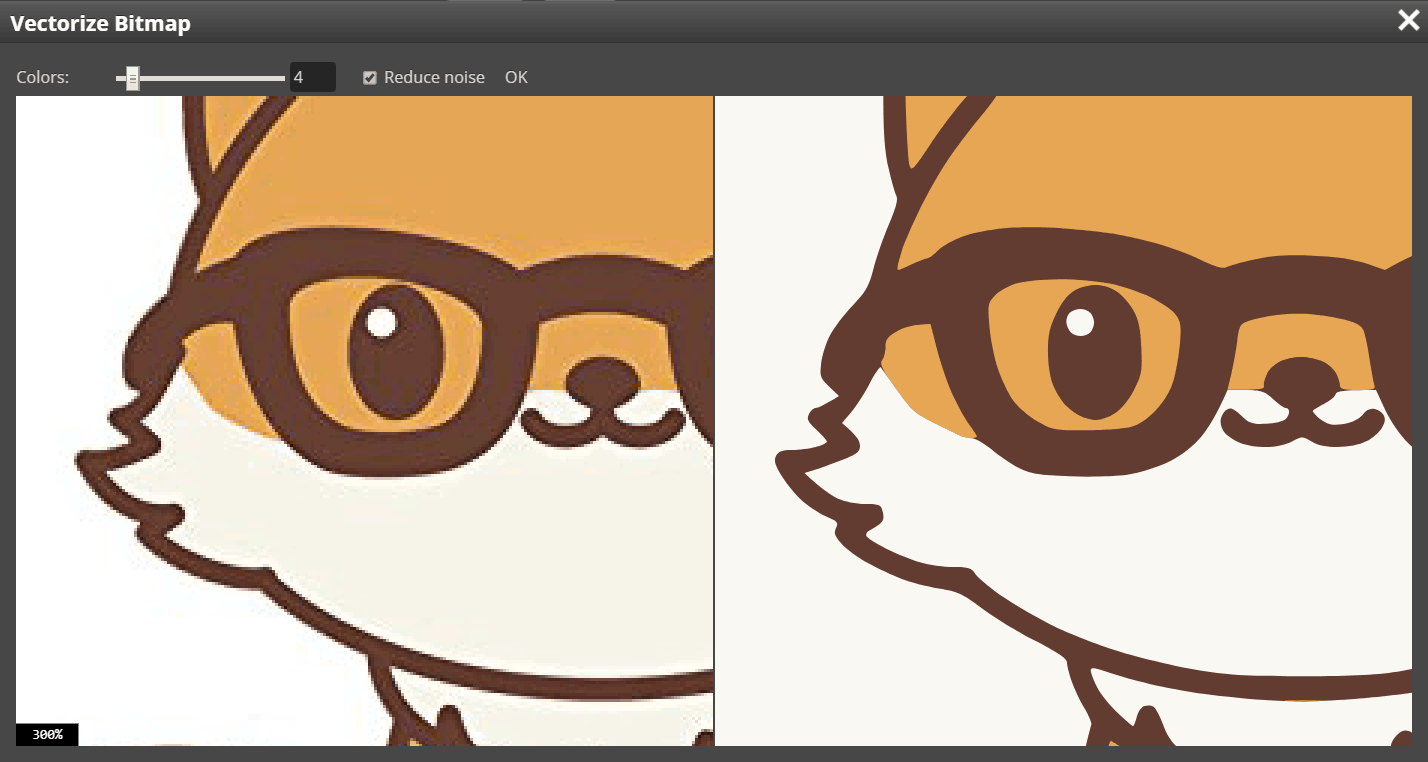
- Access the Vectorizer: Navigate to the image tools section and select the ‘Vectorize Bitmap’ option. A specialized Vectorizer window will typically appear, presenting your original image on one side and a real-time preview of the vectorized output on the other.
- Adjust Parameters (Optional): Most automated vectorizers offer parameters to fine-tune the conversion. The most common settings include:
- Number of Colors: This parameter allows you to control the color depth of the output vector. Reducing the number of colors can simplify the image and create a more stylized, graphic look, which is often desirable for logos or illustrations. Increasing it can help retain more detail from complex raster images.
- Noise Reduction: This setting helps clean up imperfections, stray pixels, or minor disturbances in the original raster image. Tophinhanhdep.com’s tools are often designed to automatically detect the need for noise reduction, and in many cases, it’s best to rely on the default settings unless you have a specific artistic intent.
- Review and Refine: You can usually zoom in and out, and move around both the original and vectorized previews to assess the quality of the conversion. This step is crucial for ensuring the automated process has captured the essence of your image accurately.
- Finalize and Export: Once you are satisfied with the vectorized output, confirm your selection. The original raster layer will typically be replaced with corresponding vector layers, ready for further editing or direct export in popular vector formats like SVG or PDF. Other formats like EPS, DXF, AI, or CDR might also be available for maximum compatibility.
Automated vectorization is ideal for users who need a fast, efficient solution for converting relatively simple images. It integrates seamlessly into Tophinhanhdep.com’s suite of image tools, including converters, compressors, and optimizers, offering a comprehensive solution for managing your digital assets.
Manual Precision: The Pen Tool Method in Tophinhanhdep.com’s Recommended Software
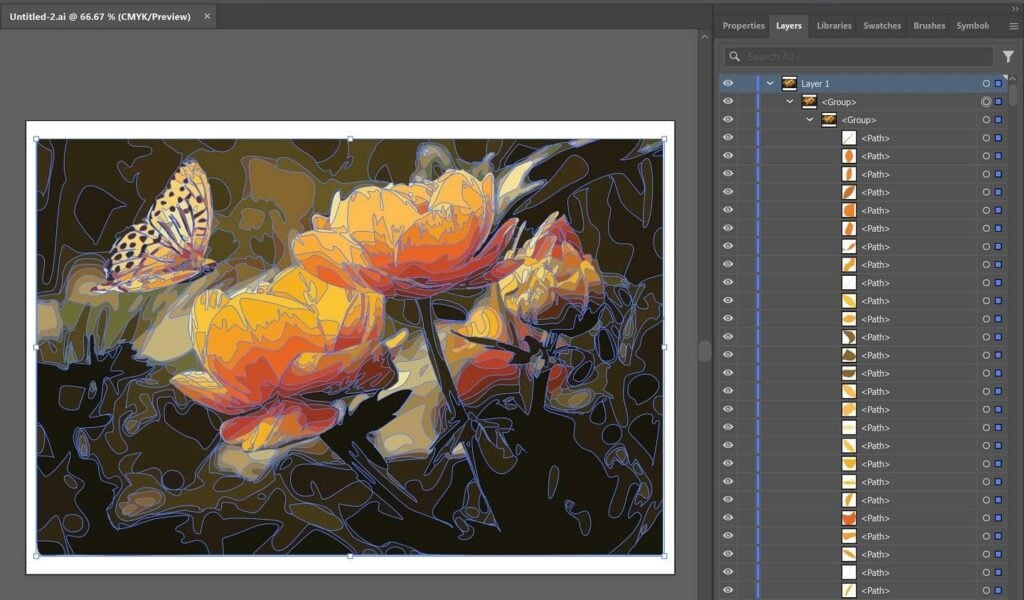
While automated tools are excellent for speed, they may not always yield perfect results for highly complex images, photographs with subtle gradients, or when you require exact artistic control. In such cases, manual vectorization using a pen tool in advanced design software (such as those recommended and discussed in Tophinhanhdep.com’s Visual Design tutorials) offers unparalleled precision and creative freedom. This method involves tracing over the raster image to create precise vector paths.
Step-by-Step Manual Vectorization (Using Pen Tool):
- Prepare Your Workspace: Open your raster image in your preferred professional design software (e.g., the advanced applications Tophinhanhdep.com often highlights in its graphic design resources).
- Adjust Image Opacity: Select the raster image layer and reduce its opacity, typically to around 50-70%. This makes it easier to see your new vector lines as you draw over the original.
- Lock the Raster Layer: To prevent accidental movement or selection of the original image, lock its layer. This ensures your tracing remains aligned with the source.
- Create a New Layer for Vectors: Always work on a new, separate layer for your vector paths. This keeps your work organized and allows for non-destructive editing.
- Trace with the Pen Tool: Select the Pen Tool (often considered one of the most powerful tools in vector design).
- Set Stroke and Fill: Set the stroke color to a bright, contrasting color (like neon green or magenta) and the fill to “None.” This allows you to clearly see the paths you are creating without obscuring the underlying raster image.
- Draw Segments: Click to create anchor points and drag to create curves. Focus on outlining the main shapes and features of your image. For complex images, break it down into smaller, manageable sections, treating each distinct color or shape as a separate path.
- Close Paths: Ensure all your paths are closed (i.e., the end point connects back to the start point) to form complete shapes that can be filled with color.
- Lock Paths as You Go: For very detailed work, consider locking individual vector paths once you complete them.
- Refine and Adjust: Once you’ve traced all the necessary components, unlock your vector paths. Use the Direct Selection Tool to fine-tune anchor points, adjust curves (Bézier handles), and ensure smooth, accurate outlines.
- Apply Colors:
- Unlock Original Image: If you locked it, temporarily unlock the original raster image.
- Use the Eyedropper Tool: Select your newly created vector shapes one by one. Use the Eyedropper Tool to sample colors directly from the original raster image and apply them as fills to your vector shapes.
- Creative Freedom: Alternatively, you can choose new, custom colors, gradients, or patterns to give your vectorized image a unique aesthetic, aligning with your creative ideas and digital art vision.
- Arrange Layers: If you have multiple overlapping shapes, you may need to adjust their stacking order (bring to front, send to back) to ensure they appear correctly.
- Remove the Raster Image: Once your vector artwork is complete, hide or delete the original raster image layer. You are now left with a fully scalable vector graphic!
- Save Your Vector File: Export your work in a standard vector format (AI, EPS, SVG, PDF, DXF, CDR) to preserve its quality and scalability.
This manual method, though more time-consuming, offers unparalleled control and is often the preferred choice for professional graphic designers, artists, and those who require pixel-perfect (or rather, path-perfect) accuracy. Tophinhanhdep.com’s tutorials and resources delve into these advanced techniques, guiding you through the intricacies of digital art and photo manipulation.
Practical Applications and Benefits of Vectorized Graphics
The versatility of vector images extends far beyond simple resizing. Their inherent qualities make them indispensable across numerous disciplines, aligning perfectly with Tophinhanhdep.com’s diverse categories, from high-resolution photography to visual design and creative ideas.
Branding and Logo Design
Perhaps the most prominent application of vectorization lies in branding and logo design. A company’s logo is its visual identity, appearing on everything from business cards and websites to vehicles, billboards, and merchandise. A logo designed as a vector graphic ensures:
- Consistent Brand Identity: The logo looks sharp and identical across all mediums, regardless of size. This is crucial for maintaining a professional and recognizable brand presence.
- Adaptability: Vector logos can be easily adapted for different uses—simplified for a mobile app icon, detailed for a large banner, or converted for embroidery—all from the same source file.
- Ease of Modification: If brand colors need to be updated or minor adjustments are required, a vector logo allows for quick and precise changes without having to redraw the entire design.
For anyone working on graphic design projects or developing new visual identities, understanding how to vectorize existing logos or create new ones in vector format is a fundamental skill that Tophinhanhdep.com champions.
Print Media and Large-Scale Displays
When it comes to physical outputs, especially large-format printing, vector images are non-negotiable. Whether you’re creating:
- Posters and Banners: Large promotional materials demand absolute clarity. Vector graphics ensure text and images remain sharp and legible from any distance.
- Brochures and Magazines: While often containing raster photography, design elements like headlines, decorative shapes, and small logos are best kept in vector format for crisp reproduction.
- Apparel and Merchandise: T-shirts, caps, mugs, and other promotional items often utilize screen printing or embroidery, both of which require vector files for accurate production.
Tophinhanhdep.com’s focus on high-resolution photography and beautiful imagery extends to ensuring these visuals are prepared for optimal print output, a goal perfectly served by vectorization.
Crafting and Digital Fabrication
Beyond traditional print, vectorization opens up a world of possibilities in crafting and digital fabrication. Modern machines rely on precise mathematical paths to perform their functions:
- Laser Cutting and Engraving: These machines follow vector lines to cut materials like wood, acrylic, or metal, or to engrave intricate designs.
- CNC Machining: Computer Numerical Control machines use vector instructions to carve, route, or mill materials with extreme accuracy.
- Vinyl Cutting and Stickers: Creating decals, wall art, or car graphics requires vector outlines for the cutter to follow.
- Embroidery Digitizing: To convert an image into a stitch pattern for an embroidery machine, it must first be vectorized.
For creative individuals and businesses exploring photo ideas for physical products, or engaging in digital art for practical applications, Tophinhanhdep.com offers insights into these specialized uses, demonstrating how vectorization bridges the gap between digital design and tangible creation.
Enhancing Digital Art and Creative Projects
For digital artists and those involved in photo manipulation, vectorization is a powerful technique for achieving unique aesthetic styles:
- Stylized Art: Converting a photograph into a vector graphic can yield striking, simplified, or “cartoony” effects. This transforms a realistic image into an abstract or artistic illustration.
- Line Art and Silhouettes: Vectorization is excellent for extracting clean outlines from complex images, creating elegant line art or dramatic silhouettes that can be easily recolored or animated.
- Creative Ideas and Mood Boards: Turning inspirational raster images into scalable vector elements allows artists to experiment freely with layout, color palettes, and compositions without worrying about quality degradation.
Whether you’re exploring aesthetic backgrounds, nature photography, or abstract art, Tophinhanhdep.com encourages leveraging vectorization as a creative tool to unlock new artistic avenues and refine your visual design skills.
Tophinhanhdep.com: Your Partner in Professional Image Vectorization
At Tophinhanhdep.com, our mission is to be your ultimate resource for all things related to images and visual design. We understand the dynamic needs of artists, designers, businesses, and enthusiasts alike, and vectorization stands as a cornerstone of achieving professional-grade results across various applications. Our platform is meticulously structured to provide comprehensive support, from practical tools to insightful tutorials and inspiring collections.
Our Comprehensive Image Tools and Services
Tophinhanhdep.com’s suite of image tools goes hand-in-hand with the power of vectorization. Our offerings are designed to streamline your workflow and enhance the quality of your visual assets:
- Converters: Beyond vectorization, our converters handle a multitude of formats, ensuring your images are always in the right type for any project. Vectorization itself is a critical conversion from raster to vector.
- Compressors and Optimizers: While vector files are often lighter, efficient compression and optimization are still vital for web performance and storage. Tophinhanhdep.com ensures your vectorized images are also web-ready.
- AI Upscalers: Though different from vectorization, our AI upscalers complement it by enhancing raster image quality. Often, a combination of intelligent upscaling and then vectorization can yield superior results from lower-quality sources, especially when dealing with high-resolution photography that needs specific vector elements.
- Dedicated Vectorization Features: Directly within Tophinhanhdep.com, you’ll find easy-to-use interfaces for bitmap vectorization. These tools, much like the automated options discussed earlier, are designed for user-friendliness, allowing you to quickly transform your JPG, PNG, GIF, or BMP files into scalable vector formats like SVG, PDF, and EPS with adjustable parameters such as color count and noise reduction. This empowers you to recreate original vector images that may have been lost, saving significant time compared to manual recreation.
- Professional Vectorization Services: For complex images, intricate designs, or when time is of the essence, Tophinhanhdep.com offers a professional vectorization service. Similar to specialized agencies, we can handle challenging tasks like vectorizing photos with people, intricate coats of arms, or highly detailed drawings. Our team provides free, no-obligation quotes and delivers high-quality vector files in formats like AI, CDR, EPS, PDF, SVG, and DXF, ensuring perfect vectorization very similar to or better than the original. We pride ourselves on fast delivery, often within hours for simpler designs, and guarantee the quality of our work, supported by extensive experience in font recognition and typography.
Expert Advice and Support for Your Visual Needs
Beyond tools, Tophinhanhdep.com is a hub of knowledge and inspiration. Our extensive resources cover every facet of visual content creation:
- Tutorials and Learning: Our in-depth tutorials guide you through various aspects of image editing, including detailed step-by-step instructions on using both automated vectorization features and mastering manual techniques with recommended professional software. We make complex processes accessible, ensuring you can confidently navigate the digital art world.
- Visual Design Insights: Dive into graphic design principles, digital art techniques, and photo manipulation strategies. Vectorization is frequently featured as a core skill for creating impactful and adaptable designs.
- Image Inspiration & Collections: Explore thematic collections, trending styles, and photo ideas. Understand how vector graphics contribute to modern aesthetics and how you can transform your creative visions into scalable artwork.
- Community and Support: We believe in fostering a vibrant community. Should you need help or have questions, Tophinhanhdep.com offers channels for support and discussion, ensuring you’re never alone on your creative journey.
Whether you’re looking to convert a JPG file to vector for a new logo, prepare an image for laser cutting, or simply understand the best practices for handling your digital photos, Tophinhanhdep.com is your comprehensive guide. We enable you to not just visualize but to realize your creative ideas with the highest possible quality and adaptability. By mastering image vectorization through Tophinhanhdep.com’s resources, you unlock a realm of infinite possibilities for your images, ensuring they remain stunning and versatile, no matter how they are used.