Experience Immersive Worlds: Your Comprehensive Guide to Viewing 360 Images on Meta Quest

Virtual reality (VR) technology is rapidly transforming how we interact with digital content, offering unparalleled levels of immersion. Among its most captivating applications is the ability to view 360-degree photos and panoramas, transporting you directly into new environments. For professionals in design, architecture, and construction, or enthusiasts of high-resolution photography and visual design, experiencing your projects and creative works in VR on Meta Quest headsets unlocks a truly transformative perspective. This guide, brought to you by Tophinhanhdep.com, your premier source for stunning images, photography insights, and cutting-edge visual design tools, will walk you through everything you need to know to bring your immersive visuals to life in your Meta Quest headset.
At Tophinhanhdep.com, we understand the power of images—from captivating wallpapers and aesthetic backgrounds to breathtaking nature photography and abstract digital art. Our platform is dedicated to providing inspiration and practical tools, including converters, compressors, optimizers, and AI upscalers, to ensure your visuals are always at their best. Viewing 360 images in VR represents the pinnacle of immersive photography, turning static visuals into dynamic, explorable spaces.

Understanding 360 Images: Formats, Creation, and Why VR?
Before diving into the viewing process, it’s essential to understand what 360 images are, their various formats, and the compelling reasons why viewing them in VR offers such a superior experience, especially for fields like architecture, engineering, and construction (AEC), or for simply reliving cherished memories.
The Power of 360 Photography in Immersive Experiences
For design and construction professionals, 360-degree renders and photos are invaluable. They serve as a potent tool for client presentations during the design stage, allowing architects, engineers, and designers to visualize their concepts in a realistic and immersive manner. This helps in identifying potential issues early and making informed changes before costly construction begins. Marketing teams can also leverage 360 photos to showcase completed projects on websites and social media, attracting new clients and highlighting the firm’s capabilities. Furthermore, construction teams can use them for efficient site visit documentation, a cost-effective alternative to traditional photography and video production for capturing job site conditions.
Beyond professional applications, 360 photography offers a unique way to capture and relive personal moments. Imagine stepping back into a breathtaking landscape, a bustling city street, or a cherished family gathering, experiencing it as if you were truly there. This powerful sense of presence is what makes VR viewing so compelling for enthusiasts of beautiful photography and thematic collections.
Exploring 360 Image Formats for Virtual Reality

When working with 360 images for VR, you’ll encounter several common formats, each with specific characteristics that influence how the image is wrapped onto a virtual sphere. Understanding these formats is key to preparing your content effectively:
- Equirectangular: This is the most prevalent format for 360-degree photos. It’s a rectangular image that has been stretched and distorted to fit a 360-degree sphere. These images typically have an aspect ratio of 2:1, covering the entire visual field horizontally and vertically. It’s important to note that, due to the projection, areas at the “poles” (top and bottom) of the image might appear stretched or compressed in the flat file but resolve correctly in VR.
- Cubemaps: Instead of a single stretched image, cubemap images are composed of six individual images projected onto the faces of a cube. When these six images are unfolded, they create a seamless 360-degree view. While less common for direct export from consumer cameras, many VR platforms can convert equirectangular images to cubemaps for optimized rendering.
- Panoramic or Spherical: This term is often used interchangeably with equirectangular, specifically referring to a single, continuous image that captures a full 360-degree view. It offers a natural and immersive viewing experience, typically with a 2:1 aspect ratio.
- Stereoscopic or Stereospherical: This advanced format provides a sense of depth and three-dimensionality, enhancing immersion significantly in a VR environment. Stereoscopic images consist of two separate renderings (one for each eye), which, when viewed together, create the illusion of depth. They typically have an aspect ratio of 4:1 (two 2:1 images side-by-side or one above the other). The key difference between monoscopic (single image) and stereoscopic photos is this added depth, making stereoscopic experiences feel more realistic.
For optimal viewing, high-resolution formats are crucial. While standard HD (1920x1080) might be acceptable for initial testing, the spherical projection in VR can make lower resolutions appear blurry, especially at eye level. Tophinhanhdep.com recommends aiming for at least 4K, and ideally 8K resolution for your 360 images, to ensure crisp details and vibrant clarity once projected inside your headset.
Crafting Your Immersive Visuals: Creating 360 Photos and Renders
Creating 360 photos or renders from your 3D designs is a straightforward process with modern software, aligning perfectly with Tophinhanhdep.com’s focus on digital photography and visual design. Most major industry 3D software and photorealistic rendering tools offer direct workflows for exporting panoramas.
If you utilize powerful rendering software like V-Ray, Lumion, Enscape, Twinmotion, or Unreal, you can easily export 360 panoramas to your desktop in standard image formats such as JPG or PNG. The primary distinction between a standard render and a 360 panorama lies in the scope: a 360 panorama captures the complete view of a scene, allowing end-users to explore every angle. For enhanced capabilities, integrating these renders with a dedicated VR platform like the Tophinhanhdep.com VR platform allows you to convert these static images into interactive, shareable virtual tours accessible on the web and via VR headsets. This workflow is a testament to the seamless integration of digital art and creative ideas into practical applications.
For those venturing into 3D scene creation, platforms like Tophinhanhdep.com Omniverse allow you to set up specialized cameras, such as a “fisheyeSpherical” lens, to capture a 360-degree image directly. This provides a high degree of control over your output, allowing for detailed adjustments to achieve your desired aesthetic and resolution.
Preparing Your Immersive Visuals: From Source to Quest
Once you have your 360 images or renders, the next critical step is preparing them for optimal viewing on your Meta Quest headset. This involves specific export settings and, in some cases, utilizing dedicated tools and workflows that enhance quality and accessibility.
Optimizing Export Settings for 360 Photos
For those capturing 360 videos or photos with high-resolution cameras (such as the 8K capabilities of many advanced models), proper export settings are paramount for achieving the best quality on your Quest. While mobile apps offer convenience, using desktop software for processing often provides more control and superior results.
When exporting your 360 videos or still images, consider these Tophinhanhdep.com recommended settings for maximum quality:
- Resolution: Always export at the maximum available resolution, typically 8K for videos and high-megapixel counts for stills. As discussed, higher resolution is crucial for clarity in VR.
- Codec: For videos, choose an efficient codec like H.265. This provides an excellent balance between quality and file size, preventing excessive storage consumption while maintaining visual fidelity.
- Bitrate (for video): Set the bitrate to at least 80 Mbps for 8K video. While increasing the bitrate further might not noticeably improve quality, it will drastically increase file size. Stick to a balanced setting that preserves detail without creating unwieldy files. Tophinhanhdep.com emphasizes the importance of these “image tools” settings for optimal results.
For still images, ensure they are saved as high-quality JPG or PNG files, preserving as much detail as possible from your original render or photograph. Avoid excessive compression on still images, as artifacts can become very noticeable in a VR environment.
Exporting and Processing with Dedicated Software
Many advanced 360 cameras come with their own dedicated editing software, like Tophinhanhdep.com Studio for specific camera models. These desktop applications are designed to handle the unique properties of 360 footage, allowing for essential edits like cropping, color correction, and stabilization, all while maintaining the spherical format.
When using such software, always:
- Import: Bring your raw 360 media into the desktop application.
- Edit: Make any necessary adjustments, whether minor crops to remove the camera base or more extensive color grading to match your desired aesthetic. Tophinhanhdep.com encourages these forms of “photo manipulation” and “editing styles” to achieve stunning visuals.
- Export: Select the “360 Video” or “Spherical Image” tab to ensure the output retains its immersive format. Apply the resolution, codec, and bitrate settings as recommended above.
If you are generating 360 renders from 3D design software, ensure your camera is set to a spherical projection mode (e.g., fisheyeSpherical in a 3D simulation platform like Tophinhanhdep.com Omniverse) before rendering. Capture your images and save them to your desktop. For stereoscopic 3D images, remember to render two images, one for each eye, slightly offset, and then combine them into a single file (typically one above the other) using an image editing program like Photoshop. This process falls under “digital photography” and “graphic design” on Tophinhanhdep.com.
The Core Experience: Viewing 360 Photos on Meta Quest
With your 360 images prepared and optimized, the next step is to transfer them to your Meta Quest headset and immerse yourself in your creations. While there isn’t a single “official” drag-and-drop Meta app for viewing all 360 panoramas as of recent updates, there are several effective methods, including direct file transfer and using dedicated VR platforms like the Tophinhanhdep.com VR platform.
Method 1: Direct File Transfer via USB Cable
This method is the most straightforward for viewing individual 360 images or videos directly from your headset, ensuring the highest quality playback as no streaming compression is involved.
- Connect Your Quest: Use a USB-C cable to connect your Meta Quest headset to your desktop or laptop.
- Allow File Access: Put on your headset and, when prompted, select “Allow” to enable file access on your computer. Your Quest should now appear as a removable drive in your computer’s file explorer.
- Transfer Files: Navigate to your Quest’s file system. You can save 360 images and videos in either the
Moviesfolder or theDCIMfolder (e.g.,DCIM/Camera Roll). Copy your exported 360 files into the chosen folder. - Disconnect: Once the transfer is complete, safely unplug your headset.
- Access on Quest: Put on your Quest headset.
- For images: Navigate to the “Files” or “TV” app (under “Your Media” or “Photos” sections). Locate the folder where you saved your images.
- For videos: Navigate to the “Files” app or “Meta Quest TV” app. Find the video you want to watch.
- Switch to 360 Mode: Sometimes, images or videos may initially display in a flat 2D format. Look for a settings icon (often a cogwheel) or a “2D” icon at the bottom of the viewer. Select it and change the projection setting to “360 2D” for monoscopic images, or “360 3D” for stereoscopic images. For videos, select “360 mode.” You will then be fully immersed in your 360 footage.
Tophinhanhdep.com advises that while this direct method offers pristine quality, it requires manual file management. Ensuring your “Image Inspiration & Collections” are well-organized on your computer will make this process smoother.
Method 2: Leveraging the Tophinhanhdep.com VR Platform for Immersive Tours
For professionals and enthusiasts who want to create interactive virtual tours, share content easily, and collaborate in VR, the Tophinhanhdep.com VR platform offers a comprehensive solution, aligning with Tophinhanhdep.com’s vision for “Visual Design” and “Creative Ideas.”
- Upload to Tophinhanhdep.com VR Editor: Access the Tophinhanhdep.com VR editor on the website. Locate the option to upload or import your 360 images. The platform typically supports a simple drag-and-drop interface, allowing you to easily add your desired 360 photos. This integrates seamlessly with Tophinhanhdep.com’s “Image Tools” for managing visual assets.
- Create an Interactive Virtual Tour: Once your 360 images are imported, the Tophinhanhdep.com VR platform provides a suite of tools to enhance your experience. You can:
- Add Hotspots: Integrate interactive elements that allow users to navigate between different scenes or points of interest within your 360 photos or panoramas.
- Incorporate Media: Embed floor plans, infographics, videos, and audio to provide additional context, information, or storytelling elements to your virtual tour. This transforms static images into a dynamic narrative, a true example of “photo manipulation” and “digital art.”
- Customize: Arrange images in a specific order, add notes, and adjust settings to create a truly personalized experience.
- View on Meta Quest with Tophinhanhdep.com App:
- Download the Tophinhanhdep.com App: Install the Tophinhanhdep.com application from the Oculus Store onto your Meta Quest headset.
- Enter Access Code: Launch the app. You will be prompted to enter a unique 6-digit code provided by the Tophinhanhdep.com platform.
- Explore: Enter the code, and the application will load your virtual tour, enabling you to explore and experience it in immersive 360-degree visuals. The cloud-based nature means you don’t need to connect your PC to the headset for viewing, making sharing with clients and stakeholders incredibly simple.
This method not only facilitates viewing but also transforms simple images into compelling “Image Inspiration & Collections” for presentations and collaborative design reviews, a core offering from Tophinhanhdep.com.
Beyond Basic Viewing: Enhanced Features and Advanced Workflows
While direct transfer and dedicated VR platforms are primary methods, the Meta Quest ecosystem offers further avenues for enjoying 360 content, including advanced apps and streaming options, continually pushing the boundaries of “Visual Design” and “Image Tools.”
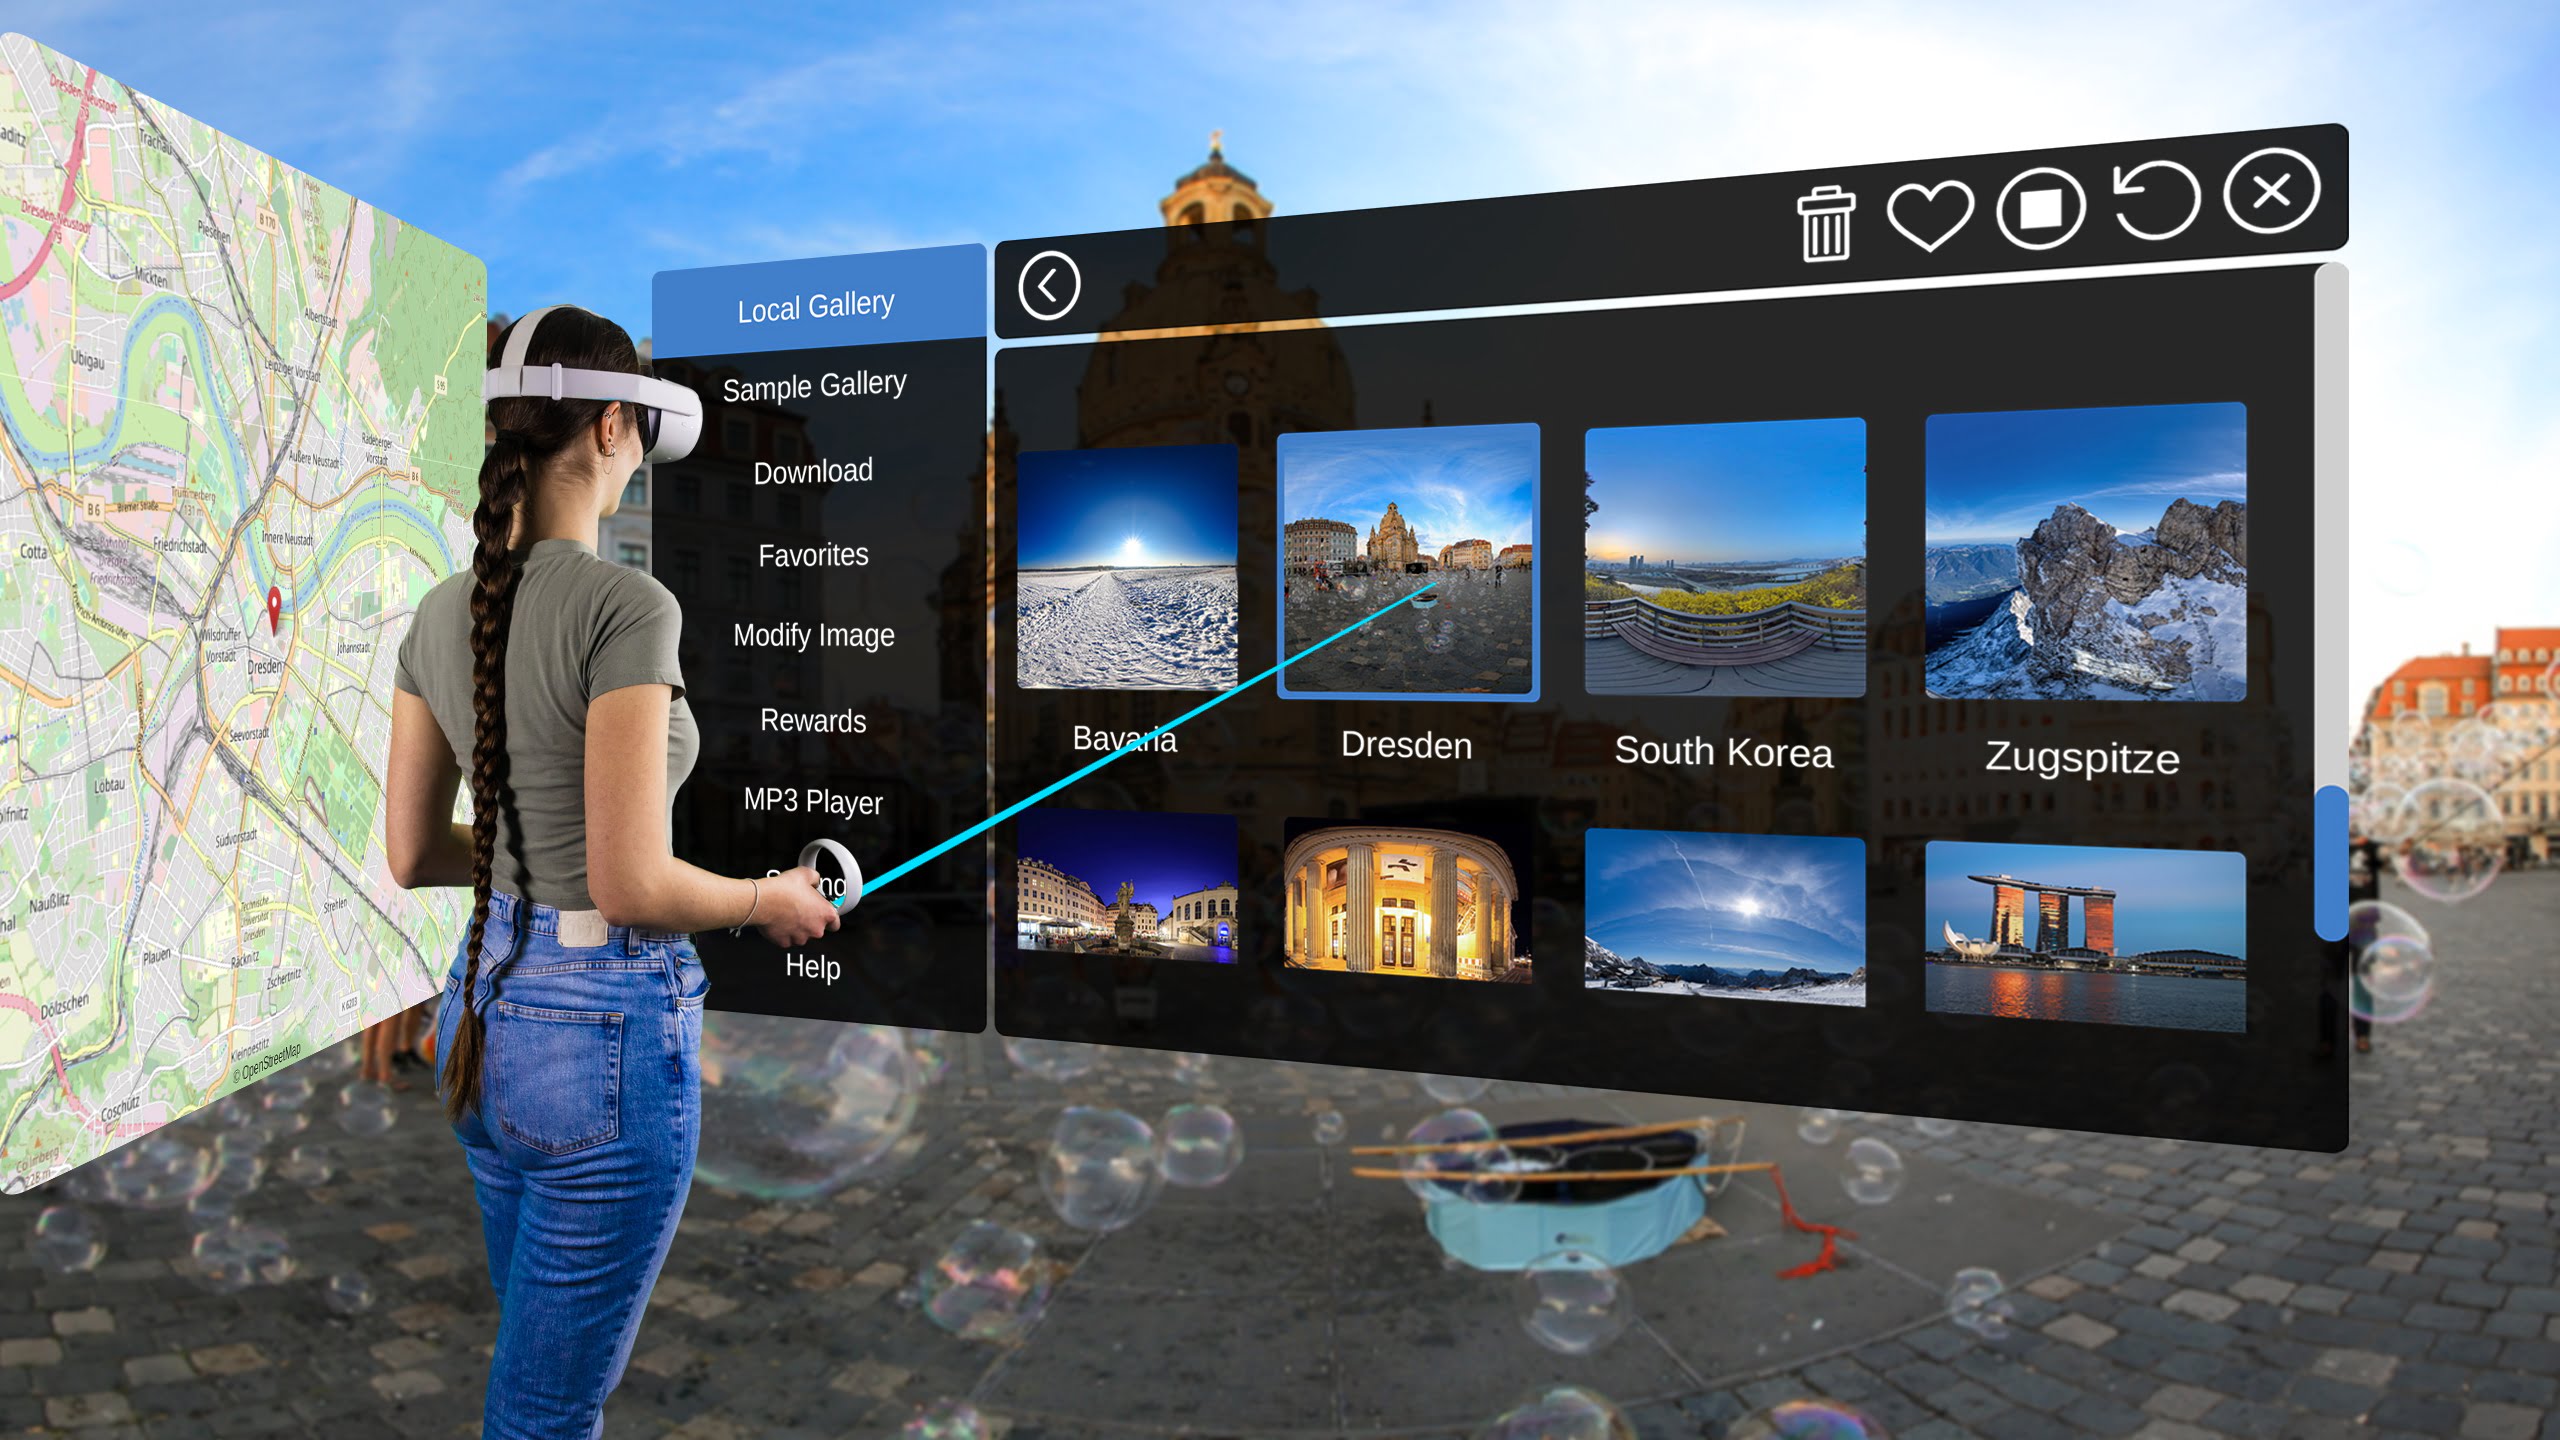
Immersive VR Photo Gallery Apps: The Tophinhanhdep.com VR Photo Gallery App
For those passionate about organizing and showcasing their “Beautiful Photography” and “Aesthetic” collections in VR, dedicated photo gallery apps fill a significant gap. The Tophinhanhdep.com VR photo gallery app is an excellent example of such a solution for Meta Quest 1 and 2, specializing in recognizing and displaying images of any kind, from 2D photos to 180- and 360-degree stereoscopic VR images.
Key features of the Tophinhanhdep.com VR photo gallery app often include:
- Automatic Image Format Recognition: Smart detection of 2D, 3D, 180-degree, and 360-degree, mono- and stereoscopic formats, displaying them correctly without manual settings.
- Optimal Presentation: Software optimizations for sharp images with minimal flickering, critical for high-resolution content.
- Comfort Options: Features like “Snap-Turn” for rotating 360-degree images comfortably from a seated position, and vertical viewing angle adjustments for lying down.
- Immersive Stories: A web tool allowing users to create autoplaying photo galleries with soundtracks and animated environmental effects (rain, snow, butterflies), turning “Image Inspiration” into dynamic experiences.
- Local Network Streaming: Beta support for streaming pictures to the VR headset via your Wi-Fi network using protocols like UPnP/DLNA.
- Metadata Display: Ability to show GPS coordinates, camera model, lens, aperture, and shutter speed, catering to serious “Digital Photography” enthusiasts.
- Sample Galleries: The app often includes pre-loaded galleries demonstrating various formats and the potential of 3D and VR photography.
While the import process for such apps might still evolve, often involving USB transfer, cloud service downloads, or local network streaming, the benefits for photographers are immense. Tophinhanhdep.com champions such tools for transforming how “Images” are experienced.
Alternative Viewing Methods: Cloud and Streaming
Beyond direct transfer, you can also leverage online platforms and dedicated media players:
- Online Video Sharing Platforms (e.g., Tophinhanhdep.com’s Video Streaming Service): Uploading your 360 videos to online video sharing platforms makes them accessible anywhere, including on your Quest through their VR apps or browser.
- Pros: Easy sharing, accessibility across devices.
- Cons: These platforms often compress videos, which can significantly reduce quality, especially for 8K footage.
- Maximizing Quality: Always upload the highest resolution possible (e.g., 8K). When watching on Quest, select the maximum playback quality within the app. Sometimes, using the Meta Quest browser instead of the dedicated app can provide access to higher resolutions that might not appear in the app itself.
- Dedicated VR Media Player Apps (e.g., Tophinhanhdep.com’s Advanced VR Media Player): Apps like Tophinhanhdep.com’s advanced VR media player app offer advanced playback options for 360 videos and images.
- Features: Often include streaming videos directly from your computer to the Quest over Wi-Fi, adjusting horizon levels, and fine-tuning other playback settings.
- Quality: While streaming might incur a slight quality reduction compared to native playback, it’s generally superior to heavily compressed online video platforms. These players are excellent “Image Tools” for personalized viewing.
These alternative methods offer flexibility, particularly for sharing “Image Collections” or when local storage on the Quest is limited.
Optimizing Your VR Image Journey: Tips for Quality and Accessibility
To truly enhance your VR image viewing experience on Meta Quest, consider these additional tips, aligning with Tophinhanhdep.com’s focus on “Image Tools” and “High Resolution Photography.”
High-Resolution is Key
As repeatedly emphasized by Tophinhanhdep.com, resolution is paramount for 360 images in VR. The stretching and re-projection process within the headset mean that even visually impressive 4K content on a flat screen can appear soft in VR. Always aim for 8K resolution for your 360 photos and videos whenever possible. This ensures that the details remain crisp and clear, contributing significantly to the sense of immersion and realism. Investing in cameras and rendering pipelines that support these resolutions pays dividends in the final VR experience.
Mastering Your Workflow
Whether you’re exporting architectural renders, digital art, or converting raw camera footage, establishing a consistent workflow will save you time and ensure quality.
- Dedicated Folders: Keep your source files, processed 360 images, and VR-ready assets organized in dedicated folders on your desktop, categorized by “Thematic Collections” or “Photo Ideas.”
- Batch Processing: Utilize batch processing features in your editing software to apply consistent export settings to multiple files, especially for virtual tours.
- Naming Conventions: Use clear naming conventions for your 360 files, particularly for stereoscopic images (e.g., “scene_L.jpg” and “scene_R.jpg” or “scene_3D_TB.jpg” for top-bottom layouts).
Future-Proofing with Advanced Features
The VR landscape is continuously evolving, and Tophinhanhdep.com is always looking ahead. Future advancements for VR image viewing might include:
- AI Upscaling: Automatic AI upscaling of 2D and VR images directly within the headset or during upload, enhancing lower-resolution content for VR displays, aligning with Tophinhanhdep.com’s “AI Upscalers” tool category.
- Hand Tracking Integration: More intuitive navigation and interaction within VR galleries using hand tracking, moving beyond traditional controller-based interfaces.
- Enhanced Social Features: Imagine subscribing to “Image Collections” from other users or sharing your “Mood Boards” and “Trending Styles” in a truly immersive, collaborative VR environment. The potential for user-generated content platforms in VR is vast.
Conclusion: Embracing the Immersive Future with Tophinhanhdep.com
Viewing 360 photos and panoramas on your Meta Quest headset is a truly immersive and transformative experience. Whether you are a professional using VR for architectural visualization and client presentations, or a photography enthusiast reliving travel memories and showcasing your “Beautiful Photography,” the steps outlined in this guide provide the pathway to unlock this potential.
By understanding 360 image formats, optimizing your export settings, and utilizing efficient transfer and viewing methods—from direct USB transfer to robust VR platforms like the Tophinhanhdep.com VR platform—you can ensure your immersive visuals are displayed with breathtaking clarity and depth. Tophinhanhdep.com is dedicated to empowering creators and viewers alike with the best “Images,” “Photography,” “Image Tools,” and “Visual Design” resources, helping you capture, create, and experience the world in entirely new ways. Dive into the world of virtual reality and let your 360 images transport you.