Master the Art of Image Transformation: How to Warp an Image in Photoshop with Precision

In the dynamic world of digital imagery, the ability to manipulate and reshape visuals is not just a skill but a superpower. Whether you’re a seasoned photographer, an aspiring graphic designer, or simply someone passionate about crafting unique visual narratives, understanding how to warp an image in Photoshop is fundamental. At Tophinhanhdep.com, we believe in empowering our community with the tools and knowledge to create stunning “Images,” breathtaking “Photography,” and innovative “Visual Design.” The Warp command in Photoshop stands as a cornerstone in this endeavor, offering unparalleled flexibility to both correct imperfections and unleash boundless creativity.
For years, Photoshop has provided tools for transforming images, but with continuous advancements, particularly in Photoshop CC 2020 and newer versions, the Warp command has evolved into an incredibly robust and intuitive feature. This enhanced functionality allows for unprecedented control, moving beyond simple corner-point adjustments to intricate grid manipulation, multi-point selection, and independent scaling or rotation of specific image areas. This comprehensive guide from Tophinhanhdep.com will take you through every nuance of the enhanced Warp tool, ensuring your “Digital Photography” and “Photo Manipulation” skills reach new heights. Prepare to dive deep and discover how this powerful “Image Tool” can revolutionize your workflow, turning ordinary concepts into extraordinary “Creative Ideas.”
Understanding the Power of the Warp Tool in Photoshop
At its core, the Warp tool allows you to distort and reshape specific areas of an image or an entire layer, bending and stretching it as if it were made of a flexible material. This capability is indispensable for a wide array of applications, from subtle corrections to dramatic artistic effects. For “Visual Design” enthusiasts, it’s a gateway to fluid shapes and integrated elements. For “Photography” aficionados, it’s a vital tool for correcting lens distortions or subtly adjusting perspectives.
The evolution of the Warp tool, especially in recent Photoshop CC versions, has made it significantly more powerful and user-friendly. Gone are the days of limited control; now, artists can define custom grids, add individual control points, and perform complex transformations with surprising ease. This level of precision is crucial when working with “High Resolution” images or when aiming for pixel-perfect “Photo Manipulation.”
Why Smart Objects are Your Best Friend

Before embarking on any significant transformation like warping, Tophinhanhdep.com highly recommends converting your image layer into a Smart Object. This practice is a cornerstone of “Digital Photography” and “Editing Styles” because it promotes non-destructive editing. When you warp a standard pixel layer, the changes are permanent, meaning you cannot easily revert to the original state or refine the warp without quality degradation.
However, by transforming a Smart Object, the warp is applied as a Smart Filter, allowing you to re-edit it at any time, adjust its parameters, or even remove it entirely without affecting the original pixel data. This flexibility is invaluable for iterative design and ensures that your “Beautiful Photography” remains pristine, even through multiple experimental adjustments.
To convert a layer to a Smart Object, simply select the layer in the Layers panel, click the Layers panel menu icon (usually in the upper right corner), and choose “Convert to Smart Object.” A small icon on the layer’s thumbnail will confirm its status, signaling that you’re ready for flexible, high-quality warping.
Accessing the Warp Command
![]()
Photoshop provides a couple of straightforward ways to activate the Warp command, ensuring it’s always within easy reach for your “Image Tools” workflow:
- Direct Access via the Menu Bar: Navigate to
Edit > Transform > Warp. This path immediately places you into Warp mode. - Through Free Transform: A commonly used method is to first activate the Free Transform command by going to
Edit > Free Transformor, more efficiently, by pressingCtrl+T(Windows) /Command+T(Mac). Once Free Transform is active, locate and click the Warp icon in the Options Bar at the top of your Photoshop interface. This icon typically looks like a bent grid.
Once activated, Photoshop will display the default Warp box around your selected layer’s content, ready for your creative or corrective touch.
Unleashing Creative and Corrective Power: Diverse Applications of Warp
The beauty of the Warp tool lies in its dual functionality: it’s equally potent for artistic expression and technical correction. Whether you’re crafting “Abstract” backgrounds or refining “Beautiful Photography,” Warp offers a precise pathway to your vision.
Enhancing Visual Design and Abstract Art
For “Visual Design,” “Graphic Design,” and creating “Digital Art,” the Warp tool opens up a universe of “Creative Ideas.” It allows you to transform elements, integrate textures into complex surfaces, or simply invent entirely new forms. Imagine creating a dynamic “Wallpaper” or an “Aesthetic” background by subtly warping an existing image.
-
Default Warp Controls: When you first enter Warp mode, you’ll encounter the default controls, which are perfect for initial explorations or broad adjustments. You can click and drag anywhere inside the bounding box to freely reshape the image. The control points located at each corner of the box, along with the handles extending from them, allow for more specific bends and curves. Dragging these handles enables you to rotate and scale segments of the image, offering a foundational level of distortion that can be perfect for quick “Photo Manipulation” or forming the basis of “Abstract” patterns. The ability to undo multiple steps (
Ctrl+Z/Command+Z) or reset the warp entirely ensures a risk-free creative process. -
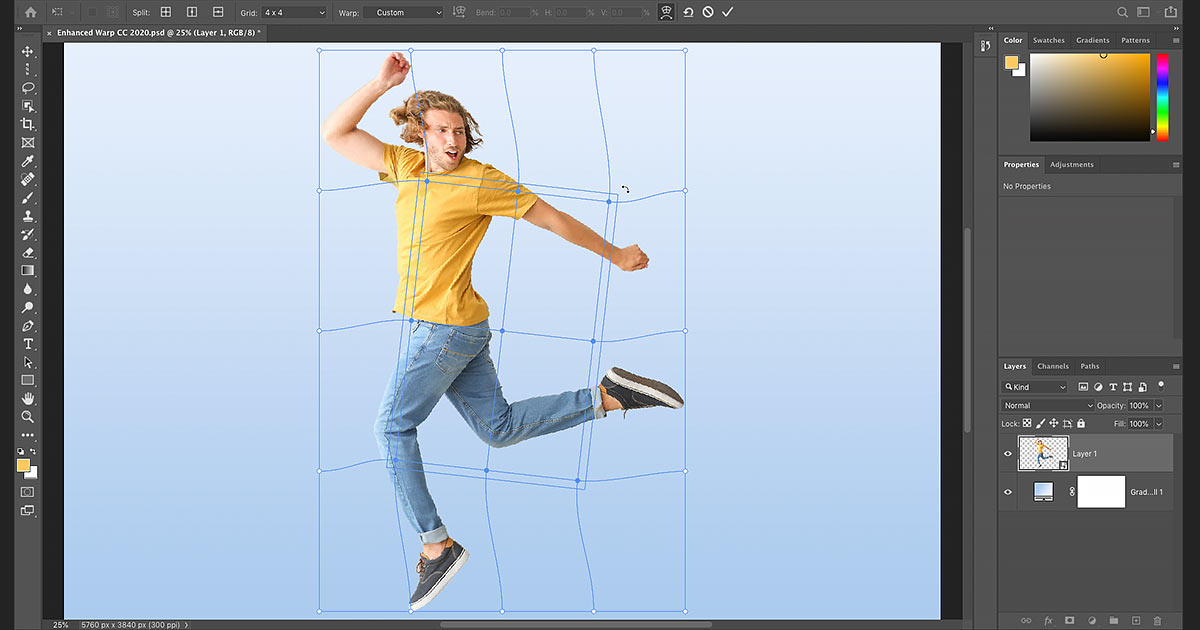
Gaining More Control with Preset Warp Grids: When the default box isn’t enough, Photoshop CC 2020 and newer versions introduce preset Warp grids, significantly enhancing control. By clicking the “Grid” option in the Options Bar, you can choose between a 3x3, 4x4, or 5x5 grid.
- Increased Control Points: The moment you select a grid preset, you’ll notice a dramatic increase in control points. Instead of just four corners, points appear wherever horizontal and vertical grid lines intersect. A 3x3 grid, for example, gives you sixteen individual control points to manipulate.
- Precision Manipulation: Each control point can be clicked and dragged independently, allowing for highly localized warping. Furthermore, the control handles extending from these points enable precise rotational and scaling adjustments around that specific point. You can even click and drag directly on the grid lines between two points to curve and reshape them, offering a fluid way to sculpt your image. This level of granular control is perfect for intricate “Photo Manipulation” projects or when crafting detailed “Digital Art.”
-
Creating Custom Warp Grids: If the preset grids don’t quite match your complex “Creative Ideas,” Photoshop offers the option to define a “Custom” Warp grid. In the Options Bar, change the “Grid” option to “Custom” and then specify the exact number of Columns and Rows you require. This empowers you to tailor the grid density precisely to the contours and complexities of your image, ensuring optimal control for any “Visual Design” challenge.
-
Warping Multiple Control Points at Once: A truly powerful enhancement in newer Photoshop versions is the ability to select and manipulate multiple control points simultaneously. By holding down the
Shiftkey and clicking or dragging a marquee selection around desired points, you can group them.- Unified Movement: Once selected, clicking and dragging within the bounding box around these points will move them all together, maintaining their relative positions.
- Group Scaling: Dragging a corner of this selection box allows you to scale the entire area encompassed by the selected points.
- Rotational Control: Moving your cursor outside the selection box reveals a rotate icon, enabling you to rotate the entire selected segment of your image. This collective manipulation capability significantly speeds up the workflow for complex “Photo Manipulation” tasks and facilitates the creation of symmetrical or repeating “Aesthetic” patterns.
Perfecting Photography: Perspective and Pose Adjustments
Beyond creative distortions, the Warp tool is an indispensable “Image Tool” for photographers seeking to correct lens distortions, straighten architectural elements, or fine-tune model poses. Tophinhanhdep.com frequently showcases “High Resolution” images where such adjustments are critical to maintaining quality and realism.
-
Architectural Photography and Perspective Warp: One of the most common challenges in “Digital Photography,” particularly with wide-angle lenses or when shooting tall structures, is perspective distortion. Buildings often appear to converge inwards, losing their imposing vertical lines.
- While the standard Warp tool can help, Photoshop also offers “Perspective Warp” (found under
Edit > Perspective Warp), a specialized tool invaluable for this task. It allows photographers to define planes and then manipulate their perspective, making converging lines parallel again. This transforms distorted “Beautiful Photography” of cityscapes into perfectly composed images, preserving the grandeur of architecture. Similarly, for “Nature” photography, subtle warping can correct horizons or foreground elements for a more balanced composition. Having a grid (View > Show > Grid) as a guide can be immensely helpful here.
- While the standard Warp tool can help, Photoshop also offers “Perspective Warp” (found under
-
Puppet Warp for Figure Manipulation: For photographers working with portraits or fashion, the “Puppet Warp” tool (found under
Edit > Puppet Warp) offers an almost magical way to adjust the pose of a subject. Instead of global distortion, Puppet Warp lays a mesh over your subject, allowing you to place “pins” at joints or specific areas.- By dragging these pins, you can subtly (or dramatically) bend and reposition limbs, adjust postures, or even create dynamic movements for “Aesthetic” and “Emotional” images. This tool is perfect for refining a model’s pose after a shoot, saving hours that would otherwise be spent on reshoots. It’s an advanced form of “Photo Manipulation” that keeps the subject looking natural and integrated, contributing to the “High Resolution” quality expected from professional “Digital Photography.” Remember to separate your subject from the background using a selection tool before applying Puppet Warp for the best results.
Advanced Techniques: Customizing Your Warp Grid
For those demanding the utmost precision in their “Photo Manipulation” or “Visual Design” projects, Photoshop CC 2020+ introduces the ability to add your own custom grid lines. This granular control is a game-changer for intricate work, allowing you to target specific areas without affecting the rest of the image. It transforms the Warp tool into a surgical instrument for “Creative Ideas.”
-
Adding Your Own Grid Lines (Split Options): In the Options Bar, you’ll find the “Split” option, accompanied by three distinct icons:
- Split Crosswise: This option, typically the most useful, adds both a vertical and a horizontal grid line at the exact spot where you click. This instantaneously creates a new control point, allowing for precise localized warping.
- Split Vertical: Adds only a vertical grid line.
- Split Horizontal: Adds only a horizontal grid line. By selecting the appropriate split option, you can strategically place new grid lines and control points wherever your image demands intricate reshaping, effectively turning your image into a custom mesh. This is particularly useful for complex “Digital Art” elements or detailed adjustments in “Backgrounds.”
-
A Faster Way to Add Grid Lines: Photoshop streamlines this process with a convenient shortcut. Instead of constantly switching between Split options in the Options Bar, simply hold down the
Alt(Windows) /Option(Mac) key and click on your image. Photoshop intelligently determines the best split type (Crosswise, Vertical, or Horizontal) based on where you click relative to existing grid lines. Clicking in an open area will usually create a crosswise split, while clicking near an existing vertical or horizontal line will add a perpendicular line accordingly. This intuitive feature significantly speeds up the workflow for experienced “Visual Design” and “Photo Manipulation” artists. -
How to Delete a Custom Grid Line: Mistakes happen, and Photoshop offers an easy way to correct them. If you’ve added a grid line in the wrong spot, simply click on a control point along that line to select it. Then,
right-click(Windows) /Control-click(Mac) and choose “Remove Warp Split” from the contextual menu. This ensures your custom grid remains clean and efficient, preserving the quality of your “High Resolution” images.
Integrating Warp into Your Tophinhanhdep.com Workflow
The enhanced Warp tool is more than just a standalone feature; it’s an integral part of a holistic creative ecosystem, perfectly aligning with the resources and inspiration provided by Tophinhanhdep.com.
Seamless Editing and Image Optimization
Consider a scenario where you’ve used an “AI Upscaler” to enhance a low-resolution image to “High Resolution.” After upscaling, you might find subtle distortions or an element that needs reshaping for your “Visual Design” project. The Warp tool becomes your next step, allowing you to fine-tune these details. It works harmoniously with other “Image Tools” like “Compressors” and “Optimizers” by ensuring that the final, creatively manipulated image is not only visually striking but also ready for various digital platforms, whether it’s for “Wallpapers” or web content.
Inspiring Collections and Mood Boards
For “Image Inspiration & Collections,” the Warp tool is a powerful asset. You can use it to generate unique textures, create abstract forms from “Nature” photos, or adapt elements to fit specific “Mood Boards.” Imagine transforming ordinary shapes into flowing “Aesthetic” designs or subtly altering “Trending Styles” in photography to give them a distinctive twist. This tool encourages experimentation and allows creators to push boundaries, resulting in fresh “Photo Ideas” and captivating “Thematic Collections.”
Finalizing Your Warp
Once you’ve achieved your desired transformation, there are two ways to conclude the Warp command:
- Accept the Warp: To apply your changes and exit Warp mode, click the checkmark icon in the Options Bar or press
Enter(Windows) /Return(Mac). - Cancel the Warp: If you’re not satisfied with your adjustments and wish to discard all changes made during the current Warp session, click the Cancel button (a circle with a slash through it) in the Options Bar or press
Escon your keyboard. Remember, if you’re working with a Smart Object, cancelling the warp simply means the Smart Filter won’t be applied; your original image remains untouched.
Conclusion
The enhanced Warp command in Photoshop CC 2020 and beyond is a testament to Adobe’s commitment to providing artists and photographers with increasingly powerful and intuitive “Image Tools.” From correcting subtle perspective distortions in “Beautiful Photography” to crafting intricate “Digital Art” and “Abstract” forms for “Visual Design,” its versatility is unmatched. Tophinhanhdep.com is dedicated to guiding you through these advanced features, helping you unlock your creative potential and elevate your “Photo Manipulation” skills.
By mastering the default controls, leveraging preset and custom grids, and utilizing the innovative split options, you gain unparalleled precision over your images. Coupled with the non-destructive workflow afforded by Smart Objects, the Warp tool ensures that your “Creative Ideas” can be explored and refined without compromise. We encourage you to practice these techniques, experiment with “Wallpapers,” “Backgrounds,” and various “Image Inspiration & Collections,” and discover how this fundamental tool can transform your approach to visual creation. Continue to explore Tophinhanhdep.com for more in-depth tutorials and resources to further hone your expertise in “High Resolution” image editing and beyond.