Mastering Image Warping in Photoshop: The Ultimate Guide for Visual Creatives on Tophinhanhdep.com

In the dynamic world of digital imagery, the ability to precisely manipulate and reshape visual elements is paramount. For photographers, graphic designers, and digital artists alike, tools that offer meticulous control over an image’s form are indispensable. Among these, Photoshop’s Warp command stands out as a fundamental feature, continuously evolving to meet the sophisticated demands of modern visual design. On Tophinhanhdep.com, where we celebrate everything from stunning High Resolution Photography and Aesthetic Backgrounds to intricate Photo Manipulation and Creative Ideas, understanding the nuances of the Warp tool is key to unlocking limitless creative potential.
The journey of digital content creation often involves more than just capturing or creating an image; it’s about refining, enhancing, and sometimes fundamentally transforming it. Whether you’re correcting subtle distortions in an architectural photograph, placing a logo seamlessly onto a curved surface, or venturing into the realm of Abstract Digital Art, the Warp tool provides the flexibility needed to bring your vision to life. This comprehensive guide, drawing from the latest enhancements in Photoshop CC 2020 and newer, will delve into every facet of the Warp command, empowering you to bend, stretch, and twist your images with unprecedented precision.
The Evolution of Image Warping in Photoshop
For years, Photoshop has offered the capability to warp images, allowing users to make basic alterations to perspective and shape. However, the controls were often rudimentary, limiting the scope of truly intricate transformations. This changed dramatically with Photoshop CC 2020, ushering in an era of enhanced control and flexibility for the Warp command. Adobe’s commitment to empowering Visual Design and Digital Photography is evident in these powerful updates, making sophisticated image manipulation more accessible than ever before.
Why the Enhanced Warp Tool Matters for Digital Photography and Visual Design
The enhanced Warp tool isn’t just a minor update; it’s a game-changer for anyone involved in Digital Photography and Graphic Design. Imagine you have a striking landscape photo but the horizon isn’t quite right, or you’re designing a vibrant Aesthetic Wallpaper and need to curve text perfectly around a sphere. Previous versions of the Warp tool might have provided a rough approximation, but the enhanced command offers the granular control necessary for flawless execution.
These improvements include:
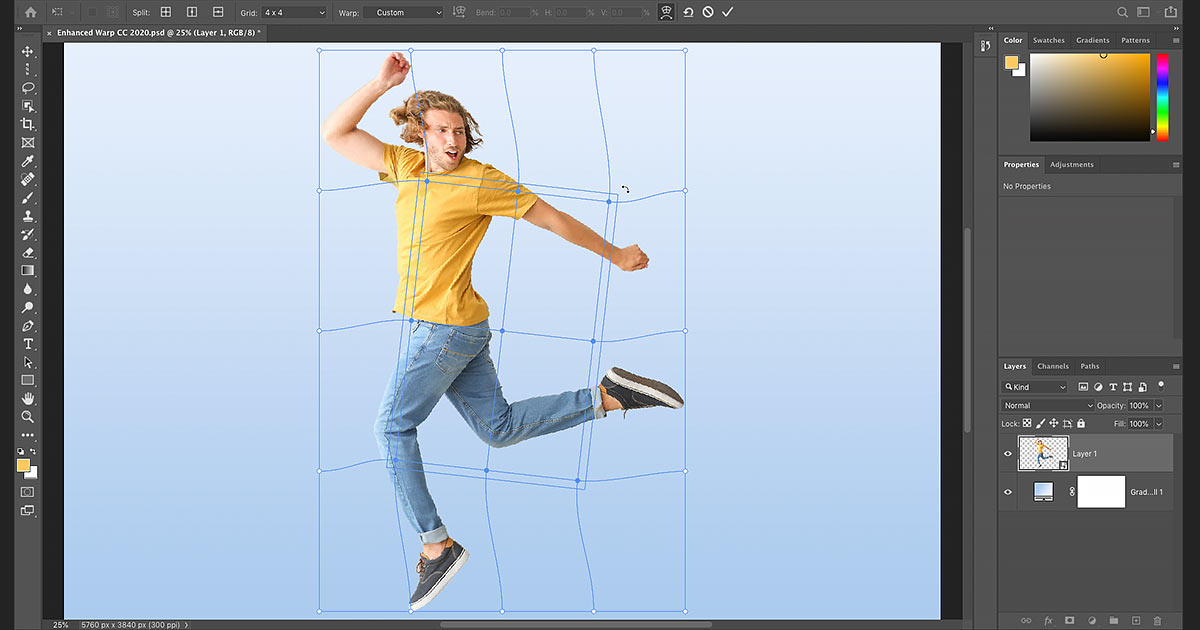
- New Warp Grid Presets: Quickly apply structured grids (like 3x3, 4x4, or 5x5) that provide a multitude of control points, moving beyond the simple corner-point manipulation.
- Custom Grid Sizes: For highly specific projects, you can define your own grid dimensions, tailoring the control to the exact needs of your Photo Manipulation.
- Ability to Add Custom Grid Lines and Control Points: This revolutionary feature allows you to introduce control wherever necessary, offering unparalleled precision for intricate reshaping.
- Multi-Point Selection and Warping: Select and manipulate multiple control points simultaneously, enabling complex and synchronized transformations.
- Independent Scaling and Rotation: Different sections of an image can now be scaled and rotated independently, opening up a universe of Creative Ideas for Digital Art.
![]()
These advancements directly contribute to the High Resolution quality expected in professional work, ensuring that even significant warping can be done without sacrificing image integrity when applied correctly.
Preparing Your Canvas: Smart Objects for Non-Destructive Warping
Before diving into the exciting world of warping, a crucial step for any responsible Image Editing workflow is to convert your layer into a Smart Object. This practice, strongly advocated by experts on Tophinhanhdep.com, underpins the principle of non-destructive editing, a cornerstone of professional Photo Manipulation.
Why Smart Objects? When you warp a standard pixel layer, the changes are permanent. Each transformation alters the actual pixels, and repeated warps can lead to a degradation of image quality. If you decide later that your warp isn’t quite right, undoing it completely might be your only option, losing all subsequent work.
By contrast, when you warp a Smart Object, the warp is applied as a Smart Filter. This means:
- Editability: The warp remains fully editable. You can return to the Warp command at any time to adjust, refine, or even completely remove the warp without affecting the original image data.
- Quality Preservation: The original image within the Smart Object remains pristine. This is crucial for maintaining the High Resolution and sharpness of your Beautiful Photography even after multiple transformations.
- Flexibility: It allows for iterative design, empowering graphic designers and digital artists to experiment freely without fear of irreversible damage.
How to Convert to a Smart Object:
- In the Layers panel, select the layer you wish to warp.
- Click the Layers panel menu icon (usually a small set of horizontal lines or a cogwheel) in the upper right corner.
- Choose “Convert to Smart Object” from the dropdown menu.
- A small icon will appear in the lower-right corner of the layer’s preview thumbnail, signifying its conversion to a Smart Object, making it ready for non-destructive warping.
This simple yet powerful step is a best practice for all forms of Image Tools usage in Photoshop, ensuring your Digital Photography projects retain their quality and flexibility.
Accessing and Understanding the Basic Warp Controls
Once your layer is a Smart Object, you’re ready to explore the Warp command. Photoshop offers several pathways to access this powerful tool, each serving different aspects of your Visual Design workflow.
Navigating to the Warp Command
There are two primary ways to initiate the Warp command in Photoshop:
-
Direct Access via the Menu Bar:
- Go to
Editin the Menu Bar. - Choose
Transform. - Then, select
Warp. This directly activates the Warp mode.
- Go to
-
Through the Free Transform Command:
- Go to
Editin the Menu Bar and chooseFree Transform, or simply pressCtrl+T(Windows) /Command+T(Mac). This activates the Free Transform bounding box. - With Free Transform active, look in the Options Bar at the top of the screen. You will see a
Warpicon (it often looks like a mesh grid or a curved arrow). Click this icon to switch from Free Transform to Warp mode.
- Go to
The latter method is often preferred as it allows for an initial general transformation (scaling, rotating) with Free Transform before diving into the more detailed reshaping offered by Warp.
Initial Warp: Freeform Manipulation and Essential Adjustments
Upon selecting the Warp command, Photoshop encloses your layer’s contents within a default Warp box. Initially, this might resemble the Free Transform box, but its functionality is distinctly different, focused on deformation rather than simple scaling or rotation.
How to Use the Default Warp Controls:
- Freeform Dragging: Click and drag anywhere inside the Warp box. This allows for a fluid, organic reshaping of the image. Imagine pushing and pulling a malleable surface. This is particularly useful for achieving Abstract or Aesthetic distortions quickly.
- Corner Control Points: Drag any of the square control points located at each corner of the box. These points allow you to manipulate the overall shape, influencing the curvature and extension of the image from its edges.
- Control Handles: Extending from each corner point are Bezier-style control handles. Clicking and dragging these handles provides fine-tuned control over the curvature of the grid lines emanating from that point. This is excellent for subtle adjustments or creating smooth, flowing curves. By rotating these handles, you can also pivot the image around the control point, adding a dynamic rotational effect to specific areas.
These basic controls form the foundation of image warping, providing a quick yet powerful way to introduce distortions, ideal for initial Photo Manipulation ideas or quick Graphic Design mock-ups.
Reversing and Resetting Your Warps
Experimentation is key in Visual Design, and with complex tools like Warp, mistakes or undesirable outcomes are part of the process. Photoshop provides user-friendly ways to correct your steps:
- Undo Last Step: Go to
Edit > Undoor repeatedly pressCtrl+Z(Win) /Command+Z(Mac). Photoshop CC 2020 and newer allows for multiple undos, letting you retrace several steps. - Completely Reset Warp: To instantly revert the image to its original, unwrapped state (within the Smart Object), click the
Resetbutton in the Options Bar. This is a quick way to discard all warp changes and start fresh.
This flexibility ensures that your creative process, whether you’re working on Sad/Emotional imagery or perfecting Beautiful Photography, remains fluid and stress-free.
Advanced Warping Techniques with Grids and Customization
While the default controls offer a good starting point, the true power of the enhanced Warp tool lies in its ability to introduce and manipulate intricate grids. These features are indispensable for achieving precision in Photo Manipulation and executing complex Creative Ideas.
Gaining Precision with Warp Grid Presets
The enhanced Warp command in Photoshop CC 2020 introduced pre-defined grid presets, significantly increasing the number of control points available for manipulation. This immediately elevates the level of detail you can achieve in your warps.
How to Use Grid Presets:
- With the Warp command active, locate the
Gridoption in the Options Bar. - Click on the
Griddropdown menu. - Choose one of the presets:
3x3,4x4, or5x5.
Once a preset is selected, a grid will overlay your image. Instead of just four corner points, you’ll now have a control point at every intersection of the horizontal and vertical grid lines. For example, a 3x3 grid transforms your four basic control points into sixteen, offering a much finer degree of control.
- Dragging a Control Point: Click and drag any of these new intersection points independently. This allows localized warping, subtly reshaping specific areas without affecting the entire image.
- Dragging a Control Handle: Just like with the default corners, each grid control point also has Bezier handles. Dragging these handles lets you adjust the curvature of the grid lines extending from that point, providing smooth, organic deformations.
- Rotating a Control Point: By dragging the control handle clockwise or counter-clockwise, you can rotate the area around that specific point, enabling complex twists and turns within your Digital Art.
- Warping a Grid Line: Beyond points and handles, you can also click and drag directly on a grid line segment between two control points. This allows you to curve or bend the entire segment, providing yet another layer of granular control.
These grid presets are excellent for situations where you need more localized control, such as adjusting the flow of a fabric texture or subtly reshaping a facial feature for Aesthetic purposes.
Mastering Multi-Point Selection and Transformation
One of the most powerful enhancements is the ability to select and warp multiple control points simultaneously, allowing for synchronized and scalable transformations of specific image areas. This is a massive boon for efficiency in Graphic Design and Photo Manipulation.
Selecting Multiple Points:
- Shift-Click: Press and hold the
Shiftkey and click on each control point you want to select. - Shift-Drag (Marquee Selection): A faster method is to hold
Shiftand drag a marquee selection box around the desired points. - Deselecting: If you accidentally select a point, keep
Shiftheld down and click it again to deselect.
A bounding box will appear around the group of selected points, indicating their collective selection.
Transforming Selected Points:
- Moving: Click and drag anywhere inside the bounding box of the selected points to move all of them together, translating that entire section of the image.
- Scaling: Drag a corner of the bounding box to scale the area enclosed by the selected points. This is incredibly useful for expanding or contracting specific regions without affecting the rest of the warp.
- Rotating: Move your mouse cursor just outside the bounding box until it changes into a curved rotate icon, then click and drag to rotate the entire selected area.
Deselecting Points: When you’re finished with your multi-point transformation, simply click on an empty spot within the grid or outside the main Warp box to deselect the points. This feature is crucial for intricate projects, ensuring consistency across a complex warp while maintaining High Resolution details.
Crafting Unique Deformations with Custom Grids
For those instances where preset grids don’t offer the exact configuration of control points needed, Photoshop’s enhanced Warp tool allows you to define your own custom grid size. This level of customization ensures that no Visual Design project is beyond your reach.
Creating a Custom Grid:
- In the Options Bar, set the
Gridoption toCustom. - The
Custom Grid Sizedialog box will appear. - Enter your desired number of
ColumnsandRows. For example, a 6x6 grid will provide a significantly higher density of control points. - Click
OK.
Your custom grid will appear, offering even more control points at each intersection. It’s important to remember that changing the grid size after you’ve already started warping will discard your previous changes, so plan your grid density upfront. This bespoke approach to warping is vital for projects requiring extreme precision, aligning perfectly with the ethos of detailed Image Editing Styles on Tophinhanhdep.com.
Dynamic Control: Adding and Removing Warp Grid Lines
Perhaps the most groundbreaking enhancement to the Warp tool is the ability to dynamically add your own grid lines and control points wherever they are needed, providing pinpoint accuracy for complex deformations. This truly empowers Photo Manipulation artists to achieve virtually any desired shape.
Adding Custom Grid Lines:
In the Options Bar, you’ll find a new Split option with three icons:
- Split Crosswise: Adds both a vertical and a horizontal grid line at the clicked location. This is often the most versatile option as it creates a new control point at the exact intersection.
- Split Vertical: Adds only a vertical grid line.
- Split Horizontal: Adds only a horizontal grid line.
How to Use the Split Options:
- Select the desired
Splitoption from the Options Bar (e.g.,Split Crosswise). - Move your mouse cursor over the image and click where you want to add the grid line(s). Photoshop will add the chosen line(s) and a new control point at the clicked location.
- You can then click and drag this new control point and its handles to warp the image with localized precision. Crucially, adding new grid lines does not discard previous changes to your warp, allowing for iterative refinement.
A Faster Way to Add Grid Lines:
For even quicker workflow, hold down Alt (Win) / Option (Mac) and click directly on the image. Photoshop will intelligently choose the best Split option (Crosswise, Vertical, or Horizontal) based on where you click:
- Clicking in an open area typically defaults to
Split Crosswise. - Clicking close to an existing vertical grid line will often choose
Split Horizontal. - Clicking near an existing horizontal grid line will usually select
Split Vertical.
Deleting Custom Grid Lines: If you make a mistake or no longer need a specific grid line, you can remove it:
- Click on a control point along the grid line you wish to remove to select it.
- Right-click (Win) / Control-click (Mac) on the selected point.
- Choose
Remove Warp Splitfrom the contextual menu.
This dynamic grid management is invaluable for intricate Digital Art and detailed Image-to-Text placements where shapes need to perfectly conform to underlying forms.
Beyond Basic Warping: Specialized Tools for Creative Visual Design
While the core Warp tool handles a vast range of transformations, Photoshop offers specialized warping commands like Perspective Warp and Puppet Warp that address specific challenges in Photography and Visual Design. These tools further expand your capabilities for Photo Manipulation and Creative Ideas.
Correcting Perspective with Purpose: Architectural Photography and Beyond
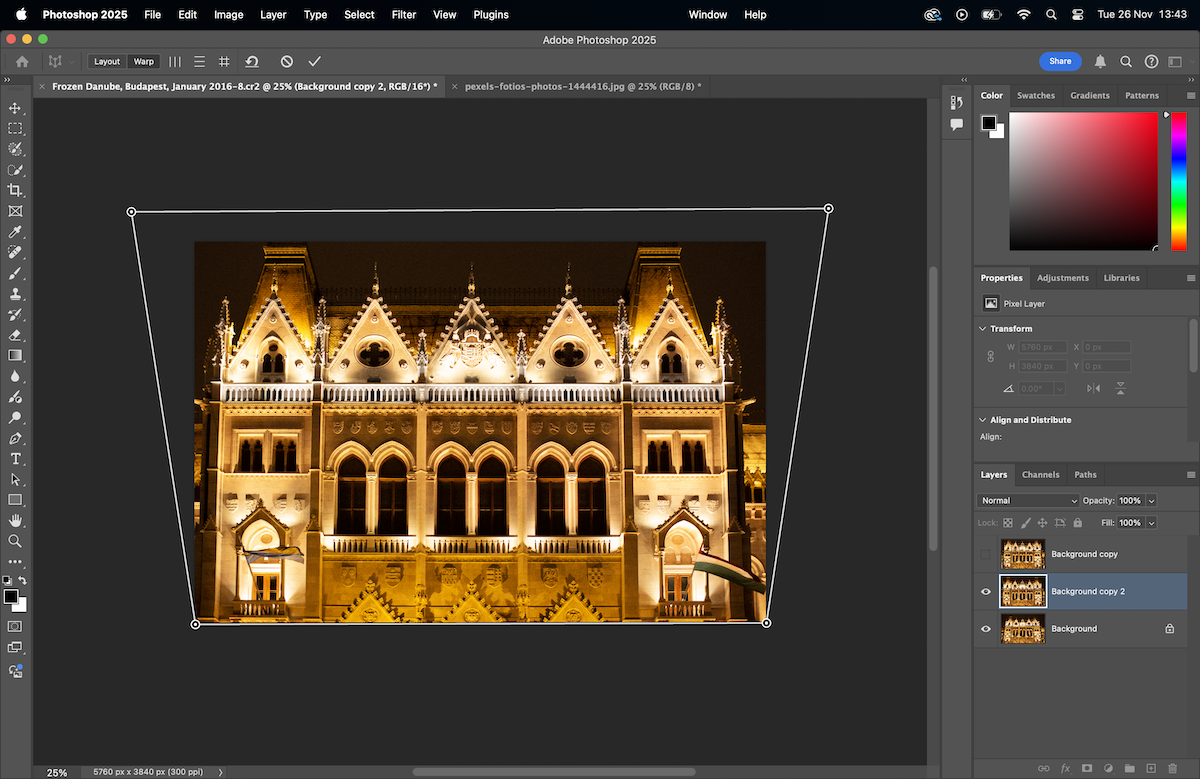
The Perspective Warp tool, found under Edit > Perspective Warp, is a lifesaver for photographers dealing with converging lines, especially common in Architectural Photography. When you tilt your camera upwards to capture tall buildings, the parallel lines appear to converge, creating an unnatural distortion. Perspective Warp allows you to rectify this.
How Perspective Warp Works:
- Select the layer you want to correct.
- Go to
Edit > Perspective Warp. - Layout Mode: You’ll first enter “Layout” mode. Here, you define the planes of your image. Drag out quadrilaterals (grids) over the surfaces you want to correct, aligning them with the distorted perspective. For a building, you might create a grid over one side of the structure. You can create multiple grids if your subject has several planes.
- Warp Mode: Once your planes are defined, switch to “Warp” mode (in the Options Bar). Now, you can drag the corners of these grids to straighten out the converging lines. Use the
View > Show > Gridoption to overlay a Photoshop grid for perfect alignment. The goal is to make the vertical lines truly vertical and horizontal lines truly horizontal, restoring natural proportions.
This tool is not just for architecture; it can correct distorted product shots, flatten skewed documents, or make objects appear to face a different direction, contributing significantly to professional Stock Photos and High Resolution Photography.
Dynamic Figure Adjustments with Puppet Warp
The Puppet Warp tool, located under Edit > Puppet Warp, is a specialized warping feature designed primarily for organic subjects, particularly people and animals. It’s an incredible tool for adjusting poses, creating subtle animations, or even exaggerating movements for Digital Art or Abstract compositions.
How Puppet Warp Works:
- First, isolate your subject onto its own layer, usually by using a selection tool and making a mask.
- Select your subject layer.
- Go to
Edit > Puppet Warp. - A mesh will appear over your subject. You then place “pins” (control points) at strategic locations, typically joints like shoulders, elbows, hips, and knees. These pins act as anchors.
- Once pins are placed, click and drag them to move specific parts of the body. The mesh stretches and contracts around the pins, creating realistic-looking deformations. You can also rotate around a pin.
Puppet Warp is an advanced tool that requires practice to make convincing edits, but its capability to subtly refine a model’s pose or dramatically alter a figure’s posture opens up immense possibilities for Photo Manipulation and Creative Ideas, allowing for dynamic compositions and even simple stop-motion effects within Digital Photography.
Integrating Warping into Graphic Design and Digital Art
Beyond correctional work, the Warp tool is a powerhouse for Graphic Design and Digital Art.
- Text on Surfaces: Warp can curve text to realistically follow the contour of objects in an image, such as a label on a bottle or a headline across a flag, making Image-to-Text integration seamless.
- Object Placement: When compositing images, Warp helps make inserted objects conform to the perspective and shape of the background, enhancing realism in Photo Manipulation.
- Abstract Creations: By intentionally exaggerating the warp controls, designers can transform ordinary images into Abstract patterns, Aesthetic distortions, or surreal visual elements, pushing the boundaries of traditional Digital Art.
- Mood Boards & Thematic Collections: Warping can quickly generate variations of images for Mood Boards, helping to explore different visual tones, from serene Nature scenes to intense Sad/Emotional compositions.
The ability to manipulate shapes and perspectives with such detail makes the Warp tool an essential asset for anyone looking to create compelling Visual Design.
Finalizing Your Warp and Integrating into Your Workflow
Once you’ve meticulously shaped your image, the final steps involve committing your changes and understanding how this powerful tool fits into your broader Image Editing workflow.
Accepting or Canceling Your Transformations
After you’ve achieved your desired warp:
- Accept the Warp: To apply the transformation, click the
checkmarkicon in the Options Bar. If you’re working with a Smart Object, this will apply the warp as a Smart Filter, keeping it editable. - Cancel the Warp: If you decide to discard all changes and exit the Warp command, click the
Cancelicon (often a circle with a slash) in the Options Bar.
The Role of Warping in High-Resolution Image Editing
In the context of High Resolution Photography and Stock Photos, the quality of your output is paramount. The enhanced Warp tool, especially when used with Smart Objects, ensures that even complex transformations maintain the integrity of your pixels. This means that a subtly warped Beautiful Photography image will still print crisply and display stunningly across various platforms, upholding the standards for professional Digital Photography.
On Tophinhanhdep.com, we encourage exploring all the Image Tools at your disposal. The enhanced Warp command is a testament to the power of modern Photo Manipulation, offering unparalleled precision and creative freedom. Whether you’re a beginner experimenting with Photo Ideas or a seasoned professional crafting Thematic Collections, mastering image warping in Photoshop will undoubtedly elevate your Visual Design capabilities and help you create truly captivating content. Now, go forth and reshape your world!