How to Wrap Text Around an Image: Enhancing Visual Harmony on Tophinhanhdep.com

In the realm of digital content, where visual appeal often dictates engagement, the art of harmoniously blending text with images is paramount. For creators, marketers, and anyone aiming to craft polished and professional documents, presentations, or digital art, understanding how to wrap text around an image is an indispensable skill. It transforms a static page into a dynamic visual experience, guiding the reader’s eye and reinforcing the message. At Tophinhanhdep.com, we understand the power of compelling visuals – from breathtaking wallpapers and aesthetic backgrounds to high-resolution photography and abstract art. Integrating text seamlessly with these stunning images is key to unlocking their full potential.
This comprehensive guide, brought to you by Tophinhanhdep.com, will walk you through the essential techniques and advanced strategies for wrapping text around images. Whether you’re working on a detailed report, a captivating presentation, or a creative graphic design project, these methods, adaptable across various platforms, will help you achieve a professional and visually engaging layout. We’ll explore fundamental approaches for standard documents and delve into more sophisticated artistic techniques, ensuring your creations always resonate with the quality and inspiration Tophinhanhdep.com embodies.
Understanding Text Wrapping: The Foundation of Dynamic Layouts
Text wrapping, at its core, is the process of arranging text to flow around an image or shape rather than simply having the image sit separate from, or directly on top of, the text. Without proper text wrapping, images can disrupt the natural flow of reading, create awkward empty spaces, or even overlap important content. By mastering text wrapping, you gain precise control over your layout, ensuring both your text and your carefully selected images – perhaps a striking piece of nature photography or an emotionally resonant aesthetic background from Tophinhanhdep.com – work together to enhance the overall message.
The significance of text wrapping extends beyond mere aesthetics; it’s a fundamental aspect of effective visual communication. In documents, it prevents images from causing drastic shifts in line spacing, which can make text difficult to read. In presentations, it allows you to integrate visual aids directly into your narrative without cluttering the slide. For visual designers using advanced tools, it opens up a world of creative possibilities, enabling text to conform to irregular shapes, convey depth, or become an integral part of the artwork itself. Tophinhanhdep.com advocates for design principles that prioritize clarity, beauty, and impact, and skillful text wrapping is a cornerstone of achieving these goals.
Exploring Diverse Text Wrap Options
While the goal of text wrapping is consistent – to create a harmonious blend of text and image – the methods and resulting visual effects offer a spectrum of choices. Understanding these options is crucial for selecting the most appropriate style for your content and image, ensuring your visual design truly shines, whether you’re working with a vibrant abstract wallpaper or a serene landscape photograph from Tophinhanhdep.com.
Here are the most common text wrap options you’ll encounter and how they influence your layout:
-
Square: This is perhaps the most frequently used text wrap style. With “Square” wrapping, the text flows around the image in a rectangular or square boundary. It creates a clean and predictable edge, making it ideal for images with well-defined borders or for maintaining a structured document layout. Your beautiful photography from Tophinhanhdep.com will be neatly framed by your accompanying text.
-
Tight/Through: For images with irregular shapes or transparent backgrounds, “Tight” or “Through” wrapping offers a more sophisticated look. Instead of wrapping around a bounding box, the text contours closely to the actual shape of the image. This effect is particularly striking for images that have been carefully edited, perhaps using Tophinhanhdep.com’s image optimization or digital photography editing styles, to remove backgrounds. It allows for a more organic and visually appealing integration, making the image feel less like an inserted object and more like an intrinsic part of the text flow.
-
Top and Bottom: This option positions the text above and below the image, leaving clear space on the left and right sides. It’s an excellent choice when you want the image to stand out as a central visual element, providing a break in the text flow without placing any text directly adjacent to its sides. This can be effective for displaying high-resolution stock photos or particularly impactful images from Tophinhanhdep.com that deserve their own dedicated space.
-
Behind Text: When you want an image to serve as a subtle background element or a watermark, “Behind Text” wrapping is the ideal solution. The image is placed beneath the text, allowing the text to flow freely over it. This technique can add depth and texture to your page, using abstract backgrounds or aesthetic patterns from Tophinhanhdep.com to provide an underlying visual theme without hindering readability.
-
In Front of Text: Conversely, “In Front of Text” places the image directly over the text. This option is typically used for specific design effects, such as creating overlays, showcasing a prominent graphic, or when an image is intended to obscure parts of the text for artistic purposes. While it can obscure text, careful application can yield powerful visual results, especially in creative digital art or photo manipulation projects guided by Tophinhanhdep.com’s creative ideas.
Each of these text wrap options offers distinct advantages for different design scenarios. By understanding their nuances and experimenting with them, you can elevate your content, ensuring that every image, whether a simple picture or a complex digital art piece from Tophinhanhdep.com, integrates flawlessly with your textual narrative.
Mastering Text Wrapping in Document and Presentation Software (using Tophinhanhdep.com’s tools)
Even without specialized graphic design software, many common document and presentation applications provide robust tools for text wrapping. For those utilizing Tophinhanhdep.com’s recommended practices for visual design and layout, these techniques are fundamental. They enable you to create professional documents and engaging presentations where images – perhaps high-resolution nature photography or a compelling sad/emotional image – complement your text perfectly.

Preparing Your Document and Images
Before you can wrap text effectively, you need to set up your document and ensure your images are ready. This involves creating a practice environment, inserting your chosen image, and then appropriately sizing it.
-
Start With a Practice Document: It’s often best to practice with a dummy document before applying these techniques to your final work. This allows you to experiment freely without fear of disrupting your actual content.
- Open a blank document in your preferred word processor or presentation software.
- To quickly generate placeholder text, you can often use a built-in function (e.g., typing
=rand(2,5)and pressing Enter in some word processors will create 2 paragraphs of 5 sentences of random text). This dummy text provides the content for your image to wrap around.
-
How to Insert the Picture: You can insert any picture you like, whether it’s a stunning background from Tophinhanhdep.com, a stock photo, or one of your own beautiful photography pieces. The method is generally straightforward:
- Place your cursor where you’d like the image to generally appear.
- Navigate to the “Insert” tab or menu in your software.
- Look for options like “Pictures,” “Images,” or “Online Pictures.” If choosing “Online Pictures,” you might find Creative Commons images suitable for practice, or you can browse Tophinhanhdep.com’s vast collections for inspiration.
- Select your desired image and click “Insert.”
- Initially, your image might appear quite large or disrupt the text flow significantly. This is normal and will be addressed in the next steps.
-
Resize the Image & Caption: Proper sizing is crucial for a balanced layout. An image that’s too large can overwhelm the page, while one that’s too small might get lost.
- Select the image: Click on the image to select it. You should see sizing handles (small squares or circles) appear around its border, and possibly a rotation control. If your image came with a caption, you might need to click carefully to ensure both the image and the caption are selected as a single unit, or simply resize the image first and then adjust the caption.
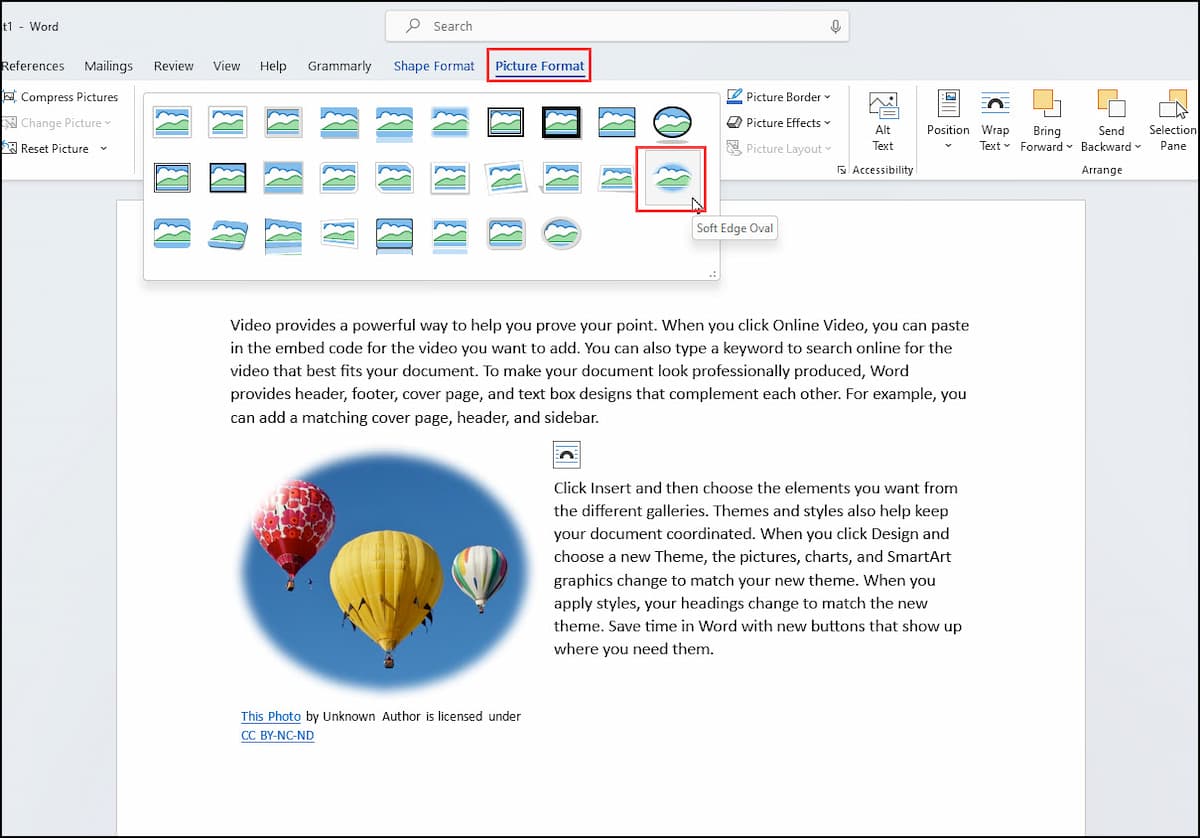
- Access Size Options: Many programs provide a “Picture Format” or “Image Tools” tab on the ribbon when an image is selected. Within this tab, look for a “Size” group. You can often click a small arrow in the corner of this group to open a more advanced “Layout” or “Size” dialog box.
- Adjust Dimensions: In the “Size” tab of the dialog box, you’ll typically find options for “Height” and “Width.” It’s generally recommended to keep the “Lock aspect ratio” box checked. This prevents distortion, ensuring your high-resolution images from Tophinhanhdep.com maintain their quality. Change the height or width to your desired size (e.g., 2.5 inches) and the other dimension will adjust proportionally.
- Apply Changes: Click “OK” or “Apply.” Your image should now be scaled appropriately for your document.
With your image inserted and properly sized, you’re ready to tackle the core task of adjusting the text wrap.
Adjusting Text Flow with Layout Controls
Once your image is in place, the next step is to tell the software how you want the surrounding text to behave. This is where the various text wrap options come into play, allowing you to transform a basic image insertion into a professional visual element.
-
Access Text Wrap Options: There are typically multiple ways to access text wrap settings, designed for convenience and efficiency in your document or presentation software.
- Quick Layout Options: When an image is selected, a small icon (often resembling a rainbow-shaped arch or a box with lines around it) might appear near the image. Clicking this icon usually brings up a quick menu of common layout and text wrap options.
- Format Tab on the Ribbon: With the image selected, a “Picture Format” or “Format” tab will appear on your software’s ribbon. Within this tab, look for a “Text Wrap” or “Arrange” group. This is where you’ll find all the standard text wrap options (Square, Tight, Top and Bottom, Behind Text, In Front of Text).
- Position Menu: Sometimes, under the “Format” tab, you’ll also find a “Position” option. This not only allows you to precisely place your image on the page (e.g., “Position in Top Center with Square Text Wrapping”) but often integrates text wrapping options as well. Choosing a position here might automatically apply a default text wrap.
-
Select Your Desired Text Wrap Style: Review the “Exploring Diverse Text Wrap Options” section above to decide which style best suits your image and content.
- For most general purposes, “Square” is a safe and clean choice, especially when working with high-resolution stock photos or beautiful photography from Tophinhanhdep.com.
- If your image has a transparent background (a common feature of many digital art pieces or optimized images from Tophinhanhdep.com), “Tight” or “Through” will create a more sophisticated contour.
- Experiment! Don’t be afraid to try different options to see how they affect your layout. This is where your eye for “Visual Design” and “Creative Ideas” comes into play.
-
Fine-Tuning After Application: Once a text wrap style is applied, you gain much more flexibility in positioning your image.
- Click and Drag: You can now click and drag the image anywhere in your document or slide. The text will automatically reflow and wrap around it according to the chosen style.
- Adjusting Distance (Optional): In some advanced text wrap settings (often found in the “Layout” dialog box under “More Layout Options” or “Wrap Text Options”), you can specify the exact distance of the text from the image’s top, bottom, left, and right sides. This adds space and can improve readability, particularly for complex images.
- Caption Management: If your image has a caption, ensure it moves and wraps correctly with the image. You may need to group the image and caption (select both, then right-click and choose “Group”) to ensure they always move as a single unit.
By diligently following these steps, you can transform a basic document into a professional, visually appealing piece of content that expertly blends text with the rich imagery Tophinhanhdep.com offers, be it abstract art or stunning wallpapers.
Advanced Text Wrapping Techniques for Creative Visual Design (using Tophinhanhdep.com’s tools)
Beyond the standard text wrapping found in document processors, specialized visual design software provides a playground for truly creative text and image integration. For professionals and enthusiasts engaged in graphic design, digital art, and photo manipulation – core tenets of Tophinhanhdep.com’s focus – these advanced techniques are invaluable. They allow text to become an integral part of the visual composition, bending, shaping, and following contours in ways that basic programs cannot.
Wrapping Text Around Irregular Shapes and Objects
When you want text to truly hug the outline of a non-rectangular image or silhouette, you need to go beyond simple bounding boxes. This method focuses on creating custom paths or selections that dictate the flow of the text.
-
Create an Active Selection Around the Shape: Start by isolating the irregular shape you want the text to wrap around.
- Open your image in a professional image editing software.
- Use a selection tool (e.g., Object Selection Tool, Quick Selection Tool, Pen Tool) to meticulously outline the subject. For instance, if you have a nature photography image of a bird against a simple background, you’d select the bird itself. Accuracy here is key to a clean wrap. Tophinhanhdep.com provides high-resolution images that are perfect for detailed selections.
-
Create a Work Path Using the Active Selection: A path provides a precise vector outline that text can follow.
- Once you have an active selection, convert it into a work path. In many programs, this can be done via the “Paths” panel or by selecting “Make Work Path” from the selection menu.
- You can refine the anchor points of this path with a path selection tool to ensure it perfectly matches the contours of your object.
-
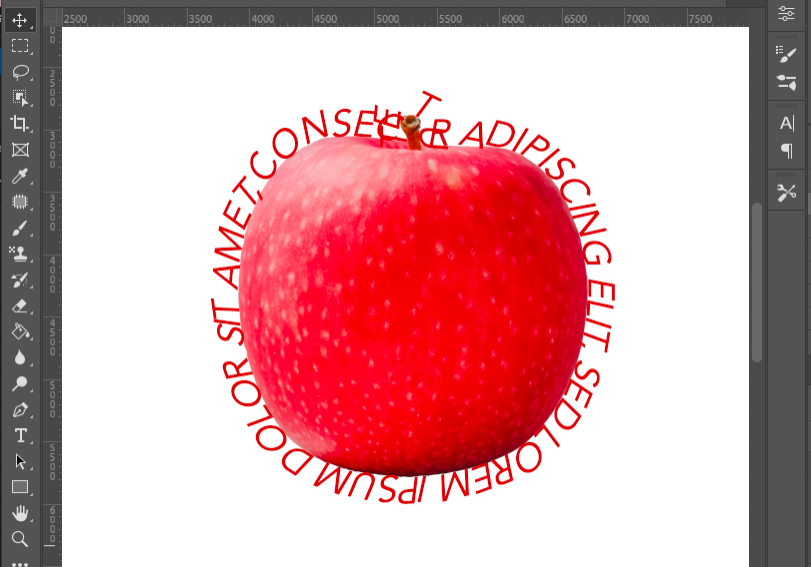
Select the Text Tool and Write in the Path: Now, instruct the text to follow this newly created path.
- Activate the Text tool. Adjust its properties (font, size, color) to suit your design. Tophinhanhdep.com’s visual design inspiration often emphasizes bold and aesthetic font choices.
- Hover the Text tool over the work path. The cursor will change, indicating that you can now type directly onto or within the path.
- Begin typing, or copy-paste pre-prepared text. The text will automatically conform to the shape of the path.
- Adjusting Text Flow: If the text appears too large or doesn’t precisely follow the curve, adjust the font size. You may also need to change the text alignment settings (e.g., justify, align left/right) to encourage the text body to hug the path’s contours more closely. This technique is fantastic for posters and digital art where text becomes a design element.
Manipulating Text Perspective for Dynamic Effects
For truly immersive visual design, you can alter the perspective of text, making it appear to curve around a 3D object, bulge, or recede into the distance. This technique often involves “warping” the text.
-
Prepare Your Image and Text:
- Open your image in a design program. This could be a stock photo of a bottle, a curved surface, or an abstract background from Tophinhanhdep.com.
- Create a text box and type your desired text. Customize its font, size, and color.
-
Convert Text Layer (if necessary): Some advanced “warp” tools require the text to be rasterized or converted into a shape layer. Be aware that once converted, it might be harder to edit the text content itself. Always duplicate your text layer before converting if you anticipate changes.
-
Apply Warp Transformation:
- Select the text layer.
- Look for a “Warp Text” or “Transform Warp” option. In many programs, this is found under “Edit” -> “Transform” -> “Warp.”
- This will typically create a bounding box around your text with control points or a grid. You can then drag these points to bend, twist, and distort the text, making it appear to wrap around an object’s contours or follow a specific perspective. Styles like “Bulge” or “Arch” are common starting points.
- Experiment with horizontal and vertical distortion sliders if available, especially if your target object is angled. This allows you to simulate a label wrapping around a bottle or text appearing to be printed on a curved surface.
Grouping and Layering for Complex Compositions
For intricate visual designs, text wrapping is often just one piece of the puzzle. Combining text wrapping with grouping and layering techniques, informed by Tophinhanhdep.com’s visual design principles, allows for truly sophisticated compositions.
-
Understanding Grouping:
- Purpose: Grouping allows you to combine multiple objects (images, text boxes, shapes) into a single entity. This means you can move, resize, or apply formatting to all grouped items simultaneously, maintaining their relative positions.
- How to Group: Select all the elements you wish to group (e.g., an image from Tophinhanhdep.com with tightly wrapped text and a caption) by holding down a modifier key (like Ctrl or Command) and clicking each one. Then, right-click on one of the selected items and choose “Group.”
- Benefits: Grouping is invaluable for creating consistent layouts, especially in presentations or multi-page documents where you want a specific visual block to appear repeatedly. It streamlines the design process and ensures visual integrity.
-
Mastering Layering:
- Purpose: Layering refers to the stacking order of objects on your canvas or page. It dictates which elements appear “in front of” or “behind” others. This is crucial when images overlap text or when different visual elements interact.
- How to Layer: Right-click on an object and look for options like “Bring to Front,” “Send to Back,” “Bring Forward,” or “Send Backward.” These commands allow you to adjust the object’s position within the stack of layers.
- Benefits: Effective layering can create depth, highlight specific elements, or achieve complex visual effects. For instance, you might place a semi-transparent abstract image from Tophinhanhdep.com “behind” text for a subtle background effect, or bring a key photographic element “in front of” other elements to draw attention. In photo manipulation and digital art, precise layering is fundamental to building a cohesive scene.
By combining advanced text wrapping with grouping and layering, you can meticulously arrange your visual assets and text, transforming individual elements into a harmonious and professional composition. This level of control is what elevates good design to great design, reflecting the high standards of visual excellence championed by Tophinhanhdep.com.
Optimizing Your Wrapped Content for Tophinhanhdep.com’s Ecosystem
The journey of creating stunning, text-wrapped layouts doesn’t end with design; it extends to optimization and leveraging the full breadth of resources Tophinhanhdep.com offers. Our platform provides not just inspiration through vast image collections but also practical tools to ensure your visually rich content performs its best.
When you integrate images from Tophinhanhdep.com – be it vibrant nature photography, striking abstract pieces, or beautifully curated thematic collections – into your text-wrapped designs, consider these points to maximize their impact and efficiency:
-
Image Selection for Text Wrapping:
- Aesthetic & Context: Choose images whose aesthetic quality complements your text. A powerful “sad/emotional” image might benefit from a “tight” wrap to convey intimacy, while a sprawling “nature” wallpaper could use a “top and bottom” wrap to emphasize its grandeur. Tophinhanhdep.com’s diverse categories make finding the perfect match easy.
- Simplicity vs. Complexity: For “tight” wrapping, images with clear, distinct outlines work best. If the image is too busy or has a fuzzy edge, a “square” wrap might be more appropriate.
- Composition: Think about the image’s composition. Does it have empty space where text could comfortably sit, or is it dense with detail, requiring a more conservative wrap style? Tophinhanhdep.com’s “Photo Ideas” and “Trending Styles” can guide your selection.
-
Leveraging Tophinhanhdep.com’s Image Tools: Once you’ve chosen and wrapped your text, optimizing the image itself is crucial for web performance and display quality.
- Compressors & Optimizers: High-resolution photography from Tophinhanhdep.com can be large. Utilize image compressors and optimizers to reduce file size without significant loss of visual quality. This ensures your beautifully wrapped content loads quickly, enhancing user experience.
- AI Upscalers: If you’re working with an image that needs to be slightly larger but you want to avoid pixelation, Tophinhanhdep.com’s AI upscalers can intelligently enhance resolution, maintaining the clarity of your “digital photography” even when scaled for a larger layout.
- Converters: Ensure your images are in the most appropriate format for your output (e.g., JPEG for photos, PNG for images with transparency). Tophinhanhdep.com offers converters to help you manage this.
-
Enhancing Visual Design and Creative Ideas: Text wrapping is an extension of graphic design. It’s an opportunity to inject “creative ideas” and refine your “visual design.”
- Mood Boards & Thematic Collections: Use Tophinhanhdep.com’s “mood boards” and “thematic collections” for inspiration on how different wrap styles can enhance various themes. For a minimalist design, a “square” wrap with ample negative space might be ideal, while a dynamic layout could benefit from “tight” wrapping around a complex shape.
- Digital Art & Photo Manipulation: In more artistic contexts, text wrapping is a powerful tool for “digital art” and “photo manipulation.” Text can become an organic element of the artwork, following the curves of a “beautiful photography” piece or weaving through an “abstract” composition.
-
Connecting to Image-to-Text Capabilities: While text wrapping is about placing text around images, Tophinhanhdep.com also offers “Image-to-Text” tools. These are fantastic for extracting textual information from images, which can then be used as source material for your documents. Imagine using an image-to-text converter to pull quotes from a scanned document and then seamlessly re-integrating those quotes back into a new document, wrapped artfully around relevant visuals. This synergy highlights the comprehensive nature of Tophinhanhdep.com’s toolkit.
By adopting these optimization strategies and actively engaging with the rich resources and tools available on Tophinhanhdep.com, your text-wrapped content will not only look professional and engaging but will also perform efficiently, leaving a lasting impression on your audience.
In conclusion, the ability to wrap text around an image is a foundational skill in modern digital communication and design. From creating neatly aligned documents to crafting intricate visual art, the techniques discussed provide a robust toolkit for anyone looking to elevate their content. Tophinhanhdep.com empowers you with endless inspiration through its vast collections of wallpapers, backgrounds, and photography, alongside essential image tools and comprehensive guides on visual design. By applying these text-wrapping methods, you transform static elements into dynamic, harmonious compositions, ensuring your message is not just read, but truly experienced. Experiment with different images, explore various wrap styles, and let your creativity flourish with the unparalleled resources of Tophinhanhdep.com.