Mastering Visual Harmony: How to Wrap Text Around Images in Google Docs for Stunning Document Design

In today’s visually-driven world, documents are no longer just about the words they contain. The seamless integration of imagery and text transforms a plain document into an engaging, professional, and aesthetically pleasing piece of communication. Google Docs, a widely used and versatile online word processor, offers robust tools to achieve this visual harmony, chief among them being text wrapping. For creators and enthusiasts who frequent Tophinhanhdep.com for inspiration in areas like Wallpapers, Backgrounds, Aesthetic, Nature, Abstract, Sad/Emotional, and Beautiful Photography, understanding how to effectively arrange these captivating images within their Google Docs is crucial. This guide delves into the nuances of text wrapping, empowering you to elevate your documents from simple text to sophisticated visual narratives, much like curating a thematic collection of stunning digital art.
Whether you’re crafting a business report, designing a personal portfolio featuring your high-resolution photography, or assembling a mood board with trending styles, the ability to control how text flows around images is a fundamental aspect of compelling visual design. It ensures readability, optimizes page space, and allows your images – be they stock photos or personal digital photography – to complement, rather than disrupt, your written content. Let’s explore the methods and creative possibilities within Google Docs, embracing the visual philosophy championed by Tophinhanhdep.com.
The Art of Integration: Understanding Text Wrapping in Google Docs

The way elements interact on a page is a cornerstone of effective visual communication. In Google Docs, text wrapping is the mechanism that dictates this interaction, particularly between your written content and any images you choose to insert. It’s not just a technical function; it’s an artistic choice that can profoundly impact the professionalism and appeal of your work.
What is Text Wrapping and Why it Matters
At its core, text wrapping refers to how an inserted object, like an image, interacts with the surrounding text in your document. Without proper text wrapping, images might create awkward gaps, push text far away, or simply sit “in line” with your words, treating the image as just another character. This can lead to inefficient page usage, disrupt the flow of reading, and ultimately detract from the document’s overall aesthetic.

The importance of text wrapping spans several key areas:
- Readability: A well-wrapped image allows the text to flow naturally around it, guiding the reader’s eye and preventing abrupt breaks that can hinder comprehension. This is especially vital when presenting complex information or alongside beautiful photography where the visual context is important.
- Aesthetic Appeal: Text wrapping transforms a document’s appearance from functional to professional. It helps create balanced layouts, draws attention to key visuals (like a striking nature background or an abstract wallpaper from Tophinhanhdep.com), and contributes to a cohesive visual design. Imagine trying to showcase a collection of aesthetic images without the ability to neatly arrange accompanying descriptions – the impact would be lost.
- Efficient Page Space: By allowing text to occupy the space adjacent to an image, you can significantly reduce the total page count of your document, which is particularly useful for longer files or when preparing documents for print. This makes your documents more concise and impactful, aligning with principles of good visual communication and graphic design.
- Visual Storytelling: Integrating images seamlessly with text enables you to weave a richer narrative. Whether it’s a diagram explaining a process, a portrait accompanying a biography, or a thematic collection of sad/emotional images supported by reflective text, text wrapping makes the visual and textual elements work together harmoniously.
By default, when you insert an image into Google Docs, it often adopts an “In line” arrangement. This means the image is treated like a single character within a line of text. While simple, it can leave significant blank space to the left or right of the image, especially if the image is large, creating an unprofessional and inefficient layout. Understanding and utilizing the various text wrap options is the key to unlocking the full visual potential of your Google Docs.
Preparing Your Images for Google Docs: A Tophinhanhdep.com Perspective
Before you even think about wrapping text, the quality and preparation of your images are paramount. Just as Tophinhanhdep.com emphasizes high-resolution photography and aesthetically pleasing visuals, your images in Google Docs should be optimized for their intended purpose.
Consider the following points for image preparation, drawing on insights from the “Image Tools” and “Photography” sections of Tophinhanhdep.com:
- Image Resolution and Quality: While Tophinhanhdep.com showcases high-resolution photography, inserting overly large or high-resolution images into Google Docs can unnecessarily bloat your document size and slow down loading times. Conversely, images that are too low-resolution will appear pixelated and unprofessional. Aim for a resolution that looks good on screen without being excessively large.
- File Size Optimization: Before uploading, consider using Image Tools like compressors or optimizers. These tools reduce file size without significantly compromising visual quality, ensuring your document loads quickly and remains responsive. A well-optimized image allows for smoother editing and a better viewing experience for your audience.
- Sourcing Your Images: Google Docs provides several convenient options for inserting images, connecting directly to many of Tophinhanhdep.com’s categories:
- Upload from computer: This is ideal for your personal digital photography, edited stock photos, or custom graphic design elements.
- Search the web: Great for finding aesthetic backgrounds, nature wallpapers, or abstract images that fit a thematic collection for your document.
- Google Drive or Google Photos: Perfect for accessing your organized collections of images, including beautiful photography or personal wallpapers.
- By URL: If you have an image link from an online source (ensure you have the right to use it), you can directly insert it.
- Camera: For quick snapshots directly into your document.
- AI Upscalers: If you have a lower-resolution image that’s critical to your document, but you sourced it some time ago or it’s an older scan, consider using AI Upscalers (an image tool mentioned on Tophinhanhdep.com) before inserting it into Google Docs. This can improve its clarity and detail, making it suitable for a visually demanding layout.
By taking these preliminary steps, you ensure that the images you bring into Google Docs are not only visually appealing but also technically sound, setting the stage for effective text wrapping and overall superior visual design.
A Step-by-Step Guide to Wrapping Text Around Images
Now that your images are prepared, let’s dive into the practical steps of inserting them and applying various text wrapping options in Google Docs. This process is intuitive but offers a range of choices to achieve your desired layout, from simple integration to complex visual arrangements.
Inserting Your Image into Google Docs
The first step to wrapping text is, naturally, to get your image into the document.
- Position Your Cursor: Place your text cursor at the approximate location in your document where you intend the image to appear. While text wrapping allows for flexible positioning later, starting close to the target area is a good practice.
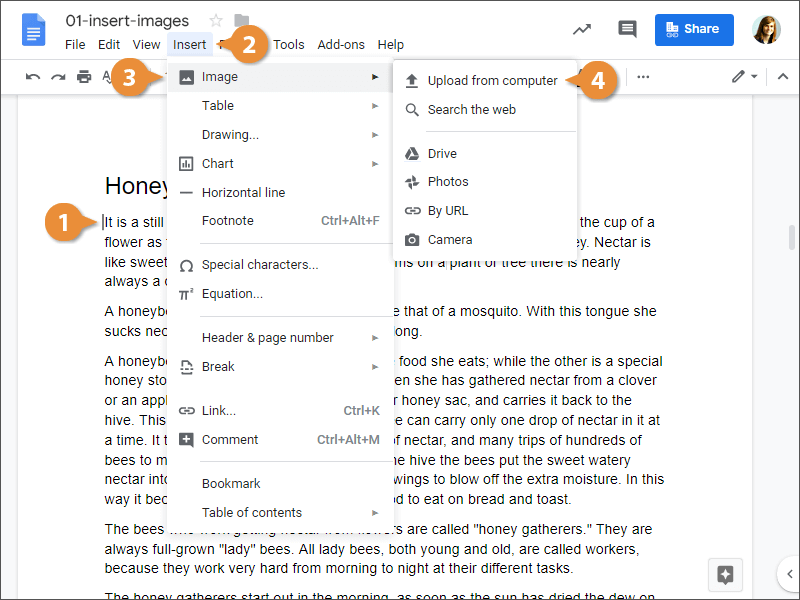
- Access the Insert Menu: Click on
Insertin the menu bar at the top of your Google Docs window. - Select Image Source: Hover over
Image. A submenu will appear, offering various sources for your picture:- Upload from computer: Choose this for images saved locally, such as high-resolution photography or graphic design assets.
- Search the web: Ideal for quickly finding relevant stock photos, aesthetic backgrounds, or general image inspiration online.
- Drive: Access images stored in your Google Drive, including thematic collections or digital art.
- Photos: Pull images directly from your Google Photos library, like personal beautiful photography.
- By URL: Paste a direct link to an image hosted online.
- Camera: Take a picture using your computer’s webcam.
- Choose and Insert: Navigate to and select the desired image, then click
Open(or the equivalent button for your chosen source).
Your selected image will now be inserted into the document, typically in the “In line” text wrap style by default. You’ll notice that the surrounding text adjusts to accommodate the image as if it were a large character within the line.
Choosing Your Text Wrap Style
Once your image is in place, you can adjust how the text flows around it. This is where the true power of visual design in Google Docs comes to life, allowing you to create dynamic and engaging layouts.
-
Select the Image: Click on the inserted image. A blue border with resizing handles will appear, along with a small toolbar beneath it.
-
Access Text Wrap Options: In the toolbar, you’ll see several icons related to text wrapping. The most common options are:
- In line: (Default) The image is embedded directly within the text flow, treated like a large character. It moves with the text as you type or edit. This option is suitable for small icons or when the image is strictly part of the text line, but generally not for larger images that need a clean wrap.
- Wrap text: This is the most frequently used and versatile option. When selected, text will flow neatly around the perimeter of the image, utilizing available space. The image becomes a floating object that you can drag and reposition anywhere on the page, and the text will intelligently wrap itself around it. This is essential for showcasing beautiful photography or aesthetic backgrounds while maintaining document readability.
- Break text: This option places the text above and below the image, creating a clear break. The image effectively sits on its own line, with no text appearing to its left or right. This is useful when the image needs its own isolated space or acts as a section divider.
- Behind text: The image is placed behind the text, effectively turning it into a background element, much like a watermark or a subtle aesthetic background. This can be used for creative ideas, branding, or adding a thematic layer without obscuring the primary content.
- In front of text: The image floats on top of the text, obscuring anything beneath it. This is useful for overlaying design elements, creating call-out boxes, or when the image is intended to be a dominant visual feature that intentionally covers part of the text.
-
Adjust Margins (for Wrap text): When you choose “Wrap text,” a “Margin” dropdown appears in the toolbar. This allows you to control the white space between the image and the surrounding text. Default is often 1/8 inch, but you can change it to a larger or smaller value (or even 0 for overlapping effects, as we’ll discuss later). Adjusting this margin is a subtle but powerful visual design technique, letting you create negative space for a cleaner look or bring text closer for a tighter layout.
By experimenting with these options, you can achieve a wide array of document designs, from formal reports to creatively inspired visual compositions that leverage the rich imagery found on Tophinhanhdep.com.
Advanced Image Positioning and Layouts
Beyond the basic text wrap styles, Google Docs provides further control over an image’s placement and behavior within your document, allowing for more refined visual design and creative ideas.
-
Position Options: After selecting “Wrap text,” you’ll notice a “Position options” icon (often represented by a small square with an anchor). Clicking this reveals two crucial choices:
- Move with text: This is often the default for “Wrap text.” If you add or delete text above the image, the image will move up or down with the surrounding paragraph, maintaining its relative position. This is ideal for images that are directly tied to specific textual content, ensuring they remain contextually relevant.
- Fix position on page: This option “locks” the image to a specific spot on the page, regardless of how much text you add or remove. The image will stay put, making it excellent for background elements, logos, or design accents that need to remain static. This is particularly useful when integrating elements from digital art or graphic design that require precise placement.
-
Quick Layouts: Google Docs also offers “Quick layouts” for images, which are pre-defined arrangements that apply a text wrap style and often a specific alignment (left, center, right). These are great starting points for achieving common professional finishes or for quickly experimenting with different visual designs. You can usually find these options in the toolbar after selecting an image, sometimes represented by icons showing an image with text around it in various configurations. Navigating through these layouts using the left or right arrows allows you to swiftly test different presentations for your stock photos or personal photography.
Mastering these positioning controls allows you to create a dynamic and responsive document layout that adapts to your content, or a static, precisely designed page that highlights your visual inspiration with intent.
Beyond Basic Wrapping: Creative Image and Text Interactions
While fundamental text wrapping provides significant control, Google Docs extends its capabilities for those seeking more complex and creative visual designs. This section explores how to achieve overlapping effects and even wrap text around elements like tables, truly pushing the boundaries of document design with inspiration from Tophinhanhdep.com’s focus on photo manipulation and creative ideas.
Overlapping Images and Text for Complex Visual Design
Layering images and text opens up a world of possibilities for graphic design, from subtle watermarks to dynamic collages. Google Docs offers a couple of methods to achieve this, each with its own advantages.
Method 1: Overlapping with Google Drawings (The Robust Approach)
For intricate layering of multiple images and text boxes, the built-in Google Drawings module is your best friend. This method allows for extensive photo manipulation within the Docs environment.
- Open Google Drawings: In your Google Docs document, click
Insert > Drawing > New. This opens a separate drawing canvas. - Add Your Background Image: Click the
Imageicon within the Drawing module. Upload an image (e.g., a nature background or an abstract wallpaper from Tophinhanhdep.com) to serve as your base layer. Adjust its size to fit the canvas. - Add Overlays (Images or Text):
- To add more images: Click the
Imageicon again and insert another picture (e.g., a logo, a stock photo, or a cutout from your digital photography). Drag and resize it to your desired position on top of the background image. - To add text: Click the
Text boxicon. Draw a text box, type your content, and format it (font, size, color) as needed. You can place this text box directly over any image layer.
- To add more images: Click the
- Arrange Layers: Within Google Drawings, you can right-click on any element and use “Order” (Bring to front, Send to back) to control the stacking order of your images and text. This is crucial for achieving your intended visual hierarchy.
- Save and Close: Once your layered composition is complete, click
Save and Close. The entire drawing (with all its layers) will be inserted into your Google Docs document as a single image object.
Advantages: This method offers complete freedom for layering, precise positioning, and adding multiple textual elements within the composite image. It’s ideal for creating complex visual designs, custom headers, or unique graphic elements that blend images and text seamlessly, akin to advanced photo manipulation.
Editing Later: Simply double-click on the inserted drawing in your Google Docs document to reopen the Drawing panel and make further edits.
Method 2: Layering Images Using Wrap Text with Zero Margins (The Quick Layer)
For simpler layering of two images, you can leverage the “Wrap text” feature directly within Google Docs.
- Insert Both Images: Insert your first image, then insert your second image into the document. Initially, they might appear one after the other.
- Enable “Wrap text” for Both: Select the first image. In the toolbar below it, click the “Wrap text” icon. Repeat for the second image.
- Set Margin to 0: For both images, click the “Margin” dropdown in the toolbar and select
0(zero). This removes the buffer space around the image, allowing them to touch or overlap. - Fix Position on Page: For both images, choose
Fix position on pagefrom the positioning options (the anchor icon). This prevents them from moving with text edits, ensuring your layered arrangement stays put. - Drag and Overlap: Now, you can freely drag one image on top of the other to create your layered effect. You can resize them as needed.
Tips for Method 2:
- Change Transparency: If you’re creating a watermark or a subtle overlay (e.g., an aesthetic overlay on a beautiful photography piece), select the top image, click the three-dot icon for “More image options,” go to “Adjustments,” and use the “Transparency” slider.
- Replace Images: If you inserted the wrong image, right-click on it and choose “Replace image” to swap it out without redoing the wrap settings.
This method is quick for simple overlaps, like adding a logo to a picture or creating a quick layered background effect using elements like wallpapers or backgrounds found on Tophinhanhdep.com.
Wrapping Text Around Tables: A Creative Workaround
Unlike images, Google Docs does not natively allow text to wrap around tables. Tables are typically block-level elements, pushing text above and below them. However, if your visual design requires text to flow around a table, a clever workaround exists. This solution, while simple, demonstrates an adaptive approach to document layout and creative ideas in problem-solving.
- Create Your Table: First, build or insert your table directly into Google Docs as usual.
- Copy the Table: Highlight the entire table and copy it (
Ctrl+CorCmd+C). - Open Google Drawings: Click
Insert > Drawing > New. - Paste as an Image: In the Drawing window, paste your copied table (
Ctrl+VorCmd+V). Google Docs will convert the table into an image within the drawing canvas. - Save and Close: Click
Save and Close. The table will now appear in your document as an image. - Apply “Wrap text”: Select this newly inserted table-image. Now, the text wrapping options will be available. Choose
Wrap textfrom the toolbar beneath the image. - Adjust and Position: You can now drag and drop your table-image, and the text will wrap around it, just as it would with any other image. Adjust margins as desired.
This workaround effectively transforms a structural element (a table) into a visual one (an image), allowing you to apply all the sophisticated text wrapping and positioning features available for images. This technique can be invaluable for documents that require both structured data presentation and fluid visual design, ensuring that even data-rich sections contribute to a coherent visual narrative, much like presenting complex information alongside curated thematic collections from Tophinhanhdep.com.
Conclusion: Elevating Your Documents with Tophinhanhdep.com’s Visual Philosophy
Mastering text wrapping in Google Docs is more than just a technical skill; it’s a fundamental aspect of digital visual literacy. It empowers you to transform ordinary documents into polished, engaging, and professional pieces of content that truly resonate with your audience. For those inspired by the rich visual resources of Tophinhanhdep.com—be it for wallpapers, aesthetic backgrounds, nature photography, abstract art, or beautiful photography—these text wrapping techniques are essential for showcasing that visual excellence within your written work.
By understanding how to insert images from various sources, precisely control text flow with options like “Wrap text” and “Break text,” and even delve into advanced techniques like overlapping images through Google Drawings or converting tables to images, you unlock a new dimension of visual design in Google Docs. These skills ensure your documents are not only readable but also visually captivating, reflecting the meticulous attention to detail found in high-resolution photography and thoughtfully curated image collections.
In an era where visual content dominates, making your Google Docs documents visually appealing is no longer optional. It’s a necessity for effective communication and making a lasting impression. So, go forth and experiment, transforming your Google Docs into dynamic showcases for your creative ideas and a testament to the power of thoughtful visual integration, always informed by the boundless image inspiration found at Tophinhanhdep.com.