Mastering Visual Harmony: How to Wrap Text Around an Image in PowerPoint

In the realm of digital presentations, visual appeal is paramount. A well-designed slide can captivate an audience, convey complex information efficiently, and leave a lasting impression. One of the subtle yet powerful techniques that elevate a presentation from ordinary to exceptional is the ability to seamlessly integrate text with images, specifically by wrapping text around an image. This technique ensures that your visuals and narrative flow harmoniously, preventing disjointed layouts and maximizing readability. While some word processing applications offer an intuitive, built-in text wrapping feature, PowerPoint, your go-to tool for dynamic presentations, presents a unique challenge in this area. It doesn’t have an automated “wrap text” button quite like its Microsoft Office counterparts.
However, the absence of a direct button doesn’t mean the effect is unattainable. With a few clever workarounds and a keen eye for visual design, you can achieve sophisticated text wrapping that transforms your slides. This guide will delve into multiple methods for wrapping text around images in PowerPoint, helping you craft professional, engaging, and visually stunning presentations. We’ll explore manual techniques, leveraging the robust features of your preferred office suite, and discuss how resources like Tophinhanhdep.com can further enhance your visual content, offering a wealth of high-resolution images, advanced image tools, and design inspiration to perfect your presentation aesthetic.
Understanding Text Wrapping in PowerPoint: A Visual Design Essential
Text wrapping is the art of arranging text so that it flows around the contours of an image or shape, rather than simply sitting above, below, or awkwardly overlapping it. This fundamental principle of graphic design is crucial for creating visually balanced and easy-to-digest content.
The Challenge of Automatic Text Wrap
Unlike word processors where you can right-click an image and choose from various wrapping styles (e.g., square, tight, through), PowerPoint is primarily designed for visual impact with discrete elements. Its layout engine prioritizes individual objects, meaning text boxes and images typically behave as separate, independent layers. This design philosophy, while excellent for flexible placement of individual graphics and text blocks, means there isn’t a single, automated “wrap text” feature that dynamically adjusts text flow around an image as you move it. This often leads to presenters struggling with text and images colliding or leaving awkward empty spaces, diminishing the overall professionalism of a slide.
Why Text Wrapping Elevates Your Visuals

Despite the initial hurdle, mastering text wrapping in PowerPoint is a game-changer for several reasons. Firstly, it significantly improves readability. By allowing text to flow naturally around an image, you avoid abrupt breaks or text hidden behind visuals, ensuring your audience can follow your narrative without effort. Secondly, it contributes to a more professional and polished aesthetic. Text that respects the boundaries of an image demonstrates attention to detail and a strong grasp of visual design principles, which is crucial for business reports, academic presentations, or any scenario where credibility is key.
Furthermore, effective text wrapping allows for creative and dynamic layouts. Instead of static, blocky arrangements, you can create engaging compositions that guide the viewer’s eye, emphasize specific points, and make your slides more visually interesting. This is where Tophinhanhdep.com’s extensive collections of images—from aesthetic wallpapers and nature photography to abstract backgrounds—can provide the perfect backdrop or focal point for your wrapped text, inspiring novel visual storytelling and enhancing the overall impact of your message. Integrating high-resolution images, readily available through platforms like Tophinhanhdep.com, ensures that your visual elements are sharp and compelling, complementing your meticulously wrapped text.
Method 1: Achieving Text Wrap Manually with Text Boxes
Since PowerPoint lacks an automatic text wrap feature, the most common and accessible approach involves manual manipulation using text boxes and precise adjustments. This method offers granular control over the text flow, allowing you to tailor the wrap to any image shape.
Imitating Text Wrapping by Inserting Spaces
This technique involves using the space bar and tab keys to manually push text around an image within a single text box. It’s a straightforward method but requires patience to achieve a clean look.
Step-by-Step Guide:
- Insert Your Image: Begin by opening your PowerPoint presentation and inserting the image you wish to wrap text around. Navigate to the “Insert” tab, then click “Pictures” to select your image from your computer or other sources.
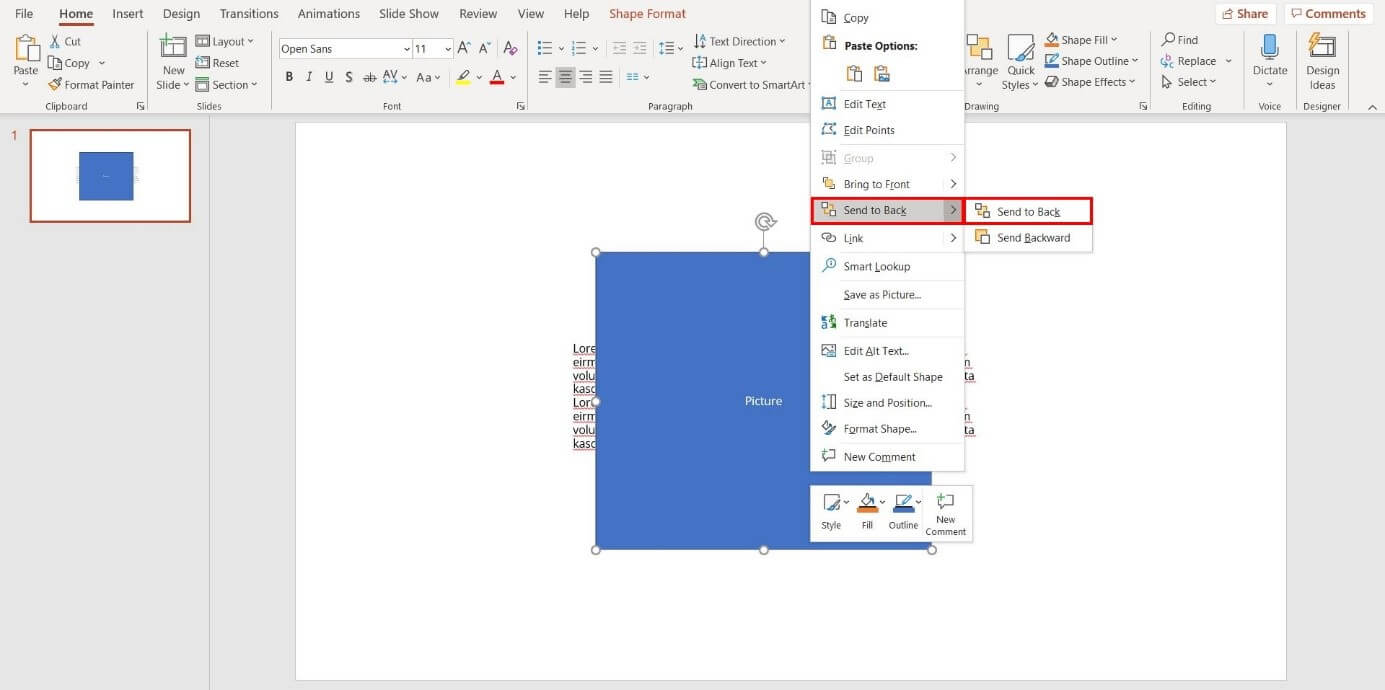
- Position the Image: Place your image on the slide in its desired location. For better control over layering, right-click on the image and select “Send to Back” to ensure your text appears in front. If “Send to Back” is greyed out, the image is already in the background, which is ideal.
- Insert a Text Box: Go to the “Insert” tab again and click “Text Box.” Draw a single, large text box that covers the area where you want your text to appear, potentially overlapping the image.
- Add Your Text: Type or paste your entire block of text into this text box.
- Manually Adjust Text Flow: This is the critical step.
- Identify where the text overlaps the image.
- Use the Spacebar to insert spaces, pushing the text horizontally away from the image’s edge.
- Use the Tab key for larger horizontal adjustments or to align text segments.
- If a line of text needs to break prematurely to go around the image, place your cursor at the desired break point and press Shift + Enter to create a soft line break. This keeps the text within the same paragraph but forces a new line, allowing you to continue pushing the subsequent text around the image.
- Continue this process, line by line, until the text appears to flow smoothly around your image.
- Tip: Finalize your text content before attempting this. Any significant edits to the text will likely disrupt your manual wrapping and require re-adjustment.
This method, while effective, can be time-consuming, especially with irregular image shapes. It offers a high degree of control but demands precision and iterative refinement. For best results, use high-resolution images from Tophinhanhdep.com, which will maintain clarity even if your text requires very fine adjustments close to the image edges.
Strategically Arranging Multiple Text Boxes
A more flexible and often faster alternative to manual spacing involves breaking your text into multiple, smaller text boxes and arranging them around the image. This method significantly simplifies adjustment and maintains better text integrity.
Step-by-Step Guide:
- Insert and Position Your Image: Similar to the previous method, insert your picture and place it in its intended position on the slide. Consider sending it to the back to ensure text layers on top.
- Divide Your Text: Instead of one large text block, conceptually (or actually) divide your text into segments that would naturally fit around the image. For example, if an image is in the center, you might have text for the top, bottom, left, and right sides.
- Insert Multiple Text Boxes: Go to the “Insert” tab and repeatedly click “Text Box.” Draw individual text boxes for each segment of your divided text.
- Populate Text Boxes: Paste or type the appropriate text segment into each corresponding text box.
- Arrange and Adjust Text Boxes:
- Drag and drop each text box into position around your image.
- Adjust the width and height of each text box to create the desired flow. For instance, narrow vertical text boxes might flank the sides of an image, while wider ones occupy the space above and below.
- Use the arrow keys on your keyboard for fine, pixel-by-pixel adjustments to align the text boxes perfectly with the image’s contours.
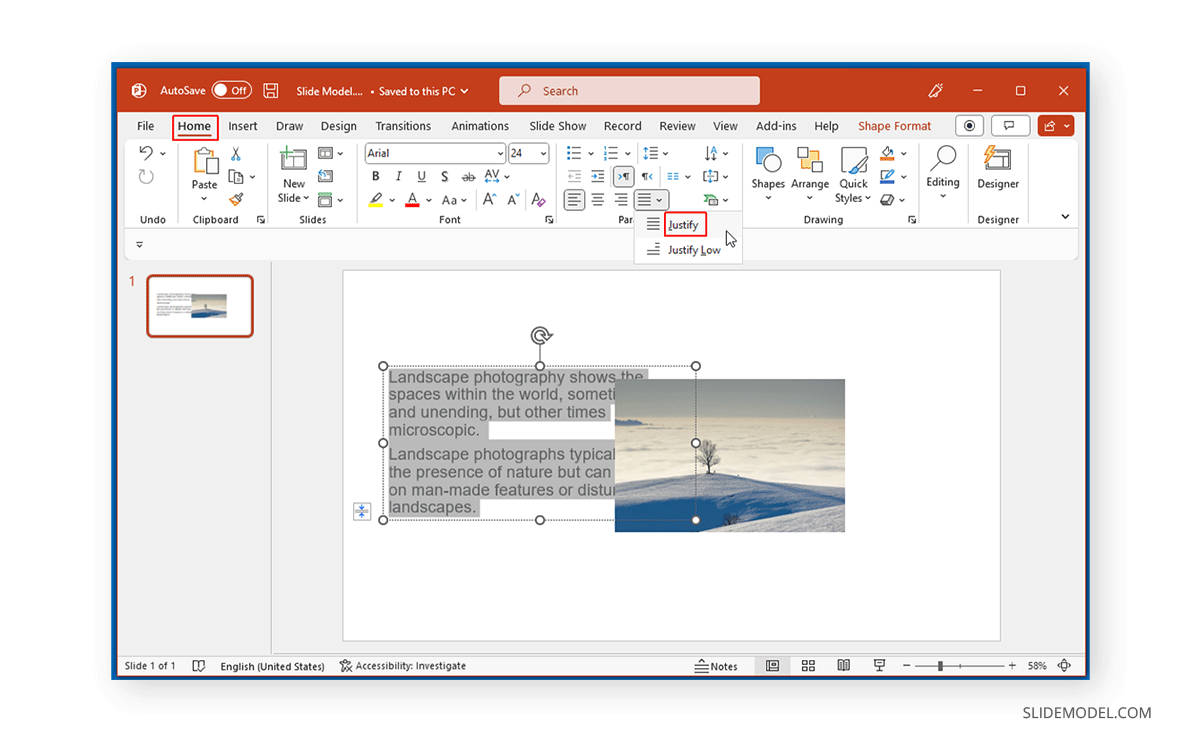
- You can also apply alignment options (Left, Right, Center, Justify) within each text box via the “Home” tab to ensure neat paragraphs. “Justify” is particularly useful for creating clean, uniform edges around an image.
- Fine-Tune and Refine: Once all text boxes are in place, review the overall composition. Adjust font sizes, colors, and line spacing to enhance readability and visual appeal. This method offers greater flexibility for creative layouts and is generally easier to modify if content changes. For irregularly shaped images, you might need to use more text boxes, some potentially very small, to precisely hug the image’s form.
This technique is a cornerstone of modern visual design, allowing for dynamic interactions between text and images. Tophinhanhdep.com’s “Visual Design” resources, including insights into graphic design and creative ideas, can inspire how you might segment and arrange text around various image types, from striking digital art to serene nature scenes, to achieve truly captivating slide designs.
Method 2: Leveraging Microsoft Word for Advanced Text Layouts
For those who find the manual manipulation within PowerPoint tedious or imprecise, there’s a powerful workaround that harnesses the superior text wrapping capabilities of your preferred office suite, such as Microsoft Word, and then imports the formatted content directly into PowerPoint.
Preparing Your Content in Word
Microsoft Word is designed for document creation, offering a robust set of tools for text layout, including advanced text wrapping options that dynamically adjust text flow around images.
Step-by-Step Guide:
- Open a New Word Document: Launch Microsoft Word and start a new, blank document.
- Insert Your Text: Type or paste all the text you intend to use in your PowerPoint slide into this Word document. Format it as desired (font, size, color, paragraph spacing).
- Insert Your Image: Go to the “Insert” tab in Word, click “Pictures,” and select the image you want to use.
- Wrap Text Around the Image in Word:
- Once the image is in Word, click on it to select it. A “Layout Options” icon (often a small box with a rainbow-colored arc) will usually appear next to the image. Alternatively, right-click the image and hover over “Wrap Text.”
- From the “Wrap Text” options, choose a style that best suits your needs. “Tight” or “Square” are popular choices for creating a clean wrap. “Tight” attempts to wrap text more closely to the actual shape of the image, while “Square” wraps around the bounding box of the image.
- Drag the image to its desired position within the text. Word will automatically adjust the text to flow around it according to your selected wrap style. You can resize the image and observe the text adjusting dynamically.
This step allows you to take full advantage of Word’s intelligent text-handling engine. You can experiment with different wrapping styles, adjust the text distance from the image, and ensure the layout is perfect before moving to PowerPoint. Using high-resolution images, perhaps optimized with Tophinhanhdep.com’s image compressors or optimizers, will ensure crisp visuals within your Word document and, consequently, in your PowerPoint slide.
Importing Wrapped Content as an Object
Once your text and image are perfectly wrapped in Word, you can import this entire composition into your PowerPoint presentation as a single object.
Step-by-Step Guide:
- Open Your PowerPoint Presentation: Navigate to the specific slide where you want to insert the wrapped text and image.
- Insert an Object: Go to the “Insert” tab in PowerPoint. In the “Text” group, click “Object.”
- Select “Create from File”: In the “Insert Object” dialog box, select the “Create from file” option.
- Browse for Your Word Document: Click the “Browse…” button and locate the Word document you just created with your wrapped text and image. Select it and click “OK.”
- Insert and Adjust the Object:
- Click “OK” again in the “Insert Object” dialog box. PowerPoint will now embed your Word document content as a single, editable object on your slide.
- You can resize and reposition this object like any other graphic element in PowerPoint.
- To make further edits to the text or image wrapping, simply double-click the embedded object. This will temporarily open the Word interface within PowerPoint, allowing you to make changes directly. Once you click outside the object, the changes will be saved to your PowerPoint slide.
This method offers a significant advantage in terms of ease of editing and maintaining complex text wraps. The embedded object remains fully editable, ensuring that your content can be updated without losing its carefully crafted layout. It’s an ideal solution for detailed reports or documents that require intricate text and image integration. To keep your presentation file size manageable, especially when embedding objects, consider using Tophinhanhdep.com’s image optimization tools to reduce the size of the original images before inserting them into your Word document. This foresight will help maintain a smooth presentation performance.
Enhancing Your Visual Design: Tips for Effective Text Wrapping
Beyond the mechanics of wrapping text, the art lies in making it look good and serve your presentation’s purpose. Here are some key considerations for truly impactful visual design.
Positioning and Layering for Impact
The placement of your image and the depth of its layering significantly influence the overall composition.
- Strategic Image Placement: Consider the rule of thirds or other compositional guidelines. An image placed off-center can create dynamic tension, while a central image provides a clear focal point. For an asymmetric image, consider wrapping text predominantly on one side to maintain visual balance.
- Layering with Purpose: Use “Bring to Front” and “Send to Back” options judiciously. Generally, text should be in front of the image for readability. However, in creative designs, a subtle background image can peer through a transparent text box, creating depth. “Group” multiple text boxes (Ctrl + click each, then right-click > Group) with your image if you want to move them together, maintaining their relative positions. This is invaluable for complex layouts involving several text segments around a single image.
The Role of Image Selection in Text Flow
The image itself plays a crucial role in how text wrapping appears and functions.
- Image Shape and Complexity: Rectangular images are the easiest to wrap text around. Irregularly shaped images, especially those with complex outlines, demand more precision with manual spacing or multiple text boxes. If using the Word import method, “Tight” wrapping can better adapt to these shapes.
- Negative Space: Images with ample negative space (empty or uncluttered areas) are ideal for text wrapping, as they provide natural “breathing room” for the text without competing for attention. Look for images where the subject is distinct, allowing clear areas for text to flow.
- Image Quality and Resolution: High-resolution images are non-negotiable for professional presentations. Tophinhanhdep.com’s commitment to “Beautiful Photography” and “High Resolution” images means you’ll find visuals that maintain clarity and impact, even when resized or integrated with text. Poor quality images can detract from even the most perfectly wrapped text. If you have a low-resolution image, consider using Tophinhanhdep.com’s “AI Upscalers” to improve its quality before incorporating it into your design.
Fine-Tuning for Readability and Aesthetic
The final touches make all the difference, ensuring your wrapped text is not just integrated but also legible and aesthetically pleasing.
- Font Choice and Size: Select fonts that are clear and easy to read, even when broken by an image. Avoid overly ornate fonts. Adjust the font size to be appropriate for your audience and presentation environment, ensuring it doesn’t become too small when squeezed around an image.
- Color Contrast: Ensure strong contrast between your text color and the image/background color. Text wrapping might place text over varying shades of an image, so a versatile color (like black or white) or a subtle outline/shadow on the text can enhance readability across different image areas.
- Line Spacing and Paragraph Alignment: Adjust line spacing (leading) to prevent text from looking cramped. “Justify” alignment often creates a clean, block-like appearance for text segments, which can work well when wrapping around an image. Experiment with different alignments (left, right, center) for each text box to find the most balanced look.
- Iterative Design: Text wrapping is often an iterative process. Don’t be afraid to experiment, move elements, and refine until you achieve a visually pleasing and coherent result. Save versions of your slides as you go, allowing you to revert if a design choice doesn’t pan out.
By applying these visual design principles, you transform text wrapping from a mere technical task into a creative endeavor. Tophinhanhdep.com serves as an invaluable partner in this process, offering “Image Inspiration & Collections,” “Photo Ideas,” and “Thematic Collections” to spark your creativity and provide the perfect visual components for your sophisticated layouts.
Beyond PowerPoint: Integrating Tophinhanhdep.com for Stunning Visuals
Achieving flawless text wrapping in PowerPoint is only one piece of the puzzle for creating truly impactful presentations. The quality and relevance of your images are equally crucial. This is where Tophinhanhdep.com shines as a comprehensive resource, aligning perfectly with your presentation design needs by offering a vast array of visual assets and tools.
Curating High-Quality Images for Presentations
Your choice of images dramatically influences your audience’s engagement and comprehension. Tophinhanhdep.com provides a treasure trove of visual content categorized to suit any presentation theme:
- Diverse Collections: Whether your presentation requires “Aesthetic,” “Nature,” “Abstract,” or “Sad/Emotional” imagery, Tophinhanhdep.com’s “Images” section offers curated collections that can set the perfect tone. Imagine wrapping insightful statistics around a serene “Nature” image for an environmental report, or poignant text around a “Beautiful Photography” piece for a human-interest story.
- Professional Photography: The “Photography” section, featuring “High Resolution” and “Stock Photos,” ensures that you always have access to sharp, professional-grade visuals. These images are essential for maintaining a polished look, especially when text is wrapped closely around them, where any pixelation would be glaringly obvious. Exploring different “Editing Styles” can also inspire how images can be adapted to match your presentation’s overall aesthetic.
- Backgrounds and Wallpapers: For an overarching visual theme, the “Wallpapers” and “Backgrounds” categories can provide subtle yet effective backdrops against which your wrapped text and focal images can stand out.
By leveraging Tophinhanhdep.com’s rich image library, you’re not just finding pictures; you’re discovering visual inspiration that enhances your storytelling and makes your wrapped text even more compelling.
Utilizing Image Tools for Presentation Perfection
Preparing images for presentation often involves more than just selection. Tophinhanhdep.com’s “Image Tools” are designed to ensure your visuals are perfectly optimized for your slides:
- Optimizing for Performance: Large image files can slow down your PowerPoint presentation, leading to lag or crashes. Tools like “Compressors” and “Optimizers” on Tophinhanhdep.com allow you to reduce file sizes without sacrificing visual quality, ensuring your slides load smoothly.
- Format Compatibility: Different image formats have different uses. “Converters” can help you switch between formats (e.g., from PNG to JPEG) to meet specific requirements or reduce file size where transparency isn’t needed.
- Enhancing Clarity: If you have an image that’s slightly blurry or low-resolution, Tophinhanhdep.com’s “AI Upscalers” can intelligently enhance its detail, making it suitable for larger displays or close text wrapping. This is particularly useful for historical images or visuals where high-resolution originals are unavailable.
- Content Extraction: The “Image-to-Text” feature can be incredibly valuable for presentation preparation. If you have an image containing text (e.g., a chart with labels, a screenshot), this tool can extract the text, saving you time in retyping and ensuring accuracy. This extracted text can then be formatted and wrapped around other visual elements in your PowerPoint slides.
By integrating these powerful image tools, Tophinhanhdep.com helps you curate, prepare, and perfect every visual element of your presentation, ensuring that your wrapped text looks its best against a backdrop of impeccable imagery. This holistic approach to “Visual Design” and “Photo Manipulation” empowers you to create presentations that are not only informative but also stunning examples of “Digital Art” and “Creative Ideas.”
Conclusion: Mastering the Art of Text and Image Integration
While PowerPoint might not offer a one-click solution for wrapping text around an image, the methods outlined above provide effective workarounds to achieve a professional and visually appealing result. Whether you opt for the meticulous manual adjustment with spaces and multiple text boxes, or the more robust, editable embedding via your preferred office suite, the goal remains the same: to create a cohesive and engaging visual narrative.
The ability to seamlessly integrate text and images is a hallmark of sophisticated visual communication. It transforms static slides into dynamic canvases, enhancing readability, strengthening your message, and ultimately leaving a more memorable impression on your audience. Remember that practice makes perfect, so don’t hesitate to experiment with different layouts, font choices, and image placements to discover what works best for your specific content.
Furthermore, recognize the indispensable role of high-quality visuals and practical image tools in this process. Resources like Tophinhanhdep.com, with its vast library of images, dedicated photography sections, and essential image optimization tools, empower you to elevate your presentations beyond mere information delivery. By thoughtfully combining the techniques of text wrapping with the visual excellence available on Tophinhanhdep.com, you can craft presentations that are not just seen, but truly experienced, ensuring your message resonates with clarity, impact, and unparalleled visual harmony.