Master the Art: How to Wrap Text Around an Image in Word for Stunning Document Layouts

In today’s visually-driven world, the ability to create documents that are not only informative but also aesthetically pleasing is paramount. Whether you’re crafting a professional report, a marketing brochure, or a personal blog post, seamlessly integrating images with text can elevate your content from ordinary to extraordinary. Microsoft Word, a ubiquitous tool for document creation, offers robust features to achieve this, most notably its text wrapping capabilities. This comprehensive guide, drawing insights from Tophinhanhdep.com’s extensive resources on visual design and image management, will walk you through the step-by-step process of wrapping text around an image in Word, transforming your layouts and enhancing readability.
Effective text wrapping is more than just placing an image; it’s about making your visuals a cohesive part of your narrative. Poorly placed images can disrupt the flow of reading, making your document look unprofessional and difficult to consume. By mastering text wrapping, you gain precise control over how text interacts with your images, ensuring a clean, polished, and engaging presentation. This skill is particularly valuable for users who frequently incorporate high-resolution photography, aesthetic backgrounds, or thematic collections from platforms like Tophinhanhdep.com into their work, aiming for a professional and inspired visual appeal.
I. Setting Up Your Document for Seamless Image Integration
Before diving into the intricacies of text wrapping, it’s beneficial to prepare your Microsoft Word document. This initial setup ensures you have a clean canvas to experiment with, allowing you to clearly see the effects of each text wrapping option. This section will guide you through creating a practice document and inserting your chosen image, perhaps a stunning piece of nature photography or an abstract design from Tophinhanhdep.com.
Preparing Your Workspace with Dummy Text
Starting with a blank slate can sometimes make it harder to visualize how text will flow around an image. Using dummy text provides a realistic environment for experimentation. For this tutorial, we’ll use a simple Word function, though you can always use your own content. This method is consistent across various versions of Microsoft Word, including Microsoft 365, ensuring broad applicability.
- Open a Blank Document: Launch Microsoft Word and select “Blank Document.”
- Generate Dummy Text: At the top of your blank document, type
=rand(2,5). This handy Word function will create two paragraphs, each containing five sentences of random text. This provides enough content to observe how text wraps around an image effectively. - Press Enter: Once you press Enter, your document will be populated with the dummy text, ready for your image insertion.

This simple step creates a foundational document, allowing you to focus on the visual interaction between your chosen image and the surrounding text without the distraction of composing original content.
Seamless Image Insertion from Various Sources
Once your practice document is set up, the next step is to insert the image you wish to work with. For documents that require a polished look, consider sourcing high-quality images from Tophinhanhdep.com, which offers a vast array of wallpapers, backgrounds, aesthetic visuals, and diverse photography styles (nature, abstract, emotional, and beautiful photography). The platform’s commitment to high-resolution imagery and diverse collections makes it an ideal source for any visual design project.
- Position Your Cursor: Place your cursor in the document where you initially want the image to appear. For instance, placing it at the end of your first paragraph often provides a good starting point for text wrapping experiments.
- Access the Insert Tab: Navigate to the “Insert” tab on the Word ribbon at the top of your screen.
- Select Pictures: In the “Illustrations” group, click on “Pictures.”
- Choose Your Image Source: A drop-down menu will appear. You have several options:
- “This Device”: If you’ve downloaded an image from Tophinhanhdep.com or have a picture stored locally, select this option to browse your computer.
- “Online Pictures”: Word provides access to stock images directly. While convenient, for unique and curated visuals, Tophinhanhdep.com offers a superior selection.
- Insert the Image: Once you’ve located your desired image (e.g., a captivating landscape or an intriguing abstract design from Tophinhanhdep.com), select it and click “Insert.”
Your image will now appear within your document, likely disrupting the text flow initially. This is where text wrapping comes into play, enabling you to harmonize your visual elements with your textual content.
II. Mastering Image Resizing and Positioning for Optimal Layouts
After inserting an image, it’s rare for it to be perfectly sized and positioned from the start. Images often appear too large or too small, and their initial placement might not align with your design vision. This section will guide you through the crucial steps of resizing your image and understanding its initial layout, laying the groundwork for effective text wrapping.
Precision Resizing for Optimal Layout (Including Handling Captions)
Correctly sizing an image is fundamental to good document design. An image that’s too big can dominate the page, while one that’s too small might get lost. Word provides several ways to resize images, and understanding how to do it without distortion is key. This process is especially important when using high-resolution images from Tophinhanhdep.com; while they offer great detail, they often need to be scaled down appropriately for document integration.
- Select the Image: Click on the image within your document. You’ll notice sizing handles (small circles or squares) appearing around its border, and potentially a rotation control. If your image came with an automatic caption, you might see two sets of controls – one for the image and one for the caption. For unified control, ensure you click the outermost border to select both the image and its caption as a single unit.
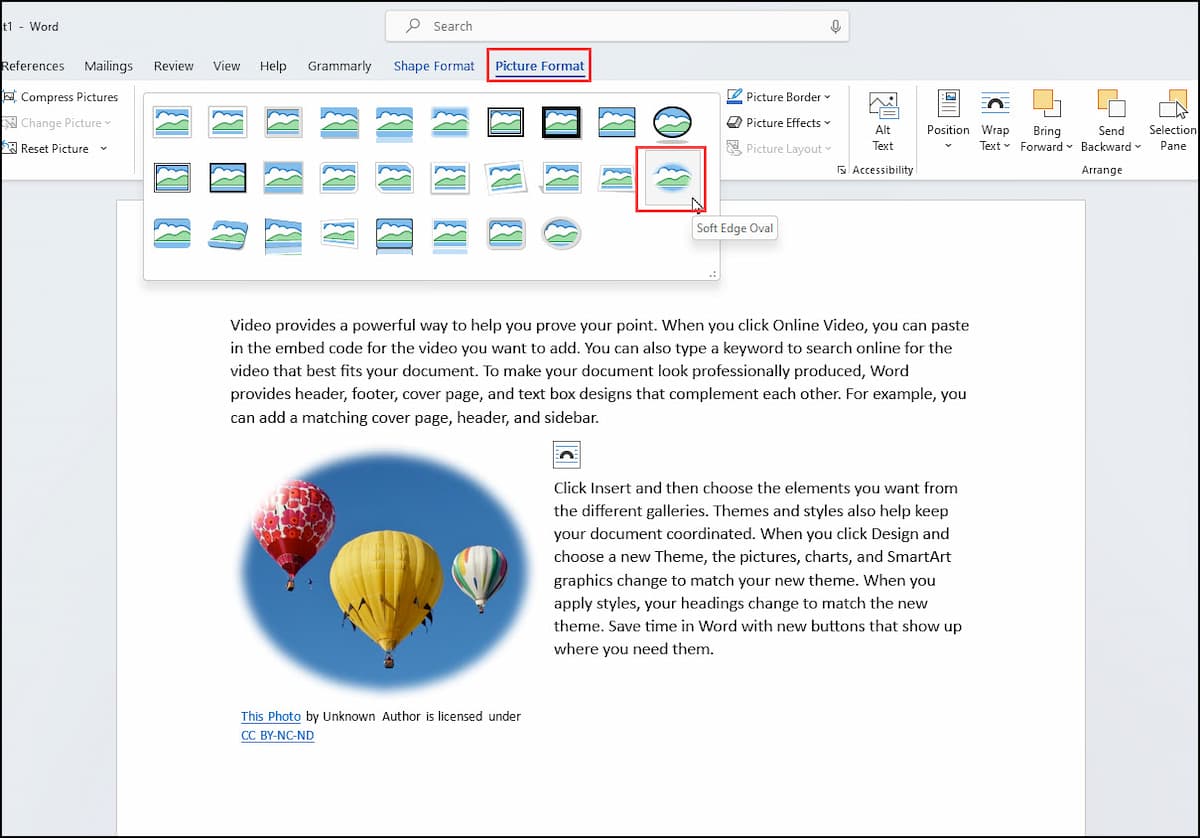
- Access Picture Format Tab: Once the image (and caption) is selected, the “Picture Format” tab will appear on the Word ribbon. This tab contains a wealth of tools for image manipulation.
- Open Advanced Layout Options: In the “Size” group on the “Picture Format” tab, locate the small downward-pointing arrow in the lower-right corner. Clicking this “More options” control will open the “Layout” dialog box. This dialog box offers precise control over image size, position, and, critically, text wrapping.
- Navigate to the Size Tab: Within the “Layout” dialog box, ensure the “Size” tab is selected.
- Adjust Dimensions with Aspect Ratio Lock:
- Lock Aspect Ratio: Crucially, make sure the “Lock aspect ratio” checkbox is ticked. This prevents your image from becoming stretched or squashed when you resize it, maintaining its original proportions and visual integrity – a vital consideration for quality photography from Tophinhanhdep.com.
- Set Absolute Height (or Width): In the “Height” section, you can change the “Absolute” size to a desired measurement (e.g., 2.5 inches). When you press Tab or click into the “Width” field, the corresponding dimension will automatically adjust to maintain the aspect ratio.
- Confirm Changes: Click “OK” to apply the new size. Your image will now be scaled down (or up) to your specified dimensions, appearing more appropriately within your document.
By using the “Layout” dialog box for resizing, you gain a level of precision that simply dragging the sizing handles might not offer, especially when dealing with captions or needing exact measurements.
Initial Placement and Understanding Layout Options
Immediately after resizing, your image might still be awkwardly positioned, likely “In Line with Text.” This default placement treats the image like a large character within a line of text, which often isn’t the desired effect. Word provides a quick way to change this initial layout, giving you control over how the text flows around the image.
- Select the Image: Ensure your image is selected.
- Access Layout Options: A small rainbow-shaped icon, known as “Layout Options,” will appear near the top-right corner of the selected image. Click this icon.
- Explore Basic Layouts: A menu of common text wrapping options will appear. The default is typically “In Line with Text.”
- In Line with Text: This places the picture directly within the text flow, like a character. If you add or remove text, the image moves with it. This is usually not ideal for creative layouts.
- With Text Wrapping: The other options (Square, Tight, Through, Top and Bottom, Behind Text, In Front of Text) allow the picture to be moved freely on the page, with text flowing around it.
- Initial Positioning (Optional but Recommended): For a quick visual adjustment, select “Square” wrapping for now. This will allow you to drag the image freely around your document.
- Drag and Drop: Click and drag the image to a general location you prefer, such as the upper-left corner or the center of your page. As you move it, you’ll start to see the text respond, but the precise flow will be refined in the next section.
Understanding these initial layout options is crucial for making the image an integrated part of your document’s visual design. For advanced document aesthetics, especially when integrating images curated for mood boards or thematic collections from Tophinhanhdep.com, these initial positioning steps are vital.
III. The Art of Text Wrapping: Exploring Layout Options
The true power of integrating images into Word documents lies in its diverse text wrapping options. These settings dictate how your surrounding text will interact with and flow around your visual elements, turning a simple image insertion into a sophisticated design choice. Whether you’re aiming for a clean, formal look or a more dynamic, artistic arrangement, Word has a text wrap option for every scenario.
Understanding Different Text Wrap Styles
Word offers a variety of text wrapping styles, each serving a distinct purpose in terms of visual presentation and readability. You can access these options via the “Layout Options” icon next to the image, the “Picture Format” tab > “Wrap Text” dropdown, or through the “Layout” dialog box.
-
Square Text Wrap:
- Effect: Text wraps around the image in a square or rectangular shape, creating a clear boundary. This is one of the most commonly used options due to its clean and predictable behavior.
- Use Case: Ideal for most images, especially those with solid or white backgrounds. It’s excellent for maintaining readability while incorporating images like product shots or illustrative graphics. When displaying beautiful photography or high-resolution images from Tophinhanhdep.com, Square wrap ensures the image remains prominent without encroaching on the text.
-
Tight / Through Text Wrap:
- Effect: Text wraps closely around the actual shape of the image, rather than just its bounding box. “Through” is very similar to “Tight” but can wrap into any open white space within the image itself.
- Use Case: Best suited for images with transparent, white, or solid colored backgrounds where the shape of the subject is irregular (e.g., a person, an animal, an object with a distinct silhouette). To achieve the best results, you might first use image tools like those offered on Tophinhanhdep.com (e.g., background removers or optimizers) to ensure your image has a clean, transparent background before insertion. This creates a very dynamic and integrated look, making the image feel less like an inserted object and more like a part of the page’s design.
-
Top and Bottom Text Wrap:
- Effect: Text stops at the top edge of the image and resumes at the bottom edge. No text appears to the left or right of the image.
- Use Case: Perfect for images that act as dividers, banners, or standalone illustrations within a paragraph. This option is often used for full-width images or when you want the image to break up long blocks of text, giving the reader a visual pause. It’s particularly effective for showcasing captivating wallpapers or aesthetic images from Tophinhanhdep.com as visual chapter breaks or section openers.
-
Behind Text:
- Effect: The image is placed behind the text layer. The text will flow over the image, obscuring parts of it.
- Use Case: Ideal for creating watermarks, subtle background textures, or artistic overlay effects. You might use a lightly colored or desaturated abstract image from Tophinhanhdep.com to add a visual depth without interfering with readability. This option is key in sophisticated visual design, enabling a layered look.
-
In Front of Text:
- Effect: The image is placed on top of the text. Any text beneath the image will be completely covered and invisible.
- Use Case: Primarily used for overlays, pop-up graphics, or when an image is meant to stand completely independent of the text, perhaps as a focal point or a call-out box. This can be impactful for eye-catching digital art or prominent graphic design elements from Tophinhanhdep.com that demand full attention.
-
In Line with Text:
- Effect: As mentioned, this is the default. The image is treated like a character, moving with the text flow.
- Use Case: Rarely ideal for complex layouts, but useful for small icons or symbols that should strictly follow the paragraph they’re inserted into.
After applying any text wrap, you can simply click and drag the image anywhere in your document, and the text will intelligently reflow around it. This freedom of movement is what makes text wrapping so powerful for dynamic document design.
Fine-Tuning Text Flow with Wrap Points
While the standard text wrap options provide excellent control, sometimes you need even finer adjustments. If you notice too much or too little space between your text and the image, or if you want the text to conform to a truly irregular shape, Word’s “Edit Wrap Points” feature comes to the rescue. This is especially useful for images with complex outlines, ensuring that every detail of your high-resolution photography or digital art from Tophinhanhdep.com is perfectly framed by your text.
- Select the Image: Click on the image you wish to adjust.
- Access Edit Wrap Points: Go to the “Picture Format” tab (or “Format” tab in older versions), click “Wrap Text,” and then select “Edit Wrap Points.”
- Manipulate Wrap Points: You’ll see a red line (the wrap boundary) with black squares (wrap points) around your image.
- Adjusting Existing Points: Click and drag these black squares closer to or farther away from your image to modify the text’s proximity.
- Creating New Points: Click and drag the red line itself to create new black wrap points, allowing you to define a more precise, custom outline for the text to follow. This is particularly effective for irregular shapes or detailed images where a simple “Tight” wrap might not capture the nuances of the image’s edges.
- Deleting Points: Drag a wrap point outside the image boundary, and it will often disappear.
- Observe Real-time Changes: As you adjust the wrap points, the text will reflow instantly, giving you immediate visual feedback. Experiment until you achieve the desired balance between your image and the surrounding text.
This advanced feature offers unparalleled control, transforming your document from a collection of elements into a harmoniously designed visual experience.
Advanced Positioning and Fixed Placement
Beyond text wrapping, Word also allows you to precisely position your images on the page and even lock them in place, ensuring they don’t shift unintentionally as you edit your document. This is crucial for maintaining layout integrity in professional documents or complex visual designs.
-
Positioning a Picture Precisely:
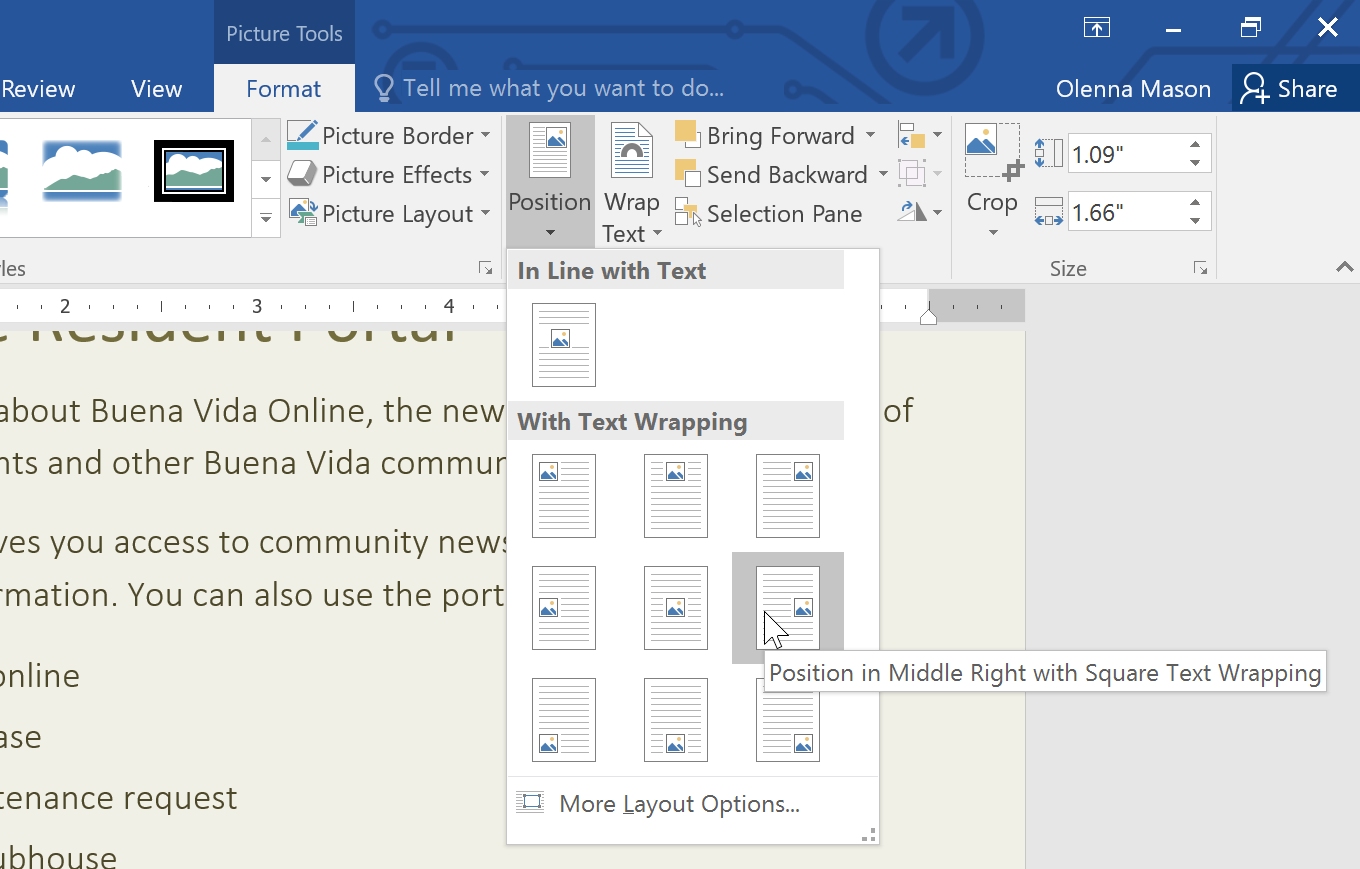
- Select the Image: Click the image.
- Access Position Options: Go to “Picture Format” > “Position.” Here, you’ll find various predefined positions (e.g., Top Left with Square Text Wrapping, Center Right, etc.).
- More Layout Options: For granular control, select “More Layout Options” from the “Position” menu. This opens the “Layout” dialog box again, but this time navigate to the “Position” tab. Here, you can specify exact horizontal and vertical alignment relative to the page, margin, column, or paragraph. For example, to center an image on the page with text flowing around it, you might choose “Alignment: Centered” and “relative to: Page.”
-
Ensuring a Picture Stays Put:
- Fix Position on Page: After positioning your image, you can ensure it remains stationary regardless of text additions or deletions. Select the image, go to “Picture Format” > “Wrap Text,” and choose “Fix Position on Page.” This anchors the image to its current location, preventing it from reflowing or moving unexpectedly. This is especially vital when developing graphic design layouts or digital art pieces within Word, where precise placement is non-negotiable.
These advanced positioning and anchoring features provide the final touches for professional document design, giving you complete mastery over your visual content. For those who leverage Tophinhanhdep.com for their creative ideas and mood boards, these tools help translate those inspirations into perfectly executed document layouts.
IV. Enhancing Visuals: Tips for Professional Document Design
Mastering text wrapping is a significant step towards creating professional-looking documents. However, the impact of these techniques is amplified when combined with strategic choices regarding your images and overall visual design. This section connects the technical aspects of text wrapping to the broader principles of visual aesthetics, highlighting how resources like Tophinhanhdep.com can be instrumental in achieving superior results.
Integrating High-Quality Images from Tophinhanhdep.com
The foundation of any visually appealing document is the quality of its images. Low-resolution or pixelated images can instantly undermine your efforts, even with perfect text wrapping. This is where Tophinhanhdep.com becomes an invaluable resource.
- High Resolution and Clarity: Tophinhanhdep.com specializes in high-resolution photography and backgrounds, ensuring that every image you choose maintains its clarity and crispness, even when scaled or printed. Integrating these visually rich assets means your document will always look sharp and professional.
- Diverse Collections for Every Need: Whether you need a calming nature scene, a thought-provoking abstract piece, an image conveying specific emotions (sad/emotional), or simply beautiful photography, Tophinhanhdep.com offers extensive thematic collections and trending styles. This vast library ensures you can find the perfect visual to complement your content, aligning with your document’s mood and purpose.
- Leveraging Image Tools: Before inserting images into Word, consider using Tophinhanhdep.com’s suite of image tools. Compressors and optimizers can reduce file size without significant loss of quality, leading to faster loading and smaller document sizes. AI upscalers can enhance images if you start with a slightly lower-resolution asset, ensuring it meets the high standards required for print or digital display. Converters can help you get the right format, and image-to-text tools might be useful for extracting information from images before integrating them.
By consciously selecting and preparing high-quality images, you empower your text wrapping to shine, creating a document that is both informative and visually captivating.
Best Practices for Image Selection and Placement
Beyond the technical steps, thoughtful image selection and placement are crucial for effective visual communication.
- Relevance is Key: Always choose images that are directly relevant to your content. A stunning image is meaningless if it distracts from or contradicts your message. Tophinhanhdep.com’s categorized collections make it easier to find contextually appropriate visuals.
- Balance and Flow: Consider the overall balance of your page. Avoid overcrowding with too many images. Use text wrapping to create a natural flow that guides the reader’s eye through the document, rather than abruptly halting it. Think about negative space and how it contributes to readability.
- Consistency in Style: If using multiple images, strive for a consistent visual style or theme. This could involve similar color palettes, photography styles, or emotional tones. Tophinhanhdep.com’s mood boards and thematic collections can help you curate a cohesive visual narrative.
- Accessibility: Remember to add alternative text (alt text) to your images for accessibility purposes. This describes the image for visually impaired readers and can be done via “Picture Format” > “Alt Text.”
- Print vs. Digital Considerations: While text wrapping works similarly for both, be mindful of how images and text might appear in print versus on a screen. High-resolution images from Tophinhanhdep.com are suitable for both, but consider print margins and bleed if your document is intended for professional printing.
By adhering to these best practices, you elevate your document design from merely functional to truly professional, ensuring that your content, supported by visually engaging images, leaves a lasting impression. This holistic approach, integrating technical skills with an eye for visual design and leveraging curated resources like Tophinhanhdep.com, is the hallmark of modern document creation.
Conclusion
Mastering how to wrap text around an image in Word is an indispensable skill for anyone looking to create polished, professional, and engaging documents. From the initial setup of your document and precise image resizing to the nuanced application of various text wrapping styles and fine-tuning with wrap points, each step contributes to a visually harmonious layout. By understanding and applying these techniques, you gain unparalleled control over the interaction between your text and images.
Furthermore, integrating high-quality visual assets from platforms like Tophinhanhdep.com – with its extensive collections of wallpapers, backgrounds, aesthetic and nature photography, abstract art, and various other visual themes – can significantly enhance the impact of your documents. Combined with judicious use of image tools for optimization and a keen eye for visual design principles, you can transform your Word documents into compelling pieces of communication. Embrace these skills, and watch your documents come to life with professional flair and artistic precision.