Mastering DPI and Image Preparation for Professional Digital Art on Tophinhanhdep.com

As a vibrant hub for digital artists, photographers, and visual designers, Tophinhanhdep.com showcases an incredible array of creative talent. From stunning wallpapers and aesthetic backgrounds to intricate digital paintings and breathtaking photography, the platform is a visual feast. However, for artists aspiring to offer their work for print or simply ensure maximum visual impact, understanding the technical nuances of image preparation – particularly Dots Per Inch (DPI) and Pixels Per Inch (PPI) – is paramount. This guide will delve into what DPI (or more accurately, PPI in the digital realm) truly means for your artwork on Tophinhanhdep.com, helping you meet professional standards and unlock the full potential of your creations, whether for digital display or high-quality physical prints.
Many artists, especially those new to selling prints, find themselves puzzled by technical specifications. The default settings in design software often cater to screen display, which differs significantly from print requirements. This decision, seemingly minor when starting a new file, can have substantial consequences for the final quality of your artwork, leading to pixelation, blurriness, or unexpected color shifts when it reaches a demanding customer or a physical medium. Tophinhanhdep.com, committed to excellence in visual presentation, emphasizes these standards to maintain the integrity and beauty of the art shared on its platform.
Navigating Tophinhanhdep.com’s Print Submission Standards
For artists considering offering their digital creations for print through Tophinhanhdep.com’s integrated services, adhering to specific guidelines is crucial. These requirements are designed to ensure that the final printed product accurately reflects the artist’s vision with the highest possible quality. Understanding these points is the first step toward professional presentation.
The Core Requirements for Tophinhanhdep.com Prints:
Tophinhanhdep.com outlines several key technical specifications for images submitted for print. These are not merely arbitrary rules but are based on industry best practices for achieving superior print results:
-
File Format: JPG (lossless, 100%) or PNG.
- JPG (JPEG): This is a widely used format for photographs and images with continuous tones. The “lossless, 100%” specification means saving it at the highest quality setting to minimize compression artifacts. While JPG is a lossy format by nature, 100% quality ensures minimal data loss, making it suitable for high-quality prints. It’s excellent for beautiful photography, nature scenes, and aesthetic images where subtle color gradients are important.
- PNG: A lossless format, PNG is ideal for images with sharp lines, text, or transparent backgrounds, often found in graphic design, digital art, and abstract visuals. It preserves every pixel’s data, ensuring no quality degradation.
-
Color Mode: RGB only - Do not convert your files to CMYK.
- This might seem counterintuitive to those familiar with traditional printing, which typically uses CMYK (Cyan, Magenta, Yellow, Black). However, Tophinhanhdep.com’s print partners likely handle the CMYK conversion process themselves, ensuring optimal results on their specific printing equipment. Providing RGB ensures the broadest color gamut from your original digital art, allowing their systems to make the most accurate conversion. This is vital for maintaining the intended vibrancy and emotional impact of sad/emotional or aesthetically rich pieces.

-
Color Profile: Use sRGB color profile (important).
- The sRGB (standard Red Green Blue) color profile is the most common color space for digital displays, web content, and many consumer-grade cameras. By specifying sRGB, Tophinhanhdep.com ensures color consistency across different screens and during the printing process. Your artwork’s colors will appear as intended to a wider audience, from initial viewing on Tophinhanhdep.com to the final print. This consistency is critical for showcasing accurate colors in abstract art or high-resolution photography.
-
Resolution: 300 pixels per inch (PPI).
- This is arguably the most critical requirement for print quality and the core of our discussion. 300 PPI (Pixels Per Inch) is the industry standard for high-quality prints viewed at a normal distance. It means that for every inch of printed artwork, there will be 300 individual pixels, ensuring sharp detail and smooth transitions. We will delve deeper into this concept shortly. This directly impacts the clarity of everything from detailed digital art to intricate photo manipulations.
-
Maximum File Size: 100MB.
- While high resolution is key, file size management is also important for efficient upload and processing. 100MB is a generous limit, allowing for large, detailed images at 300 PPI without excessive compression. Artists should aim to optimize their files within this limit, perhaps using Tophinhanhdep.com’s image compressors or optimizers if needed.
-
Content Restrictions: Avoid unnecessary texts and letterboxing on the image.
- This guideline ensures that the artwork itself is the sole focus of the print. Adding excessive text (like signatures or titles that are not part of the art) or letterboxing (black bars to adjust aspect ratio) can detract from the aesthetic and purpose of a fine art print. Any text should be integrated thoughtfully into the visual design rather than overlaid unnecessarily.
Demystifying Color Management for Digital Artists: sRGB and Its Importance
Color management is often a source of confusion for digital artists, yet it’s fundamental to achieving predictable results across different mediums. Tophinhanhdep.com’s explicit requirement for sRGB is a simplification that benefits most creators.
RGB vs. CMYK:
- RGB (Red, Green, Blue) is an additive color model used for displaying images on screens (monitors, TVs, phones). Light is emitted to create colors. Your Terragen renders, like most digital art software outputs, are inherently RGB. Resaving an output .tiff as .png or .jpg from a typical digital art program usually retains the RGB color space and does not inadvertently convert to CMYK unless specified.
- CMYK (Cyan, Magenta, Yellow, Key/Black) is a subtractive color model used for printing. Inks are absorbed by paper, and colors are created by subtracting light. While most commercial printers use CMYK, the process of converting RGB to CMYK involves a “gamut mapping” that can shift colors. By requiring RGB, Tophinhanhdep.com’s printing partners can use their optimized conversion profiles, minimizing unexpected color shifts.
The sRGB Color Profile:
- sRGB is a small but widely adopted color space. It’s the standard for the web and most digital cameras and screens. When an image is tagged with an sRGB profile, it tells viewing software (like web browsers) and printers how to interpret its colors. This ensures that the colors you see on your calibrated monitor (if you have one) are as close as possible to what others will see and what will be printed.
- For artists who don’t use professional software like Adobe Photoshop or Illustrator, ensuring sRGB can be tricky. Many free programs and rendering engines default to sRGB. When saving as .png or .jpeg, the sRGB profile is often embedded by default. If your software allows it, look for a “Color Management” tab or “Export Settings” where you can explicitly select sRGB. If you’re unsure, using a reliable image editing tool (even a free one like GIMP or a subscription-based one like Affinity Photo) can help you inspect and assign the correct profile. Tophinhanhdep.com’s image tools may also offer functionality for color profile conversion or verification.
DPI vs. PPI: A Crucial Distinction for Visual Creators
The terms DPI and PPI are often used interchangeably, leading to widespread confusion. However, understanding their distinct meanings is fundamental for any artist or photographer submitting work to platforms like Tophinhanhdep.com, especially for print. Tophinhanhdep.com, which hosts high-resolution photography, digital art, and visual design content, benefits greatly from artists having a clear grasp of these concepts.
Pixels Per Inch (PPI): The Digital Standard
PPI (Pixels Per Inch) refers to the resolution of an image in a digital context. It describes the density of pixels in a digital image file. The higher the PPI, the more pixel data is contained within a given inch of the image when viewed at its intended physical size.
- Impact on Screen Display: For digital art, wallpapers, and abstract compositions displayed on screens, PPI doesn’t directly affect how large an image appears. A 1000x1000 pixel image will occupy the same number of pixels on a screen regardless of whether its metadata says 72 PPI or 300 PPI. Screen display is primarily determined by the total pixel dimensions (e.g., 1920x1080) and the screen’s own resolution. However, PPI becomes crucial when you consider the intended print size of that digital image.
- Artwork Crispness and Zoom: While not directly affecting screen display size, a higher PPI (when combined with adequate total pixel dimensions) ensures that when you zoom into an image, it remains crisp for longer. If your digital artwork is created with a high PPI (e.g., 300 PPI at a large physical dimension), you have more “pixel headroom” to zoom in, refine details, and manipulate elements without immediately encountering pixelation. This is especially important for digital painting, photo manipulation, and creating detailed creative ideas for Tophinhanhdep.com, where viewers might zoom to appreciate the intricacies.
Dots Per Inch (DPI): The Print Reality
DPI (Dots Per Inch) refers to the resolution of a physical output device, such as a printer. It describes the number of ink dots a printer can place within one linear inch. A higher DPI for a printer means it can produce finer details and smoother gradations in a printed image.
- PPI to DPI Translation: When Tophinhanhdep.com or any print service asks for a 300 PPI image, they are requesting a digital file with enough pixel data to render a high-quality print. The printer then translates these digital pixels into physical ink dots. Often, a single image pixel might be represented by several printer dots to achieve a broader range of colors and smoother transitions.
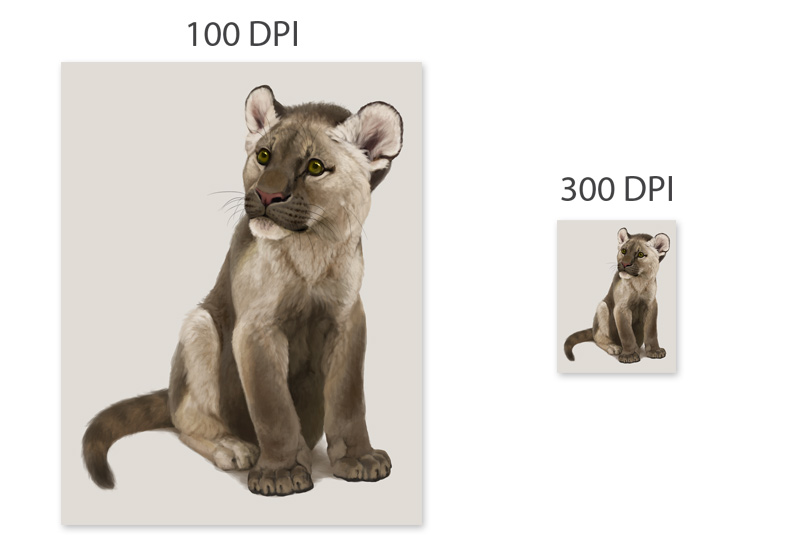
- 300 PPI as the Industry Standard: For most small to medium-sized prints (like those offered through Tophinhanhdep.com’s print services), 300 PPI is the widely accepted minimum standard for “photographic quality.” This density of pixels ensures that individual pixels are imperceptible to the naked eye when viewed from a typical distance, resulting in a sharp, clear image. Lower PPI (e.g., 72 PPI, common for web-only images) will lead to pixelation and blurriness when printed at a larger size because the printer has to stretch too few pixels over a larger area.
- The Calculation Method: The calculation is straightforward. If you want to offer a 20x11.25 inch image on Tophinhanhdep.com, and the requirement is 300 PPI, your digital image should have the following pixel dimensions:
- Width: 20 inches * 300 pixels/inch = 6000 pixels
- Height: 11.25 inches * 300 pixels/inch = 3375 pixels
- Therefore, your render should be 6000x3375 pixels. This ensures that every inch of the 20x11.25 print contains 300 distinct pixels, resulting in a high-resolution, detailed outcome suitable for beautiful photography or intricate digital artwork.
This clarity between PPI (digital image density) and DPI (printer output density) is vital. While Tophinhanhdep.com specifies “pixels per inch” for submission, the underlying purpose is to ensure the image has sufficient digital resolution (PPI) to be printed at a high physical resolution (DPI) by the print machinery.
Optimizing Your Artwork: Size, Resolution, and Tools for Tophinhanhdep.com
Beyond understanding the technical definitions, practical application is key. Preparing your images correctly for Tophinhanhdep.com, whether for screen display, print, or integration into various visual design projects, involves strategic decisions about resolution, size, and the effective use of image tools.
Strategic Resolution for Digital Display and Zoom
While print requires 300 PPI for a given physical dimension, purely digital art and photography shared on Tophinhanhdep.com also benefit from high initial resolution.
- Avoiding Pixelation on Zoom: Your screen displays images using its native pixel resolution. If you create a digital file with pixel dimensions smaller than your screen’s resolution (e.g., a 1280x720 image on a 1920x1080 monitor), it won’t fill the screen at 100% zoom. To make it larger, your software will “zoom in,” effectively enlarging the image’s pixels and making it appear pixelated or blurry.
- The 200-300% Rule for Digital Work: To combat this, it’s highly recommended to create new files that are two or three times larger than your screen’s resolution. For a 1920x1080 screen, this would mean starting with a canvas of 3840x2160 pixels (200%) or 5760x3240 pixels (300%). When displayed on your screen, the image will appear at 50% or 33% zoom, respectively, meaning you can zoom in multiple times without crossing the 100% threshold where pixelation becomes visible. This provides a “crisp zoom” capability, allowing you to work on intricate details in digital art, photo manipulation, or high-resolution photography without quality degradation. This ensures that your aesthetic backgrounds, abstract art, or nature photography maintain their visual integrity even under scrutiny.
- Hardware and Software Limits: Bigger isn’t always better without limits. Very high resolutions (e.g., 10,000 pixels wide) can strain your device’s processing power, leading to lag, especially with large brushes or numerous layers. Some apps on devices might limit layer counts to prevent this. Additionally, your digital brushes have their own inherent resolution; a large canvas might make smaller brush stamps appear pixelated if enlarged beyond their effective resolution. It’s a balance: test your hardware and software limits to find the optimal resolution that supports your workflow without sacrificing performance or brush quality.
- Starting Smaller for Sketches: For initial sketches or thumbnails, starting with a smaller canvas is perfectly acceptable. These don’t require high detail or extensive zooming. Once the foundational work is done, you can resize the image to a higher resolution (merging layers if necessary) before adding fine details, effectively covering any base pixelation.
Preparing for Print: Setting Physical Dimensions First
When the goal is a physical print, the workflow changes slightly. Instead of focusing solely on pixel dimensions, you define the physical size of the print first.
- Define Physical Dimensions: When creating a new file for print, choose your desired physical dimensions (e.g., 8x10 inches, A4, 20x11.25 inches) in your design software.
- Set PPI/DPI: Then, set the PPI (or DPI, as it’s often labeled in software for print output) to 300. The software will automatically calculate the necessary pixel dimensions for you. For example, an 8x10 inch print at 300 PPI will require an image of 2400x3000 pixels. This ensures the correct pixel density for the chosen print size, resulting in a high-quality outcome for all forms of images, from wallpapers to beautiful photography.
- The Importance of This Order: This order is crucial. If you start with pixel dimensions (e.g., 1920x1080) and then assign it 300 PPI, you won’t get a better print; you’ll just get a smaller print. The 1920x1080 image would only print cleanly at approximately 6.4x3.6 inches at 300 PPI. To get a larger, high-quality print, your original pixel dimensions must be sufficiently large to accommodate the desired physical size at 300 PPI.
- Beyond 300 PPI: While 300 PPI is the standard, images at 600 DPI or even higher exist. For commercial materials and most art prints, the visual difference between 300 PPI and higher resolutions is negligible to the human eye, especially for prints viewed at arm’s length or further. Higher resolutions require significantly more data, ink, and processing time, often without a proportional increase in perceived quality, particularly on standard printing equipment. Therefore, sticking to 300 PPI generally offers the best balance of quality and efficiency.
Essential Image Tools and Software
Effectively preparing images for Tophinhanhdep.com necessitates using the right tools. Tophinhanhdep.com itself offers various Image Tools (Converters, Compressors, Optimizers, AI Upscalers, Image-to-Text), and many popular software options exist:
- Professional Software (Adobe Photoshop, Illustrator): These industry-standard tools offer comprehensive control over image resolution, color profiles, and output settings.
- Photoshop: To change/check DPI/PPI, go to
Image > Image Size. Uncheck “Resample Image” to see how changing resolution affects physical dimensions without altering pixel count, or check it to resize pixels. Set resolution to 300 pixels/inch. - Illustrator (for Vector Art): For raster effects within Illustrator, navigate to
Effect > Document Raster Effects Settingsand set resolution to 300 PPI. Vector art itself is resolution-independent, but any rasterized elements will adhere to this setting.
- Photoshop: To change/check DPI/PPI, go to
- Cost-Effective Alternatives (Affinity Photo, Designer): Affinity Photo is a powerful, one-time purchase alternative to Photoshop, offering full-featured image editing, including robust resolution and color profile management. Affinity Designer provides vector and raster capabilities.
- Free & Open-Source (GIMP): GIMP is a powerful, free image editor. To adjust print size/resolution, go to
Image > Print Size. Set the X and Y Resolution to 300 pixels/inch. - User-Friendly Tools (Canva): For quick adjustments or designs, Canva (premium version) allows you to create designs with specified dimensions and resolutions, including 300 DPI, upon creation.
- Built-in OS Tools (MacOS Preview): Mac users can open an image in Preview, go to
Tools > Adjust Size, uncheck “Resample Image,” and then set the resolution to 300 pixels/inch. - Tophinhanhdep.com’s Image Tools:
- Converters: Can help switch between JPG and PNG formats while maintaining quality.
- Compressors/Optimizers: Useful for reducing file size while adhering to the 100MB limit, without sacrificing perceived quality.
- AI Upscalers: For older or lower-resolution artworks, Tophinhanhdep.com’s AI Upscalers can intelligently increase pixel dimensions, making them suitable for larger prints or higher-resolution digital displays. This is a game-changer for artists who want to offer prints of legacy work.
- Image-to-Text: While not directly related to DPI, this can be useful for cataloging images in thematic collections or adding descriptions for accessibility.
Using these tools effectively ensures that your art, whether it’s abstract, nature-inspired, or a complex photo manipulation, meets the highest technical standards for Tophinhanhdep.com.
Beyond Technicalities: Creative Considerations and Best Practices on Tophinhanhdep.com
While technical specifications are vital, the art of image preparation also involves creative decisions that align with Tophinhanhdep.com’s diverse categories, from Image Inspiration to Visual Design.
Raster vs. Vector Art: A Scalability Advantage
The discussion of DPI/PPI primarily applies to raster art, which is pixel-based (like traditional paintings, photographs, or digital art created in Photoshop). Raster images lose quality when scaled up too much.
- Vector Art: In contrast, vector art is mathematically based. Shapes, lines, and curves are defined by equations rather than pixels. This makes vector art infinitely scalable without any loss of quality or pixelation. Logos, illustrations, and graphic design elements are often created as vector art.
- Tools for Vector Art: While traditionally more technical, modern tools like Affinity Designer, Adobe Illustrator, or even Adobe Fresco (on iPad for freehand vector drawing) make vector creation more accessible. For visual designers on Tophinhanhdep.com, understanding when to use vector versus raster is critical for delivering crisp graphics at any size. While natural, organic blending still works best in raster apps, vector art excels in crispness for branding and digital design elements.
Aspect Ratios and Cropping for Diverse Visuals
Tophinhanhdep.com features a wide range of images, including wallpapers and backgrounds, often necessitating various aspect ratios.
- Artist’s Choice, Printer’s Limits: While artists generally have the freedom to choose any aspect ratio for their artwork, it’s wise to be aware of common print sizes (e.g., 4:3, 5:7, 16:9 for specific digital displays or prints). Tophinhanhdep.com’s print services might offer a fixed set of print sizes, meaning your artwork might be cropped or have white space if its aspect ratio doesn’t match.
- Impact of Cropping on Resolution: When cropping an image, remember that you are reducing its overall pixel dimensions. If you start with a high-resolution image and crop it significantly, ensure the remaining cropped area still meets the 300 PPI requirement for your desired print size. For example, if you crop a 6000x3375 pixel image down to 3000x1500 pixels, it will only print clearly at half the original physical size (e.g., 10x5 inches at 300 PPI). Always keep an eye on the pixel dimensions relative to the intended physical output size. This applies to creating thematic collections and mood boards where consistency and quality are key.
Protecting Your High-Quality Work
Given the ease of digital sharing, artists often worry about unauthorized use of their high-resolution work.
- Strategic Online Presentation: One common practice is to upload lower-resolution versions (e.g., 72 PPI with smaller pixel dimensions) of your artwork for general viewing on Tophinhanhdep.com and social media. These smaller files look fine on screen but are unsuitable for high-quality printing.
- Offer High-Res for Legitimate Prints: For those genuinely interested in purchasing prints, Tophinhanhdep.com’s print service handles the high-resolution file. This allows you to protect your full-resolution originals while still making them available for purchase through legitimate channels. This strategy helps ensure your unique creative ideas and trending styles are respected.
Conclusion
The journey of a digital artwork from its initial concept to a stunning physical print or a vibrant display on Tophinhanhdep.com is filled with technical considerations. Understanding DPI, and more precisely, PPI, is not merely a technicality but a fundamental skill for any artist or photographer aiming for professional-grade results.
By adhering to Tophinhanhdep.com’s print requirements – using JPG or PNG, maintaining RGB and sRGB color profiles, and especially targeting 300 PPI for appropriate pixel dimensions – you ensure that your work is presented with the clarity, color accuracy, and detail it deserves. Whether you specialize in high-resolution photography, intricate digital art, captivating abstract designs, or simply want your wallpapers and backgrounds to look their best, these principles are your guide.
Leverage the power of modern image tools, including the converters, compressors, optimizers, and AI upscalers offered by Tophinhanhdep.com, to streamline your workflow and enhance your existing portfolio. Embrace the distinction between raster and vector art, make informed decisions about aspect ratios, and protect your creations with strategic online presentations.
Ultimately, mastering image preparation allows your artistic vision to transcend the digital canvas, ensuring that every pixel, whether on screen or in print, contributes to the powerful visual narrative you wish to share with the world on Tophinhanhdep.com. Take the time to prepare your images correctly, and watch your art make its intended impact.